
Owners Manual
Page 1
CONTENTS OWNER'S MANUAL 3LCD DATA PROJECTOR TLP780U TLP781U (WITH DOCUMENT IMAGING CAMERA) TLP780U
CONTENTS OWNER'S MANUAL 3LCD DATA PROJECTOR TLP780U TLP781U (WITH DOCUMENT IMAGING CAMERA) TLP780U
Owners Manual
Page 3
... or plastic products touching the unit for future reference. Retain this unit immediately after moving it was originally packed at the bottom of your LCD projector. To prevent the unit from a cold location to ship your LCD...
... or plastic products touching the unit for future reference. Retain this unit immediately after moving it was originally packed at the bottom of your LCD projector. To prevent the unit from a cold location to ship your LCD...

Owners Manual
Page 7
.... b) If liquid has been spilled, or objects have the same characteristics as an improper adjustment of the lamp rupturing, thoroughly clean the area around the projector and discard any way. Before use IMPORTANT SAFETY INSTRUCTIONS (continued) CONTENTS 7 16. Damage Requiring Service Unplug this indicates a need for repair service.
.... b) If liquid has been spilled, or objects have the same characteristics as an improper adjustment of the lamp rupturing, thoroughly clean the area around the projector and discard any way. Before use IMPORTANT SAFETY INSTRUCTIONS (continued) CONTENTS 7 16. Damage Requiring Service Unplug this indicates a need for repair service.
Owners Manual
Page 8
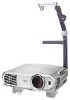
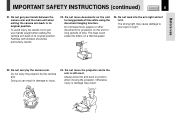
.... 23. The heat could erase the letters on the unit for long periods of time while using the document imaging function. Do not carry the projector by the camera arm. Do not leave documents on a thermal paper. 25. Doing so can result in position when moving the... projector. Do not look into the arm light while it is still erect. Do not move the projector while the arm is lit. The strong light may result. Do not carry by the camera arm...
.... 23. The heat could erase the letters on the unit for long periods of time while using the document imaging function. Do not carry the projector by the camera arm. Do not leave documents on a thermal paper. 25. Doing so can result in position when moving the... projector. Do not look into the arm light while it is still erect. Do not move the projector while the arm is lit. The strong light may result. Do not carry by the camera arm...

Owners Manual
Page 10
... part on the main unit 11 Names of COMPUTER IN, MONITOR OUT connector .... 70 Applicable signal 71 Controlling the projector by using RS-232C 73 Specifications 79 Before use the output connector 27 Operations Projection on the remote control 13 Loading... batteries 15 Remote control operation 16 Installation and connections Floor-mounted projector placement 17 Projector placement angle adjustment 20 Ceiling-mounted projector placement 21 Connecting a computer (COMPUTER IN 1 connector 22 Connecting a computer (COMPUTER IN 2 connector ...
... part on the main unit 11 Names of COMPUTER IN, MONITOR OUT connector .... 70 Applicable signal 71 Controlling the projector by using RS-232C 73 Specifications 79 Before use the output connector 27 Operations Projection on the remote control 13 Loading... batteries 15 Remote control operation 16 Installation and connections Floor-mounted projector placement 17 Projector placement angle adjustment 20 Ceiling-mounted projector placement 21 Connecting a computer (COMPUTER IN 1 connector 22 Connecting a computer (COMPUTER IN 2 connector ...

Owners Manual
Page 11
... the main unit CONTENTS 11 CAUTION Openings in the cabinet are provided for the model not with the document imaging camera, refer to carry the projector. The explanation here is only for ventilation and to ensure reliable operation of the product and to protect it may be blocked or covered. AC...
... the main unit CONTENTS 11 CAUTION Openings in the cabinet are provided for the model not with the document imaging camera, refer to carry the projector. The explanation here is only for ventilation and to ensure reliable operation of the product and to protect it may be blocked or covered. AC...
Owners Manual
Page 12
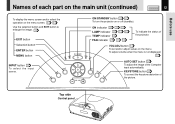
... (standby). Top side Control panel To adjust volume when the menu is not displayed. 32 AUTO SET button 34 To adjust the image of the projector. Selection button ENTER button MENU button INPUT button 30 To s e l e c t t h e i n p u t source. ON indicator 28 33 62 LAMP indicator 28 33 62 TEMP indicator 62 FAN... screen. 43 44 Use the selection button and EXIT button to enlarge the image. 39 EXIT button ON/STANDBY button 28 33 To turn the projector on the menu.
... (standby). Top side Control panel To adjust volume when the menu is not displayed. 32 AUTO SET button 34 To adjust the image of the projector. Selection button ENTER button MENU button INPUT button 30 To s e l e c t t h e i n p u t source. ON indicator 28 33 62 LAMP indicator 28 33 62 TEMP indicator 62 FAN... screen. 43 44 Use the selection button and EXIT button to enlarge the image. 39 EXIT button ON/STANDBY button 28 33 To turn the projector on the menu.
Owners Manual
Page 13
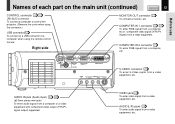
... use Names of each part on the main unit (continued) CONTENTS 13 CONTROL connector 26 73 (RS-232C connector) To connect a computer to control the projector. (Remove the cover when using the connector.) USB connector 42 To connect to a USB connector of a computer when using the remote control mouse. AUDIO IN...
... use Names of each part on the main unit (continued) CONTENTS 13 CONTROL connector 26 73 (RS-232C connector) To connect a computer to control the projector. (Remove the cover when using the connector.) USB connector 42 To connect to a USB connector of a computer when using the remote control mouse. AUDIO IN...

Owners Manual
Page 14
...A1;1997 Laser emission part Remote control transmission part INPUT ON/STANDBY LASER KEYSTONE AUTO SET ON/STANDBY button 28 33 To turn the projector on the menu screen. 43 44 Use the selection button and EXIT button to enlarge the im- AUTO SET button 34 To ... SEPTEMBER 2000 PLACE OF MANUFACTURE:A IEC60825-1 A1;1997 CT - 9 0 0 5 7 MODEL CONTROL REMOTE 82 TOTOWA RD., WAYNE, NJ 07470, U.S.A. : 1mW MAXIMA) PUISSANCE TOSHIBA AMERICA CONSUMER PRODUCTS,INC. use of controls or adjustments or performance of the Computer input automatically. age. 39 RESIZE button 39 To enlarge the picture...
...A1;1997 Laser emission part Remote control transmission part INPUT ON/STANDBY LASER KEYSTONE AUTO SET ON/STANDBY button 28 33 To turn the projector on the menu screen. 43 44 Use the selection button and EXIT button to enlarge the im- AUTO SET button 34 To ... SEPTEMBER 2000 PLACE OF MANUFACTURE:A IEC60825-1 A1;1997 CT - 9 0 0 5 7 MODEL CONTROL REMOTE 82 TOTOWA RD., WAYNE, NJ 07470, U.S.A. : 1mW MAXIMA) PUISSANCE TOSHIBA AMERICA CONSUMER PRODUCTS,INC. use of controls or adjustments or performance of the Computer input automatically. age. 39 RESIZE button 39 To enlarge the picture...
Owners Manual
Page 16
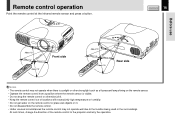
... About 15° MENU PIP ENTER EXIT FREEZE CALL MUTE RESIZE Rear side Notes • The remote control may not operate well due to the projector and retry the operation. At such times, change the direction of locations with excessively high temperature or humidity. • Do not get water on the...
... About 15° MENU PIP ENTER EXIT FREEZE CALL MUTE RESIZE Rear side Notes • The remote control may not operate well due to the projector and retry the operation. At such times, change the direction of locations with excessively high temperature or humidity. • Do not get water on the...
Owners Manual
Page 17
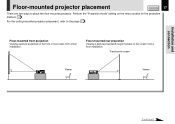
Floor-mounted front projection Viewing a picture projected on the menu screen for the projection method. 51 For the ceiling-mounted projector placement, refer to place the floor-mounted projector. Perform the "Projection mode" setting on the front of the screen from a floor installation. Translucent screen Viewer Viewer Continued Installation and connection Floor-mounted projector placement CONTENTS 17 There are two ways to the page 21 . Floor-mounted rear projection Viewing a picture projected through the back of the screen from a floor installation.
Floor-mounted front projection Viewing a picture projected on the menu screen for the projection method. 51 For the ceiling-mounted projector placement, refer to place the floor-mounted projector. Perform the "Projection mode" setting on the front of the screen from a floor installation. Translucent screen Viewer Viewer Continued Installation and connection Floor-mounted projector placement CONTENTS 17 There are two ways to the page 21 . Floor-mounted rear projection Viewing a picture projected through the back of the screen from a floor installation.
Owners Manual
Page 18
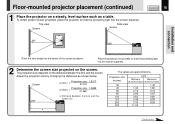
...; Installation and connection Point the lens straight at the center of the screen as shown below. To obtain proper screen projected, place the projector so that the projecting light hits the screen squarely. 2 Determine the screen size projected on the screen. Screen a (min.) = Projection...- 1.42 1.42 1.80 2.16 2.74 2.90 3.67 3.63 4.60 5.48 6.93 7.33 9.26 11.02 - Floor-mounted projector placement (continued) 1 Place the projector on the distance between the lens and the screen (m) 90° a The values are approximations. The projection size depends on a steady,...
...; Installation and connection Point the lens straight at the center of the screen as shown below. To obtain proper screen projected, place the projector so that the projecting light hits the screen squarely. 2 Determine the screen size projected on the screen. Screen a (min.) = Projection...- 1.42 1.42 1.80 2.16 2.74 2.90 3.67 3.63 4.60 5.48 6.93 7.33 9.26 11.02 - Floor-mounted projector placement (continued) 1 Place the projector on the distance between the lens and the screen (m) 90° a The values are approximations. The projection size depends on a steady,...
Owners Manual
Page 19
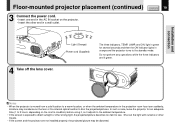
...Shut out the light with curtains or other strong light, the projected picture becomes too faint to the standby mode. Installation and connection Floor-mounted projector placement (continued) CONTENTS 19 3 Connect the power cord. • Insert one end in the AC IN socket on the... the projection room has risen suddenly, moisture may be distorted. In such a case, leave the projector for several seconds and then the ON indicator lights in orange and the projector turns to see. Notes • When the projector is exposed to direct sunlight or other means. • If the screen and the...
...Shut out the light with curtains or other strong light, the projected picture becomes too faint to the standby mode. Installation and connection Floor-mounted projector placement (continued) CONTENTS 19 3 Connect the power cord. • Insert one end in the AC IN socket on the... the projection room has risen suddenly, moisture may be distorted. In such a case, leave the projector for several seconds and then the ON indicator lights in orange and the projector turns to see. Notes • When the projector is exposed to direct sunlight or other means. • If the screen and the...
Owners Manual
Page 20
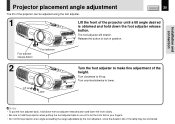
... Lift up . Turn clockwise to lift up Lower Turn the foot adjuster to let the front fall on your fingers. • Do not tilt the projector at an angle exceeding the range adjustable by the foot adjusters, since the duration life of the lamp may be adjusted using the foot adjuster.... 1 Lift the front of the projector until a tilt angle desired is obtained and hold the projector when putting the foot adjuster back so as not to make fine adjustment of the...
... Lift up . Turn clockwise to lift up Lower Turn the foot adjuster to let the front fall on your fingers. • Do not tilt the projector at an angle exceeding the range adjustable by the foot adjusters, since the duration life of the lamp may be adjusted using the foot adjuster.... 1 Lift the front of the projector until a tilt angle desired is obtained and hold the projector when putting the foot adjuster back so as not to make fine adjustment of the...
Owners Manual
Page 21
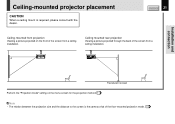
... method. 51 Note • The relation between the projection size and the distance to the screen is required, please consult with the dealer. Ceiling-mounted projector placement CAUTION When a ceiling mount is the same as that of the floor-mounted projection mode. 18 Ceiling-mounted rear projection Viewing a picture projected through...
... method. 51 Note • The relation between the projection size and the distance to the screen is required, please consult with the dealer. Ceiling-mounted projector placement CAUTION When a ceiling mount is the same as that of the floor-mounted projection mode. 18 Ceiling-mounted rear projection Viewing a picture projected through...

Owners Manual
Page 22
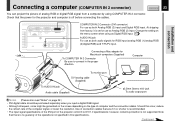
... from the computer. For details, refer to the computer manual. • You may have output modes which are not compatible with this projector. Connecting a computer (COMPUTER IN 1 connector) You can project the picture from factory, it is set for Macintosh computers (Supplied) To...connection Connecting a Mac adapter for use the supplied Mac adapter (Multiple Scan 21 compatible). AUDIO IN jack For use as both audio signals for the projector and computer is off before connecting the cables. CONTENTS 22 USB MONITOR OUT CONTROL COMPUTER IN 1 ( Y/PB/PR ) COMPUTER IN 2 AUDIO ...
... from the computer. For details, refer to the computer manual. • You may have output modes which are not compatible with this projector. Connecting a computer (COMPUTER IN 1 connector) You can project the picture from factory, it is set for Macintosh computers (Supplied) To...connection Connecting a Mac adapter for use the supplied Mac adapter (Multiple Scan 21 compatible). AUDIO IN jack For use as both audio signals for the projector and computer is off before connecting the cables. CONTENTS 22 USB MONITOR OUT CONTROL COMPUTER IN 1 ( Y/PB/PR ) COMPUTER IN 2 AUDIO ...
Owners Manual
Page 23
... are 2 m or shorter is recommended. • The input signal specifications of the DVI port of the projector conform to connect in this occur, reduce the refresh rate of connection cables that the power for the projector and computer is not supported. At shipping from a computer by using as Digital RGB input. 45...
... are 2 m or shorter is recommended. • The input signal specifications of the DVI port of the projector conform to connect in this occur, reduce the refresh rate of connection cables that the power for the projector and computer is not supported. At shipping from a computer by using as Digital RGB input. 45...
Owners Manual
Page 24
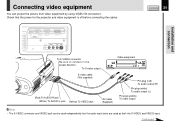
... You can be used independently, but the audio input jacks are used as both the S-VIDEO and VIDEO input. Check that the power for the projector and video equipment is off before connecting the cables. AUDIO -
... You can be used independently, but the audio input jacks are used as both the S-VIDEO and VIDEO input. Check that the power for the projector and video equipment is off before connecting the cables. AUDIO -
Owners Manual
Page 25
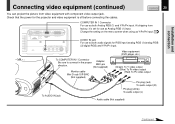
...) To audio output (R) Pin plug (white) To audio output (L) Audio cable (Not supplied) Continued COMPUTER IN 1 Connector For use as both audio signals for the projector and video equipment is set for use as Y/PB/PR input. 45 USB MONITOR OUT CONTROL COMPUTER IN 1 ( Y/PB/PR ) COMPUTER IN 2 AUDIO IN VIDEO...
...) To audio output (R) Pin plug (white) To audio output (L) Audio cable (Not supplied) Continued COMPUTER IN 1 Connector For use as both audio signals for the projector and video equipment is set for use as Y/PB/PR input. 45 USB MONITOR OUT CONTROL COMPUTER IN 1 ( Y/PB/PR ) COMPUTER IN 2 AUDIO IN VIDEO...
Owners Manual
Page 26
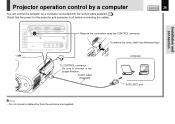
... connection USB MONITOR OUT CONTROL COMPUTER IN 1 ( Y/PB/PR ) COMPUTER IN 2 AUDIO IN VIDEO IN R - To remove the cover, slide it up while pushing it. Projector operation control by a computer You can control the projector by a computer connected with the control cable supplied. 73 Check that the power for the...
... connection USB MONITOR OUT CONTROL COMPUTER IN 1 ( Y/PB/PR ) COMPUTER IN 2 AUDIO IN VIDEO IN R - To remove the cover, slide it up while pushing it. Projector operation control by a computer You can control the projector by a computer connected with the control cable supplied. 73 Check that the power for the...


