
Owners Manual
Page 4
... unpacking this unit will protect you if you are provided for installation, use and servicing. Improper use IMPORTANT SAFETY INSTRUCTIONS CONTENTS 4 CAUTION: PLEASE READ AND OBSERVE ALL WARNINGS AND INSTRUCTIONS GIVEN IN THIS OWNER'S MANUAL AND THOSE MARKED ON THE UNIT. The openings should never be blocked by the user. Power Sources This product should not be placed in a built-in this product...
... unpacking this unit will protect you if you are provided for installation, use and servicing. Improper use IMPORTANT SAFETY INSTRUCTIONS CONTENTS 4 CAUTION: PLEASE READ AND OBSERVE ALL WARNINGS AND INSTRUCTIONS GIVEN IN THIS OWNER'S MANUAL AND THOSE MARKED ON THE UNIT. The openings should never be blocked by the user. Power Sources This product should not be placed in a built-in this product...
Owners Manual
Page 8
... proper operating condition. Replacement Parts When replacement parts are covered by the operating instructions as opening or removing covers may result in any service or repairs to qualified service personnel under the following the operating instructions. this product from the wall outlet and refer servicing to this product yourself as an improper adjustment of the lamp only should be sure the service technician has used replacement parts specified by following conditions: a) When the power-supply cord...
... proper operating condition. Replacement Parts When replacement parts are covered by the operating instructions as opening or removing covers may result in any service or repairs to qualified service personnel under the following the operating instructions. this product from the wall outlet and refer servicing to this product yourself as an improper adjustment of the lamp only should be sure the service technician has used replacement parts specified by following conditions: a) When the power-supply cord...
Owners Manual
Page 10
... Quick menu setting 34 Adjusting picture (Picture adjustment 36 Adjusting Image (Image adjustment 38 Adjusting RGB-level (Level adjustment 40 Adjusting audio output (Audio adjustment 42 Setting the input signal (Signal setting 44 Setting the display method (Display setting 47 Default setting 49 Reset, Status display (Data setting 52 Maintenance Trouble indications 54 Air filter cleaning 55 Lens and main unit cleaning 56 Lamp replacement 57 Others Before calling service personal 59 Signal assignment for RGB input 60 Applicable RGB signal 61 Controlling the projector by using RS...
... Quick menu setting 34 Adjusting picture (Picture adjustment 36 Adjusting Image (Image adjustment 38 Adjusting RGB-level (Level adjustment 40 Adjusting audio output (Audio adjustment 42 Setting the input signal (Signal setting 44 Setting the display method (Display setting 47 Default setting 49 Reset, Status display (Data setting 52 Maintenance Trouble indications 54 Air filter cleaning 55 Lens and main unit cleaning 56 Lamp replacement 57 Others Before calling service personal 59 Signal assignment for RGB input 60 Applicable RGB signal 61 Controlling the projector by using RS...

Owners Manual
Page 13
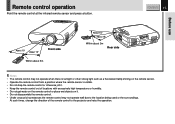
ZOOM buttons 32 (- / +) ENTER button 34 MUTE button 30 KEY STONE ON/ STANDBY FREEZE RGB VIDEO RESET MENU Ð VOL ENTER + VOL MUTE ZOOM Ð+ CT-90038 ON/STANDBY button 25 FREEZE button 31 MENU button 33 SELECT/ADJUST buttons 34 (/ / / ) VOL (+) Increase the volume. Names of each part on the remote control CONTENTS 13 Before use KEYSTONE button 29 RGB button 26 VIDEO button 26 RESET button 35 VOL (-) Decrease the volume.
ZOOM buttons 32 (- / +) ENTER button 34 MUTE button 30 KEY STONE ON/ STANDBY FREEZE RGB VIDEO RESET MENU Ð VOL ENTER + VOL MUTE ZOOM Ð+ CT-90038 ON/STANDBY button 25 FREEZE button 31 MENU button 33 SELECT/ADJUST buttons 34 (/ / / ) VOL (+) Increase the volume. Names of each part on the remote control CONTENTS 13 Before use KEYSTONE button 29 RGB button 26 VIDEO button 26 RESET button 35 VOL (-) Decrease the volume.
Owners Manual
Page 15
... - CONTENTS 15 Before use About 15° About 15° MUTE STO KENYE FREEZE RGB VIDEO RESET MENU -VOL ENTER VOL + - At such times, change the direction of locations with excessively high temperature or humidity. • Do not get water on the remote control or place wet objects on the remote sensor. • Operate the remote control from a position where the remote sensor is visible. •...
... - CONTENTS 15 Before use About 15° About 15° MUTE STO KENYE FREEZE RGB VIDEO RESET MENU -VOL ENTER VOL + - At such times, change the direction of locations with excessively high temperature or humidity. • Do not get water on the remote control or place wet objects on the remote sensor. • Operate the remote control from a position where the remote sensor is visible. •...
Owners Manual
Page 16
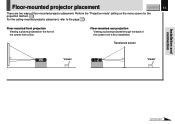
Floor-mounted rear projection Viewing a picture projected through the back of the screen from a floor. Perform the "Projection mode" setting on the front of floor-mounted projector placement. Floor-mounted front projection Viewing a picture projected on the menu screen for the projection method. 49 For the ceiling-mounted projector placement, refer to the page 20 . Installation and connection Floor-mounted projector placement CONTENTS 16 There are two ways of the screen from a floor installation. Translucent screen Viewer Viewer Continued
Floor-mounted rear projection Viewing a picture projected through the back of the screen from a floor. Perform the "Projection mode" setting on the front of floor-mounted projector placement. Floor-mounted front projection Viewing a picture projected on the menu screen for the projection method. 49 For the ceiling-mounted projector placement, refer to the page 20 . Installation and connection Floor-mounted projector placement CONTENTS 16 There are two ways of the screen from a floor installation. Translucent screen Viewer Viewer Continued

Owners Manual
Page 17
Top view Screen Side view Screen CONTENTS 17 90° 90° Installation and connection Point the lens straight at the center of 200 7.93 9.57 30.5 a projection area 250 9.93 - 38.1 • The values are approximations. Adjust the projection size by changing the distances as above. The projection size depends on the screen. Continued Screen a (m) Projection size Minimum Maximum (inches) (At maximum zoom) (At minimum zoom) b (cm) 25 - 1.15 3.5 Lens 40 1.55...
Top view Screen Side view Screen CONTENTS 17 90° 90° Installation and connection Point the lens straight at the center of 200 7.93 9.57 30.5 a projection area 250 9.93 - 38.1 • The values are approximations. Adjust the projection size by changing the distances as above. The projection size depends on the screen. Continued Screen a (m) Projection size Minimum Maximum (inches) (At maximum zoom) (At minimum zoom) b (cm) 25 - 1.15 3.5 Lens 40 1.55...

Owners Manual
Page 18
... lens cover. In such a case, leave the projector for an adequate time (1 to a warm location, or when the ambient temperature in the projection room has risen suddenly, moisture may be distorted. Control panel on the room's condition) before using it so it adjusts to the ambient temperature. • If the screen is moved from a cold location to 2 hours, depending on the main unit CONTENTS 18 Light Light (Orange...
... lens cover. In such a case, leave the projector for an adequate time (1 to a warm location, or when the ambient temperature in the projection room has risen suddenly, moisture may be distorted. Control panel on the room's condition) before using it so it adjusts to the ambient temperature. • If the screen is moved from a cold location to 2 hours, depending on the main unit CONTENTS 18 Light Light (Orange...
Owners Manual
Page 20
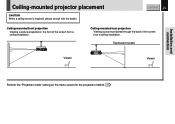
CONTENTS 20 Ceiling-mounted front projection Viewing a picture projected on the menu screen for the projection method. 49 Ceiling-mounted rear projection Viewing a picture projected through the back of the screen from a ceiling installation. Installation and connection Ceiling-mounted projector placement CAUTION When a ceiling mount is required, please consult with the dealer. Translucent screen Viewer Viewer Perform the "Projection mode" setting on the front of the screen from a ceiling installation.
CONTENTS 20 Ceiling-mounted front projection Viewing a picture projected on the menu screen for the projection method. 49 Ceiling-mounted rear projection Viewing a picture projected through the back of the screen from a ceiling installation. Installation and connection Ceiling-mounted projector placement CAUTION When a ceiling mount is required, please consult with the dealer. Translucent screen Viewer Viewer Perform the "Projection mode" setting on the front of the screen from a ceiling installation.
Owners Manual
Page 25
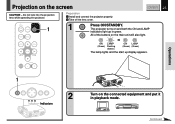
Continued ON LAMP (Green) Flashing (Green) ON LAMP (Green) (Green) The lamp lights and the start up in playback mode. All of the buttons on the connected equipment and put it in green. Operations 2 Indicators Turn on the main unit will also light. Projection on and both the ON and LAMP indicators light up display appears. Do not look into the projection lens while operating the projector. Preparation 1 Install and connect the projector properly. 2 Take off the lens cover. 1 Press ON/STANDBY. The projector turns on the screen CONTENTS 25 CAUTION -
Continued ON LAMP (Green) Flashing (Green) ON LAMP (Green) (Green) The lamp lights and the start up in playback mode. All of the buttons on the connected equipment and put it in green. Operations 2 Indicators Turn on the main unit will also light. Projection on and both the ON and LAMP indicators light up display appears. Do not look into the projection lens while operating the projector. Preparation 1 Install and connect the projector properly. 2 Take off the lens cover. 1 Press ON/STANDBY. The projector turns on the screen CONTENTS 25 CAUTION -

Owners Manual
Page 26
...'s manual and description on the projector. For details on controlling the computer display, etc., refer to XGA mode (1024 x 768). • The projector can be projected properly, depending on the computer model. SXGA signal can be projected since the projector has simplified compatibility with an LCD screen while monitoring the image on the screen (Continued) CONTENTS 26 Operations 3 RGB or VIDEO Select the input source. On the remote control, press RGB or VIDEO...
...'s manual and description on the projector. For details on controlling the computer display, etc., refer to XGA mode (1024 x 768). • The projector can be projected properly, depending on the computer model. SXGA signal can be projected since the projector has simplified compatibility with an LCD screen while monitoring the image on the screen (Continued) CONTENTS 26 Operations 3 RGB or VIDEO Select the input source. On the remote control, press RGB or VIDEO...
Owners Manual
Page 28
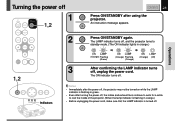
... instruction message appears. Notes • Immediately after the power off, the projector may not be turned on while the LAMP indicator is flashing in orange.) ON LAMP (Orange) Flashing (Green) ON LAMP (Orange) Flashing (Orange) ON LAMP (Orange) (Off) 3 After confirming the LAMP indicator turns off . The ON indicator turns off 1 CONTENTS 28 Press ON/STANDBY after turning the power off, the intake and exhaust fans continue to work for a while to standby mode. (The ON indicator lights in green. • Even after using the projector. Turning...
... instruction message appears. Notes • Immediately after the power off, the projector may not be turned on while the LAMP indicator is flashing in orange.) ON LAMP (Orange) Flashing (Green) ON LAMP (Orange) Flashing (Orange) ON LAMP (Orange) (Off) 3 After confirming the LAMP indicator turns off . The ON indicator turns off 1 CONTENTS 28 Press ON/STANDBY after turning the power off, the intake and exhaust fans continue to work for a while to standby mode. (The ON indicator lights in green. • Even after using the projector. Turning...

Owners Manual
Page 33
... Brightness Phase Auto keystone FULL MENU To adjust the contrast. The quick menu is displayed when the power turns on for the first time. • Operation guide (indicated by the illustration of unit buttons) appears on (Manual, Auto) Data setting 52 Status display, Factory reset mode, Keystone reset Picture adjustment 36 Contrast, Brightness, Color, Tint, Sharpness Image adjustment 38 Keystone, Phase, Horizontal position, Vertical position, Clock Level adjustment 40 Red level, Green level, Blue level Audio adjustment 42 Signal setting 44 Display setting 47 Default setting 49...
... Brightness Phase Auto keystone FULL MENU To adjust the contrast. The quick menu is displayed when the power turns on for the first time. • Operation guide (indicated by the illustration of unit buttons) appears on (Manual, Auto) Data setting 52 Status display, Factory reset mode, Keystone reset Picture adjustment 36 Contrast, Brightness, Color, Tint, Sharpness Image adjustment 38 Keystone, Phase, Horizontal position, Vertical position, Clock Level adjustment 40 Red level, Green level, Blue level Audio adjustment 42 Signal setting 44 Display setting 47 Default setting 49...

Owners Manual
Page 45
... no signal status continues. 5 minutes : The power turns off automatically if the no signal status. True color: To set TOSHIBA logo on the background at no signal status continues for approx. 5 min. Blue background: To set the picture with its brightness priority. If not determined properly, select the kind of video signal entered automatically. Adjustments Continued Setting the input signal (Continued) CONTENTS 45 4 Change the selection by pressing / . Picture mode: Bright: To set blue screen on...
... no signal status continues. 5 minutes : The power turns off automatically if the no signal status. True color: To set TOSHIBA logo on the background at no signal status continues for approx. 5 min. Blue background: To set the picture with its brightness priority. If not determined properly, select the kind of video signal entered automatically. Adjustments Continued Setting the input signal (Continued) CONTENTS 45 4 Change the selection by pressing / . Picture mode: Bright: To set blue screen on...
Owners Manual
Page 54
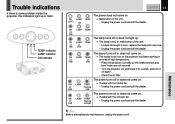
...; Turn the projector off or does not come on again. • Clean the air filter. Maintenance Note Before attempting any maintenance, unplug the power cord. The power turns off , and leave it for a while, and turn it on . ON LAMP TEMP Lit Flashing (red) (red) → Trouble with the exhaust fan. • Unplug the power cord and call the dealer. Trouble indications If there is some problem inside is over, replace the lamp with new...
...; Turn the projector off or does not come on again. • Clean the air filter. Maintenance Note Before attempting any maintenance, unplug the power cord. The power turns off , and leave it for a while, and turn it on . ON LAMP TEMP Lit Flashing (red) (red) → Trouble with the exhaust fan. • Unplug the power cord and call the dealer. Trouble indications If there is some problem inside is over, replace the lamp with new...
Owners Manual
Page 55
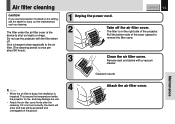
... about 50 hours). 1 Unplug the power cord. Air filter cleaning CAUTION If you use the projector with a vacuum cleaner. Give a frequent clean especially to the air filter. (The cleaning period is not set correctly, the dusts will enter and they will be projected and overlapped on the ceiling, ask the dealer to remove the filter cover. 3 Clean the air filter cover. Do not use the projector mounted on the picture. 4 Attach the air filter cover. The filter under the air filter cover is...
... about 50 hours). 1 Unplug the power cord. Air filter cleaning CAUTION If you use the projector with a vacuum cleaner. Give a frequent clean especially to the air filter. (The cleaning period is not set correctly, the dusts will enter and they will be projected and overlapped on the ceiling, ask the dealer to remove the filter cover. 3 Clean the air filter cover. Do not use the projector mounted on the picture. 4 Attach the air filter cover. The filter under the air filter cover is...
Owners Manual
Page 59
... image appears. Focusing is an obstruction between the remote control and the remote sensor. • The batteries are dim. The colors are strange. The remote control does not work. The power turns off the lens cover. No sounds are blurred. Correction Firmly plug in the power cord. Connect the source correctly to the projector. Make the "Picture" adjustments. Press MUTE to clean the lens. Use a lens cleaner to restore the picture. Before calling service personal CONTENTS 59 Check...
... image appears. Focusing is an obstruction between the remote control and the remote sensor. • The batteries are dim. The colors are strange. The remote control does not work. The power turns off the lens cover. No sounds are blurred. Correction Firmly plug in the power cord. Connect the source correctly to the projector. Make the "Picture" adjustments. Press MUTE to clean the lens. Use a lens cleaner to restore the picture. Before calling service personal CONTENTS 59 Check...
Owners Manual
Page 62
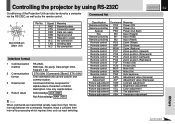
...Remote control PKA Auto keystone Adjustment ARG Adjustment value (Increase) Adjustment ALF Adjustment value (Decrease) Picture adjustment VCN Contrast adjustment Picture adjustment VBR Brightness adjustment Picture adjustment VCL Color adjustment Picture adjustment VTN Tint adjustment Picture adjustment VSH Sharpness adjustment Others Continued However, leave a sufficient time interval for processing which requires time, such as by the remote control. Use only capital letters. Acknowledge ACK (06h) Not Acknowledge NAK (15h) Note When commands are transmitted serially, keep...
...Remote control PKA Auto keystone Adjustment ARG Adjustment value (Increase) Adjustment ALF Adjustment value (Decrease) Picture adjustment VCN Contrast adjustment Picture adjustment VBR Brightness adjustment Picture adjustment VCL Color adjustment Picture adjustment VTN Tint adjustment Picture adjustment VSH Sharpness adjustment Others Continued However, leave a sufficient time interval for processing which requires time, such as by the remote control. Use only capital letters. Acknowledge ACK (06h) Not Acknowledge NAK (15h) Note When commands are transmitted serially, keep...
Owners Manual
Page 63
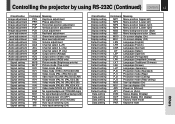
Controlling the projector by using RS-232C (Continued) CONTENTS 63 Classification Command Meaning Image adjustment PKS Keystone adjustment Image adjustment PPH Phase adjustment Image adjustment PHP Horizontal position adjustment Image adjustment PVP Vertical position adjustment Image adjustment PCK Clock adjustment Level adjustment VLR Red level adjustment Level adjustment VLG Green level adjustment Level adjustment VLB Blue level adjustment Audio adjustment VOL Volume adjustment Audio adjustment ACA Channel select (L+R) Audio adjustment ACL Channel select (L only) Audio ...
Controlling the projector by using RS-232C (Continued) CONTENTS 63 Classification Command Meaning Image adjustment PKS Keystone adjustment Image adjustment PPH Phase adjustment Image adjustment PHP Horizontal position adjustment Image adjustment PVP Vertical position adjustment Image adjustment PCK Clock adjustment Level adjustment VLR Red level adjustment Level adjustment VLG Green level adjustment Level adjustment VLB Blue level adjustment Audio adjustment VOL Volume adjustment Audio adjustment ACA Channel select (L+R) Audio adjustment ACL Channel select (L only) Audio ...
Owners Manual
Page 66
... units which have had the serial number removed, altered, defaced or rendered illegible. 7. Read the owners manual thoroughly before operating. 2. The shipment of the product must retain your discovery of customer controls are effective only if the product is not able to the original end-user purchaser. Continued Others Labor service charges for a warranty service within thirty (30) days after...
... units which have had the serial number removed, altered, defaced or rendered illegible. 7. Read the owners manual thoroughly before operating. 2. The shipment of the product must retain your discovery of customer controls are effective only if the product is not able to the original end-user purchaser. Continued Others Labor service charges for a warranty service within thirty (30) days after...


