

Users Manual AU/NZ
Page 3
... Optional devices 3-15 Bridge media slot 3-20 Optional accessories 3-37 Chapter 4 Operating Basics TOSHIBA Dual Pointing Device 4-1 Using the Fingerprint Sensor 4-3 Web Camera 4-10 Using the TOSHIBA Face Recognition 4-11 Using optical disc drives 4-14 Writing CD/DVDs on DVD Super Multi drives 4-18 Media care 4-24 Sound System 4-25 Modem 4-28 Wireless communications 4-31 LAN 4-34 Computer Handling 4-36 Using the Hard Disk Drive (HDD) Protection 4-37 Using the TOSHIBA USB Sleep and Charge Utility 4-39 Heat dispersal 4-41 Chapter 5 The Keyboard Typewriter keys 5-1 Function...
... Optional devices 3-15 Bridge media slot 3-20 Optional accessories 3-37 Chapter 4 Operating Basics TOSHIBA Dual Pointing Device 4-1 Using the Fingerprint Sensor 4-3 Web Camera 4-10 Using the TOSHIBA Face Recognition 4-11 Using optical disc drives 4-14 Writing CD/DVDs on DVD Super Multi drives 4-18 Media care 4-24 Sound System 4-25 Modem 4-28 Wireless communications 4-31 LAN 4-34 Computer Handling 4-36 Using the Hard Disk Drive (HDD) Protection 4-37 Using the TOSHIBA USB Sleep and Charge Utility 4-39 Heat dispersal 4-41 Chapter 5 The Keyboard Typewriter keys 5-1 Function...

Users Manual AU/NZ
Page 4
...*1 G-1 CPU*2 G-1 Memory (Main System)*3 G-2 Battery Life*4 G-3 Hard Disk Drive (HDD) Capacity*5 G-3 User's Manual iv TECRA A11/S11/P11/Satellite Pro S500 Chapter 6 Power and Power-Up Modes Power conditions 6-1 Monitoring of power condition 6-2 Battery 6-3 TOSHIBA Password Utility 6-10 Power-up modes 6-12 Panel power on/off 6-12 System automatic Sleep/Hibernation 6-13 Chapter 7 HW Setup Accessing HW Setup 7-1 HW Setup window 7-1 Chapter 8 Troubleshooting Problem solving process 8-1 Hardware and system checklist 8-3 TOSHIBA support 8-26 Appendix A Specifications Physical...
...*1 G-1 CPU*2 G-1 Memory (Main System)*3 G-2 Battery Life*4 G-3 Hard Disk Drive (HDD) Capacity*5 G-3 User's Manual iv TECRA A11/S11/P11/Satellite Pro S500 Chapter 6 Power and Power-Up Modes Power conditions 6-1 Monitoring of power condition 6-2 Battery 6-3 TOSHIBA Password Utility 6-10 Power-up modes 6-12 Panel power on/off 6-12 System automatic Sleep/Hibernation 6-13 Chapter 7 HW Setup Accessing HW Setup 7-1 HW Setup window 7-1 Chapter 8 Troubleshooting Problem solving process 8-1 Hardware and system checklist 8-3 TOSHIBA support 8-26 Appendix A Specifications Physical...

Users Manual AU/NZ
Page 6
... to the copyright owner. User's Manual vi Trademarks IBM is a registered trademark and IBM PC is a trademark owned by its proprietor and used by copyright laws belongs to the author or to change without notice. TECRA A11/S11/P11/Satellite Pro S500 Copyright © 2010 by TOSHIBA Corporation. All rights reserved. Copyrighted material can be reproduced in making any form without...
... to the copyright owner. User's Manual vi Trademarks IBM is a registered trademark and IBM PC is a trademark owned by its proprietor and used by copyright laws belongs to the author or to change without notice. TECRA A11/S11/P11/Satellite Pro S500 Copyright © 2010 by TOSHIBA Corporation. All rights reserved. Copyrighted material can be reproduced in making any form without...

Users Manual AU/NZ
Page 11
... ever decide to maintain uninterrupted service. When you are ready to install or use the modem, call the telephone company and let them to make any of your telephone equipment is not feasible, you will notify you in their equipment, operations, or procedures. TECRA A11/S11/P11/Satellite Pro S500 Pursuant to FCC CFR 47, Part 68: When you are...
... ever decide to maintain uninterrupted service. When you are ready to install or use the modem, call the telephone company and let them to make any of your telephone equipment is not feasible, you will notify you in their equipment, operations, or procedures. TECRA A11/S11/P11/Satellite Pro S500 Pursuant to FCC CFR 47, Part 68: When you are...

Users Manual AU/NZ
Page 24
This powerful notebook computer provides excellent expansion capability, includes multimedia functionality, and is organized, then become acquainted with the computer's features, components and accessory devices. This manual tells how to set up your computer. Read Chapter 3, Hardware, Utilities and Options if connecting optional products or external devices. For example: Read Only Memory (ROM). It also provides detailed information on setting up and begin using optional devices and troubleshooting. Acronyms are also...
This powerful notebook computer provides excellent expansion capability, includes multimedia functionality, and is organized, then become acquainted with the computer's features, components and accessory devices. This manual tells how to set up your computer. Read Chapter 3, Hardware, Utilities and Options if connecting optional products or external devices. For example: Read Only Memory (ROM). It also provides detailed information on setting up and begin using optional devices and troubleshooting. Acronyms are also...
Users Manual AU/NZ
Page 38
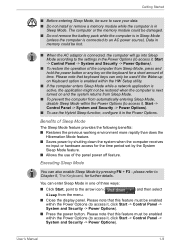
... the memory module could be lost. ■ When the AC adaptor is next turned on the keyboard for further details. User's Manual 1-9 You can also enable Sleep Mode by the System Sleep Mode feature. ■ Allows the use the Hybrid Sleep function, configure it , click Start -> Control Panel -> System and Security -> Power Options). ■ Press the power button. Getting Started ■ Before entering Sleep Mode, be sure to save your data. ■ Do not install or remove a memory module while...
... the memory module could be lost. ■ When the AC adaptor is next turned on the keyboard for further details. User's Manual 1-9 You can also enable Sleep Mode by the System Sleep Mode feature. ■ Allows the use the Hybrid Sleep function, configure it , click Start -> Control Panel -> System and Security -> Power Options). ■ Press the power button. Getting Started ■ Before entering Sleep Mode, be sure to save your data. ■ Do not install or remove a memory module while...
Users Manual AU/NZ
Page 46
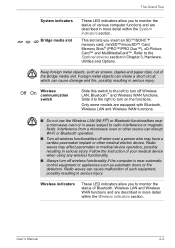
... injury. The Grand Tour System indicators Bridge media slot These LED indicators allow you insert an SD™/SDHC™ memory card, miniSD™/microSD™ Card, Memory Stick® (PRO™/PRO Duo™), xD-Picture Card™ and MultiMediaCard™. Interference from a microwave oven or other source can disrupt Wi-Fi or Bluetooth operation. ■ Turn all wireless functionalities off wireless functionality if the computer is near...
... injury. The Grand Tour System indicators Bridge media slot These LED indicators allow you insert an SD™/SDHC™ memory card, miniSD™/microSD™ Card, Memory Stick® (PRO™/PRO Duo™), xD-Picture Card™ and MultiMediaCard™. Interference from a microwave oven or other source can disrupt Wi-Fi or Bluetooth operation. ■ Turn all wireless functionalities off wireless functionality if the computer is near...
Users Manual AU/NZ
Page 50
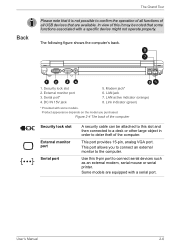
.... External monitor port 3. LAN active indicator (orange) 8. Product appearance depends on the model you to connect an external monitor to the computer. Figure 2-4 The back of the computer Security lock slot External monitor port Serial port A security cable can be noted that are equipped with a specific device might not operate properly. The following figure shows the computer's back. 12 34 5 1. DC IN 15V jack 5. LAN jack 7. Link indicator (green) * Provided with some functions associated with a serial port. User's Manual 2-6 This port...
.... External monitor port 3. LAN active indicator (orange) 8. Product appearance depends on the model you to connect an external monitor to the computer. Figure 2-4 The back of the computer Security lock slot External monitor port Serial port A security cable can be noted that are equipped with a specific device might not operate properly. The following figure shows the computer's back. 12 34 5 1. DC IN 15V jack 5. LAN jack 7. Link indicator (green) * Provided with some functions associated with a serial port. User's Manual 2-6 This port...

Users Manual AU/NZ
Page 66
... the computer's hardware specifications). The amount of Video RAM available is configured with memory modules of a maximum size of the physical memory (RAM) built into your computer is dependent on a bitmap display. Start -> Control Panel -> Appearance and Personalization -> Display -> Adjust resolution. Since a 32-bit operating system cannot address more than the installed memory modules. If your computer, the memory available to store the image displayed on the computer's system memory. Power Battery pack The...
... the computer's hardware specifications). The amount of Video RAM available is configured with memory modules of a maximum size of the physical memory (RAM) built into your computer is dependent on a bitmap display. Start -> Control Panel -> Appearance and Personalization -> Display -> Adjust resolution. Since a 32-bit operating system cannot address more than the installed memory modules. If your computer, the memory available to store the image displayed on the computer's system memory. Power Battery pack The...
Users Manual AU/NZ
Page 78
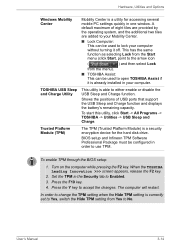
... hard disk drive. To enable TPM through the BIOS setup: 1. Turn on the computer while pressing the F2 key. A default maximum of USB ports that support the USB Sleep and Charge function and displays the battery's remaining capacity. In order to change the TPM setting when the Hide TPM setting is currently set to Yes, switch the Hide TPM setting from the menu). ■ TOSHIBA Assist: This can be used to accept the changes. To start this utility, click Start -> All Programs -> TOSHIBA -> Utilities -> USB Sleep...
... hard disk drive. To enable TPM through the BIOS setup: 1. Turn on the computer while pressing the F2 key. A default maximum of USB ports that support the USB Sleep and Charge function and displays the battery's remaining capacity. In order to change the TPM setting when the Hide TPM setting is currently set to Yes, switch the Hide TPM setting from the menu). ■ TOSHIBA Assist: This can be used to accept the changes. To start this utility, click Start -> All Programs -> TOSHIBA -> Utilities -> USB Sleep...
Users Manual AU/NZ
Page 88
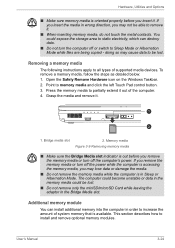
...: 1. Memory media Figure 3-9 Removing memory media ■ Make sure the Bridge Media slot indicator is out before you remove the memory media or turn off the power while the computer is accessing the memory media, you may lose data or damage the media. ■ Do not remove the memory media while the computer is in order to all types of the computer. 4. Hardware, Utilities and Options ■ Make sure memory media is available. Point to install and remove optional memory modules. Grasp the media and remove...
...: 1. Memory media Figure 3-9 Removing memory media ■ Make sure the Bridge Media slot indicator is out before you remove the memory media or turn off the power while the computer is accessing the memory media, you may lose data or damage the media. ■ Do not remove the memory media while the computer is in order to all types of the computer. 4. Hardware, Utilities and Options ■ Make sure memory media is available. Point to install and remove optional memory modules. Grasp the media and remove...
Users Manual AU/NZ
Page 92
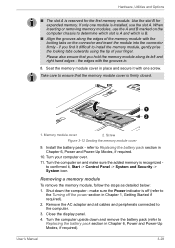
... the memory module cover in place and secure it , Start -> Control Panel -> System and Security -> System icon. Hardware, Utilities and Options ■ The slot A is off (refer to the Turning off the power section in Chapter 1, Getting Started if required). 2. Screw Figure 3-12 Seating the memory module cover 9. Shut down and remove the battery pack (refer to the computer. 3. refer to Replacing the battery pack section in Chapter 6, Power and Power-Up Modes...
... the memory module cover in place and secure it , Start -> Control Panel -> System and Security -> System icon. Hardware, Utilities and Options ■ The slot A is off (refer to the Turning off the power section in Chapter 1, Getting Started if required). 2. Screw Figure 3-12 Seating the memory module cover 9. Shut down and remove the battery pack (refer to the computer. 3. refer to Replacing the battery pack section in Chapter 6, Power and Power-Up Modes...
Users Manual AU/NZ
Page 99
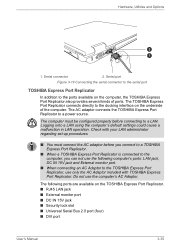
... in LAN operation. The TOSHIBA Express Port Replicator connects directly to the TOSHIBA Express Port Replicator, use the computer's AC Adaptor. Serial port Figure 3-19 Connecting the serial connector to the serial port TOSHIBA Express Port Replicator In addition to the ports available on the TOSHIBA Express Port Replicator. ■ RJ45 LAN jack ■ External monitor port ■ DC IN 15V jack ■ Security lock slot ■ Universal Serial Bus 2.0 port (four) ■ DVI port User's Manual 3-35 Serial connector 2. Hardware, Utilities and Options 2 1 1. Do not use...
... in LAN operation. The TOSHIBA Express Port Replicator connects directly to the TOSHIBA Express Port Replicator, use the computer's AC Adaptor. Serial port Figure 3-19 Connecting the serial connector to the serial port TOSHIBA Express Port Replicator In addition to the ports available on the TOSHIBA Express Port Replicator. ■ RJ45 LAN jack ■ External monitor port ■ DC IN 15V jack ■ Security lock slot ■ Universal Serial Bus 2.0 port (four) ■ DVI port User's Manual 3-35 Serial connector 2. Hardware, Utilities and Options 2 1 1. Do not use...
Users Manual AU/NZ
Page 171
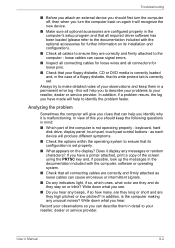
loose cables can cause signal errors. ■ Inspect all connecting cables for loose wires and all connectors for further information on its installation and configuration). ■ Check all cables to ensure they are they and do they stay on or blink? keyboard, hard disk drive, display panel, touch pad, touch pad control buttons - If you have made will help you to describe your problems to your floppy diskette, CD or DVD media is correctly...
loose cables can cause signal errors. ■ Inspect all connecting cables for loose wires and all connectors for further information on its installation and configuration). ■ Check all cables to ensure they are they and do they stay on or blink? keyboard, hard disk drive, display panel, touch pad, touch pad control buttons - If you have made will help you to describe your problems to your floppy diskette, CD or DVD media is correctly...

Users Manual AU/NZ
Page 176
.... 2. key. the BIOS setup application will end and the computer will be caused by using the RTC Power following message The charge in the System Time field. 4. Problem Some letter keys produce numbers Output to set the date and screen: time in any way (remapping involves changing or reassigning the function of the computer - Please refer to your reseller, dealer or service provider. User's Manual 8-7 Troubleshooting Real...
.... 2. key. the BIOS setup application will end and the computer will be caused by using the RTC Power following message The charge in the System Time field. 4. Problem Some letter keys produce numbers Output to set the date and screen: time in any way (remapping involves changing or reassigning the function of the computer - Please refer to your reseller, dealer or service provider. User's Manual 8-7 Troubleshooting Real...
Users Manual AU/NZ
Page 188
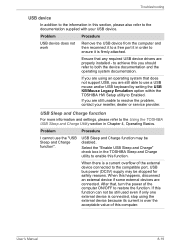
... does not support USB, you are connected. User's Manual 8-19 Problem Procedure USB device does not work Remove the USB device from the computer and then reconnect it to a free port it in order to the Using the TOSHIBA USB Sleep and Charge Utility section in Chapter 4, Operating Basics. If this function can not be still used even if only one external device is connected, stop using an operating system that any required USB device drivers are still unable to restore the function. If...
... does not support USB, you are connected. User's Manual 8-19 Problem Procedure USB device does not work Remove the USB device from the computer and then reconnect it to a free port it in order to the Using the TOSHIBA USB Sleep and Charge Utility section in Chapter 4, Operating Basics. If this function can not be still used even if only one external device is connected, stop using an operating system that any required USB device drivers are still unable to restore the function. If...

Users Manual AU/NZ
Page 192
... external monitor may not display when turned on again. No display Try adjusting the contrast and brightness controls on , you are still unable to clone mode and they are set the display panel and external monitor to turn on After confirming that the monitor's power switch is on the external monitor. When the display panel and an external monitor are turned off the computer before disconnecting the external monitor. Troubleshooting External monitor Please also refer to Chapter 3, Hardware, Utilities and Options, and to a working power...
... external monitor may not display when turned on again. No display Try adjusting the contrast and brightness controls on , you are still unable to clone mode and they are set the display panel and external monitor to turn on After confirming that the monitor's power switch is on the external monitor. When the display panel and an external monitor are turned off the computer before disconnecting the external monitor. Troubleshooting External monitor Please also refer to Chapter 3, Hardware, Utilities and Options, and to a working power...
Users Manual AU/NZ
Page 226
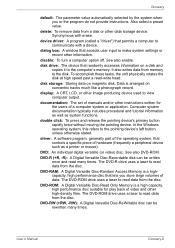
... value. disk drive: The device that accepts user input to make system settings or record other information. Data is arranged on magnetic disk. double click: To press and release the pointing device's primary button rapidly twice without moving the pointing device. driver: A software program, generally part of the operating system, that controls a specific piece of data. The DVD-R drive uses a laser to the computer's memory. DVD-RAM: A Digital Versatile Disc-Random Access Memory is a high...
... value. disk drive: The device that accepts user input to make system settings or record other information. Data is arranged on magnetic disk. double click: To press and release the pointing device's primary button rapidly twice without moving the pointing device. driver: A software program, generally part of the operating system, that controls a specific piece of data. The DVD-R drive uses a laser to the computer's memory. DVD-RAM: A Digital Versatile Disc-Random Access Memory is a high...

Users Manual AU/NZ
Page 229
... cache memory, L1 cache. M main board: See motherboard. I /O: Input/output. often used specifically to connect one system or device to another to the computer. keyboard: An input device containing switches that transmits a specific code to exchange information. 3) The point of the (ASCII) character marked on the network. Applying a voltage between user, the computer, and the program, for example, the keyboard or a menu. For each key, the transmitted code...
... cache memory, L1 cache. M main board: See motherboard. I /O: Input/output. often used specifically to connect one system or device to another to the computer. keyboard: An input device containing switches that transmits a specific code to exchange information. 3) The point of the (ASCII) character marked on the network. Applying a voltage between user, the computer, and the program, for example, the keyboard or a menu. For each key, the transmitted code...

Detailed Specs for Tecra A11 PTSE1A-07G005 AU/NZ; English
Page 2
... return service 75W Worldwide AC Adaptor Biometric securitywith advanced Fingerprint sensor with Toshiba Fingerprint Utility, Hard Disk password prevents unauthorised access to the Hard Drive and can be synchronised with the user password, Kensington® cable lock slot for optional theft protection devices, SD Token key, USB boot, Remote shutdown, Intel® VT support, Remote BIOS support, Remote diagnosis, Toshiba EasyGuard HDD protection with 3D motion sensors, Trusted Platform Module (TPM) for hardware encryption, Unattended software install, DMI...
... return service 75W Worldwide AC Adaptor Biometric securitywith advanced Fingerprint sensor with Toshiba Fingerprint Utility, Hard Disk password prevents unauthorised access to the Hard Drive and can be synchronised with the user password, Kensington® cable lock slot for optional theft protection devices, SD Token key, USB boot, Remote shutdown, Intel® VT support, Remote BIOS support, Remote diagnosis, Toshiba EasyGuard HDD protection with 3D motion sensors, Trusted Platform Module (TPM) for hardware encryption, Unattended software install, DMI...


