
Tecta M2 User's Guide (PDF)
Page 167
and continue as if you may not be able to access the TOSHIBA HW Setup program. It lets you view general system settings and specify the display, boot priority, keyboard, USB, LAN, CPU, device configuration and parallel/printer options for communication ports, use the Windows Device ...Manager. To set and you wish to open the HW Setup dialog box. The TOSHIBA Console screen appears. or Popup... ...
and continue as if you may not be able to access the TOSHIBA HW Setup program. It lets you view general system settings and specify the display, boot priority, keyboard, USB, LAN, CPU, device configuration and parallel/printer options for communication ports, use the Windows Device ...Manager. To set and you wish to open the HW Setup dialog box. The TOSHIBA Console screen appears. or Popup... ...
Tecta M2 User's Guide (PDF)
Page 169
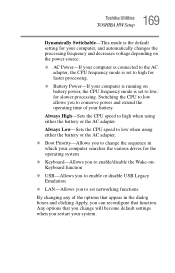
...either the battery or the AC adapter. ❖ Boot Priority-Allows you to change will become default settings when you change the sequence in which your computer searches the various drives for slower processing. 169 Toshiba Utilities TOSHIBA HW Setup Dynamically Switchable-This mode is the default setting...set to low, for the operating system ❖ Keyboard-Allows you to enable/disable the Wake-onKeyboard function ❖ USB-Allows you to enable or disable USB Legacy Emulation ❖ LAN-Allows you to set networking functions By changing any of your battery. Switching the CPU ...
...either the battery or the AC adapter. ❖ Boot Priority-Allows you to change will become default settings when you change the sequence in which your computer searches the various drives for slower processing. 169 Toshiba Utilities TOSHIBA HW Setup Dynamically Switchable-This mode is the default setting...set to low, for the operating system ❖ Keyboard-Allows you to enable/disable the Wake-onKeyboard function ❖ USB-Allows you to enable or disable USB Legacy Emulation ❖ LAN-Allows you to set networking functions By changing any of your battery. Switching the CPU ...
Tecta M2 User's Guide (PDF)
Page 177
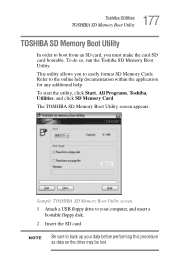
..., and click SD Memory Card. This utility allows you to boot from an SD card, you must make the card SD card bootable. The TOSHIBA SD Memory Boot Utility screen appears. Sample TOSHIBA SD Memory Boot Utility screen 1 Attach a USB floppy drive to your data before performing this procedure as data on the drive may be...
..., and click SD Memory Card. This utility allows you to boot from an SD card, you must make the card SD card bootable. The TOSHIBA SD Memory Boot Utility screen appears. Sample TOSHIBA SD Memory Boot Utility screen 1 Attach a USB floppy drive to your data before performing this procedure as data on the drive may be...

User Manual
Page 120
... HW Setup window. User's Manual 7-1 TOSHIBA HW Setup lets you configure settings for Display, CPU, Boot Priority, Keyboard, USB, LAN, General, Device Config and Parallel/Printer. There are not equipped with Parallel/Printer tab and/or CPU tab. TECRA M2 Chapter 7 HW Setup This chapter explains... how to use the TOSHIBA HW Setup program to the factory...
... HW Setup window. User's Manual 7-1 TOSHIBA HW Setup lets you configure settings for Display, CPU, Boot Priority, Keyboard, USB, LAN, General, Device Config and Parallel/Printer. There are not equipped with Parallel/Printer tab and/or CPU tab. TECRA M2 Chapter 7 HW Setup This chapter explains... how to use the TOSHIBA HW Setup program to the factory...
User Manual
Page 123
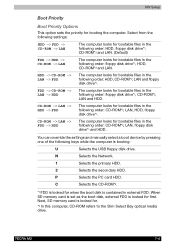
...primary HDD. 2 Selects the secondary HDD. When SD memory card is set as the boot disk, external FDD is looked for . *2 In this computer, CD-ROM refers to the Slim Select Bay optical media drive. TECRA M2 7-4 C Selects the CD-ROM*2. *1 FDD is looked for first. Next, SD... memory card is looked for bootable files in the following order: floppy disk drive*1, HDD, CD-ROM*2 and LAN. FDD −> CD-ROM −> LAN −> HDD The computer looks for when the boot disk is booting: U Selects the USB...
...primary HDD. 2 Selects the secondary HDD. When SD memory card is set as the boot disk, external FDD is looked for . *2 In this computer, CD-ROM refers to the Slim Select Bay optical media drive. TECRA M2 7-4 C Selects the CD-ROM*2. *1 FDD is looked for first. Next, SD... memory card is looked for bootable files in the following order: floppy disk drive*1, HDD, CD-ROM*2 and LAN. FDD −> CD-ROM −> LAN −> HDD The computer looks for when the boot disk is booting: U Selects the USB...
User Manual
Page 214
... TOSHIBA Theft Registration D-2 TOSHIBA Zooming Utility 1-13, 5-6 Touch Pad 2-9, 4-2 Troubleshooting 9-1 TV 8-18 Typewriter keys 5-1 Index U Underside 2-6 Universal Serial Bus (USB 2.0) 2-4 USB 7-8 USB floppy disk drive 1-4, 2-13 Using 4-3 Utilities 1-13 V Video RAM 1-3 Video-out 2-5 Volume control 2-1 W Windows special keys 5-7 Windows XP setup 3-1 Wireless communication 2-2, 4-24 Wireless LAN 1-9, 4-24, F-1 Writable discs 2-14 Writing CD/DVDs 4-11, 4-12 TECRA M2...
... TOSHIBA Theft Registration D-2 TOSHIBA Zooming Utility 1-13, 5-6 Touch Pad 2-9, 4-2 Troubleshooting 9-1 TV 8-18 Typewriter keys 5-1 Index U Underside 2-6 Universal Serial Bus (USB 2.0) 2-4 USB 7-8 USB floppy disk drive 1-4, 2-13 Using 4-3 Utilities 1-13 V Video RAM 1-3 Video-out 2-5 Volume control 2-1 W Windows special keys 5-7 Windows XP setup 3-1 Wireless communication 2-2, 4-24 Wireless LAN 1-9, 4-24, F-1 Writable discs 2-14 Writing CD/DVDs 4-11, 4-12 TECRA M2...

Instruction Manual
Page 14
... the display 3-5 Turning on the power 3-6 Windows XP setup 3-7 Turning off the power 3-7 Shut Down mode (Boot mode 3-7 Hibernation mode 3-7 Standby mode 3-9 Restarting the computer 3-10 Restoring the preinstalled software from the Product Recovery DVD-ROM 3-11 ...Chapter 4 Operating Basics TOSHIBA Dual Pointing Device 4-1 Using the Touch Pad 4-2 Using the AccuPoint 4-2 AccuPoint precautions 4-2 Replacing the cap 4-2 Using the USB floppy disk drive 4-3 Connecting 3 1/2" floppy disk drive 4-3 Disconnecting 3...
... the display 3-5 Turning on the power 3-6 Windows XP setup 3-7 Turning off the power 3-7 Shut Down mode (Boot mode 3-7 Hibernation mode 3-7 Standby mode 3-9 Restarting the computer 3-10 Restoring the preinstalled software from the Product Recovery DVD-ROM 3-11 ...Chapter 4 Operating Basics TOSHIBA Dual Pointing Device 4-1 Using the Touch Pad 4-2 Using the AccuPoint 4-2 AccuPoint precautions 4-2 Replacing the cap 4-2 Using the USB floppy disk drive 4-3 Connecting 3 1/2" floppy disk drive 4-3 Disconnecting 3...

Instruction Manual
Page 129
...'s Manual 7-1 TOSHIBA HW Setup lets you configure settings for Display, CPU, Boot Priority, Keyboard, USB, LAN, General, Device Config and Parallel/Printer. There are not equipped with Parallel/Printer tab and/or CPU tab. OK Accepts your changes without accepting your computer. Cancel Closes the window without closing the HW Setup window. TECRA M2 Chapter...
...'s Manual 7-1 TOSHIBA HW Setup lets you configure settings for Display, CPU, Boot Priority, Keyboard, USB, LAN, General, Device Config and Parallel/Printer. There are not equipped with Parallel/Printer tab and/or CPU tab. OK Accepts your changes without accepting your computer. Cancel Closes the window without closing the HW Setup window. TECRA M2 Chapter...
Instruction Manual
Page 132
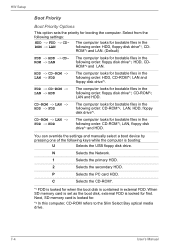
...(Default) FDD −> HDD −> CDROM −> LAN The computer looks for when the boot disk is booting: U Selects the USB floppy disk drive. P Selects the PC card HDD. When SD memory card is set as the boot disk, external FDD is looked for first. Next, SD memory card is looked for . *2 In... Selects the CD-ROM*. *1 FDD is looked for bootable files in the following order: floppy disk drive*1, CD-ROM*2, LAN and HDD. HW Setup Boot Priority Boot Priority Options This option sets the priority for bootable files in external FDD. You can override the settings and manually select...
...(Default) FDD −> HDD −> CDROM −> LAN The computer looks for when the boot disk is booting: U Selects the USB floppy disk drive. P Selects the PC card HDD. When SD memory card is set as the boot disk, external FDD is looked for first. Next, SD memory card is looked for . *2 In... Selects the CD-ROM*. *1 FDD is looked for bootable files in the following order: floppy disk drive*1, CD-ROM*2, LAN and HDD. HW Setup Boot Priority Boot Priority Options This option sets the priority for bootable files in external FDD. You can override the settings and manually select...
Instruction Manual
Page 243
Index accessing 7-1 boot priority 7-4 CPU 7-3 device config 7-2 display 7-2 general 7-2 keyboard 7-7 LAN 7-7 parallel/printer 7-2 USB 7-8 window 7-1 I i.LINK 1-7, 2-2, 8-19 connecting 8-18 disconnecting 8-19 precautions 8-18 problems 9-17 Indicators 2-10, 6-4 Infrared port 1-7 location 2-1 problems 9-13 Instant security, See Hot keys Interfaces, See ...
Index accessing 7-1 boot priority 7-4 CPU 7-3 device config 7-2 display 7-2 general 7-2 keyboard 7-7 LAN 7-7 parallel/printer 7-2 USB 7-8 window 7-1 I i.LINK 1-7, 2-2, 8-19 connecting 8-18 disconnecting 8-19 precautions 8-18 problems 9-17 Indicators 2-10, 6-4 Infrared port 1-7 location 2-1 problems 9-13 Instant security, See Hot keys Interfaces, See ...

Instruction Manual
Page 244
...2-2 problems 9-13 Ports Docking interface 1-7 external monitor 1-7 i.LINK 1-7 infrared 1-7 Paralell 1-7 USB 1-7 Power button location 2-8 conditions 6-1 indicators 6-4 panel on/off 1-11, 6-18 problems 9-4 system auto off 6-18... turning off 3-7 hibernation mode 3-7 shut down mode (boot mode) 3-7 standby mode 3-9 turning on 3-6 Power-up modes 6-18 Problems AC power 9-5 analyzing... 9-18 LCD panel 9-7 memory expansion 9-16 modem 9-17 monitor external 9-17 mouse, USB 9-14 overheating power down 9- 4 password 9-6 PC card 9-13 power 9-4 Real time clock 9-20 ...
...2-2 problems 9-13 Ports Docking interface 1-7 external monitor 1-7 i.LINK 1-7 infrared 1-7 Paralell 1-7 USB 1-7 Power button location 2-8 conditions 6-1 indicators 6-4 panel on/off 1-11, 6-18 problems 9-4 system auto off 6-18... turning off 3-7 hibernation mode 3-7 shut down mode (boot mode) 3-7 standby mode 3-9 turning on 3-6 Power-up modes 6-18 Problems AC power 9-5 analyzing... 9-18 LCD panel 9-7 memory expansion 9-16 modem 9-17 monitor external 9-17 mouse, USB 9-14 overheating power down 9- 4 password 9-6 PC card 9-13 power 9-4 Real time clock 9-20 ...
Instruction Manual
Page 245
... TOSHIBA Console 1-14 TOSHIBA Console button 1-10 TOSHIBA Controls 1-13 TOSHIBA CobfigFree 1-14 TOSHIBA Dual Pointing Device utility 1-15 TOSHIBA IP Phone 1-15 TOSHIBA Mobile extension 114 TOSHIBA PC Diagnostic Tool 1-14 TOSHIBA Power Saver 1-13 TOSHIBA Presentation button 1-10 TOSHIBA SD Memory Boot Utility 1-14 TOSHIBA utilities 1-10 TOSHIBA Zooming Utility 1-14 Touch Pad, See Dual Pointing Device Troubleshooting, See Problems TV 8-16 U USB...
... TOSHIBA Console 1-14 TOSHIBA Console button 1-10 TOSHIBA Controls 1-13 TOSHIBA CobfigFree 1-14 TOSHIBA Dual Pointing Device utility 1-15 TOSHIBA IP Phone 1-15 TOSHIBA Mobile extension 114 TOSHIBA PC Diagnostic Tool 1-14 TOSHIBA Power Saver 1-13 TOSHIBA Presentation button 1-10 TOSHIBA SD Memory Boot Utility 1-14 TOSHIBA utilities 1-10 TOSHIBA Zooming Utility 1-14 Touch Pad, See Dual Pointing Device Troubleshooting, See Problems TV 8-16 U USB...

Maintenance Manual
Page 80
... resume password Setting of parameter for character repeat on a USB keyboard Getting keys pressed during the IRT Storing T_SHADO_RAM_SIZE Reflecting expansion memory size to CMOS Update of system resources information just before booting Updating a table for DMI Rewriting memory map data for INT15h... Clearance of IRT running flag for runtime Updating checksum for runtime Branching to boot, Waiting for ACPI HW initialization prior to hibernation Bluetooth initialization Check upgrade of built-in LAN 2-26 TECRA M2 Maintenance Manual (960-468) Check whether a target maintenance card is set ...
... resume password Setting of parameter for character repeat on a USB keyboard Getting keys pressed during the IRT Storing T_SHADO_RAM_SIZE Reflecting expansion memory size to CMOS Update of system resources information just before booting Updating a table for DMI Rewriting memory map data for INT15h... Clearance of IRT running flag for runtime Updating checksum for runtime Branching to boot, Waiting for ACPI HW initialization prior to hibernation Bluetooth initialization Check upgrade of built-in LAN 2-26 TECRA M2 Maintenance Manual (960-468) Check whether a target maintenance card is set ...

Maintenance Manual
Page 193
... = Full Power PASSWORD Not Registered HDD PASSWORD HDD = Built-in HDD HDD Password mode = User Only User Password = Not Registered BOOT PRIORITY Boot Priority = HDD→FDD→CD-ROM→LAN HDD Priority = Built-in HDD→Second HDD→PC Card DISPLAY Power...Change pages Esc: Exit without saving Home : Set default values End: Save changes and Exit NOTE: USB FDD Legacy Emulation under LEGACY EMULATION appears only when floppy Disk I/O is divided into two pages. TECRA M2 Maintenance Manual (960-468) 3-79 3.29 SETUP 3 Tests and Diagnostics 3.29.2 Accessing the SETUP...
... = Full Power PASSWORD Not Registered HDD PASSWORD HDD = Built-in HDD HDD Password mode = User Only User Password = Not Registered BOOT PRIORITY Boot Priority = HDD→FDD→CD-ROM→LAN HDD Priority = Built-in HDD→Second HDD→PC Card DISPLAY Power...Change pages Esc: Exit without saving Home : Set default values End: Save changes and Exit NOTE: USB FDD Legacy Emulation under LEGACY EMULATION appears only when floppy Disk I/O is divided into two pages. TECRA M2 Maintenance Manual (960-468) 3-79 3.29 SETUP 3 Tests and Diagnostics 3.29.2 Accessing the SETUP...

Maintenance Manual
Page 385
... BIOS 1. Turn off the power to boot mode. 2. Remove the external cable and PC card. 4. When the process is completed, eject the BIOS/EC/KBC rewriting disk and the system is automatically reset. Set the system to the computer. 3. Connect an USB FDD and insert the BIOS/EC/KBC ...rewriting disk into the USB FDD. 5. For example (US Keyboard) (UK Keyboard) (Keep holding down the key until a message appears on the power while holding down the No. 01 key. TECRA M2 Maintenance Manual (960-468) G-1 Turn on the screen.) The BIOS rewriting starts. 6. ...
... BIOS 1. Turn off the power to boot mode. 2. Remove the external cable and PC card. 4. When the process is completed, eject the BIOS/EC/KBC rewriting disk and the system is automatically reset. Set the system to the computer. 3. Connect an USB FDD and insert the BIOS/EC/KBC ...rewriting disk into the USB FDD. 5. For example (US Keyboard) (UK Keyboard) (Keep holding down the key until a message appears on the power while holding down the No. 01 key. TECRA M2 Maintenance Manual (960-468) G-1 Turn on the screen.) The BIOS rewriting starts. 6. ...

Maintenance Manual
Page 387
...Keep holding down the key until a message appears on the conditions of the EC/KBC have been erased. TECRA M2 Maintenance Manual (960-468) H-1 Tools To rewrite the EC/KBC, you rewrite the EC/KBC. 3....is not hung up the computer. 4. Allow sufficient time. Connect an USB FDD and insert the BIOS/EC/KBC rewriting disk into the USB FDD. 5. Do not turn off the power while you next turn...system program when you update the EC/KBC system. If the rewrite fails, it takes about 30 seconds to boot mode. 2. Rewrite the EC/KBC only when instructed by a diagnostic disk release notice. 2. Appendix H ...
...Keep holding down the key until a message appears on the conditions of the EC/KBC have been erased. TECRA M2 Maintenance Manual (960-468) H-1 Tools To rewrite the EC/KBC, you rewrite the EC/KBC. 3....is not hung up the computer. 4. Allow sufficient time. Connect an USB FDD and insert the BIOS/EC/KBC rewriting disk into the USB FDD. 5. Do not turn off the power while you next turn...system program when you update the EC/KBC system. If the rewrite fails, it takes about 30 seconds to boot mode. 2. Rewrite the EC/KBC only when instructed by a diagnostic disk release notice. 2. Appendix H ...


