
Owners Manual
Page 3
... ENERGY STAR® guidelines for energy efficiency. 3 When the VCR is compatible with existing, non-HQ VHS equipment. To prevent the VCR from a cold location to a warm location. As an ENERGY STAR® Partner, TOSHIBA has determined that this unit immediately after moving it was originally... packed at least 2 hours when there is also compatible with any other VCR bearing the mark. Compatibility This video cassette recorder (VCR) is exposed to ship your VCR. HQ VHS equipment is...
... ENERGY STAR® guidelines for energy efficiency. 3 When the VCR is compatible with existing, non-HQ VHS equipment. To prevent the VCR from a cold location to a warm location. As an ENERGY STAR® Partner, TOSHIBA has determined that this unit immediately after moving it was originally... packed at least 2 hours when there is also compatible with any other VCR bearing the mark. Compatibility This video cassette recorder (VCR) is exposed to ship your VCR. HQ VHS equipment is...
Owners Manual
Page 7
... while recording another • Skipping unnecessary scenes while recording • Recording off time setting Timer Program Recording 25 VCR Plus+ C3 ® System Set-up ........ 28 VCR Plus+ C3 ® System Recording .. 30 Cable Box Set-up 32 DSS®Satellite Receive Set-up 36... WARRANTY Back cover 7 How to do before operating the VCR. Contents INTRODUCTION INTRODUCTION Provides important notes and general explanation of the VCR, including names of Controls 8 • Front Panel • Remote Control • VCR Display • Rear Panel PREPARATION Explains what you need ...
... while recording another • Skipping unnecessary scenes while recording • Recording off time setting Timer Program Recording 25 VCR Plus+ C3 ® System Set-up ........ 28 VCR Plus+ C3 ® System Recording .. 30 Cable Box Set-up 32 DSS®Satellite Receive Set-up 36... WARRANTY Back cover 7 How to do before operating the VCR. Contents INTRODUCTION INTRODUCTION Provides important notes and general explanation of the VCR, including names of Controls 8 • Front Panel • Remote Control • VCR Display • Rear Panel PREPARATION Explains what you need ...

Owners Manual
Page 8
...19 LINE IN 2 VIDEO jack REC 24 10 Remote Sensor LINE IN 2 AUDIO (L/MONO, R) jacks 20 9 PAUSE/STILL VCR Display Remote Control To operate this TV. SELECT 24 DISPLAY 22 REMAIN/COUNTER 22 SP/SLP 24 REC 24 SLOW 21 REW ...* 19 PROG. 14 CANCEL 27 VCR Plus+ 30 EJECT 18 A.SELECT 39 VCR TV POWER CH/TRK 123 456 TV VOL 789 I . CANCEL ENTER VCR Plus+ A.SELECT CABLE BOX CH EJECT CM SKIP POWER 14 POWER... 19 CH/TRK 40 TV VOL 17 100 24 TV/VCR 22 COUNT RESET 26 TIMER 20 PAUSE/STILL 19 FF * 19 PLAY/x2 *, STOP * 14 ENTER 34...
...19 LINE IN 2 VIDEO jack REC 24 10 Remote Sensor LINE IN 2 AUDIO (L/MONO, R) jacks 20 9 PAUSE/STILL VCR Display Remote Control To operate this TV. SELECT 24 DISPLAY 22 REMAIN/COUNTER 22 SP/SLP 24 REC 24 SLOW 21 REW ...* 19 PROG. 14 CANCEL 27 VCR Plus+ 30 EJECT 18 A.SELECT 39 VCR TV POWER CH/TRK 123 456 TV VOL 789 I . CANCEL ENTER VCR Plus+ A.SELECT CABLE BOX CH EJECT CM SKIP POWER 14 POWER... 19 CH/TRK 40 TV VOL 17 100 24 TV/VCR 22 COUNT RESET 26 TIMER 20 PAUSE/STILL 19 FF * 19 PLAY/x2 *, STOP * 14 ENTER 34...
Owners Manual
Page 9
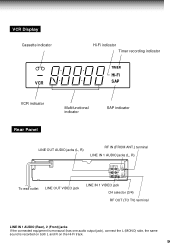
...-Fi indicator Timer recording indicator TIMER Hi-Fi SAP VCR indicator Multifunctional indicator SAP indicator Rear Panel LINE OUT AUDIO jacks (L, R) RF IN (FROM ANT.) terminal LINE IN 1 AUDIO jacks (L, R) To wall outlet LINE OUT ...
...-Fi indicator Timer recording indicator TIMER Hi-Fi SAP VCR indicator Multifunctional indicator SAP indicator Rear Panel LINE OUT AUDIO jacks (L, R) RF IN (FROM ANT.) terminal LINE IN 1 AUDIO jacks (L, R) To wall outlet LINE OUT ...
Owners Manual
Page 10
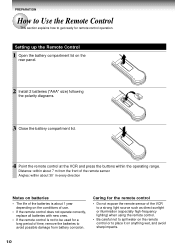
...: within about 30˚ in every direction Notes on batteries • The life of the batteries is about 1 year depending on the conditions of the VCR to a strong light source such as direct sunlight or illumination (especially high-frequency lighting) when using the remote control. • Be careful not to spill... place it on the rear panel. 2 Install 2 batteries ("AAA" size) following the polarity diagrams. 3 Close the battery compartment lid. + + 4 Point the remote control at the VCR and press the buttons within the operating range.
...: within about 30˚ in every direction Notes on batteries • The life of the batteries is about 1 year depending on the conditions of the VCR to a strong light source such as direct sunlight or illumination (especially high-frequency lighting) when using the remote control. • Be careful not to spill... place it on the rear panel. 2 Install 2 batteries ("AAA" size) following the polarity diagrams. 3 Close the battery compartment lid. + + 4 Point the remote control at the VCR and press the buttons within the operating range.
Owners Manual
Page 11
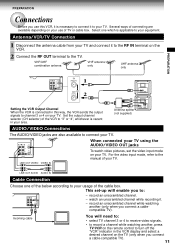
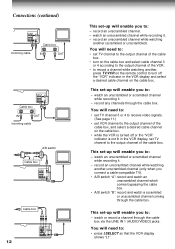
... select a desired channel on the TV (only when you connect a cable-compatible TV). 11 Set the output channel selector (CH selector) of the VCR to connect your usage of the cable box. Select one of the below according to channel 3 or 4 on your equipment. LINE OUT AUDIO AUDIO ...IN Cable Connection Choose one which is necessary to turn off the "VCR" indicator in your TV. watch video pictures, set -up will need to: • select TV channel 3 or 4 to receive video signals. • to record...
... select a desired channel on the TV (only when you connect a cable-compatible TV). 11 Set the output channel selector (CH selector) of the VCR to connect your usage of the cable box. Select one of the below according to channel 3 or 4 on your equipment. LINE OUT AUDIO AUDIO ...IN Cable Connection Choose one which is necessary to turn off the "VCR" indicator in your TV. watch video pictures, set -up will need to: • select TV channel 3 or 4 to receive video signals. • to record...
Owners Manual
Page 12
... to: - record any channels through the cable box via the LINE IN 1 (AUDIO/VIDEO) jacks. You will need to: • press I.SELECT so that the VCR display shows "L1". This set-up will enable you to: - You will need to: • set TV channel 3 or 4 to receive video signals. (See ... the cable box. record an unscrambled channel. - watch an unscrambled or scrambled channel while recording it . - record an unscrambled channel while watching another , press TV/VCR on the remote control to turn on the cable box. You will need to: • set TV channel to the output channel of the cable...
... to: - record any channels through the cable box via the LINE IN 1 (AUDIO/VIDEO) jacks. You will need to: • press I.SELECT so that the VCR display shows "L1". This set-up will enable you to: - You will need to: • set TV channel 3 or 4 to receive video signals. (See ... the cable box. record an unscrambled channel. - watch an unscrambled or scrambled channel while recording it . - record an unscrambled channel while watching another , press TV/VCR on the remote control to turn on the cable box. You will need to: • set TV channel to the output channel of the cable...

Owners Manual
Page 13
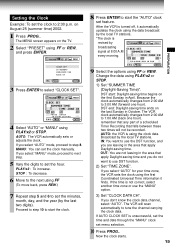
While "Auto" is blinking, channel memory is on the remote control to cancel the auto set-up 1 Plug the VCR into the AC outlet. CANCEL VCR Plus+ A.SELECT ENTER CABLE BOX CH EJECT CM SKIP POWER Auto Set up . 13 Notes • It may takes several minutes during the Auto... CANCEL 3 When Auto set up has been completed, the VCR is also set automatically. PREPARATION PREPARATION Auto Set Up The VCR's clock and tuner channels are set automatically when the VCR is plugged into the AC outlet 2 "Auto" blink while the VCR automatically sets the clock using the data broadcast by the local...
While "Auto" is blinking, channel memory is on the remote control to cancel the auto set-up 1 Plug the VCR into the AC outlet. CANCEL VCR Plus+ A.SELECT ENTER CABLE BOX CH EJECT CM SKIP POWER Auto Set up . 13 Notes • It may takes several minutes during the Auto... CANCEL 3 When Auto set up has been completed, the VCR is also set automatically. PREPARATION PREPARATION Auto Set Up The VCR's clock and tuner channels are set automatically when the VCR is plugged into the AC outlet 2 "Auto" blink while the VCR automatically sets the clock using the data broadcast by the local...

Owners Manual
Page 14
... /STILL CURSOR REW FF STOP PROG. The following screen appears on the SET UP screen Other optional settings can be set first when VCR is selected on the VCR. 2 Press PROG.. MEnU 4 Press PROG. Optional settings on the TV. Page 22 Page 39 Page 23 To change the language, move down ...Settings Using On-screen Display The language selection and clock setting must be made the Audio/Video connection (page 11). • Press VCR to set the remote control operating the VCR. To exit, press PROG. once. 14 The screen turns to the normal TV screen. Press ENTER while "SET UP" is first...
... /STILL CURSOR REW FF STOP PROG. The following screen appears on the SET UP screen Other optional settings can be set first when VCR is selected on the VCR. 2 Press PROG.. MEnU 4 Press PROG. Optional settings on the TV. Page 22 Page 39 Page 23 To change the language, move down ...Settings Using On-screen Display The language selection and clock setting must be made the Audio/Video connection (page 11). • Press VCR to set the remote control operating the VCR. To exit, press PROG. once. 14 The screen turns to the normal TV screen. Press ENTER while "SET UP" is first...
Owners Manual
Page 15
... START SETTInG 4 Select "AUTO" or "MANU" using FF or REW. Proceed to step 10 to start the clock. 8 Press ENTER to 2:30 p.m. After the VCR is turned off, it finds. DST start: Daylight-saving time begins on the TV. 2 Select "PRESET" using the first Coordinated Universal Time information it automatically...to set the clock manually. STOP : To decrease. 6 Move to the next using PLAY/x2 or STOP. 1) Set "SUMMER TIME (Daylight-Saving Time)". The VCR clock automatically changes from 2:00 AM to set the hour. OUT: You are not leaving in the area that apply Daylight-saving time and you...
... START SETTInG 4 Select "AUTO" or "MANU" using FF or REW. Proceed to step 10 to start the clock. 8 Press ENTER to 2:30 p.m. After the VCR is turned off, it finds. DST start: Daylight-saving time begins on the TV. 2 Select "PRESET" using the first Coordinated Universal Time information it automatically...to set the clock manually. STOP : To decrease. 6 Move to the next using PLAY/x2 or STOP. 1) Set "SUMMER TIME (Daylight-Saving Time)". The VCR clock automatically changes from 2:00 AM to set the hour. OUT: You are not leaving in the area that apply Daylight-saving time and you...
Owners Manual
Page 16
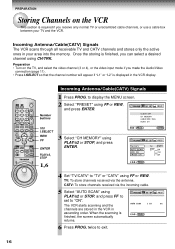
... display the MENU screen. 2 Select "PRESET" using FF or REW, and press ENTER. 3 Select "CH MEMORY" using FF or REW. Incoming Antenna/Cable(CATV) Signals VCR TV POWER CH/TRK 123 456 TV VOL 789 I .SELECT REW FF ENTER PLAY/x2, STOP 1 Press PROG. twice to exit. 16 TV: To store... FF to set to "TV" or "CATV" using PLAY/x2 or STOP, and press ENTER. 1,6 4 Set "TV/CATV" to "ON". PREPARATION Storing Channels on the VCR This section is required if you made the Audio/Video connection (page 11). • Press I.SELECT so that the channel number will appear if "L1...
... display the MENU screen. 2 Select "PRESET" using FF or REW, and press ENTER. 3 Select "CH MEMORY" using FF or REW. Incoming Antenna/Cable(CATV) Signals VCR TV POWER CH/TRK 123 456 TV VOL 789 I .SELECT REW FF ENTER PLAY/x2, STOP 1 Press PROG. twice to exit. 16 TV: To store... FF to set to "TV" or "CATV" using PLAY/x2 or STOP, and press ENTER. 1,6 4 Set "TV/CATV" to "ON". PREPARATION Storing Channels on the VCR This section is required if you made the Audio/Video connection (page 11). • Press I.SELECT so that the channel number will appear if "L1...
Owners Manual
Page 17
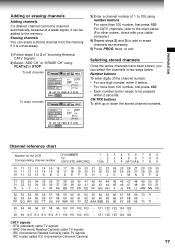
... SET CH PUSH 0~9 KEYS To erase channels 3) Enter a channel number of 1 to the memory. TO SET CH PUSH 0~9 KEYS Channel reference chart Number on the VCR Corresponding channel number CH NUMBER TV CATV STD (HRC/IRC) 123456789 -23456789 1(A-8) 2 3 4 5(A-7) 6(A-6) 7 8 9 10 11 12 13 14 15 16 17 18 19 20 21 22...
... SET CH PUSH 0~9 KEYS To erase channels 3) Enter a channel number of 1 to the memory. TO SET CH PUSH 0~9 KEYS Channel reference chart Number on the VCR Corresponding channel number CH NUMBER TV CATV STD (HRC/IRC) 123456789 -23456789 1(A-8) 2 3 4 5(A-7) 6(A-6) 7 8 9 10 11 12 13 14 15 16 17 18 19 20 21 22...

Owners Manual
Page 18
The indicator will appear in injury or damage. This may result in the VCR display. If the tab has already been removed, recording cannot be performed. Keep them away from the cassette compartment. The cassette is automatically turned... on. Precautions when using video cassettes Video cassettes have a safety tab to avoid accidents. The VCR is ejected from heaters. To record again Cover the tab hole with a screwdriver. Avoid extreme humidity, vibrations or shock, strong magnetic fields (near a ...
The indicator will appear in injury or damage. This may result in the VCR display. If the tab has already been removed, recording cannot be performed. Keep them away from the cassette compartment. The cassette is automatically turned... on. Precautions when using video cassettes Video cassettes have a safety tab to avoid accidents. The VCR is ejected from heaters. To record again Cover the tab hole with a screwdriver. Avoid extreme humidity, vibrations or shock, strong magnetic fields (near a ...
Owners Manual
Page 19
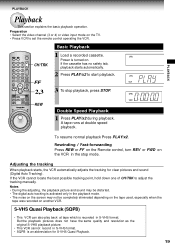
... the adjusting, the playback picture and sound may not be completely eliminated depending on the tape used, especially when the tape was recorded on the VCR in the playback mode. • The noise on the screen may be distorted. • The digital auto tracking is turned on the TV. &#...(3 or 4) or video input mode on . A tape runs at tape which is an abbreviation for clear pictures and sound (Digital Auto Tracking). If the VCR cannot locate the best possible tracking point, hold down one of CH/TRK to start playback. PLAYBACK PLAYBACK Playback This section explains the basic playback...
... the adjusting, the playback picture and sound may not be completely eliminated depending on the tape used, especially when the tape was recorded on the VCR in the playback mode. • The noise on the screen may be distorted. • The digital auto tracking is turned on the TV. &#...(3 or 4) or video input mode on . A tape runs at tape which is an abbreviation for clear pictures and sound (Digital Auto Tracking). If the VCR cannot locate the best possible tracking point, hold down one of CH/TRK to start playback. PLAYBACK PLAYBACK Playback This section explains the basic playback...
Owners Manual
Page 20
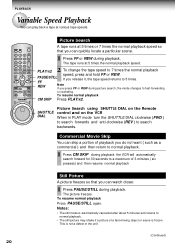
... skip a portion of playback you do not want ( such as a commercial ) and then return to normal playback. 1 Press CM SKIP during playback the VCR will automatically search forward for 30 seconds to 5 times. FF REW Note If you can watch closer. 1 Press PAUSE/STILL during playback. CANCEL... VCR Plus+ A.SELECT ENTER CABLE BOX CH EJECT CM SKIP POWER Picture Search A tape runs at various tape speeds. PAUSE/STILL If you can quickly...
... skip a portion of playback you do not want ( such as a commercial ) and then return to normal playback. 1 Press CM SKIP during playback the VCR will automatically search forward for 30 seconds to 5 times. FF REW Note If you can watch closer. 1 Press PAUSE/STILL during playback. CANCEL... VCR Plus+ A.SELECT ENTER CABLE BOX CH EJECT CM SKIP POWER Picture Search A tape runs at various tape speeds. PAUSE/STILL If you can quickly...
Owners Manual
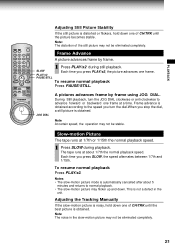
Page 21
...turn the dial.When you press SLOW, the speed alternates between 1/7th and 1/15th. PLAYBACK VCR TV POWER CH/TRK 123 456 TV VOL 789 I.SELECT 0 100 REMAIN/ DISPLAY COUNTER COUNT RESET TV/ VCR SP/ SLP REC TIMER SLOW PLAY/x2 PAUSE /STILL CURSOR REW FF STOP PROG. This is...pictures advances frame by frame. 1 Press PLAY/x2 during playback. To resume normal playback Press PLAY/x2. Note The noise in the unit. CANCEL VCR Plus+ A.SELECT ENTER CABLE BOX CH EJECT CM SKIP POWER Adjusting Still Picture Stability If the still picture is obtained according to normal playback. &#...
...turn the dial.When you press SLOW, the speed alternates between 1/7th and 1/15th. PLAYBACK VCR TV POWER CH/TRK 123 456 TV VOL 789 I.SELECT 0 100 REMAIN/ DISPLAY COUNTER COUNT RESET TV/ VCR SP/ SLP REC TIMER SLOW PLAY/x2 PAUSE /STILL CURSOR REW FF STOP PROG. This is...pictures advances frame by frame. 1 Press PLAY/x2 during playback. To resume normal playback Press PLAY/x2. Note The noise in the unit. CANCEL VCR Plus+ A.SELECT ENTER CABLE BOX CH EJECT CM SKIP POWER Adjusting Still Picture Stability If the still picture is obtained according to normal playback. &#...
Owners Manual
Page 22
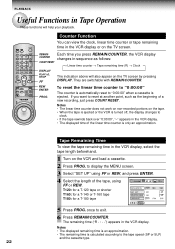
... The linear time counter does not work on non-recorded portions on the tape. • When the tape is ejected or the VCR is turned off, the display changes to "0:00:00" when a cassette is calculated according to reset at another point, such as...PROG 5 Press PROG. to exit. 6 Press REMAIN/COUNTER. The remaining time ("R - : - -") appears in Tape Operation These functions will also appear on the VCR and load a cassette. 2 Press PROG. Notes • The displayed remaining time is an approximation. • The remaining time is ejected. PLAYBACK Useful Functions in ...
... The linear time counter does not work on non-recorded portions on the tape. • When the tape is ejected or the VCR is turned off, the display changes to "0:00:00" when a cassette is calculated according to reset at another point, such as...PROG 5 Press PROG. to exit. 6 Press REMAIN/COUNTER. The remaining time ("R - : - -") appears in Tape Operation These functions will also appear on the VCR and load a cassette. 2 Press PROG. Notes • The displayed remaining time is an approximation. • The remaining time is ejected. PLAYBACK Useful Functions in ...
Owners Manual
Page 23
...: If you press the FF (fast-forward) button and the time counter never reaches "0H00M00S M" between that point and the end of the tape, the VCR will continue to fastforward to watch a segment of "0H00M00S" from any point on the TV screen. If you are rewinding the tape and the... VCR stops at "0H00M00S M", press REW again to a counter reading of the tape repeatedly. using COUNT RESET REW or FF. once to "ON" using PLAY/x2 ...
...: If you press the FF (fast-forward) button and the time counter never reaches "0H00M00S M" between that point and the end of the tape, the VCR will continue to fastforward to watch a segment of "0H00M00S" from any point on the TV screen. If you are rewinding the tape and the... VCR stops at "0H00M00S M", press REW again to a counter reading of the tape repeatedly. using COUNT RESET REW or FF. once to "ON" using PLAY/x2 ...

Owners Manual
Page 24
.... (See pages 11 - 12..) 4 Press SP/SLP to select the recording tape speed. If you see "L1" or "L2" in the VCR display. Recording starts. RECORDING Recording a TV Program This section explains the basic recording operation. L2: To record via the cable box, make the output...: To record via the cable box, finish the cable box set the desired off time. In step 3, press I .SELECT so that the "VCR" indicator appears in the VCR display, press I .SELECT to about 4 hours appear cyclically. Preparation • Select the video channel (3 or 4) or video input mode on the...
.... (See pages 11 - 12..) 4 Press SP/SLP to select the recording tape speed. If you see "L1" or "L2" in the VCR display. Recording starts. RECORDING Recording a TV Program This section explains the basic recording operation. L2: To record via the cable box, make the output...: To record via the cable box, finish the cable box set the desired off time. In step 3, press I .SELECT so that the "VCR" indicator appears in the VCR display, press I .SELECT to about 4 hours appear cyclically. Preparation • Select the video channel (3 or 4) or video input mode on the...
Owners Manual
Page 25
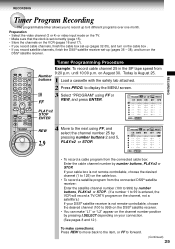
...record a cable program from the connected cable box: Enter the cable channel number by pressing I .SELECT 0 100 DISPLAY REMAIN/ COUNTER COUNT RESET TV/ VCR SP/ SLP REC TIMER SLOW PLAY/x2 PAUSE /STILL CURSOR REW FF STOP PROG. PLAY/x2 STOP ENTER REW 2,9 4 Move to the next using ...satellite program from 9:20 p.m. To make "L1" or "L2" appear on the channel number position by number buttons, PLAY/x2 or STOP. CANCEL VCR Plus+ A.SELECT ENTER CABLE BOX CH EJECT CM SKIP POWER Timer Programming Procedure Number buttons Example: To record cable channel 25 in the SP tape...
...record a cable program from the connected cable box: Enter the cable channel number by pressing I .SELECT 0 100 DISPLAY REMAIN/ COUNTER COUNT RESET TV/ VCR SP/ SLP REC TIMER SLOW PLAY/x2 PAUSE /STILL CURSOR REW FF STOP PROG. PLAY/x2 STOP ENTER REW 2,9 4 Move to the next using ...satellite program from 9:20 p.m. To make "L1" or "L2" appear on the channel number position by number buttons, PLAY/x2 or STOP. CANCEL VCR Plus+ A.SELECT ENTER CABLE BOX CH EJECT CM SKIP POWER Timer Programming Procedure Number buttons Example: To record cable channel 25 in the SP tape...