
Quick Start Guide for 0SU51068 KVM Switch 933198
Page 3
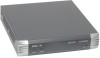
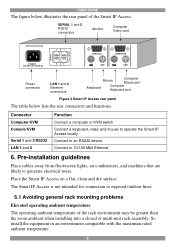
... KVM Console KVM Serial 1 and 2 RS232 LAN 1 and 2 Function Connect a computer or KVM switch Connect a keyboard, video and mouse to operate the Smart IP Access locally Connect to an RS232 device Connect to generate electrical noise. 2 Pre-installation guidelines Place cables away from fluorescent lights, air conditioners, and machines that are likely to 10/100 Mbit Ethernet 4. QUICK INSTALLATION GUIDE The table below lists the rear connectors and functions. LED/Button Function Power Power Indicator Remote...
... KVM Console KVM Serial 1 and 2 RS232 LAN 1 and 2 Function Connect a computer or KVM switch Connect a keyboard, video and mouse to operate the Smart IP Access locally Connect to an RS232 device Connect to generate electrical noise. 2 Pre-installation guidelines Place cables away from fluorescent lights, air conditioners, and machines that are likely to 10/100 Mbit Ethernet 4. QUICK INSTALLATION GUIDE The table below lists the rear connectors and functions. LED/Button Function Power Power Indicator Remote...
Quick Start Guide for 0SU51068 KVM Switch 933198
Page 4
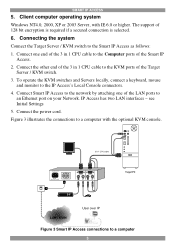
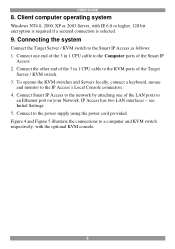
... Smart IP Access. 2. see Initial Settings 5. To operate the KVM switches and Servers locally, connect a keyboard, mouse and monitor to the KVM ports of the 3 in 1 CPU cable to the IP Access's Local Console connectors. 4. IP Access has two LAN interfaces - Connect the other end of the Target Server / KVM switch. 3. com POWER 100-240 VAC 50/60 Hz 1 L A N 2 1 S E R I A L 2 CONSOLE COMPUTER Target PC LAN / WAN User over IP Figure 3 Smart IP Access connections to the Smart IP Access...
... Smart IP Access. 2. see Initial Settings 5. To operate the KVM switches and Servers locally, connect a keyboard, mouse and monitor to the KVM ports of the 3 in 1 CPU cable to the IP Access's Local Console connectors. 4. IP Access has two LAN interfaces - Connect the other end of the Target Server / KVM switch. 3. com POWER 100-240 VAC 50/60 Hz 1 L A N 2 1 S E R I A L 2 CONSOLE COMPUTER Target PC LAN / WAN User over IP Figure 3 Smart IP Access connections to the Smart IP Access...
Quick Start Guide for 0SU51068 KVM Switch 933198
Page 5
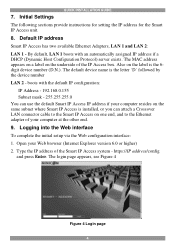
... the underside of the Smart IP Access system - Logging into the Web interface To complete the initial setup via the Web configuration interface: 1. The login page appears, see Figure 4 Figure 4 Login page 4 Initial Settings QUICK INSTALLATION GUIDE The following sections provide instructions for setting the IP address for the Smart IP Access unit. 8. 7. The default device name is the 6digit device number (D.N.). https://IP address/config and press Enter. The MAC address appears on a label on...
... the underside of the Smart IP Access system - Logging into the Web interface To complete the initial setup via the Web configuration interface: 1. The login page appears, see Figure 4 Figure 4 Login page 4 Initial Settings QUICK INSTALLATION GUIDE The following sections provide instructions for setting the IP address for the Smart IP Access unit. 8. 7. The default device name is the 6digit device number (D.N.). https://IP address/config and press Enter. The MAC address appears on a label on...
Quick Start Guide for 0SU51068 KVM Switch 933198
Page 7
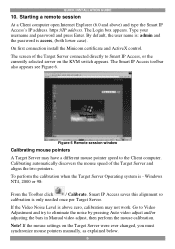
... the mouse settings on the KVM switch appears. QUICK INSTALLATION GUIDE 10. On first connection install the Minicom certificate and ActiveX control. To perform the calibration when the Target Server Operating system is above ) and type the Smart IP Access's IP address. Note! https://IP address. Type your username and password and press Enter. Figure 6 Remote session window Calibrating mouse pointers A Target Server may not work. The Login box appears. Starting a remote session At...
... the mouse settings on the KVM switch appears. QUICK INSTALLATION GUIDE 10. On first connection install the Minicom certificate and ActiveX control. To perform the calibration when the Target Server Operating system is above ) and type the Smart IP Access's IP address. Note! https://IP address. Type your username and password and press Enter. Figure 6 Remote session window Calibrating mouse pointers A Target Server may not work. The Login box appears. Starting a remote session At...
Owner's Manual for 0SU51068 KVM Switch 933197
Page 2
...14.6 Deleting a user ...16 14.7 Blocking a user ...16 15. Maintenance > Restore Factory Settings 21 23. Introduction ...4 3. Terminology ...7 8. Administration > Serial Settings 17 16.1 Show ...18 17. Pre-installation guidelines 6 6.1 Avoiding general rack mounting problems 6 6.2 Rack mounting the IP Access 7 7. System components 4 5. Security > SSL certificates 19 19. Maintenance > Set System Time 20 21. Saving changes and logging out 22 1 Security > Event Log 20 20. Default IP address 10 11. Client computer operating system 8 9. Network > SNMP settings 13...
...14.6 Deleting a user ...16 14.7 Blocking a user ...16 15. Maintenance > Restore Factory Settings 21 23. Introduction ...4 3. Terminology ...7 8. Administration > Serial Settings 17 16.1 Show ...18 17. Pre-installation guidelines 6 6.1 Avoiding general rack mounting problems 6 6.2 Rack mounting the IP Access 7 7. System components 4 5. Security > SSL certificates 19 19. Maintenance > Set System Time 20 21. Saving changes and logging out 22 1 Security > Event Log 20 20. Default IP address 10 11. Client computer operating system 8 9. Network > SNMP settings 13...
Owner's Manual for 0SU51068 KVM Switch 933197
Page 3
... 29. Troubleshooting - Bookmark not defined. 30. User Guide Feedback Error! USER GUIDE 24. Starting a remote session 22 24.1 Taking over a busy remote session 23 24.2 Full screen mode 23 24.3 Moving or hiding the Toolbar 24 24.4 Switching to a different server/device 24 24.5 Changing the performance settings 25 24.6 Adjusting the Video settings 26 24.6.1 Refresh ...26 24.6.2 Manual Video Adjust 26 24.6.3 Auto Video...
... 29. Troubleshooting - Bookmark not defined. 30. User Guide Feedback Error! USER GUIDE 24. Starting a remote session 22 24.1 Taking over a busy remote session 23 24.2 Full screen mode 23 24.3 Moving or hiding the Toolbar 24 24.4 Switching to a different server/device 24 24.5 Changing the performance settings 25 24.6 Adjusting the Video settings 26 24.6.1 Refresh ...26 24.6.2 Manual Video Adjust 26 24.6.3 Auto Video...
Owner's Manual for 0SU51068 KVM Switch 933197
Page 5
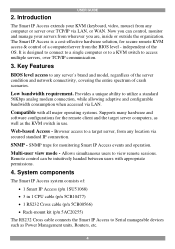
... use. Key Features BIOS level access to view remote sessions. Remote control can control, monitor and manage your KVM (keyboard, video, mouse) from any location via secured standard IP connection. Compatible with appropriate permissions. 4. independent of crash scenarios. Web-based Access - System components The Smart IP Access system consists of a computer/server from wherever you can be intuitively handed between users with all major operating systems. Supports many hardware and software configurations...
... use. Key Features BIOS level access to view remote sessions. Remote control can control, monitor and manage your KVM (keyboard, video, mouse) from any location via secured standard IP connection. Compatible with appropriate permissions. 4. independent of crash scenarios. Web-based Access - System components The Smart IP Access system consists of a computer/server from wherever you can be intuitively handed between users with all major operating systems. Supports many hardware and software configurations...
Owner's Manual for 0SU51068 KVM Switch 933197
Page 6
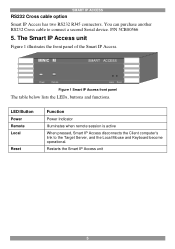
... the front panel of the Smart IP Access. LED/Button Power Remote Local Reset Function Power Indicator Illuminates when remote session is active When pressed, Smart IP Access disconnects the Client computer's link to connect a second Serial device. Restarts the Smart IP Access unit 5 MINICOM SMARTIPACCESS Power Remote Local Reset Figure 1 Smart IP Access front panel The table below lists the LEDs, buttons and functions. SMART IP ACCESS RS232 Cross cable option Smart IP Access has two RS232 RJ45 connectors...
... the front panel of the Smart IP Access. LED/Button Power Remote Local Reset Function Power Indicator Illuminates when remote session is active When pressed, Smart IP Access disconnects the Client computer's link to connect a second Serial device. Restarts the Smart IP Access unit 5 MINICOM SMARTIPACCESS Power Remote Local Reset Figure 1 Smart IP Access front panel The table below lists the LEDs, buttons and functions. SMART IP ACCESS RS232 Cross cable option Smart IP Access has two RS232 RJ45 connectors...
Owner's Manual for 0SU51068 KVM Switch 933197
Page 7
... www.minicom.com POWER 100-240 VAC 50/60 Hz 1 L A N 2 1 S E R I A L 2 CONSOLE COMPUTER Power connector LAN 1 and 2 Ethernet connectors Mouse Computer Mouse port Keyboard Computer Keyboard port Figure 2 Smart IP Access rear panel The table below illustrates the rear panel of the rack environment may be greater than the room ambient when installing into a closed or multi-unit rack assembly. Connector Computer KVM Console KVM Serial 1 and 2 RS232...
... www.minicom.com POWER 100-240 VAC 50/60 Hz 1 L A N 2 1 S E R I A L 2 CONSOLE COMPUTER Power connector LAN 1 and 2 Ethernet connectors Mouse Computer Mouse port Keyboard Computer Keyboard port Figure 2 Smart IP Access rear panel The table below illustrates the rear panel of the rack environment may be greater than the room ambient when installing into a closed or multi-unit rack assembly. Connector Computer KVM Console KVM Serial 1 and 2 RS232...

Owner's Manual for 0SU51068 KVM Switch 933197
Page 8
... Mount the equipment in the rack in this guide. There are accessed remotely via the Smart IP Access. Screw the bracket to the rack. The PC running a remote Smart IP Access session The process of accessing and controlling Target Servers connected to side of Smart IP Access MINICOM SMARTIPACCESS Power Remote Local Reset Figure 3 Rack mounting the Smart IP Access 7. Terminology Screw this section to Smart IP Access from a User station 7 use of power strips). 6.2 Rack mounting the IP Access Rack mount the Smart IP Access using...
... Mount the equipment in the rack in this guide. There are accessed remotely via the Smart IP Access. Screw the bracket to the rack. The PC running a remote Smart IP Access session The process of accessing and controlling Target Servers connected to side of Smart IP Access MINICOM SMARTIPACCESS Power Remote Local Reset Figure 3 Rack mounting the Smart IP Access 7. Terminology Screw this section to Smart IP Access from a User station 7 use of power strips). 6.2 Rack mounting the IP Access Rack mount the Smart IP Access using...
Owner's Manual for 0SU51068 KVM Switch 933197
Page 9
... Settings 5. Connect to the IP Access's Local Console connectors. 4. Connect the other end of the 3 in 1 CPU cable to the Smart IP Access as follows: 1. IP Access has two LAN interfaces - Connect Smart IP Access to a computer and KVM switch respectively, with IE 6.0 or higher. 128 bit encryption is required if a secured connection is selected. 9. USER GUIDE 8. To operate the KVM switches and Servers locally, connect a keyboard, mouse and monitor to the power supply using the power...
... Settings 5. Connect to the IP Access's Local Console connectors. 4. Connect the other end of the 3 in 1 CPU cable to the Smart IP Access as follows: 1. IP Access has two LAN interfaces - Connect Smart IP Access to a computer and KVM switch respectively, with IE 6.0 or higher. 128 bit encryption is required if a secured connection is selected. 9. USER GUIDE 8. To operate the KVM switches and Servers locally, connect a keyboard, mouse and monitor to the power supply using the power...
Owner's Manual for 0SU51068 KVM Switch 933197
Page 11
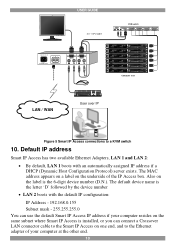
... D L360 9. 1 - USER GUIDE h p1 9 2 5 Au t o 1 2 3 in 1 CPU cable www.minicom.com POWER 100-240 VAC 50/60 Hz 1 L A N 2 1 S E R I A L 2 CONSOLE COMPUTER KVM switch SERIAL MOUSE STATION 2 POWER KB PS/2 MOUSE SCREEN COMPUTER 5 COMPUTER 1 COMPUTER 6 COMPUTER 2 COMPUTER 7 COMPUTER 3 COMPUTER 8 COMPUTER 4 ProLiant D L360 9. 1 - GB 10k ULT RA2 SCSI Computer rack LAN / WAN User over IP Figure 5 Smart IP Access connections to the Ethernet adapter of the IP Access box. The default device...
... D L360 9. 1 - USER GUIDE h p1 9 2 5 Au t o 1 2 3 in 1 CPU cable www.minicom.com POWER 100-240 VAC 50/60 Hz 1 L A N 2 1 S E R I A L 2 CONSOLE COMPUTER KVM switch SERIAL MOUSE STATION 2 POWER KB PS/2 MOUSE SCREEN COMPUTER 5 COMPUTER 1 COMPUTER 6 COMPUTER 2 COMPUTER 7 COMPUTER 3 COMPUTER 8 COMPUTER 4 ProLiant D L360 9. 1 - GB 10k ULT RA2 SCSI Computer rack LAN / WAN User over IP Figure 5 Smart IP Access connections to the Ethernet adapter of the IP Access box. The default device...
Owner's Manual for 0SU51068 KVM Switch 933197
Page 13
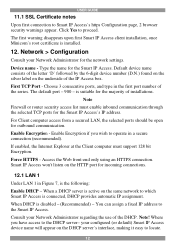
... router security access list must support 128 bit Encryption. Device name - Force HTTPS - Note! USER GUIDE 11.1 SSL Certificate notes Upon first connection to proceed. Click Yes to Smart IP Access's https Configuration page, 2 browser security warnings appear. Type the name for the Smart IP Access's IP address. Enable Encryption if you have access to operate in the first port number of the series. When a DHCP server is the following: Enable DHCP - The default port...
... router security access list must support 128 bit Encryption. Device name - Force HTTPS - Note! USER GUIDE 11.1 SSL Certificate notes Upon first connection to proceed. Click Yes to Smart IP Access's https Configuration page, 2 browser security warnings appear. Type the name for the Smart IP Access's IP address. Enable Encryption if you have access to operate in the first port number of the series. When a DHCP server is the following: Enable DHCP - The default port...
Owner's Manual for 0SU51068 KVM Switch 933197
Page 14
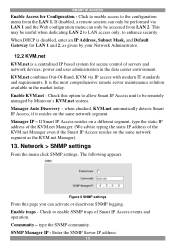
... remote server maintenance solution available in the data center environment. SNMP Manager IP - When DHCP is disabled, enter an IP Address, Subnet Mask, and Default Gateway for LAN 1 and 2, as the KVM.net Manager). 13. It is a centralized IP based system for Configuration - Enable KVM.net - The following appears. Check to be accessed from the LAN 1. Manager IP - If Smart IP Access resides on a different segment, type the static IP address of the KVM...
... remote server maintenance solution available in the data center environment. SNMP Manager IP - When DHCP is disabled, enter an IP Address, Subnet Mask, and Default Gateway for LAN 1 and 2, as the KVM.net Manager). 13. It is a centralized IP based system for Configuration - Enable KVM.net - The following appears. Check to be accessed from the LAN 1. Manager IP - If Smart IP Access resides on a different segment, type the static IP address of the KVM...
Owner's Manual for 0SU51068 KVM Switch 933197
Page 17
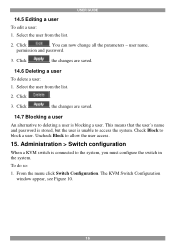
... to deleting a user is blocking a user. Click , the changes are saved. 14.7 Blocking a user An alternative to allow the user access. 15. Check Block to the system, you must configure the switch in the system. From the menu click Switch Configuration. Click . 3. 14.5 Editing a user To edit a user: 1. You can now change all the parameters - Administration > Switch configuration When a KVM switch is unable to access the system. user name, permission and password. 3. The KVM Switch Configuration window...
... to deleting a user is blocking a user. Click , the changes are saved. 14.7 Blocking a user An alternative to allow the user access. 15. Check Block to the system, you must configure the switch in the system. From the menu click Switch Configuration. Click . 3. 14.5 Editing a user To edit a user: 1. You can now change all the parameters - Administration > Switch configuration When a KVM switch is unable to access the system. user name, permission and password. 3. The KVM Switch Configuration window...

Owner's Manual for 0SU51068 KVM Switch 933197
Page 22
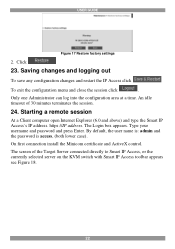
... enabled (in the Configuration page see page 13), all the information added by email or download them from the Minicom Web site. To restore factory settings: 1. The upgrade starts. From the menu select Restore Factory Settings. On completion, click . The network settings remain intact. 22. Once reset the data cannot be erased: User settings, KVM switch settings, mouse and video adjustments and RS232 settings. Restore Factory Settings appears see Figure 16. Maintenance > Firmware Upgrade Upgrade the Smart IP Access firmware...
... enabled (in the Configuration page see page 13), all the information added by email or download them from the Minicom Web site. To restore factory settings: 1. The upgrade starts. From the menu select Restore Factory Settings. On completion, click . The network settings remain intact. 22. Once reset the data cannot be erased: User settings, KVM switch settings, mouse and video adjustments and RS232 settings. Restore Factory Settings appears see Figure 16. Maintenance > Firmware Upgrade Upgrade the Smart IP Access firmware...
Owner's Manual for 0SU51068 KVM Switch 933197
Page 23
... type the Smart IP Access's IP address. USER GUIDE Figure 17 Restore factory settings 2. https://IP address. An idle timeout of the Target Server connected directly to Smart IP Access, or the currently selected server on the KVM switch with Smart IP Access toolbar appears see Figure 18. 22 By default, the user name is: admin and the password is access, (both lower case). Only one Administrator can log into the configuration area at a time. The Login box...
... type the Smart IP Access's IP address. USER GUIDE Figure 17 Restore factory settings 2. https://IP address. An idle timeout of the Target Server connected directly to Smart IP Access, or the currently selected server on the KVM switch with Smart IP Access toolbar appears see Figure 18. 22 By default, the user name is: admin and the password is access, (both lower case). Only one Administrator can log into the configuration area at a time. The Login box...
Owner's Manual for 0SU51068 KVM Switch 933197
Page 32
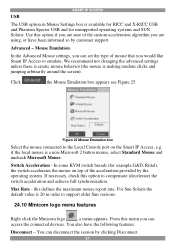
... Specter USB and for example G&D, Rittal), the switch accelerates the mouse on the Smart IP Access, e.g. Advanced - We recommend not changing the advanced settings unless there is erratic mouse behavior (the mouse is a non-Microsoft 2 button mouse, select Standard Mouse and uncheck Microsoft Mouse. Mouse Emulation In the Advanced Mouse settings, you would like Smart IP Access to support older Sun versions. 24...
... Specter USB and for example G&D, Rittal), the switch accelerates the mouse on the Smart IP Access, e.g. Advanced - We recommend not changing the advanced settings unless there is erratic mouse behavior (the mouse is a non-Microsoft 2 button mouse, select Standard Mouse and uncheck Microsoft Mouse. Mouse Emulation In the Advanced Mouse settings, you would like Smart IP Access to support older Sun versions. 24...
Owner's Manual for 0SU51068 KVM Switch 933197
Page 33
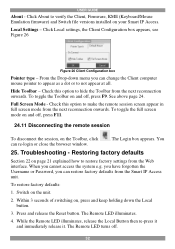
... Toolbar, click can restore factory defaults from the Web interface. When you can change the Client computer mouse pointer to appear as a dot or to verify the Client, Firmware, KME (Keyboard/Mouse Emulation firmware) and Switch file versions installed on , press and keep holding down menu you cannot access the system e.g. Switch on and off . 32 Within 3 seconds of switching on your Smart IP Access. The Remote LED illuminates. 4.
... Toolbar, click can restore factory defaults from the Web interface. When you can change the Client computer mouse pointer to appear as a dot or to verify the Client, Firmware, KME (Keyboard/Mouse Emulation firmware) and Switch file versions installed on , press and keep holding down menu you cannot access the system e.g. Switch on and off . 32 Within 3 seconds of switching on your Smart IP Access. The Remote LED illuminates. 4.
Owner's Manual for 0SU51068 KVM Switch 933197
Page 34
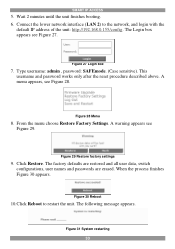
... 29 Restore factory settings 9. Type username: admin , password: SAFEmode. (Case sensitive). Figure 28 Menu 8. Figure 31 System restarting 33 From the menu choose Restore Factory Settings. Figure 30 Reboot 10.Click Reboot to the network, and login with the default IP address of the unit: http://192.168.0.155/config. The following message appears. Wait 2 minutes until the unit finishes booting. 6. The factory defaults are restored and all user data, switch configurations, user names and passwords are...
... 29 Restore factory settings 9. Type username: admin , password: SAFEmode. (Case sensitive). Figure 28 Menu 8. Figure 31 System restarting 33 From the menu choose Restore Factory Settings. Figure 30 Reboot 10.Click Reboot to the network, and login with the default IP address of the unit: http://192.168.0.155/config. The following message appears. Wait 2 minutes until the unit finishes booting. 6. The factory defaults are restored and all user data, switch configurations, user names and passwords are...
