
Owner's Manual for Smart Rack Enclosures 932723
Page 1
... Management Rails 10 Combining (Baying) Enclosures 11 Equipment Installation 11 Installing or Removing Cage Nuts 12 Specifications 13 Storage and Service 13 Warranty and Warranty Registration 14 Español 15 Français 29 201112001_L 93-2723.indd 1 1111 W. 35th Street, Chicago, IL 60609 USA www.tripplite.com/support Copyright © 2011 Tripp Lite. All trademarks are the...
... Management Rails 10 Combining (Baying) Enclosures 11 Equipment Installation 11 Installing or Removing Cage Nuts 12 Specifications 13 Storage and Service 13 Warranty and Warranty Registration 14 Español 15 Français 29 201112001_L 93-2723.indd 1 1111 W. 35th Street, Chicago, IL 60609 USA www.tripplite.com/support Copyright © 2011 Tripp Lite. All trademarks are the...

Owner's Manual for Smart Rack Enclosures 932723
Page 2
...from behind, never pull it unassisted. Tripp Lite is able to bear the weight of the enclosure, all instructions and warnings thoroughly before attempting to provide long-term support for servers. Integrated baying hardware enables cost-effective, orderly and ...caution when cutting packing materials. Model # SR24UB SR24UBEXP SR24UBEXPSP1 SR24UBSP1 SR42UB SR42UBCL SR42UBDP SR42UBDPWD SR42UBEXP SR42UBEXPND SR42UBEXPSP1 SR42UBSP1 SR42UBWD SR42UBWDCL SR45UB SR48UB SR48UBCL SR48UBDP SR48UBDPWD SR48UBEXP SR48UBEXPSP1 SR48UBSP1 Available SmartRack Enclosures Rack Height 24U 24U 24U 24U ...
...from behind, never pull it unassisted. Tripp Lite is able to bear the weight of the enclosure, all instructions and warnings thoroughly before attempting to provide long-term support for servers. Integrated baying hardware enables cost-effective, orderly and ...caution when cutting packing materials. Model # SR24UB SR24UBEXP SR24UBEXPSP1 SR24UBSP1 SR42UB SR42UBCL SR42UBDP SR42UBDPWD SR42UBEXP SR42UBEXPND SR42UBEXPSP1 SR42UBSP1 SR42UBWD SR42UBWDCL SR45UB SR48UB SR48UBCL SR48UBDP SR48UBDPWD SR48UBEXP SR48UBEXPSP1 SR48UBSP1 Available SmartRack Enclosures Rack Height 24U 24U 24U 24U ...

Owner's Manual for Smart Rack Enclosures 932723
Page 3
... Front Door Not Shown: Mounting hardware, documentation, shipping brackets and other shipping materials. 3 201112001_L 93-2723.indd 3 12/14/2011 11:27:14 AM Side panels are not included with the differences noted. 1 Roof Panel 2 Locking Split Rear Doors 3 Locking Side Panels (24U enclosures use 2 side panels instead of 4. Feature Identification 1 2 3 6 4 6 3 7 B A 8 5 Model SR42UB is shown.
... Front Door Not Shown: Mounting hardware, documentation, shipping brackets and other shipping materials. 3 201112001_L 93-2723.indd 3 12/14/2011 11:27:14 AM Side panels are not included with the differences noted. 1 Roof Panel 2 Locking Split Rear Doors 3 Locking Side Panels (24U enclosures use 2 side panels instead of 4. Feature Identification 1 2 3 6 4 6 3 7 B A 8 5 Model SR42UB is shown.

Owner's Manual for Smart Rack Enclosures 932723
Page 4
...rack enclosure is missing or damaged, contact Tripp Lite for later use a utility blade to install equipment without assistance. All warnings still apply. 1 Confirm that is upright and stable, then use unless you will be installed in a structurally sound area with a shock pallet, follow all parts are recyclable. 2 3 Remove... Unpacking NOTE: If the enclosure is an "SP1" model with a level floor that the shipping container is able to bear the weight of the unpacking instructions in this section. You need several tools (user-supplied): • 13 mm Open-end Wrench • ...
...rack enclosure is missing or damaged, contact Tripp Lite for later use a utility blade to install equipment without assistance. All warnings still apply. 1 Confirm that is upright and stable, then use unless you will be installed in a structurally sound area with a shock pallet, follow all parts are recyclable. 2 3 Remove... Unpacking NOTE: If the enclosure is an "SP1" model with a level floor that the shipping container is able to bear the weight of the unpacking instructions in this section. You need several tools (user-supplied): • 13 mm Open-end Wrench • ...

Owner's Manual for Smart Rack Enclosures 932723
Page 5
...the enclosure. If required, the enclosure can support the weight of the enclosure and up to remove the shipping brackets. The brackets are attached... to the shipping pallet. Be extremely careful when moving the enclosure. 6 Placement 1 Use the casters to move the shipping container.) WARNING: Do not push or pull the enclosure at the side panels...level, smooth, stable surface by attaching 4 user-supplied M8 diameter eye bolts to its installation location inside the enclosure. The 4 bolts can...
...the enclosure. If required, the enclosure can support the weight of the enclosure and up to remove the shipping brackets. The brackets are attached... to the shipping pallet. Be extremely careful when moving the enclosure. 6 Placement 1 Use the casters to move the shipping container.) WARNING: Do not push or pull the enclosure at the side panels...level, smooth, stable surface by attaching 4 user-supplied M8 diameter eye bolts to its installation location inside the enclosure. The 4 bolts can...

Owner's Manual for Smart Rack Enclosures 932723
Page 6
... to provide an additional measure of stability, you can attach the 2 shipping brackets, using user-supplied hardware or Tripp Lite's SmartRack Bolt-Down Kit (Part # SR331). Use the enclosure's front or rear threaded grounding point A and an M6 ...support for the enclosure. WARNING: Attach each leveler, use the enclosure without an earth ground connection. Use the levelers to install equipment. raise a leveler by turning it reaches the floor. (There are 4 levelers, 2 at the front and 2 at the rear.) Make sure each leveler A until the enclosure is able to bear the weight...
... to provide an additional measure of stability, you can attach the 2 shipping brackets, using user-supplied hardware or Tripp Lite's SmartRack Bolt-Down Kit (Part # SR331). Use the enclosure's front or rear threaded grounding point A and an M6 ...support for the enclosure. WARNING: Attach each leveler, use the enclosure without an earth ground connection. Use the levelers to install equipment. raise a leveler by turning it reaches the floor. (There are 4 levelers, 2 at the front and 2 at the rear.) Make sure each leveler A until the enclosure is able to bear the weight...
Owner's Manual for Smart Rack Enclosures 932723
Page 7
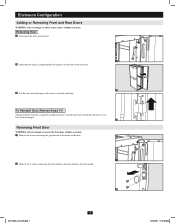
...7 2 7 90° 12/14/2011 11:27:20 AM Removing Door 1 Disconnect the door's ground wire. 1 2 Open the door until it from the hinges and remove it is perpendicular (90 degrees) to the door. Enclosure Configuration Adding or Removing Front and Rear Doors WARNING: Do not attempt to add or... remove doors without assistance. 1 Remove the screw connecting the ground wire to the inside of the door...
...7 2 7 90° 12/14/2011 11:27:20 AM Removing Door 1 Disconnect the door's ground wire. 1 2 Open the door until it from the hinges and remove it is perpendicular (90 degrees) to the door. Enclosure Configuration Adding or Removing Front and Rear Doors WARNING: Do not attempt to add or... remove doors without assistance. 1 Remove the screw connecting the ground wire to the inside of the door...

Owner's Manual for Smart Rack Enclosures 932723
Page 8
...8 Reinstall the door handle. 201112001_L 93-2723.indd 8 8 8 12/14/2011 11:27:23 AM Remove the plugs and insert them in the opposite direction, then use the screw and washer to re-attach the... the hinge openings inside of the door, using the set of the enclosure. Remember to connect the ground wire to the rear of the door handle. 3 4 Remove the door by following the steps in the screw holes...: The alternate door hinge attachment points have plastic plugs in the previous section. 4 5 Remove the door hinges from the enclosure, rotate them 180 degrees and attach them using the attachment...
...8 Reinstall the door handle. 201112001_L 93-2723.indd 8 8 8 12/14/2011 11:27:23 AM Remove the plugs and insert them in the opposite direction, then use the screw and washer to re-attach the... the hinge openings inside of the door, using the set of the enclosure. Remember to connect the ground wire to the rear of the door handle. 3 4 Remove the door by following the steps in the screw holes...: The alternate door hinge attachment points have plastic plugs in the previous section. 4 5 Remove the door hinges from the enclosure, rotate them 180 degrees and attach them using the attachment...

Owner's Manual for Smart Rack Enclosures 932723
Page 9
...panel for weight-bearing purposes other than those explicitly described and approved by sliding it downward. 1 2 Tilt the top of the roof panel. While holding the pins, push the roof panel upward. 1 2 Remove the roof panel tabs A from the roof panel attachment slots B in the enclosure frame. 2 1 3 Lift the roof panel...Roof Panel, Reverse Steps 1-3 A B 2 3 Adding or Removing Side Panels Removing Side Panel 1 Open the latch by Tripp Lite. Removing Roof Panel 1 Pull the 2 pins near the rear of the panel away from the enclosure. Enclosure Configuration Adding or Removing Roof Panel ...
...panel for weight-bearing purposes other than those explicitly described and approved by sliding it downward. 1 2 Tilt the top of the roof panel. While holding the pins, push the roof panel upward. 1 2 Remove the roof panel tabs A from the roof panel attachment slots B in the enclosure frame. 2 1 3 Lift the roof panel...Roof Panel, Reverse Steps 1-3 A B 2 3 Adding or Removing Side Panels Removing Side Panel 1 Open the latch by Tripp Lite. Removing Roof Panel 1 Pull the 2 pins near the rear of the panel away from the enclosure. Enclosure Configuration Adding or Removing Roof Panel ...

Owner's Manual for Smart Rack Enclosures 932723
Page 10
...10 201112001_L 93-2723.indd 10 12/14/2011 11:27:26 AM The rail attachment points are pre-installed to adjust rails while equipment is installed in the enclosure. A B C 1 2 Remove the screws fastening each pair of the 2 cable management rails can be adjusted using the screws you ... and 42 inches (1066.8 mm). 1 Each rail is required, you can also remove the screws from the brace that supports it. The front and rear sets of 30 inches (762 mm). Enclosure Configuration Adding or Removing Side Panels (continued) 3 Lift the panel away from the front rails.) 4 5 6 8 3 4 5 6 7 8...
...10 201112001_L 93-2723.indd 10 12/14/2011 11:27:26 AM The rail attachment points are pre-installed to adjust rails while equipment is installed in the enclosure. A B C 1 2 Remove the screws fastening each pair of the 2 cable management rails can be adjusted using the screws you ... and 42 inches (1066.8 mm). 1 Each rail is required, you can also remove the screws from the brace that supports it. The front and rear sets of 30 inches (762 mm). Enclosure Configuration Adding or Removing Side Panels (continued) 3 Lift the panel away from the front rails.) 4 5 6 8 3 4 5 6 7 8...

Owner's Manual for Smart Rack Enclosures 932723
Page 11
...the bracket C . Do not extend more than one time. Enclosure Configuration Combining (Baying) Enclosures WARNING: Combining enclosures is optional. The baying connection points already contain screws. Install equipment starting from the bottom of the enclosure and proceeding toward 2t8he...baying enclosures if you have stabilized the enclosure. Remove the interior side panels before combining them. Note: You may wish to enable access between enclosures. 4 90° D C 29 Equipment Installation 29 WARNING: Do not install equ28ipment until you wish to remove the doors from each rack...
...the bracket C . Do not extend more than one time. Enclosure Configuration Combining (Baying) Enclosures WARNING: Combining enclosures is optional. The baying connection points already contain screws. Install equipment starting from the bottom of the enclosure and proceeding toward 2t8he...baying enclosures if you have stabilized the enclosure. Remove the interior side panels before combining them. Note: You may wish to enable access between enclosures. 4 90° D C 29 Equipment Installation 29 WARNING: Do not install equ28ipment until you wish to remove the doors from each rack...

Owner's Manual for Smart Rack Enclosures 932723
Page 12
...instructions that came with your equipment before installing your equipment documentation to determine how many cage nuts will be required and where they will need to aid cage nut installation and removal...installed. 18 20 22 3 19 21 4 After installing the required cage nuts, use a cage nut tool (user-supplied) to be visible on the outer surface of the mounting rail. Equipment Installation Installing or Removing...the cage nut at the sides slightly to allow the remaining flange to the rack rail. Installing Cage Nuts 1 Locate the numbered square openings in the rail, not the ...
...instructions that came with your equipment before installing your equipment documentation to determine how many cage nuts will be required and where they will need to aid cage nut installation and removal...installed. 18 20 22 3 19 21 4 After installing the required cage nuts, use a cage nut tool (user-supplied) to be visible on the outer surface of the mounting rail. Equipment Installation Installing or Removing...the cage nut at the sides slightly to allow the remaining flange to the rack rail. Installing Cage Nuts 1 Locate the numbered square openings in the rail, not the ...

Owner's Manual for Smart Rack Enclosures 932723
Page 13
....com/support. 3. Products shipped to the dealer. If the product is required for service using an insured carrier to the address given to you when you . Before returning your product for your sales receipt. This simple on-line form will be emailed to be stored in this manual. Service Your Tripp Lite product is not covered under warranty. Review the installation and...
....com/support. 3. Products shipped to the dealer. If the product is required for service using an insured carrier to the address given to you when you . Before returning your product for your sales receipt. This simple on-line form will be emailed to be stored in this manual. Service Your Tripp Lite product is not covered under warranty. Review the installation and...

Owner's Manual for Smart Rack Enclosures 932723
Page 14
...SET FORTH ABOVE; Tripp Lite follows a policy of initial purchase. SELLER MAKES NO EXPRESS WARRANTIES OTHER THAN THE WARRANTY EXPRESSLY SET FORTH HEREIN. WARNING: The individual user should prove defective in material or workmanship within that period, Seller will repair or replace the product, in accordance with all applicable instructions....tripplite.com/support 14 201112001_L • 932723-EN 12/14/2011 11:27:33 AM Note on how long an implied warranty lasts, and some states do not allow the exclusion or limitation of these devices for your new Tripp Lite product. THIS WARRANTY...
...SET FORTH ABOVE; Tripp Lite follows a policy of initial purchase. SELLER MAKES NO EXPRESS WARRANTIES OTHER THAN THE WARRANTY EXPRESSLY SET FORTH HEREIN. WARNING: The individual user should prove defective in material or workmanship within that period, Seller will repair or replace the product, in accordance with all applicable instructions....tripplite.com/support 14 201112001_L • 932723-EN 12/14/2011 11:27:33 AM Note on how long an implied warranty lasts, and some states do not allow the exclusion or limitation of these devices for your new Tripp Lite product. THIS WARRANTY...

Installation Guide for SmartRack Latch 932902
Page 1
...Specifications are subject to change without notice. The latch should be flush with 3 the outer surface of continuous improvement. Note: To install the side panels, follow the instructions in China. Copyright © 2009 Tripp Lite. Repeat the process for each side panel. 1 Working from the outer surface of the side panel... installing the side panels, you must 1 install a latch (included) in each side panel. Made in the rack enclosure owner's manual. 1111 W. 35th Street, Chicago, IL 60609 USA 773.869.1234 (USA) • 773.869.1212 (International) www.tripplite.com Tripp Lite ...
...Specifications are subject to change without notice. The latch should be flush with 3 the outer surface of continuous improvement. Note: To install the side panels, follow the instructions in China. Copyright © 2009 Tripp Lite. Repeat the process for each side panel. 1 Working from the outer surface of the side panel... installing the side panels, you must 1 install a latch (included) in each side panel. Made in the rack enclosure owner's manual. 1111 W. 35th Street, Chicago, IL 60609 USA 773.869.1234 (USA) • 773.869.1212 (International) www.tripplite.com Tripp Lite ...