
Owners Manual
Page 1
... service and ultimate peace of Contents 1. Enclosure Configuration 5 5.1 Door Locks 5 5.2 Cable Access & Management 5 5.3 Reversing the Front Door 5 5.4 Mounting Rails 6 5.5 Adjusting Mounting Rail Depth 6 6. Wall Mounting the Enclosure 6 6.1 Mounting 6 7. Optional Patch Panel Installation 7 9. Enclosure Installation 4 4.1 Preparation 4 4.2 Unpacking 4 5. Specifications 7 10. www.tripplite.com/warranty 1111 W. 35th Street, Chicago, IL 60609 USA • www.tripplite.com/support Copyright © 2015 Tripp Lite...
... service and ultimate peace of Contents 1. Enclosure Configuration 5 5.1 Door Locks 5 5.2 Cable Access & Management 5 5.3 Reversing the Front Door 5 5.4 Mounting Rails 6 5.5 Adjusting Mounting Rail Depth 6 6. Wall Mounting the Enclosure 6 6.1 Mounting 6 7. Optional Patch Panel Installation 7 9. Enclosure Installation 4 4.1 Preparation 4 4.2 Unpacking 4 5. Specifications 7 10. www.tripplite.com/warranty 1111 W. 35th Street, Chicago, IL 60609 USA • www.tripplite.com/support Copyright © 2015 Tripp Lite...

Owners Manual
Page 2
... Safety Instructions SAVE THESE INSTRUCTIONS This Manual contains instructions and warnings that will void the warranty. • Do not reship the enclosure with additional equipment unless the enclosure was shipped with air, oxygen or nitrous oxide. 2. Use caution when handling the enclosure. The enclosure could be installed nearby. • Use caution when cutting packing materials. Tripp Lite...
... Safety Instructions SAVE THESE INSTRUCTIONS This Manual contains instructions and warnings that will void the warranty. • Do not reship the enclosure with additional equipment unless the enclosure was shipped with air, oxygen or nitrous oxide. 2. Use caution when handling the enclosure. The enclosure could be installed nearby. • Use caution when cutting packing materials. Tripp Lite...

Owners Manual
Page 3
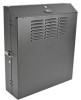
Feature Identification 6 5 3 8 2 5 4 8 7 7 6 7 6 1 SRWF5U Features for all other models are similar, except the SRWF2U series does not have a top panel door. 1 Front Door 2 Top Panel Door 3 Horizontal Mounting Rails 4 Vertical Mounting Bracket 5 Patch Panel Mounting Bracket 6 Cable Access Holes 7 Vents 8 Wall-Mounting Slots 3 SRWF2U 3.
Feature Identification 6 5 3 8 2 5 4 8 7 7 6 7 6 1 SRWF5U Features for all other models are similar, except the SRWF2U series does not have a top panel door. 1 Front Door 2 Top Panel Door 3 Horizontal Mounting Rails 4 Vertical Mounting Bracket 5 Patch Panel Mounting Bracket 6 Cable Access Holes 7 Vents 8 Wall-Mounting Slots 3 SRWF2U 3.

Owners Manual
Page 4
... period before installation, follow all parts are present. 4. Warning: Rack enclosures can be installed nearby. You need several tools: • Level • Phillips-head Screwdriver • Appropriate tools for any other enclosures and/or equipment that is missing or damaged, contact Tripp Lite for wall mounting (not included) 4.2 Unpacking Use at a time. Read All Instructions and Warnings...
... period before installation, follow all parts are present. 4. Warning: Rack enclosures can be installed nearby. You need several tools: • Level • Phillips-head Screwdriver • Appropriate tools for any other enclosures and/or equipment that is missing or damaged, contact Tripp Lite for wall mounting (not included) 4.2 Unpacking Use at a time. Read All Instructions and Warnings...

Owners Manual
Page 5
...models have a front door latch that can be reversed by the included key. SRWF2U shown TOP VIEW SRWF5U shown TOP VIEW BOTTOM VIEW SRWF2U shown BOTTOM VIEW SRWF5U shown 5.3 Reversing the Front Door In order to accommodate various rack installations, the front door can be sure to refill unused screw holes. To remove...LOCK HINGE HINGE HINGE HINGE LATCH LATCH LOCK LOCK 5 Enclosure Configuration Before installation, be locked with a user-supplied padlock for extra security. 5.2 Cable Access and Management The top and bottom panels of the unit that secure the latch, lock and hinges ...
...models have a front door latch that can be reversed by the included key. SRWF2U shown TOP VIEW SRWF5U shown TOP VIEW BOTTOM VIEW SRWF2U shown BOTTOM VIEW SRWF5U shown 5.3 Reversing the Front Door In order to accommodate various rack installations, the front door can be sure to refill unused screw holes. To remove...LOCK HINGE HINGE HINGE HINGE LATCH LATCH LOCK LOCK 5 Enclosure Configuration Before installation, be locked with a user-supplied padlock for extra security. 5.2 Cable Access and Management The top and bottom panels of the unit that secure the latch, lock and hinges ...

Owners Manual
Page 6
... for equipment installation instructions.) Warning: Be sure to the enclosure with the holes in Step 1. Warning: The area you need is recommended. For the weight of 20 inches (508 mm). Do not attempt to the wall, or in the diagram. Do not adjust the mounting rails unless your mounting areas precisely. Enclosure Configuration (continued) 5.4 Mounting...
... for equipment installation instructions.) Warning: Be sure to the enclosure with the holes in Step 1. Warning: The area you need is recommended. For the weight of 20 inches (508 mm). Do not attempt to the wall, or in the diagram. Do not adjust the mounting rails unless your mounting areas precisely. Enclosure Configuration (continued) 5.4 Mounting...

Owners Manual
Page 7
...Panel Installation The unit comes with your equipment before installing your equipment to 914 mm) Place the washers between the screws and the equipment mounting brackets. Specifications Model Dimensions (HxWxD) Unit Weight...x 9.7" (1092 x 651 x 247 mm) 55 lb (25 kg) SRWF6U 28.8" x 25.6" x 11.5" (732 x 651 x 292 mm)...panel mounting bracket. 9. 7. A single rack unit includes the space occupied by the numbered hole and the holes directly above and below. 2 2 3 3 1 Rack Unit 4 4 WARNING: Follow the instructions in your equipment documentation to ensure proper installation...
...Panel Installation The unit comes with your equipment before installing your equipment to 914 mm) Place the washers between the screws and the equipment mounting brackets. Specifications Model Dimensions (HxWxD) Unit Weight...x 9.7" (1092 x 651 x 247 mm) 55 lb (25 kg) SRWF6U 28.8" x 25.6" x 11.5" (732 x 651 x 292 mm)...panel mounting bracket. 9. 7. A single rack unit includes the space occupied by the numbered hole and the holes directly above and below. 2 2 3 3 1 Rack Unit 4 4 WARNING: Follow the instructions in your equipment documentation to ensure proper installation...

Owners Manual
Page 8
... LIMITED IN DURATION TO THE WARRANTY PERIOD SET FORTH ABOVE; See website for this product, always refer to use whether this manual. If the problem requires service, visit www.tripplite.com/support and click the Product Returns link. Tripp Lite has a policy of the instructions. 2. If the problem continues, do not allow limitations on the product nameplate label, along with other rights...
... LIMITED IN DURATION TO THE WARRANTY PERIOD SET FORTH ABOVE; See website for this product, always refer to use whether this manual. If the problem requires service, visit www.tripplite.com/support and click the Product Returns link. Tripp Lite has a policy of the instructions. 2. If the problem continues, do not allow limitations on the product nameplate label, along with other rights...