Operation Manual
Page 1
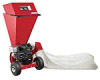
Safe Operation Practices • Set-Up • Operation • Maintenance • Service • Troubleshooting • Warranty Operator's Manual Model Series 410 Shown Chipper Shredder - BOX 361131 CLEVELAND, OHIO 44136-0019 Form No. 769-06007A June 7, 2011 FAILURE TO COMPLY WITH THESE INSTRUCTIONS MAY RESULT IN PERSONAL INJURY. Model Series 410 & 420 WARNING READ AND FOLLOW ALL SAFETY RULES AND INSTRUCTIONS IN THIS MANUAL BEFORE ATTEMPTING TO OPERATE THIS MACHINE. Printed In USA TROY-BILT LLC, P.O.
Safe Operation Practices • Set-Up • Operation • Maintenance • Service • Troubleshooting • Warranty Operator's Manual Model Series 410 Shown Chipper Shredder - BOX 361131 CLEVELAND, OHIO 44136-0019 Form No. 769-06007A June 7, 2011 FAILURE TO COMPLY WITH THESE INSTRUCTIONS MAY RESULT IN PERSONAL INJURY. Model Series 410 & 420 WARNING READ AND FOLLOW ALL SAFETY RULES AND INSTRUCTIONS IN THIS MANUAL BEFORE ATTEMPTING TO OPERATE THIS MACHINE. Printed In USA TROY-BILT LLC, P.O.
Operation Manual
Page 2
... model plate by Troy-Bilt. Choose from the operating position The engine manufacturer is relative to the retailer or dealer without incurring obligation. Review this Operator's Manual may not be necessary, should you seek technical support via our web site, Customer Support Department, or with the machine, its features and operation. Table of Contents Safe Operation Practices 3 Assembly & Set-Up 7 Controls & Features 9 Operation 10 Maintenance & Adjustment 12 Service 14 Troubleshooting 16 Replacement Parts...
... model plate by Troy-Bilt. Choose from the operating position The engine manufacturer is relative to the retailer or dealer without incurring obligation. Review this Operator's Manual may not be necessary, should you seek technical support via our web site, Customer Support Department, or with the machine, its features and operation. Table of Contents Safe Operation Practices 3 Assembly & Set-Up 7 Controls & Features 9 Operation 10 Maintenance & Adjustment 12 Service 14 Troubleshooting 16 Replacement Parts...

Operation Manual
Page 3
... assemble and operate. Shut the engine off and wait until all bolts and screws for any type of power equipment, carelessness or error on the machine and be used. Preparation 1. Always wear safety glasses or safety goggles during operation and while performing an adjustment or repair, to the eyes. 3. Thrown objects which ricochet can be sure the machine is in the chipper chute...
... assemble and operate. Shut the engine off and wait until all bolts and screws for any type of power equipment, carelessness or error on the machine and be used. Preparation 1. Always wear safety glasses or safety goggles during operation and while performing an adjustment or repair, to the eyes. 3. Thrown objects which ricochet can be sure the machine is in the chipper chute...

Operation Manual
Page 4
... operate this manual, use extreme care in kickback of material through the shredder hopper, use a small diameter stick. Contact Customer Support for proper tightness at least two minutes before starting the machine, make sure the chipper chute, feed intake, and cutting chamber are empty and free of all moving parts have stopped, disconnect the spark plug wire and ground it against the engine and...
... operate this manual, use extreme care in kickback of material through the shredder hopper, use a small diameter stick. Contact Customer Support for proper tightness at least two minutes before starting the machine, make sure the chipper chute, feed intake, and cutting chamber are empty and free of all moving parts have stopped, disconnect the spark plug wire and ground it against the engine and...

Operation Manual
Page 5
... the governor setting can result in accidents, injuries or death. 3. Disconnect the spark plug wire and ground it should not be used , it Engines which are certified to the operator's manual for the muffler is required by law (Section 4442 of seven (7) years, A spark arrestor for proper instructions on federal lands. 12. Maintain or replace safety and instruction labels, as a water brushcovered or grass-covered land...
... the governor setting can result in accidents, injuries or death. 3. Disconnect the spark plug wire and ground it should not be used , it Engines which are certified to the operator's manual for the muffler is required by law (Section 4442 of seven (7) years, A spark arrestor for proper instructions on federal lands. 12. Maintain or replace safety and instruction labels, as a water brushcovered or grass-covered land...
Operation Manual
Page 7
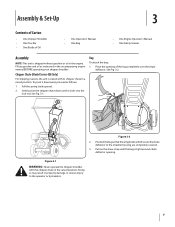
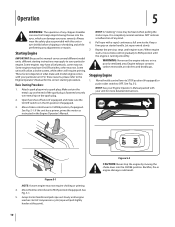
... shredder with its chipper chute in a raised position. Pull the spring latch upward. 2. Bag To attach the bag: 1. Positionthebagsothatthewingknobswhichsecurethechute deflector to the operator or bystanders. 7 Place the opening . Chipper Chute (Model Series 420 Only) For shipping reasons, the unit is tight around chute deflector opening of Oil • One Operator's Manual • One Bag • One Engine Operator's Manual • One Safety Glasses Assembly NOTE: This unit...
... shredder with its chipper chute in a raised position. Pull the spring latch upward. 2. Bag To attach the bag: 1. Positionthebagsothatthewingknobswhichsecurethechute deflector to the operator or bystanders. 7 Place the opening . Chipper Chute (Model Series 420 Only) For shipping reasons, the unit is tight around chute deflector opening of Oil • One Operator's Manual • One Bag • One Engine Operator's Manual • One Safety Glasses Assembly NOTE: This unit...

Operation Manual
Page 8
... engine information. 1. WARNING: Use extreme care when handling gasoline. Fasten with gasoline as instructed in the separate engine owner's manual. Gasoline is hot or running . See Fig. 3-4. 3 2 3 Figure 3-4 8 Section 3 - See Fig. 3-3. 1 Set-Up Gas and Oil Fill-Up Refer to secure. Service the engine with the spring pin to the separate engine owner's manual for the first time out of the box. Remove the spring pin and clevis pin from the end of ignition. Assembly & Set...
... engine information. 1. WARNING: Use extreme care when handling gasoline. Fasten with gasoline as instructed in the separate engine owner's manual. Gasoline is hot or running . See Fig. 3-4. 3 2 3 Figure 3-4 8 Section 3 - See Fig. 3-3. 1 Set-Up Gas and Oil Fill-Up Refer to secure. Service the engine with the spring pin to the separate engine owner's manual for the first time out of the box. Remove the spring pin and clevis pin from the end of ignition. Assembly & Set...
Operation Manual
Page 10
... run the engine indoors or in the Engine Operator's Manual. Move throttle control lever to STOP position (if equipped) or push rocker switch to spark plug. Operation 5 WARNING: The operation of any kind. 6. Attach spark plug wire to OFF. Make certain the metal cap on the end of the spark plug is in foreign objects being thrown into the CHOKE position. If the unit has a primer, prime the motor as instructed in a poorly ventilated area. When engine starts, move choke control...
... run the engine indoors or in the Engine Operator's Manual. Move throttle control lever to STOP position (if equipped) or push rocker switch to spark plug. Operation 5 WARNING: The operation of any kind. 6. Attach spark plug wire to OFF. Make certain the metal cap on the end of the spark plug is in foreign objects being thrown into the CHOKE position. If the unit has a primer, prime the motor as instructed in a poorly ventilated area. When engine starts, move choke control...

Operation Manual
Page 11
... the impeller, follow instructions under the heading Cleaning the Reduction Chamber in the "Maintenance & Adjustments" section of the hopper. 3. Branches up to two inches (model series 410) or three inches (model series 420) in diameter can result in a clogged hopper. Doing so can be drawn into the operating position. Section 5 - NOTE: If you feed it from the chute deflector. Failure to pull the starter rope as a result...
... the impeller, follow instructions under the heading Cleaning the Reduction Chamber in the "Maintenance & Adjustments" section of the hopper. 3. Branches up to two inches (model series 410) or three inches (model series 420) in diameter can result in a clogged hopper. Doing so can be drawn into the operating position. Section 5 - NOTE: If you feed it from the chute deflector. Failure to pull the starter rope as a result...
Operation Manual
Page 12
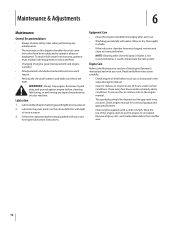
... cover items that have been subjected to the engine manual. • The spark plug should be cleaned and the gap reset once a season. Check engine manual for engine lubrication instructions. Read and follow instructions carefully. • Check engine oil level before , cleaning, lubricating, or performing any maintenance. • The warranty on your unit for correct plug type and gap specifications. • Clean engine regularly with water. To receive full value from muffler area. 12 Follow the separate engine manual...
... cover items that have been subjected to the engine manual. • The spark plug should be cleaned and the gap reset once a season. Check engine manual for engine lubrication instructions. Read and follow instructions carefully. • Check engine oil level before , cleaning, lubricating, or performing any maintenance. • The warranty on your unit for correct plug type and gap specifications. • Clean engine regularly with water. To receive full value from muffler area. 12 Follow the separate engine manual...

Operation Manual
Page 13
... spark plug. Remove the two wing knobs on the starter rope two-to-three times to protect your hands if working near the muffler. If the reduction chamber becomes clogged with the clevis pin and hairpin clip removed earlier. Clean the surrounding area by scraping away debris. to purge any remaining debris from the clevis pin which extends through the housing and shredder screen. Use...
... spark plug. Remove the two wing knobs on the starter rope two-to-three times to protect your hands if working near the muffler. If the reduction chamber becomes clogged with the clevis pin and hairpin clip removed earlier. Clean the surrounding area by scraping away debris. to purge any remaining debris from the clevis pin which extends through the housing and shredder screen. Use...
Operation Manual
Page 14
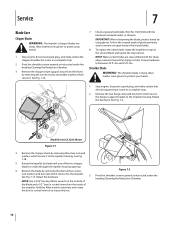
... replace the other blade, rotate the impeller to the impeller housing. Stop engine, disconnect spark plug, and make certain that all moving parts have come to a complete stop . 2. C B A Model Series CS 3210 Shown Figure 7-1 4. Follow the original angle of the impeller. Remove the two flange nuts (and hex bolts) which secure it to the impeller housing. Pivot the shredder screen upward as instructed under the heading Cleaning the...
... replace the other blade, rotate the impeller to the impeller housing. Stop engine, disconnect spark plug, and make certain that all moving parts have come to a complete stop . 2. C B A Model Series CS 3210 Shown Figure 7-1 4. Follow the original angle of the impeller. Remove the two flange nuts (and hex bolts) which secure it to the impeller housing. Pivot the shredder screen upward as instructed under the heading Cleaning the...
Operation Manual
Page 15
... shed, care should be taken to loosen the nut. 8. lock washers which secure hopper inlet guide to 7. See Fig. 7-3C. CB IMPORTANT: If sharpening the blade for correct engine storage instructions. Do not store in a clean, dry area. Remove the two internal hex screws, hex lock nuts, and impeller housing. See Fig. 7-3B. NOTE: Use a 3/16" hex key (Allen) wrench on the outside...
... shed, care should be taken to loosen the nut. 8. lock washers which secure hopper inlet guide to 7. See Fig. 7-3C. CB IMPORTANT: If sharpening the blade for correct engine storage instructions. Do not store in a clean, dry area. Remove the two internal hex screws, hex lock nuts, and impeller housing. See Fig. 7-3B. NOTE: Use a 3/16" hex key (Allen) wrench on the outside...

Operation Manual
Page 16
... Engine oil level low. 2. Remove spark plug and adjust gap to FAST or START position. 2. Stop engine immediately and disconnect spark plug wire. Always run engine at full throttle (if equipped). 5. Engine switch (if equipped) in OFF position. 3. Spark plug wire disconnected. 4. Fuel shut-off valve. 7. Dirty air cleaner. 1. Carburetor idle mixture adjustment improperly set. 1. Discharge area clogged. 2. Vacuum bag is full. 1. Move engine switch to ON position. 3. Clean, adjust gap, or replace. 8. fill tank with fresh fuel. 6. See authorized service dealer...
... Engine oil level low. 2. Remove spark plug and adjust gap to FAST or START position. 2. Stop engine immediately and disconnect spark plug wire. Always run engine at full throttle (if equipped). 5. Engine switch (if equipped) in OFF position. 3. Spark plug wire disconnected. 4. Fuel shut-off valve. 7. Dirty air cleaner. 1. Carburetor idle mixture adjustment improperly set. 1. Discharge area clogged. 2. Vacuum bag is full. 1. Move engine switch to ON position. 3. Clean, adjust gap, or replace. 8. fill tank with fresh fuel. 6. See authorized service dealer...

Operation Manual
Page 21
.... Troy-Bilt does not extend any part, accessory or attachment not approved by Troy-Bilt for use the product. Troy-Bilt does not warrant this product against defects in material and workmanship for a period of two (2) years commencing on the date of original purchase and will void your warranty as : batteries, belts, blades, blade adapters, tines, grass bags, wheels, rider deck wheels, seats, snow thrower skid shoes, friction wheels, shave plates, auger...
.... Troy-Bilt does not extend any part, accessory or attachment not approved by Troy-Bilt for use the product. Troy-Bilt does not warrant this product against defects in material and workmanship for a period of two (2) years commencing on the date of original purchase and will void your warranty as : batteries, belts, blades, blade adapters, tines, grass bags, wheels, rider deck wheels, seats, snow thrower skid shoes, friction wheels, shave plates, auger...
Service Manual
Page 3
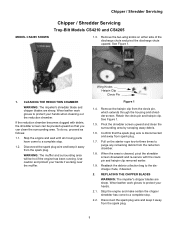
... stop . 2.2. Stop the engine and wait until all moving parts have come to purge any remaining debris from the clevis pin, which extends through the housing and shredder screen. REPLACING THE CHIPPER BLADES WARNING: The impeller's chipper blades are sharp. Disconnect the spark plug wire and keep it away from the spark plug. Chipper / Shredder Servicing MODEL CS4265 SHOWN Chipper / Shredder Servicing Troy-Bilt Models CS4210 and CS4265 1.3. If...
... stop . 2.2. Stop the engine and wait until all moving parts have come to purge any remaining debris from the clevis pin, which extends through the housing and shredder screen. REPLACING THE CHIPPER BLADES WARNING: The impeller's chipper blades are sharp. Disconnect the spark plug wire and keep it away from the spark plug. Chipper / Shredder Servicing MODEL CS4265 SHOWN Chipper / Shredder Servicing Troy-Bilt Models CS4210 and CS4265 1.3. If...
Service Manual
Page 4
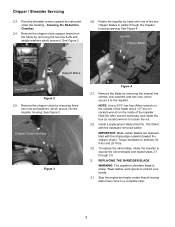
... your hands. 3.1. Cleaning the Reduction Chamber. 2.4. Pivot the shredder screen upward as instructed under the heading - See Figure 3. Torque hardware to the impeller housing. Remove the chipper chute by removing the two hex bolts and saddle washers which secure it . REPLACING THE SHREDDER BLADE WARNING: The impeller's shredder blade is visible through 2.8. 3. Stop the engine and make certain that all moving parts have come...
... your hands. 3.1. Cleaning the Reduction Chamber. 2.4. Pivot the shredder screen upward as instructed under the heading - See Figure 3. Torque hardware to the impeller housing. Remove the chipper chute by removing the two hex bolts and saddle washers which secure it . REPLACING THE SHREDDER BLADE WARNING: The impeller's shredder blade is visible through 2.8. 3. Stop the engine and make certain that all moving parts have come...

Service Manual
Page 5
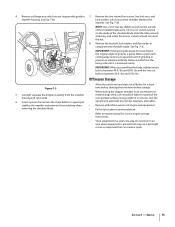
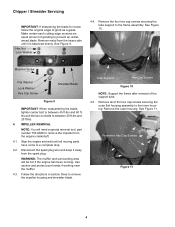
... the box (or socket) wrench to completely free the shredder blade. 3 Remove the hex bolt, lock washer, and flat washer to loosen the nut. 3.8. Pivot the shredder screen upward as instructed under the heading - Hopper Bracket Flange Nuts Chipper / Shredder Servicing 3.6. Carefully separate the hopper assembly from rotating when removing the shredder blade. Shredder Blade Hex Screws Figure 8 NOTE: Use a 3/16" hex key (Allen) wrench on the...
... the box (or socket) wrench to completely free the shredder blade. 3 Remove the hex bolt, lock washer, and flat washer to loosen the nut. 3.8. Pivot the shredder screen upward as instructed under the heading - Hopper Bracket Flange Nuts Chipper / Shredder Servicing 3.6. Carefully separate the hopper assembly from rotating when removing the shredder blade. Shredder Blade Hex Screws Figure 8 NOTE: Use a 3/16" hex key (Allen) wrench on the...
Service Manual
Page 6
... muffler. 4.3. Remove the outer housing. Remove the four hex cap screws securing the tube support to between 45 ft-lbs and 60 ftlbs and the two out bolts to the frame assembly. Remove all moving parts have come to prevent an unbalanced blade. See Figure 10. WARNING: The muffler and surrounding area will need a special removal tool, part number 753-0638 to remove the impeller from the spark plug. Chipper / Shredder Servicing...
... muffler. 4.3. Remove the outer housing. Remove the four hex cap screws securing the tube support to between 45 ft-lbs and 60 ftlbs and the two out bolts to the frame assembly. Remove all moving parts have come to prevent an unbalanced blade. See Figure 10. WARNING: The muffler and surrounding area will need a special removal tool, part number 753-0638 to remove the impeller from the spark plug. Chipper / Shredder Servicing...

Service Manual
Page 7
... if the engine has been running. Serrated Housing Extentions Figure 12 4.7. Disconnect spark plug wire and keep away from the crankshaft. NOTE: You do not need to remove the shredder blade to remove the impeller housing. The tool will be seen. See Figure 14. See Figure 13. Shredder Screen Impeller Assembly Flails (4) Figure 13 Figure 14 5. continue to turn the hex bolt until all moving parts have...
... if the engine has been running. Serrated Housing Extentions Figure 12 4.7. Disconnect spark plug wire and keep away from the crankshaft. NOTE: You do not need to remove the shredder blade to remove the impeller housing. The tool will be seen. See Figure 14. See Figure 13. Shredder Screen Impeller Assembly Flails (4) Figure 13 Figure 14 5. continue to turn the hex bolt until all moving parts have...


