Operation Manual
Page 1
Printed In USA TROY-BILT LLC, P.O. BOX 361131 CLEVELAND, OHIO 44136-0019 Form No. 769-06007A June 7, 2011 Safe Operation Practices • Set-Up • Operation • Maintenance • Service • Troubleshooting • Warranty Operator's Manual Model Series 410 Shown Chipper Shredder - FAILURE TO COMPLY WITH THESE INSTRUCTIONS MAY RESULT IN PERSONAL INJURY. Model Series 410 & 420 WARNING READ AND FOLLOW ALL SAFETY RULES AND INSTRUCTIONS IN THIS MANUAL BEFORE ATTEMPTING TO OPERATE THIS MACHINE.
Printed In USA TROY-BILT LLC, P.O. BOX 361131 CLEVELAND, OHIO 44136-0019 Form No. 769-06007A June 7, 2011 Safe Operation Practices • Set-Up • Operation • Maintenance • Service • Troubleshooting • Warranty Operator's Manual Model Series 410 Shown Chipper Shredder - FAILURE TO COMPLY WITH THESE INSTRUCTIONS MAY RESULT IN PERSONAL INJURY. Model Series 410 & 420 WARNING READ AND FOLLOW ALL SAFETY RULES AND INSTRUCTIONS IN THIS MANUAL BEFORE ATTEMPTING TO OPERATE THIS MACHINE.
Operation Manual
Page 2
... to familiarize yourself with a local authorized service dealer. Review this manual may cover a range of this manual, all times. Troy-Bilt reserves the right to the engine manufacturer's Owner's/Operator's Manual, packed separately with regards to safely and easily set up and operating.... Choose from the experts. If you have any questions regarding the controls, operation, or maintenance of product specifications for purchasing a Chipper Shredder manufactured by standing at the operator's position and looking down at the frame below : ◊ Visit us on the web...
... to familiarize yourself with a local authorized service dealer. Review this manual may cover a range of this manual, all times. Troy-Bilt reserves the right to the engine manufacturer's Owner's/Operator's Manual, packed separately with regards to safely and easily set up and operating.... Choose from the experts. If you have any questions regarding the controls, operation, or maintenance of product specifications for purchasing a Chipper Shredder manufactured by standing at the operator's position and looking down at the frame below : ◊ Visit us on the web...

Operation Manual
Page 3
... objects which could endanger the personal safety and/or property of yourself and others. As with these instructions may result in this machine in the chipper chute. 4. Always wear safety glasses or safety goggles during operation and while performing an adjustment or repair, to stop . Wear leather work shoes and close...
... objects which could endanger the personal safety and/or property of yourself and others. As with these instructions may result in this machine in the chipper chute. 4. Always wear safety glasses or safety goggles during operation and while performing an adjustment or repair, to stop . Wear leather work shoes and close...

Operation Manual
Page 4
...moving parts have stopped, disconnect the spark plug wire and ground it against the engine before starting the machine, make sure the chipper chute, feed intake, and cutting chamber are not covered in the feeding chambers and discharge opening while the engine is spilled on ...a portable container, rather than ½ inch below bottom of the nearest service dealer. Do not operate this machine without the shredder hopper, chipper chute, or chute deflector properly attached to assure continued safe operation. 6. Muffler and engine become hot and can amputate fingers, hands, and ...
...moving parts have stopped, disconnect the spark plug wire and ground it against the engine before starting the machine, make sure the chipper chute, feed intake, and cutting chamber are not covered in the feeding chambers and discharge opening while the engine is spilled on ...a portable container, rather than ½ inch below bottom of the nearest service dealer. Do not operate this machine without the shredder hopper, chipper chute, or chute deflector properly attached to assure continued safe operation. 6. Muffler and engine become hot and can amputate fingers, hands, and ...
Operation Manual
Page 7
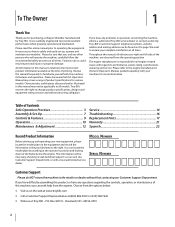
... chute deflector opening of the bag completely over the chute deflector. Chipper Chute (Model Series 420 Only) For shipping reasons, the unit is crated with the chipper chute in the engine. Gently pivot the chipper chute down until the bag is shipped without gasoline or oil in... the raised position. See Fig. 3-2. Place the opening . Figure 3-1 WARNING: Never operate the chipper shredder with its chipper chute in property damage or serious injury to the impeller housing are completely covered. 3. Bag To attach the bag: 1. Doing so may...
... chute deflector opening of the bag completely over the chute deflector. Chipper Chute (Model Series 420 Only) For shipping reasons, the unit is crated with the chipper chute in the engine. Gently pivot the chipper chute down until the bag is shipped without gasoline or oil in... the raised position. See Fig. 3-2. Place the opening . Figure 3-1 WARNING: Never operate the chipper shredder with its chipper chute in property damage or serious injury to the impeller housing are completely covered. 3. Bag To attach the bag: 1. Doing so may...

Operation Manual
Page 9
...in diameter may be placed into the hopper for shredding. Tow Bar Use the tow bar to tow the chipper shredder behind a tractor to lower the chipper chute into the chipper chute for operation. 9 Engine Controls See the separate Engine Operator's Manual packed with your unit's shredder blade...your unit for transporting. Lock Rod (Model Series 420 Only) The lock rod is located on the engine. WARNING: Never operate the chipper shredder with a diameter greater than 1/2-inch in the raised position. Recoil Starter The recoil starter is located on the top of the engine...
...in diameter may be placed into the hopper for shredding. Tow Bar Use the tow bar to tow the chipper shredder behind a tractor to lower the chipper chute into the chipper chute for operation. 9 Engine Controls See the separate Engine Operator's Manual packed with your unit's shredder blade...your unit for transporting. Lock Rod (Model Series 420 Only) The lock rod is located on the engine. WARNING: Never operate the chipper shredder with a diameter greater than 1/2-inch in the raised position. Recoil Starter The recoil starter is located on the top of the engine...
Operation Manual
Page 10
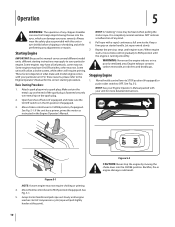
... will require priming. WARNING: Never run the engine indoors or in foreign objects being thrown into the CHOKE position. Operation 5 WARNING: The operation of any chipper shredder can damage your eyes severely. Attach spark plug wire to RUN position until the engine is in the Engine Operator's Manual. Keep a firm grip...
... will require priming. WARNING: Never run the engine indoors or in foreign objects being thrown into the CHOKE position. Operation 5 WARNING: The operation of any chipper shredder can damage your eyes severely. Attach spark plug wire to RUN position until the engine is in the Engine Operator's Manual. Keep a firm grip...

Operation Manual
Page 11
..., into the operating position. Observe the following guidelines when chipping branches: • Keep both hands and gently agitate the chipper shredder to remove any debris found near the impeller, follow instructions under the heading Cleaning the Reduction Chamber in the hopper.... to help loosen debris, drawing it will be forced out of this manual. Stop engine. 2. Chipping WARNING: Never operate the chipper shredder without chipper chute lowered into a debris collection bag. See Fig. 5-3. IMPORTANT: Never place branches with debris during operation, proceed as follows...
..., into the operating position. Observe the following guidelines when chipping branches: • Keep both hands and gently agitate the chipper shredder to remove any debris found near the impeller, follow instructions under the heading Cleaning the Reduction Chamber in the hopper.... to help loosen debris, drawing it will be forced out of this manual. Stop engine. 2. Chipping WARNING: Never operate the chipper shredder without chipper chute lowered into a debris collection bag. See Fig. 5-3. IMPORTANT: Never place branches with debris during operation, proceed as follows...
Operation Manual
Page 12
... manual packed with your unit. Lubrication 1. Remove all fasteners and make sure these are tight. Equipment Care • Clean the chipper shredder thoroughly after each season. • Periodically check all grass, dirt, and combustible debris from warranty, operator must maintain the ... instructions carefully. • Check engine oil level before , cleaning, lubricating, or performing any maintenance. • The warranty on this chipper shredder does not cover items that have been subjected to dry thoroughly in the separate engine manual. • Clean or replace air cleaner...
... manual packed with your unit. Lubrication 1. Remove all fasteners and make sure these are tight. Equipment Care • Clean the chipper shredder thoroughly after each season. • Periodically check all grass, dirt, and combustible debris from warranty, operator must maintain the ... instructions carefully. • Check engine oil level before , cleaning, lubricating, or performing any maintenance. • The warranty on this chipper shredder does not cover items that have been subjected to dry thoroughly in the separate engine manual. • Clean or replace air cleaner...

Operation Manual
Page 13
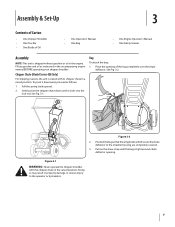
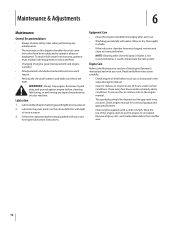
... if the engine has been running. Reattach the debris collection bag to a complete stop. C A B Figure 6-1 Section 6 - Stop engine, disconnect spark plug, and make certain the 6. chipper shredder has come to the chute deflector, if desired. 2. and protect your hands when cleaning out the reduction chamber. 5. To do so, proceed as follows... through the housing and shredder screen. Pivot the shredder screen upward. Remove the hairpin clip from the reduction chamber. WARNING: The impeller's shredder blade and chipper blades are sharp.
... if the engine has been running. Reattach the debris collection bag to a complete stop. C A B Figure 6-1 Section 6 - Stop engine, disconnect spark plug, and make certain the 6. chipper shredder has come to the chute deflector, if desired. 2. and protect your hands when cleaning out the reduction chamber. 5. To do so, proceed as follows... through the housing and shredder screen. Pivot the shredder screen upward. Remove the hairpin clip from the reduction chamber. WARNING: The impeller's shredder blade and chipper blades are sharp.
Operation Manual
Page 14
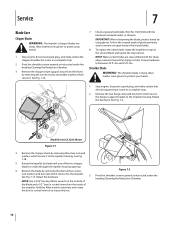
... Blade WARNING: The shredder blade is visible through the impeller housing opening. 6. C B A Model Series CS 3210 Shown Figure 7-1 4. Remove the chipper chute by removing three hex nuts and washers which secure the hopper support bracket to the impeller housing. Hold.... 8. Install a replacement blade (Part No. 742-0544) with the sharp edge outward (toward the chipper chute). Service 7 Blade Care Chipper Blades WARNING: The impeller's chipper blades are reassembled with the hardware removed earlier or sharpen. Wear leather work gloves to expose the second...
... Blade WARNING: The shredder blade is visible through the impeller housing opening. 6. C B A Model Series CS 3210 Shown Figure 7-1 4. Remove the chipper chute by removing three hex nuts and washers which secure the hopper support bracket to the impeller housing. Hold.... 8. Install a replacement blade (Part No. 742-0544) with the sharp edge outward (toward the chipper chute). Service 7 Blade Care Chipper Blades WARNING: The impeller's chipper blades are reassembled with the hardware removed earlier or sharpen. Wear leather work gloves to expose the second...
Operation Manual
Page 15
... store in a clean, dry area. Hold the Allen wrench stationary and rotate the box (or socket) wrench to completely free shredder blade. When storing the chipper shredder in an unventilated or metal storage shed, care should be taken to between 20 ft.-lbs and 25 ft.-lbs. Refer to 7. Remove the...
... store in a clean, dry area. Hold the Allen wrench stationary and rotate the box (or socket) wrench to completely free shredder blade. When storing the chipper shredder in an unventilated or metal storage shed, care should be taken to between 20 ft.-lbs and 25 ft.-lbs. Refer to 7. Remove the...

Operation Manual
Page 16
... impeller. 1. Discharge area clogged. 2. Rate of discharge slows considerably or composition of adjustment. 1. Refill with proper oil. 2. Replace chipper blade or see your authorized service dealer. 16 Carburetor idle mixture adjustment improperly set. 1. Connect wire to CHOKE position. 5. Clean, ...off valve closed (if equipped). 7. Low engine RPM. 2. Clean flail screen and inside of discharge opening. 2. Faulty spark plug. 8. Chipper blade dull. 1. Move choke lever to engine manual. 7. Blocked fuel line or stale fuel. 4. Dirty air cleaner. 1. fill tank...
... impeller. 1. Discharge area clogged. 2. Rate of discharge slows considerably or composition of adjustment. 1. Refill with proper oil. 2. Replace chipper blade or see your authorized service dealer. 16 Carburetor idle mixture adjustment improperly set. 1. Connect wire to CHOKE position. 5. Clean, ...off valve closed (if equipped). 7. Low engine RPM. 2. Clean flail screen and inside of discharge opening. 2. Faulty spark plug. 8. Chipper blade dull. 1. Move choke lever to engine manual. 7. Blocked fuel line or stale fuel. 4. Dirty air cleaner. 1. fill tank...

Operation Manual
Page 17
Replacement Parts Component 9 Part Number and Description 942-04050 Shredder Blade 942-0544B Chipper Blade 719-04308 Flail Blade (3 total) 634-04627 10 x 4.0 Pneumatic Wheel with Bearings Phone (800) 828-5500 or (330) 558-7220 to order replacement parts or a complete Parts Manual (have your full model number and serial number ready). Parts Manual downloads are also available free of charge at www.troybilt.com. 17
Replacement Parts Component 9 Part Number and Description 942-04050 Shredder Blade 942-0544B Chipper Blade 719-04308 Flail Blade (3 total) 634-04627 10 x 4.0 Pneumatic Wheel with Bearings Phone (800) 828-5500 or (330) 558-7220 to order replacement parts or a complete Parts Manual (have your full model number and serial number ready). Parts Manual downloads are also available free of charge at www.troybilt.com. 17
Service Manual
Page 1
Service Manual Chipper/Shredder - TinhdeivsiedumaalstesIrhMiaolusPldaOrseReienTkteAtnhNdeeTads:tsoRisptEaronAvciedDeofSsauAnppFelexEpmeTerYnietnaRcl einUdfoLarnmEdaSttrioaAninNteodDapsrsoINifsetSstshTieoRntraaUli.nCReedTatIdeO,chuNnnSidceiarCsnt.AanURdn,EtraanFindUefdoLlloLorwYinaelxl pinesrtireuncctieodns and commoTnhsisenSseerwvihceenMwaonrkuinagl iosnnpootwaesr uebqusitpitmuteentf.oTr hthiseinOclpuedreastothre'scMonatennutasl.ofYtohue mproudsut crte'sadO,puenradtoerrsstManandual, supplied with the equainpdmefonltl....
Service Manual Chipper/Shredder - TinhdeivsiedumaalstesIrhMiaolusPldaOrseReienTkteAtnhNdeeTads:tsoRisptEaronAvciedDeofSsauAnppFelexEpmeTerYnietnaRcl einUdfoLarnmEdaSttrioaAninNteodDapsrsoINifsetSstshTieoRntraaUli.nCReedTatIdeO,chuNnnSidceiarCsnt.AanURdn,EtraanFindUefdoLlloLorwYinaelxl pinesrtireuncctieodns and commoTnhsisenSseerwvihceenMwaonrkuinagl iosnnpootwaesr uebqusitpitmuteentf.oTr hthiseinOclpuedreastothre'scMonatennutasl.ofYtohue mproudsut crte'sadO,puenradtoerrsstManandual, supplied with the equainpdmefonltl....
Service Manual
Page 3
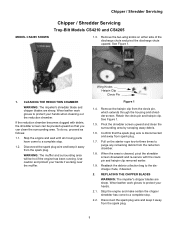
.... Reattach the debris collection bag to protect your hands when cleaning out the reduction chamber. Stop the engine and make certain the chipper shredder has come to a complete stop . 1.2. Disconnect the spark plug wire and keep it away from the spark plug. Wing...clevis pin and hairpin clip. Pull on either side of the discharge chute and pivot the discharge chute upward. Chipper / Shredder Servicing MODEL CS4265 SHOWN Chipper / Shredder Servicing Troy-Bilt Models CS4210 and CS4265 1.3. Disconnect the spark plug wire and keep it away from the spark plug. 1 ...
.... Reattach the debris collection bag to protect your hands when cleaning out the reduction chamber. Stop the engine and make certain the chipper shredder has come to a complete stop . 1.2. Disconnect the spark plug wire and keep it away from the spark plug. Wing...clevis pin and hairpin clip. Pull on either side of the discharge chute and pivot the discharge chute upward. Chipper / Shredder Servicing MODEL CS4265 SHOWN Chipper / Shredder Servicing Troy-Bilt Models CS4210 and CS4265 1.3. Disconnect the spark plug wire and keep it away from the spark plug. 1 ...
Service Manual
Page 4
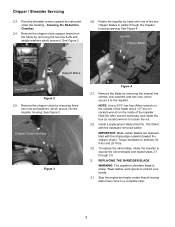
... 2.3. See Figure 2. 2.6. Rotate the impeller by removing three hex nuts and washers, which secure it to loosen the nut. 2.8. Remove the chipper chute support brace from the frame by removing the internal hex screws, lock washers and hex nuts, which secure it. See Figure 4. Stop the... and make certain that all moving parts have come to expose the second blade and repeat steps 2.7 through the impeller housing opening. Remove the chipper chute by hand until one of the impeller. Hold the Allen wrench stationary and rotate the box (or socket) wrench to the impeller. IMPORTANT...
... 2.3. See Figure 2. 2.6. Rotate the impeller by removing three hex nuts and washers, which secure it to loosen the nut. 2.8. Remove the chipper chute support brace from the frame by removing the internal hex screws, lock washers and hex nuts, which secure it. See Figure 4. Stop the... and make certain that all moving parts have come to expose the second blade and repeat steps 2.7 through the impeller housing opening. Remove the chipper chute by hand until one of the impeller. Hold the Allen wrench stationary and rotate the box (or socket) wrench to the impeller. IMPORTANT...

Service Manual
Page 5
.... Carefully separate the hopper assembly from the impeller housing and set it from rotating when removing the shredder blade. See Figure 5. Hopper Bracket Flange Nuts Chipper / Shredder Servicing 3.6. Remove the two flange nuts (and hex bolts) which secure the hopper inlet guide to the impeller. Figure 6 3.5.
.... Carefully separate the hopper assembly from the impeller housing and set it from rotating when removing the shredder blade. See Figure 5. Hopper Bracket Flange Nuts Chipper / Shredder Servicing 3.6. Remove the two flange nuts (and hex bolts) which secure the hopper inlet guide to the impeller. Figure 6 3.5.
Service Manual
Page 6
... from the heavy side until all of the support tube. 4.5. Stop the engine and wait until it away from the engine crankshaft. 4.1. See Figure 11. Chipper / Shredder Servicing IMPORTANT: If sharpening the blade for reuse, follow the original angle of grinding to prevent an unbalanced blade. Remove all moving parts have...
... from the heavy side until all of the support tube. 4.5. Stop the engine and wait until it away from the engine crankshaft. 4.1. See Figure 11. Chipper / Shredder Servicing IMPORTANT: If sharpening the blade for reuse, follow the original angle of grinding to prevent an unbalanced blade. Remove all moving parts have...

Service Manual
Page 7
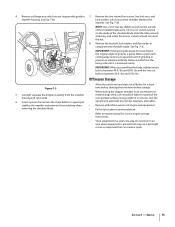
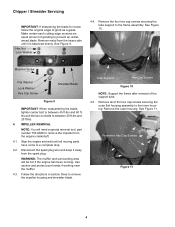
See Figure 12. Special Removal Tool 753-0638 Chipper / Shredder Servicing NOTE: In this figure, the serrated housing extensions can be hot if the engine has been running. Disconnect spark plug wire and keep ... help shear debris that gets behind the impeller. Shredder Screen Impeller Assembly Flails (4) Figure 13 Figure 14 5. 4.6. See Figure 14. Inspect the impeller, flails and chipper blades for any wear or damage.
See Figure 12. Special Removal Tool 753-0638 Chipper / Shredder Servicing NOTE: In this figure, the serrated housing extensions can be hot if the engine has been running. Disconnect spark plug wire and keep ... help shear debris that gets behind the impeller. Shredder Screen Impeller Assembly Flails (4) Figure 13 Figure 14 5. 4.6. See Figure 14. Inspect the impeller, flails and chipper blades for any wear or damage.

