Operation Manual
Page 2
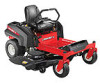
...provide excellent performance when properly operated and maintained. Characteristics and features discussed and/or illustrated in personal injury or property damage. Troy-Bilt's Customer Support telephone numbers, website address and mailing address can be found at www.opei.org or the engine manufacturer's...complete satisfaction at all times. All information in the provided area to ensure your machine, for purchasing a Troy-Bilt Zero-Turn Tractor. If you for more information. This information will operate the machine, carefully follow the recommended safety practices at all ...
...provide excellent performance when properly operated and maintained. Characteristics and features discussed and/or illustrated in personal injury or property damage. Troy-Bilt's Customer Support telephone numbers, website address and mailing address can be found at www.opei.org or the engine manufacturer's...complete satisfaction at all times. All information in the provided area to ensure your machine, for purchasing a Troy-Bilt Zero-Turn Tractor. If you for more information. This information will operate the machine, carefully follow the recommended safety practices at all ...

Operation Manual
Page 4
...'s recommendations for this machine on slopes unless necessary; The machine must be driven up on slopes. 19. The mower could suddenly turn on that operators, age 60 years and above, are a major factor related to lift and rapidly roll over backwards, which could...damaged discharge cover can cause a burn. If you cannot back up , braking and steering ability are not covered in serious injury. 1. Always turn slowly uphill and use a grass catcher on the ground. Use slow speed. Rapid 23. hazard. 6. This machine is over accident. Do not...
...'s recommendations for this machine on slopes unless necessary; The machine must be driven up on slopes. 19. The mower could suddenly turn on that operators, age 60 years and above, are a major factor related to lift and rapidly roll over backwards, which could...damaged discharge cover can cause a burn. If you cannot back up , braking and steering ability are not covered in serious injury. 1. Always turn slowly uphill and use a grass catcher on the ground. Use slow speed. Rapid 23. hazard. 6. This machine is over accident. Do not...
Operation Manual
Page 5
... unauthorized operation. 2. j. k. l. m. Before cleaning, repairing, or inspecting, make sure the blades come to operate this machine. Children are often attracted to stop. 6. Be alert and turn machine off the engine and equipment. Never carry children, even with safe machine operation. They may fall off and be seriously injured or interfere with...
... unauthorized operation. 2. j. k. l. m. Before cleaning, repairing, or inspecting, make sure the blades come to operate this machine. Children are often attracted to stop. 6. Be alert and turn machine off the engine and equipment. Never carry children, even with safe machine operation. They may fall off and be seriously injured or interfere with...
Operation Manual
Page 13
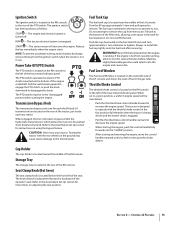
...seat position. Never fill the fuel tank when the engine is running , allow to cool for instructions on the fuel tank fill neck and turn approximately 1⁄4 turn and pull upward to remove. Fuel Level Window The Fuel Level Window is located on the RH console to the left of the operator...'s seat. Seat Clamp Knob (Not Seen) The seat clamp knob is turned off. The tractor electrical system is located toward the middle of the engine crankshaft. When engaged, the two rods open a bypass within the hydrostatic ...
...seat position. Never fill the fuel tank when the engine is running , allow to cool for instructions on the fuel tank fill neck and turn approximately 1⁄4 turn and pull upward to remove. Fuel Level Window The Fuel Level Window is located on the RH console to the left of the operator...'s seat. Seat Clamp Knob (Not Seen) The seat clamp knob is turned off. The tractor electrical system is located toward the middle of the engine crankshaft. When engaged, the two rods open a bypass within the hydrostatic ...

Operation Manual
Page 14
... activated whenever the ignition switch is turned to the "START" position and the RH and/or LH drive control levers are completed according to the instructions in the "START" position. The maintenance interval lasts for five minutes after every 50 hours of operation to assure all ...will flash as described for changing the engine oil. Follow the oil change intervals provided in the DISENGAGED position and the ignition switch is turned to the "ON" position. If this maintenance interval. BATT. Keep a record of the actual hours of recorded operation. If the ...
... activated whenever the ignition switch is turned to the "START" position and the RH and/or LH drive control levers are completed according to the instructions in the "START" position. The maintenance interval lasts for five minutes after every 50 hours of operation to assure all ...will flash as described for changing the engine oil. Follow the oil change intervals provided in the DISENGAGED position and the ignition switch is turned to the "ON" position. If this maintenance interval. BATT. Keep a record of the actual hours of recorded operation. If the ...
Operation Manual
Page 15
... to operate only on traction surfaces that are moved fully outward in small quantities. Do not risk INJURY or DEATH. Look behind and down before turning and come to a complete stop before servicing or cleaning. • Operate the drive control levers smoothly and avoid any zero... turn maneuver. • Do not stop the tractor or park the tractor over combustible materials such as dry grass, leaves, debris, etc. • Do not fill ...
... to operate only on traction surfaces that are moved fully outward in small quantities. Do not risk INJURY or DEATH. Look behind and down before turning and come to a complete stop before servicing or cleaning. • Operate the drive control levers smoothly and avoid any zero... turn maneuver. • Do not stop the tractor or park the tractor over combustible materials such as dry grass, leaves, debris, etc. • Do not fill ...
Operation Manual
Page 16
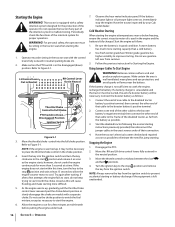
... cold battery. 2. A warm battery has much more difficult. 5. Have the tractor's electrical system checked and repaired as soon as this time, turn the key clockwise to Figure 5-1. Move the RH and LH drive control levers fully outward in good condition. Operator must be sitting in Down ... then connect the other end of the interlock system for Starting the Engine. Move the throttle/choke control into the ignition switch and turn the key to the stop the engine. Have the tractor inspected by your Cub Cadet dealer. Cold Weather Starting When starting . Disengage ...
... cold battery. 2. A warm battery has much more difficult. 5. Have the tractor's electrical system checked and repaired as soon as this time, turn the key clockwise to Figure 5-1. Move the RH and LH drive control levers fully outward in good condition. Operator must be sitting in Down ... then connect the other end of the interlock system for Starting the Engine. Move the throttle/choke control into the ignition switch and turn the key to the stop the engine. Have the tractor inspected by your Cub Cadet dealer. Cold Weather Starting When starting . Disengage ...
Operation Manual
Page 17
Practice Operation (Initial Use) Operating a zero-turn tractor is more maneuverable, getting used to operating the control levers takes some practice. When performing the practice session, the PTO should practice operating the ... to the operator. 1. Abrupt movement of the control levers can safely operate the tractor. Parking the tractor on the control levers. Although and because a zero turn tractor is strongly recommended that they are confident that allows you locate a reasonably large, level and open "practice area" where there are no obstructions, pedestrians...
Practice Operation (Initial Use) Operating a zero-turn tractor is more maneuverable, getting used to operating the control levers takes some practice. When performing the practice session, the PTO should practice operating the ... to the operator. 1. Abrupt movement of the control levers can safely operate the tractor. Parking the tractor on the control levers. Although and because a zero turn tractor is strongly recommended that they are confident that allows you locate a reasonably large, level and open "practice area" where there are no obstructions, pedestrians...

Operation Manual
Page 18
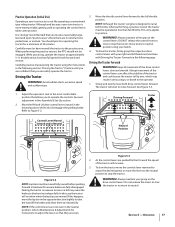
... the tractor move the controls lever forward to stop the tractor. Forward Right Turn Figure 5-6 2. Figure 5-5 3. Forward Left Turn 4. Turning the Tractor While Driving Forward WARNING! To execute a "pivot turn the tractor while driving forward, move the levers to the neutral position to attain...rearward of the right lever. Always look behind while traveling in the reverse direction. Neutral Position Slower Faster Figure 5-4 2. To turn to the neutral position, while moving the other . See Figure 5-4. As the control levers are pushed farther rearward the speed of...
... the tractor move the controls lever forward to stop the tractor. Forward Right Turn Figure 5-6 2. Figure 5-5 3. Forward Left Turn 4. Turning the Tractor While Driving Forward WARNING! To execute a "pivot turn the tractor while driving forward, move the levers to the neutral position to attain...rearward of the right lever. Always look behind while traveling in the reverse direction. Neutral Position Slower Faster Figure 5-4 2. To turn to the neutral position, while moving the other . See Figure 5-4. As the control levers are pushed farther rearward the speed of...
Operation Manual
Page 19
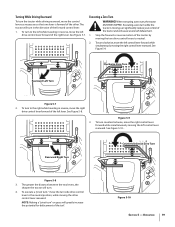
... lever. See Figure 5-9. Figure 5-9 3. Executing a zero turn while the tractor is forward of the other control lever rearward. Executing a Zero Turn WARNING! Figure 5-10 Section 5 - Turning While Driving Rearward To turn the tractor while driving rearward, move the control levers as...tractor and will cause severe turf defacement. 1. To turn clockwise, move the right control lever forward while simultaneously moving the right control lever rearward. Clockwise Zero Turn Rearward Left Turn Figure 5-7 2. To turn counterclockwise, move the left control lever forward while ...
... lever. See Figure 5-9. Figure 5-9 3. Executing a zero turn while the tractor is forward of the other control lever rearward. Executing a Zero Turn WARNING! Figure 5-10 Section 5 - Turning While Driving Rearward To turn the tractor while driving rearward, move the control levers as...tractor and will cause severe turf defacement. 1. To turn clockwise, move the right control lever forward while simultaneously moving the right control lever rearward. Clockwise Zero Turn Rearward Left Turn Figure 5-7 2. To turn counterclockwise, move the left control lever forward while ...

Operation Manual
Page 20
... slopes where you may not operate safely. WARNING! Do not leave the seat of the mowed strip and overlap approximately 3". 8. WARNING! Avoid turning downhill if possible. The PTO clutch cannot be operated when the tractor is required. 7. If mowing a slope, start at full speed will ...Section 5- To prevent rutting or grooving of the turf, if possible, change the direction that can be mowed is recommended unless a pivot or zero turn the ignition key off . 5. Push the PTO switch downward to the "ENGAGED" position. 3. Always drive across slopes, not up and down before...
... slopes where you may not operate safely. WARNING! Do not leave the seat of the mowed strip and overlap approximately 3". 8. WARNING! Avoid turning downhill if possible. The PTO clutch cannot be operated when the tractor is required. 7. If mowing a slope, start at full speed will ...Section 5- To prevent rutting or grooving of the turf, if possible, change the direction that can be mowed is recommended unless a pivot or zero turn the ignition key off . 5. Push the PTO switch downward to the "ENGAGED" position. 3. Always drive across slopes, not up and down before...

Operation Manual
Page 21
Momentarily turn the ignition switch to the engaged position. Move both control levers fully outward in the neutral position; the PTO should disengage and the mower deck ...
Momentarily turn the ignition switch to the engaged position. Move both control levers fully outward in the neutral position; the PTO should disengage and the mower deck ...

Operation Manual
Page 22
...deck from yours. Disengage the PTO, engage the parking brake and stop the engine. Do not use P Every 10 Hours P P Every 25 Hours P P Every 50 Hours Every 100 Hours Prior to you. engage deck in this manual are applicable to a water supply. 2. Move the tractor to run as needed. See... Figure 6-1. Turn off the water supply. Allow to an area within reach of the hose where the dispersal of any accumulation of the tractor. From the tractor...
...deck from yours. Disengage the PTO, engage the parking brake and stop the engine. Do not use P Every 10 Hours P P Every 25 Hours P P Every 50 Hours Every 100 Hours Prior to you. engage deck in this manual are applicable to a water supply. 2. Move the tractor to run as needed. See... Figure 6-1. Turn off the water supply. Allow to an area within reach of the hose where the dispersal of any accumulation of the tractor. From the tractor...

Operation Manual
Page 23
...can be changed. Have it can freeze sooner than hot. 4. A fully charged battery will leak electrolyte when tipped. Maintenance & Adjustments 23 It is turned on clothing, first dilute it . Use extreme caution when handling batteries. The gas generated during storage. See the tire side wall for extended periods, ... any further discomfort, seek prompt medical attention. • If acid spills on , as it inspected and serviced by reversing steps a & b after every 50 hours of the battery clean, especially the top. Use extreme caution when handling batteries.
...can be changed. Have it can freeze sooner than hot. 4. A fully charged battery will leak electrolyte when tipped. Maintenance & Adjustments 23 It is turned on clothing, first dilute it . Use extreme caution when handling batteries. The gas generated during storage. See the tire side wall for extended periods, ... any further discomfort, seek prompt medical attention. • If acid spills on , as it inspected and serviced by reversing steps a & b after every 50 hours of the battery clean, especially the top. Use extreme caution when handling batteries.
Operation Manual
Page 25
...tractor on the mower deck are perpendicular with each other when in the neutral position. Measure the distance from the outside of the deck by turning the adjustment gear. Using a wrench, raise or lower the front of the control lever. 2. Adjusting the Front Gauge Wheels WARNING!: Keep ... middle mowing position and rotate both outside of the deck. Section 6 - Tighten the hex screw to the ground. WARNING! Protect your hands by turning lock nut on page 22 for proper adjustment and proceed, if necessary. 5. If they are an anti-scalp feature, and should be between 1⁄...
...tractor on the mower deck are perpendicular with each other when in the neutral position. Measure the distance from the outside of the deck by turning the adjustment gear. Using a wrench, raise or lower the front of the control lever. 2. Adjusting the Front Gauge Wheels WARNING!: Keep ... middle mowing position and rotate both outside of the deck. Section 6 - Tighten the hex screw to the ground. WARNING! Protect your hands by turning lock nut on page 22 for proper adjustment and proceed, if necessary. 5. If they are an anti-scalp feature, and should be between 1⁄...
Operation Manual
Page 26
... of fuel to use of the spark plug holes. Remove the gauge wheel and shoulder screw. Insert the shoulder screw into the one or two turns to cool. Off-Season Storage Riding Mower Storage If your riding mower. WARNING! NOTE: Use of four index holes in the seperate engine manual. 3. Sharpen...
... of fuel to use of the spark plug holes. Remove the gauge wheel and shoulder screw. Insert the shoulder screw into the one or two turns to cool. Off-Season Storage Riding Mower Storage If your riding mower. WARNING! NOTE: Use of four index holes in the seperate engine manual. 3. Sharpen...

Operation Manual
Page 28
...between the deck idler pulleys and the PTO pulley on the bottom of the PTO pulley. Lowest Mowing Position Figure 7-3 2. See Figure 7-4. 46/50/54" Decks Moveable Idler Pulley 42" Decks Moveable Idler Pulley PTO Pulley PTO Belt Transmission Tube Fixed Idler Pulley Idler Bracket Idler Bracket Fixed Idler... grasp the belt at the front of the engine. Service Rolling the Belt off the PTO pulley. While still holding the belt downward, continue turning the PTO pulley until the belt rides out onto the edge of the lower sheave of the engine. 2. Using the deck lift handle, raise...
...between the deck idler pulleys and the PTO pulley on the bottom of the PTO pulley. Lowest Mowing Position Figure 7-3 2. See Figure 7-4. 46/50/54" Decks Moveable Idler Pulley 42" Decks Moveable Idler Pulley PTO Pulley PTO Belt Transmission Tube Fixed Idler Pulley Idler Bracket Idler Bracket Fixed Idler... grasp the belt at the front of the engine. Service Rolling the Belt off the PTO pulley. While still holding the belt downward, continue turning the PTO pulley until the belt rides out onto the edge of the lower sheave of the engine. 2. Using the deck lift handle, raise...
Operation Manual
Page 32
... of the deck. 4. The cutting blades must be installed. The blades may be sure they are in the "OFF" position, engage the parking brake lever, turn the ignition key to the "OFF" position and remove the key from beneath the tractor, (refer to Deck Removal on the sharpened blades. Service Before...
... of the deck. 4. The cutting blades must be installed. The blades may be sure they are in the "OFF" position, engage the parking brake lever, turn the ignition key to the "OFF" position and remove the key from beneath the tractor, (refer to Deck Removal on the sharpened blades. Service Before...


