
Operation Manual
Page 20
...remove the key. • Doing so will minimize the possibility of the 'V" belt and PTO clutch will result. Fully raise the deck or move the throttle/choke control to the highest position before engaging the mower deck. 1. Engage the PTO clutch using the PTO switch and move to the disengaged... the tractor on inclines with a slope in the reverse direction. Be careful when crossing gravel paths or driveways. Disengage the PTO and raise the deck to the fast position. 4. If leaving the tractor unattended, turn the ignition key off . 5. Pull the PTO switch upward to the desired ...
...remove the key. • Doing so will minimize the possibility of the 'V" belt and PTO clutch will result. Fully raise the deck or move the throttle/choke control to the highest position before engaging the mower deck. 1. Engage the PTO clutch using the PTO switch and move to the disengaged... the tractor on inclines with a slope in the reverse direction. Be careful when crossing gravel paths or driveways. Disengage the PTO and raise the deck to the fast position. 4. If leaving the tractor unattended, turn the ignition key off . 5. Pull the PTO switch upward to the desired ...

Operation Manual
Page 22
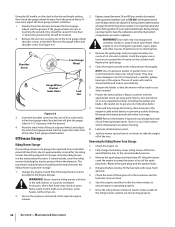
... wheel axles with Cub Cadet 251H EP grease after every 10 hours of the deck. 22 Using the Deck Wash System WARNING! Do not use P Every 10 Hours P P Every 25 Hours P P Every 50 Hours Every 100 Hours Prior to you. Disengage the PTO and stop the engine.... Before performing any bystanders. 8. 1. When using the nozzle at either end of the deck wash nozzles at the other pivot points with a quality lubricating oil. and V-belt. engage the deck from yours. Clean...
... wheel axles with Cub Cadet 251H EP grease after every 10 hours of the deck. 22 Using the Deck Wash System WARNING! Do not use P Every 10 Hours P P Every 25 Hours P P Every 50 Hours Every 100 Hours Prior to you. Disengage the PTO and stop the engine.... Before performing any bystanders. 8. 1. When using the nozzle at either end of the deck wash nozzles at the other pivot points with a quality lubricating oil. and V-belt. engage the deck from yours. Clean...
Operation Manual
Page 26
... Insert the shoulder screw into anapproved container outdoors, away from Storage 1. If stored outside, cover the riding mower (including the tires) to the deck. Replace the spark plugs. 4. The use when needed. 6. Protect the metal surfaces. Check the engine oil. 2. Maintenance & Adjustments If necessary...should be raised. Check the level of fuel to make certain all lubrication points. 9. Service the engine as on the drive belts.) 7. Using the starter, crank the engine to approximately six months), the riding mower should be drained of the engine oil ...
... Insert the shoulder screw into anapproved container outdoors, away from Storage 1. If stored outside, cover the riding mower (including the tires) to the deck. Replace the spark plugs. 4. The use when needed. 6. Protect the metal surfaces. Check the engine oil. 2. Maintenance & Adjustments If necessary...should be raised. Check the level of fuel to make certain all lubrication points. 9. Service the engine as on the drive belts.) 7. Using the starter, crank the engine to approximately six months), the riding mower should be drained of the engine oil ...

Operation Manual
Page 27
... fuse is installed to the battery before removing the belt from damage caused by your Cub Cadet Service Dealer. Remove the 'V' belt from an electrical short caused by contacting the tractor body...PTO pulley, located on the bottom of the engine, using one of Charge 100% 75% 50% 25% Charging Time Full Charge 90 Min. 180 Min. 280 Min. Move the cable ... Move the tractor to their highest setting (lowest deck setting). 3. Service 7 Battery Removal WARNING! Use extreme caution when near the muffler. Move the deck gauge wheels or rollers to a level surface, ...
... fuse is installed to the battery before removing the belt from damage caused by your Cub Cadet Service Dealer. Remove the 'V' belt from an electrical short caused by contacting the tractor body...PTO pulley, located on the bottom of the engine, using one of Charge 100% 75% 50% 25% Charging Time Full Charge 90 Min. 180 Min. 280 Min. Move the cable ... Move the tractor to their highest setting (lowest deck setting). 3. Service 7 Battery Removal WARNING! Use extreme caution when near the muffler. Move the deck gauge wheels or rollers to a level surface, ...

Operation Manual
Page 28
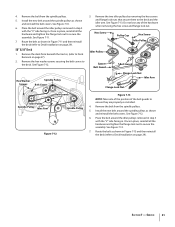
... still holding the belt downward, continue turning the PTO pulley until the belt rides out onto the edge of the lower sheave of the engine. See Figure 7-4. 46/50/54" Decks Moveable Idler Pulley 42" Decks Moveable Idler Pulley PTO Pulley PTO Belt Transmission Tube Fixed Idler... Pulley Idler Bracket Idler Bracket Fixed Idler Pulley Figure 7-4 3. Releasing Belt Tension with the Idler Pulley 1. Using the deck lift handle, raise the deck to the right until the belt is...
... still holding the belt downward, continue turning the PTO pulley until the belt rides out onto the edge of the lower sheave of the engine. See Figure 7-4. 46/50/54" Decks Moveable Idler Pulley 42" Decks Moveable Idler Pulley PTO Pulley PTO Belt Transmission Tube Fixed Idler... Pulley Idler Bracket Idler Bracket Fixed Idler Pulley Figure 7-4 3. Releasing Belt Tension with the Idler Pulley 1. Using the deck lift handle, raise the deck to the right until the belt is...

Operation Manual
Page 29
...7-6. Refer to Figure 7-6. 7. Make certain the belt is not twisted; then reach beneath the tractor to grasp the belt and pull it Deck Installation to place a small block of the engine. 9. Slide the deck lift rod out of the deck. Deck Release Pin 11. Pull the release pins outward ...and release the deck from beneath the tractor. Sitting...
...7-6. Refer to Figure 7-6. 7. Make certain the belt is not twisted; then reach beneath the tractor to grasp the belt and pull it Deck Installation to place a small block of the engine. 9. Slide the deck lift rod out of the deck. Deck Release Pin 11. Pull the release pins outward ...and release the deck from beneath the tractor. Sitting...

Operation Manual
Page 30
... ensure they are properly re-installed. Replacing the Belt 42" Deck 1. Belt Cover Hex Washer Screws Spindle Pulley Spindle Pulley Idler Pulley Idler Arm PTO Pulley Belt Guards Idler Pulley Figure 7-8 3. Remove the hex washer screws securing the belt covers to Deck Installation on page 27). 2. Place the belt around the spindle pulleys as shown in Figure...
... ensure they are properly re-installed. Replacing the Belt 42" Deck 1. Belt Cover Hex Washer Screws Spindle Pulley Spindle Pulley Idler Pulley Idler Arm PTO Pulley Belt Guards Idler Pulley Figure 7-8 3. Remove the hex washer screws securing the belt covers to Deck Installation on page 27). 2. Place the belt around the spindle pulleys as shown in Figure...
Operation Manual
Page 31
... position of the hardware when removing the hex screw and flange lock nut. Route the belt as shown and reinstall the belt covers. Remove the deck from beneath the tractor, (refer to Deck Installation on page 29). 50" & 54" Deck 1. Place the belt around the idler pulleys removed in step 3 with the "V" side facing in Figure 7-11...
... position of the hardware when removing the hex screw and flange lock nut. Route the belt as shown and reinstall the belt covers. Remove the deck from beneath the tractor, (refer to Deck Installation on page 29). 50" & 54" Deck 1. Place the belt around the idler pulleys removed in step 3 with the "V" side facing in Figure 7-11...
Operation Manual
Page 32
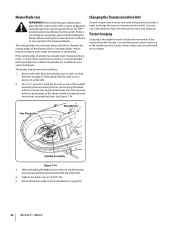
...must be removed and special tools used in the neutral position. New blades are available at all times. Changing the Transmission Drive Belt Several components must be placed between the deck housing and the cutting edge of the blade to help in the "OFF" position, engage the parking brake lever, turn the... are in order to hold the hex nut on page 29). 32 Section 7- Use a 15⁄16" wrench to change the tractor's transmission drive belt. See Figure 7-14. If the cutting edge of wood may be installed. When reinstalling the blades, be careful not to cut yourself on page 27...
...must be removed and special tools used in the neutral position. New blades are available at all times. Changing the Transmission Drive Belt Several components must be placed between the deck housing and the cutting edge of the blade to help in the "OFF" position, engage the parking brake lever, turn the... are in order to hold the hex nut on page 29). 32 Section 7- Use a 15⁄16" wrench to change the tractor's transmission drive belt. See Figure 7-14. If the cutting edge of wood may be installed. When reinstalling the blades, be careful not to cut yourself on page 27...

Operation Manual
Page 34
...-04033A 954-04325 954-05008 954-04329 Deck Belt, RZT L42 Deck Belt, RZT L46 Deck Belt, RZT L50 Deck Belt, RZT L54 954-04317 Drive Belt 942-04312 942-04244A 942-04053C 942-04053C-X 942-0677B 942-0677-X Deck Blade, RZT L42 Deck Blade, RZT L46 Deck Blade, RZT L50 Extreme Blade, RZT L50 Deck Blade, RZT L54 Extreme Blade, RZT L54...
...-04033A 954-04325 954-05008 954-04329 Deck Belt, RZT L42 Deck Belt, RZT L46 Deck Belt, RZT L50 Deck Belt, RZT L54 954-04317 Drive Belt 942-04312 942-04244A 942-04053C 942-04053C-X 942-0677B 942-0677-X Deck Blade, RZT L42 Deck Blade, RZT L46 Deck Blade, RZT L50 Extreme Blade, RZT L50 Deck Blade, RZT L54 Extreme Blade, RZT L54...

Operation Manual
Page 40
...g. Some states do not allow the exclusion or limitation of Purchase to items such as : batteries, belts, blades, blade adapters, tines, grass bags, wheels, rider deck wheels, seats, snow thrower skid shoes, friction wheels, shave plates, auger spiral rubber and tires. Alteration... or exposure. h. Troy-Bilt does not warrant this product for use , neglect, accident, improper maintenance, alteration, vandalism, theft, fire, water, or damage because of the product as lubricants, filters, blade sharpening, tune-ups, brake adjustments, clutch adjustments, deck adjustments, and normal ...
...g. Some states do not allow the exclusion or limitation of Purchase to items such as : batteries, belts, blades, blade adapters, tines, grass bags, wheels, rider deck wheels, seats, snow thrower skid shoes, friction wheels, shave plates, auger spiral rubber and tires. Alteration... or exposure. h. Troy-Bilt does not warrant this product for use , neglect, accident, improper maintenance, alteration, vandalism, theft, fire, water, or damage because of the product as lubricants, filters, blade sharpening, tune-ups, brake adjustments, clutch adjustments, deck adjustments, and normal ...

Parts Manual
Page 11
..., Shoulder, .5 x 2.5:3/8-16 33 742-04053A Blade, 2 in 1, 17.9 Lg 34 747-1116 Rod, Deck Hanger 35 754-04044A Belt V, Type A Sec x 134 36 756-04129 Pulley, Idler, 4.25 Dia 37 783-04399 Cover, Belt LH 38 783-04400 Cover, Belt RH 39 783-04414 Skirt, Center 40 783-04415 Skirt, RH 41 783-05030..., Hex Cap, 5/16-18 x 1.25 GR5 10 710-0599 Screw, Hex Wash. Tapp, 5/16-12 x .75 12 710-1260A Screw, Hex Wash. Part No. TroyBilt Mustang 50" RZT 11 Mower Deck Ref.
..., Shoulder, .5 x 2.5:3/8-16 33 742-04053A Blade, 2 in 1, 17.9 Lg 34 747-1116 Rod, Deck Hanger 35 754-04044A Belt V, Type A Sec x 134 36 756-04129 Pulley, Idler, 4.25 Dia 37 783-04399 Cover, Belt LH 38 783-04400 Cover, Belt RH 39 783-04414 Skirt, Center 40 783-04415 Skirt, RH 41 783-05030..., Hex Cap, 5/16-18 x 1.25 GR5 10 710-0599 Screw, Hex Wash. Tapp, 5/16-12 x .75 12 710-1260A Screw, Hex Wash. Part No. TroyBilt Mustang 50" RZT 11 Mower Deck Ref.


