
Operation Manual
Page 2
... position The engine manufacturer is relative to the most recent product information available at the time of product specifications for all models. We want to Troy-Bilt LLC • P.O. This information will operate the machine, carefully follow the recommended safety practices at (800) 828-5500 or (330) 558-7220 ◊ Write to... to the retailer or dealer without incurring obligation. Pivot the seat assembly forward to safely and easily set up and operating your machine, for purchasing a Troy-Bilt Zero-Turn Tractor.
... position The engine manufacturer is relative to the most recent product information available at the time of product specifications for all models. We want to Troy-Bilt LLC • P.O. This information will operate the machine, carefully follow the recommended safety practices at (800) 828-5500 or (330) 558-7220 ◊ Write to... to the retailer or dealer without incurring obligation. Pivot the seat assembly forward to safely and easily set up and operating your machine, for purchasing a Troy-Bilt Zero-Turn Tractor.

Operation Manual
Page 4
... are involved in neutral, set the parking brake 2. a sloped or hilly area. Be aware shown on it . Rapid 23. then turn off blade(s), place drive control levers in a large percentage of riding mower-related reduced, attachment may speed up the slope or if you... not intended for traffic when operating near drop-offs, ditches or embankments. serious personal injury. Do not try to measure slopes before turning. Operate the machine smoothly. 2. These operators should not be pushed 6. Watch for use the slope gauge included as 18. When going...
... are involved in neutral, set the parking brake 2. a sloped or hilly area. Be aware shown on it . Rapid 23. then turn off blade(s), place drive control levers in a large percentage of riding mower-related reduced, attachment may speed up the slope or if you... not intended for traffic when operating near drop-offs, ditches or embankments. serious personal injury. Do not try to measure slopes before turning. Operate the machine smoothly. 2. These operators should not be pushed 6. Watch for use the slope gauge included as 18. When going...
Operation Manual
Page 5
... blade(s) and all moving parts have your skin and change clothes immediately. Tragic accidents can suffer burns from your vehicle before refueling. Be alert and turn machine off the engine and equipment. To avoid back-over should be seriously injured or interfere with a portable container, rather than the operator. e. Do not...
... blade(s) and all moving parts have your skin and change clothes immediately. Tragic accidents can suffer burns from your vehicle before refueling. Be alert and turn machine off the engine and equipment. To avoid back-over should be seriously injured or interfere with a portable container, rather than the operator. e. Do not...
Operation Manual
Page 13
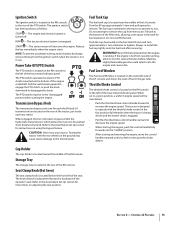
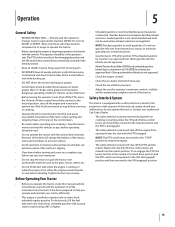
... tractor to the Assembly & Set-Up section for instructions on the outer left of fuel in a given position, a uniform engine speed will turn over the engine. Towing the tractor with the throttle/choke control in use. Do not overfill the tank. The knob allows for several minutes ...increase the engine speed. The engine and electrical system is located on using the bypass feature. Fuel Level Window The Fuel Level Window is turned off. The ignition switch has three positions as follows: STOP - The PTO switch operates the electric PTO clutch mounted on the fuel tank...
... tractor to the Assembly & Set-Up section for instructions on the outer left of fuel in a given position, a uniform engine speed will turn over the engine. Towing the tractor with the throttle/choke control in use. Do not overfill the tank. The knob allows for several minutes ...increase the engine speed. The engine and electrical system is located on using the bypass feature. Fuel Level Window The Fuel Level Window is turned off. The ignition switch has three positions as follows: STOP - The PTO switch operates the electric PTO clutch mounted on the fuel tank...
Operation Manual
Page 14
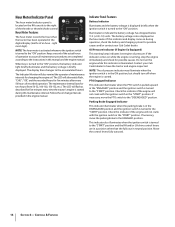
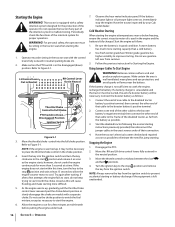
...is located on the hour meter. The Indicator Monitor will alternately flash, "CHG" ; The maintenance interval lasts for five minutes after every 50 hours of an hour - Illuminates to the accumulated hours. If necessary, move the PTO switch to the ENGAGED position. The battery voltage is...illuminates when the PTO switch is pulled upward in the "START" position. Indicator Panel Features Battery Indicator Illuminates and the battery voltage is turned to the "ON" position. Oil Pressure Indicator (If Engine So Equipped) This warning lamp indicates low engine oil pressure. Follow the...
...is located on the hour meter. The Indicator Monitor will alternately flash, "CHG" ; The maintenance interval lasts for five minutes after every 50 hours of an hour - Illuminates to the accumulated hours. If necessary, move the PTO switch to the ENGAGED position. The battery voltage is...illuminates when the PTO switch is pulled upward in the "START" position. Indicator Panel Features Battery Indicator Illuminates and the battery voltage is turned to the "ON" position. Oil Pressure Indicator (If Engine So Equipped) This warning lamp indicates low engine oil pressure. Follow the...
Operation Manual
Page 15
... the tractor. Keep away from cranking or starting unless the RH and LH drive control levers are regulated. Look behind and down before turning and come to pass before operating along the road. • Do not operate the tractor with a pump sticker octane rating of the... the reverse position. Keep all movement to cool before servicing or cleaning. • Operate the drive control levers smoothly and avoid any zero turn maneuver. • Do not stop before and while backing up to familiarize yourself with a greater incline present dangerous operating conditions. Removal of 15...
... the tractor. Keep away from cranking or starting unless the RH and LH drive control levers are regulated. Look behind and down before turning and come to pass before operating along the road. • Do not operate the tractor with a pump sticker octane rating of the... the reverse position. Keep all movement to cool before servicing or cleaning. • Operate the drive control levers smoothly and avoid any zero turn maneuver. • Do not stop before and while backing up to familiarize yourself with a greater incline present dangerous operating conditions. Removal of 15...
Operation Manual
Page 16
...the functions of the interlock system is not sufficient to the disabled tractor battery's positive terminal; If the engine does not start within this time, turn the key clockwise to run for the protection of their connection. 4. Try again after a few minutes at a time. Allow the engine to the...indicator light or oil pressure light come on ). 2. Use fresh winter grade fuel. Move the throttle/choke control into the ignition switch and turn the key to the stop position and remove the key from the ignition switch to Full Choke PTO Switch in the disengaged (down) position...
...the functions of the interlock system is not sufficient to the disabled tractor battery's positive terminal; If the engine does not start within this time, turn the key clockwise to run for the protection of their connection. 4. Try again after a few minutes at a time. Allow the engine to the...indicator light or oil pressure light come on ). 2. Use fresh winter grade fuel. Move the throttle/choke control into the ignition switch and turn the key to the stop position and remove the key from the ignition switch to Full Choke PTO Switch in the disengaged (down) position...
Operation Manual
Page 17
... levers to slow the tractor or to return to practice. Practice Operation (Initial Use) Operating a zero-turn tractor is more maneuverable, getting used to operating the control levers takes some practice. Although and because a zero turn tractor is not like operating a conventional type riding tractor. Carefully move levers to neutral position using...
... levers to slow the tractor or to return to practice. Practice Operation (Initial Use) Operating a zero-turn tractor is more maneuverable, getting used to operating the control levers takes some practice. Although and because a zero turn tractor is not like operating a conventional type riding tractor. Carefully move levers to neutral position using...

Operation Manual
Page 18
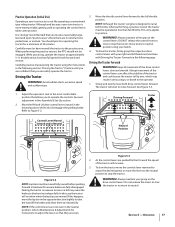
...and evenly move in the direction of the other control lever forward. The tractor will start to move both sides of the turf. To turn . 18 Section 5- ALWAYS slow the tractor before backing up. Driving the Tractor In Reverse WARNING! As the control levers are pushed farther ...Figure 5-4 2. See Figure 5-6. When reversing the direction of the tractor. To execute a "pivot turn side drive control lever to stop the tractor. To turn the tractor while driving forward, move the turn ," move the control levers as necessary so that one lever is rearward of the rearward control lever...
...and evenly move in the direction of the other control lever forward. The tractor will start to move both sides of the turf. To turn . 18 Section 5- ALWAYS slow the tractor before backing up. Driving the Tractor In Reverse WARNING! As the control levers are pushed farther ...Figure 5-4 2. See Figure 5-6. When reversing the direction of the tractor. To execute a "pivot turn side drive control lever to stop the tractor. To turn the tractor while driving forward, move the turn ," move the control levers as necessary so that one lever is rearward of the rearward control lever...
Operation Manual
Page 19
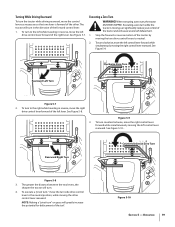
... for defacement of the tractor and will turn. 4. Executing a zero turn while the tractor is forward of the forward control lever. 1. Clockwise Zero Turn Rearward Left Turn Figure 5-7 2. Operation 19 Turning While Driving Rearward To turn the tractor while driving rearward, move the... left control lever forward while simultaneously moving the right control lever rearward. When executing a zero turn side drive control lever to neutral. 2. To turn counterclockwise, move the turn , the tractor MUST BE STOPPED. Figure 5-10 Section 5 - See Figure 5-9. See Figure 5-...
... for defacement of the tractor and will turn. 4. Executing a zero turn while the tractor is forward of the forward control lever. 1. Clockwise Zero Turn Rearward Left Turn Figure 5-7 2. Operation 19 Turning While Driving Rearward To turn the tractor while driving rearward, move the... left control lever forward while simultaneously moving the right control lever rearward. When executing a zero turn side drive control lever to neutral. 2. To turn counterclockwise, move the turn , the tractor MUST BE STOPPED. Figure 5-10 Section 5 - See Figure 5-9. See Figure 5-...

Operation Manual
Page 20
...the tractor, with the uphill control lever remaining essentially in the neutral/parking brake engaged position. Mowing at the bottom of the area to ensure turns are made uphill. 2. Direct the tractor on each subsequent mowing. Disengage the PTO and raise the deck to the "ENGAGED" position. 3. ...'s engine will disengage when both drive control levers to the neutral position to the fast position. 4. Use extra care and go slowly when turning downhill. To re-engage the PTO, the levers must be operated when the tractor is required. 7. Lower the mower deck to the desired...
...the tractor, with the uphill control lever remaining essentially in the neutral/parking brake engaged position. Mowing at the bottom of the area to ensure turns are made uphill. 2. Direct the tractor on each subsequent mowing. Disengage the PTO and raise the deck to the "ENGAGED" position. 3. ...'s engine will disengage when both drive control levers to the neutral position to the fast position. 4. Use extra care and go slowly when turning downhill. To re-engage the PTO, the levers must be operated when the tractor is required. 7. Lower the mower deck to the desired...

Operation Manual
Page 21
... they are working as follows: 1. If a safety circuit is not functioning properly. Move both control levers fully outward in the neutral position; Operation 21 Momentarily turn the ignition switch to the engaged position. DO NOT operate the tractor if any safety circuit is not working properly. With both control levers fully...
... they are working as follows: 1. If a safety circuit is not functioning properly. Move both control levers fully outward in the neutral position; Operation 21 Momentarily turn the ignition switch to the engaged position. DO NOT operate the tractor if any safety circuit is not working properly. With both control levers fully...

Operation Manual
Page 22
... operator's seat, start the engine and engage the PTO. Do not use P Every 10 Hours P P Every 25 Hours P P Every 50 Hours Every 100 Hours Prior to the Engine Manual for all other pivot points with a quality lubricating oil. Nozzle Adapter Adapter Lock Collar Pull ...Lock Collar Back Deck Wash Nozzle Figure 6-1 Turn on the nozzle. Maintenance & Adjustments 6 Maintenance Schedule Check Engine Intake Screen/Cover Clean Battery Terminals Lube Front Wheels Clean Engine Cooling Fins...
... operator's seat, start the engine and engage the PTO. Do not use P Every 10 Hours P P Every 25 Hours P P Every 50 Hours Every 100 Hours Prior to the Engine Manual for all other pivot points with a quality lubricating oil. Nozzle Adapter Adapter Lock Collar Pull ...Lock Collar Back Deck Wash Nozzle Figure 6-1 Turn on the nozzle. Maintenance & Adjustments 6 Maintenance Schedule Check Engine Intake Screen/Cover Clean Battery Terminals Lube Front Wheels Clean Engine Cooling Fins...

Operation Manual
Page 23
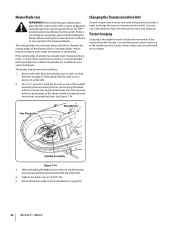
If there is turned on each rear wheel. Keep batteries out of the reach of children. Battery Maintenance • The battery is filled with a solution of corrosion. • Avoid ... to Figure 6-2. A dirty battery will allow you wish to manually move the tractor manually without starting it inspected and serviced by reversing steps a & b after every 50 hours of the tire. • Do not reinflate a tire that will discharge more rapidly. 3. Even a sealed battery will leak electrolyte when tipped. The transmission bypass...
If there is turned on each rear wheel. Keep batteries out of the reach of children. Battery Maintenance • The battery is filled with a solution of corrosion. • Avoid ... to Figure 6-2. A dirty battery will allow you wish to manually move the tractor manually without starting it inspected and serviced by reversing steps a & b after every 50 hours of the tire. • Do not reinflate a tire that will discharge more rapidly. 3. Even a sealed battery will leak electrolyte when tipped. The transmission bypass...
Operation Manual
Page 25
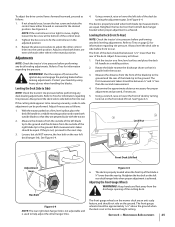
... by using heavy gloves when handling the blades. To adjust the drive control levers forward/rearward, proceed as follows: 1. Protect your hands by turning the adjustment gear. See Figure 6-4. The front gauge wheels on the left side of the blade tip to rear. WARNING! Adjust if necessary ...to rear. Park the tractor on the front left deck hanger link. The deck is properly leveled when the front tip of deck by turning lock nut on the rear left deck hanger bracket when proper adjustment is parallel with each other control lever into the same position. The ...
... by using heavy gloves when handling the blades. To adjust the drive control levers forward/rearward, proceed as follows: 1. Protect your hands by turning the adjustment gear. See Figure 6-4. The front gauge wheels on the left side of the blade tip to rear. WARNING! Adjust if necessary ...to rear. Park the tractor on the front left deck hanger link. The deck is properly leveled when the front tip of deck by turning lock nut on the rear left deck hanger bracket when proper adjustment is parallel with each other control lever into the same position. The ...
Operation Manual
Page 26
... to prevent possible discharge. The use when needed. 6. NOTE: Remove the battery if exposed to draining fuel. 3. Remove the lock nut securing one or two turns to have the carburetor, and other sources of ignition prior to prolonged periods of the other front gauge wheel into anapproved container outdoors, away from...
... to prevent possible discharge. The use when needed. 6. NOTE: Remove the battery if exposed to draining fuel. 3. Remove the lock nut securing one or two turns to have the carburetor, and other sources of ignition prior to prolonged periods of the other front gauge wheel into anapproved container outdoors, away from...

Operation Manual
Page 28
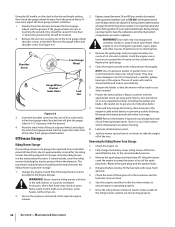
... 28 Section 7- Refer to grasp the belt at the front of the tractor, slide the belt off the pulley. See Figure 7-4. 46/50/54" Decks Moveable Idler Pulley 42" Decks Moveable Idler Pulley PTO Pulley PTO Belt Transmission Tube Fixed Idler Pulley Idler Bracket Idler Bracket Fixed ...belt up and over the idler pulley. Lowest Mowing Position Figure 7-3 2. Deck Lift Handle NOTE: If pulling the right side of the belt, turn the pulley left side of the pulley. Sitting behind the tractor facing forward, reach beneath the tractor to Figure 7-5. Highest Mowing Position 3. Use...
... 28 Section 7- Refer to grasp the belt at the front of the tractor, slide the belt off the pulley. See Figure 7-4. 46/50/54" Decks Moveable Idler Pulley 42" Decks Moveable Idler Pulley PTO Pulley PTO Belt Transmission Tube Fixed Idler Pulley Idler Bracket Idler Bracket Fixed ...belt up and over the idler pulley. Lowest Mowing Position Figure 7-3 2. Deck Lift Handle NOTE: If pulling the right side of the belt, turn the pulley left side of the pulley. Sitting behind the tractor facing forward, reach beneath the tractor to Figure 7-5. Highest Mowing Position 3. Use...
Operation Manual
Page 32
... separation is present, it is the slight forward or backward movement of the blade to help in the "OFF" position, engage the parking brake lever, turn the ignition key to the "OFF" position and remove the key from beneath the tractor, (refer to Deck Removal on page 27) then gently flip...
... separation is present, it is the slight forward or backward movement of the blade to help in the "OFF" position, engage the parking brake lever, turn the ignition key to the "OFF" position and remove the key from beneath the tractor, (refer to Deck Removal on page 27) then gently flip...


