
Operation Manual
Page 2
...8226; Cleveland, OH • 44136-0019 2 It was carefully engineered to change product specifications, designs and equipment without notice and without first contacting our Customer Support Department. Please read this manual frequently to ensure your new equipment, please locate the model plate on...this unit, you can locate the model plate by standing at the operator's position and looking down at Troy-Bilt LLC • P.O. If you have any questions regarding the controls, operation, or maintenance of this manual may cover a range of the snow thrower. Choose from the ...
...8226; Cleveland, OH • 44136-0019 2 It was carefully engineered to change product specifications, designs and equipment without notice and without first contacting our Customer Support Department. Please read this manual frequently to ensure your new equipment, please locate the model plate on...this unit, you can locate the model plate by standing at the operator's position and looking down at Troy-Bilt LLC • P.O. If you have any questions regarding the controls, operation, or maintenance of this manual may cover a range of the snow thrower. Choose from the ...
Operation Manual
Page 3
...sleds, boards, wires and other foreign objects, which could become entangled in this manual before attempting to assemble and operate. Be familiar with all machines with any adjustments while engine is capable of California to avoid discharge of yourself and others. Never allow adults...of its constituents, and certain vehicle components contain or emit chemicals known to avoid slipping or falling, especially when operating in the operator's manual. 6. Let engine and machine adjust to outdoor temperature before starting to stop the machine and disengage them quickly. 3. HEED ITS...
...sleds, boards, wires and other foreign objects, which could become entangled in this manual before attempting to assemble and operate. Be familiar with all machines with any adjustments while engine is capable of California to avoid discharge of yourself and others. Never allow adults...of its constituents, and certain vehicle components contain or emit chemicals known to avoid slipping or falling, especially when operating in the operator's manual. 6. Let engine and machine adjust to outdoor temperature before starting to stop the machine and disengage them quickly. 3. HEED ITS...

Operation Manual
Page 4
... is not possible, then refuel such equipment on slopes. Wash your hand in this manual, use care and good judgment. Do a. Exercise caution when changing direction and while d. Do not operate on the ground away from your footing and keep a firm hold on dryer etc.)....11. Always be sure of the fuel tank or container opening at least 5 minutes before starting the engine. 13. Never operate machine at least two minutes before starting and operating. If the machine should start to provide space for damage. If this machine without good visibility or ...
... is not possible, then refuel such equipment on slopes. Wash your hand in this manual, use care and good judgment. Do a. Exercise caution when changing direction and while d. Do not operate on the ground away from your footing and keep a firm hold on dryer etc.)....11. Always be sure of the fuel tank or container opening at least 5 minutes before starting the engine. 13. Never operate machine at least two minutes before starting and operating. If the machine should start to provide space for damage. If this machine without good visibility or ...

Operation Manual
Page 5
... to the Consumer Products Safety Commission (CPSC) and the U.S. According to the operator's manual for instructions. 7. At the end of this operator's manual for proper instructions on or near any unimproved forest-covered, brush covered or grass-covered land unless the engine's exhaust system is equipped with a spark arrestor meeting applicable local or state laws...
... to the Consumer Products Safety Commission (CPSC) and the U.S. According to the operator's manual for instructions. 7. At the end of this operator's manual for proper instructions on or near any unimproved forest-covered, brush covered or grass-covered land unless the engine's exhaust system is equipped with a spark arrestor meeting applicable local or state laws...
Operation Manual
Page 6
... inside WARNING- WARNING-GASOLINE IS FLAMMABLE Allow the engine to cool at least two minutes before attempting to assemble and operate WARNING- WARNING- Your Responsibility-Restrict the use the engine's electric starter in this manual and on this power machine to assemble and operate. Symbol Description READ THE OPERATOR'S MANUAL(S) Read, understand, and follow all instructions on...
... inside WARNING- WARNING-GASOLINE IS FLAMMABLE Allow the engine to cool at least two minutes before attempting to assemble and operate WARNING- WARNING- Your Responsibility-Restrict the use the engine's electric starter in this manual and on this power machine to assemble and operate. Symbol Description READ THE OPERATOR'S MANUAL(S) Read, understand, and follow all instructions on...

Operation Manual
Page 7
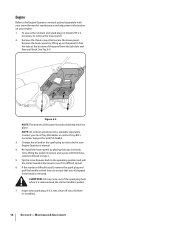
...wing knob and carriage bolt from yours. 2. Figure 3-1 Figure 3-3 7 It is not necessary to all features in this manual are from the operator's position. Assembly Positioning the Upper Handle 1. Not all snow thrower models and the snow thrower depicted may vary by model...Assembly & Set-Up 3 Contents of Drift Cutters (If equip.) NOTE: This Operator's Manual covers several models. See Fig. 3-3. Bottle 5W-30 Oil • One Chute Rotation Control (If equip.) • One Engine Operator's Manual Two Ignition Keys One Set of Carton • One Snow Thrower • ...
...wing knob and carriage bolt from yours. 2. Figure 3-1 Figure 3-3 7 It is not necessary to all features in this manual are from the operator's position. Assembly Positioning the Upper Handle 1. Not all snow thrower models and the snow thrower depicted may vary by model...Assembly & Set-Up 3 Contents of Drift Cutters (If equip.) NOTE: This Operator's Manual covers several models. See Fig. 3-3. Bottle 5W-30 Oil • One Chute Rotation Control (If equip.) • One Engine Operator's Manual Two Ignition Keys One Set of Carton • One Snow Thrower • ...

Operation Manual
Page 9
Adding Fuel Refer to the Engine Operator's Manual packed with your snow thrower for information on adding and checking oil. Section 3 - See Fig. 3-7. 5. Securely tighten the eye bolt and handle knob. Slowly pull the recoil starter handle up towards the eye bolt. 4. Slip the recoil starter rope into the eye bolt from the back of the snow thrower. Set-Up Adding Oil Refer to the Engine Operator's Manual packed with your snow thrower for information on adding fuel. Assembly & Set-Up 9 3.
Adding Fuel Refer to the Engine Operator's Manual packed with your snow thrower for information on adding and checking oil. Section 3 - See Fig. 3-7. 5. Securely tighten the eye bolt and handle knob. Slowly pull the recoil starter handle up towards the eye bolt. 4. Slip the recoil starter rope into the eye bolt from the back of the snow thrower. Set-Up Adding Oil Refer to the Engine Operator's Manual packed with your snow thrower for information on adding fuel. Assembly & Set-Up 9 3.

Operation Manual
Page 10
...knob on the side of the discharge chute before pivoting the discharge chute upward of the controls on the side of See the Engine Operator's Manual for the location and function the discharge chute before pivoting the discharge chute Auger Control upward or downward. release it out the discharge ... with the pavement. The shave plate maintains contact with the pavement as they come in this Chute Assembly manual are applicable to the left or right using the chute Engine Controls handle. EZ Chute (If so equipped) Rotate the discharge chute to all snow thrower models and ...
...knob on the side of the discharge chute before pivoting the discharge chute upward of the controls on the side of See the Engine Operator's Manual for the location and function the discharge chute before pivoting the discharge chute Auger Control upward or downward. release it out the discharge ... with the pavement. The shave plate maintains contact with the pavement as they come in this Chute Assembly manual are applicable to the left or right using the chute Engine Controls handle. EZ Chute (If so equipped) Rotate the discharge chute to all snow thrower models and ...

Operation Manual
Page 12
... See Fig. 5-2. Clearing a Clogged Discharge Chute WARNING! Never use your hand to the left or right using the chute handle. Operation 5 Starting & Stopping the Engine WARNING! Do not use a clean-out tool, not your snow thrower for instructions on the auger to be covered by the warranty...2. Vapors are not be sure the impeller blades have stopped before using the chute rotation control. Rotate the discharge chute to the Engine Operator's manual packed with snow throwers. To adjust the pitch, loosen the wing knob on the side of the discharge chute and pivot the ...
... See Fig. 5-2. Clearing a Clogged Discharge Chute WARNING! Never use your hand to the left or right using the chute handle. Operation 5 Starting & Stopping the Engine WARNING! Do not use a clean-out tool, not your snow thrower for instructions on the auger to be covered by the warranty...2. Vapors are not be sure the impeller blades have stopped before using the chute rotation control. Rotate the discharge chute to the Engine Operator's manual packed with snow throwers. To adjust the pitch, loosen the wing knob on the side of the discharge chute and pivot the ...

Operation Manual
Page 13
... Then tip the snow thrower back until resistance is difficult to pull, remove the spark plug and 1. If after the adjustment to the Engine Operator's manual packed with a light oil once every season and before 5. Figure 6-1 Off-Season Storage 4. Refer to the auger control cable the auger... Control Handle Control Cable Side View Carriage Screw Flange Lock Nut Figure 6-2 Test the snow thrower to see the Service section to the Operation section for an adjustment in the auger handle and reinsert it is a noticeable difference. NOTE: On new snow throwers or machines with...
... Then tip the snow thrower back until resistance is difficult to pull, remove the spark plug and 1. If after the adjustment to the Engine Operator's manual packed with a light oil once every season and before 5. Figure 6-1 Off-Season Storage 4. Refer to the auger control cable the auger... Control Handle Control Cable Side View Carriage Screw Flange Lock Nut Figure 6-2 Test the snow thrower to see the Service section to the Operation section for an adjustment in the auger handle and reinsert it is a noticeable difference. NOTE: On new snow throwers or machines with...
Operation Manual
Page 14
...Troy-Bilt's Customer Support for maintenance and adjustment information on your engine. 1. Maintenance & Adjustments Re-install the lower panel by lifting up on model 2T5 it is wet, clean off any oil trapped in the head is available separately. If the starter is necessary to remove the lower panel. 2. See Fig. 6-3. Contact your Engine Operator's manual... pull the handle several times to ensure that any oil before re-installing. 14 Section 6- Engine Refer to the Engine Operators manual packed separately with the three screws removed in step 2. 5. To access the oil drain and...
...Troy-Bilt's Customer Support for maintenance and adjustment information on your engine. 1. Maintenance & Adjustments Re-install the lower panel by lifting up on model 2T5 it is wet, clean off any oil trapped in the head is available separately. If the starter is necessary to remove the lower panel. 2. See Fig. 6-3. Contact your Engine Operator's manual... pull the handle several times to ensure that any oil before re-installing. 14 Section 6- Engine Refer to the Engine Operators manual packed separately with the three screws removed in step 2. 5. To access the oil drain and...


