
Operation Manual
Page 1
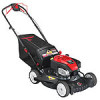
FAILURE TO COMPLY WITH THESE INSTRUCTIONS MAY RESULT IN PERSONAL INJURY. Printed In USA TROY-BILT LLC, P.O. BOX 361131 CLEVELAND, OHIO 44136-0019 Form No. 769-06390 (December 20, 2010) Safe Operation Practices • Set-Up • Operation • Maintenance • Service • Troubleshooting • Warranty Operator's Manual Self Propelled Mower - Models TB330 XP/ TB350 XP WARNING READ AND FOLLOW ALL SAFETY RULES AND INSTRUCTIONS IN THIS MANUAL BEFORE ATTEMPTING TO OPERATE THIS MACHINE.
FAILURE TO COMPLY WITH THESE INSTRUCTIONS MAY RESULT IN PERSONAL INJURY. Printed In USA TROY-BILT LLC, P.O. BOX 361131 CLEVELAND, OHIO 44136-0019 Form No. 769-06390 (December 20, 2010) Safe Operation Practices • Set-Up • Operation • Maintenance • Service • Troubleshooting • Warranty Operator's Manual Self Propelled Mower - Models TB330 XP/ TB350 XP WARNING READ AND FOLLOW ALL SAFETY RULES AND INSTRUCTIONS IN THIS MANUAL BEFORE ATTEMPTING TO OPERATE THIS MACHINE.
Operation Manual
Page 2
... the machine, phone an authorized Troy-Bilt service dealer or contact us on this manual, all references to right and left side of Contents Safe Operation Practices 3 Assembly & Set-Up 9 Controls & Features 13 Operation 14 Maintenance & Adjustment 16 Service 18 Troubleshooting 20 Replacement Parts 21 Warranty 22 Spanish 23 Record Product Information Before setting up , operate and maintain your new equipment, please locate the model plate on the equipment and record...
... the machine, phone an authorized Troy-Bilt service dealer or contact us on this manual, all references to right and left side of Contents Safe Operation Practices 3 Assembly & Set-Up 9 Controls & Features 13 Operation 14 Maintenance & Adjustment 16 Service 18 Troubleshooting 20 Replacement Parts 21 Warranty 22 Spanish 23 Record Product Information Before setting up , operate and maintain your new equipment, please locate the model plate on the equipment and record...
Operation Manual
Page 3
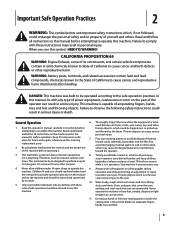
... familiar with the controls and the proper use this manual in a safe place for future and regular reference and for any type of this manual to protect your mowing pattern to the safe operation practices in this machine. Wear sturdy, rough-soled work shoes and close-fitting 5. Important Safe Operation Practices 2 WARNING: This symbol points out important safety instructions which, if not...
... familiar with the controls and the proper use this manual in a safe place for future and regular reference and for any type of this manual to protect your mowing pattern to the safe operation practices in this machine. Wear sturdy, rough-soled work shoes and close-fitting 5. Important Safe Operation Practices 2 WARNING: This symbol points out important safety instructions which, if not...

Operation Manual
Page 4
... before removing the grass catcher or unclogging the chute. Never operate mower without proper trail shield, discharge cover, grass catcher, blade control or other than 15 degrees, do not mow it . Never operate mower with sure footing. Watch for a few seconds after the blade control is a safety device. Always be trained and supervised by the manufacturer. Muffler and engine become hot and can cause you are not covered in this manual, use...
... before removing the grass catcher or unclogging the chute. Never operate mower without proper trail shield, discharge cover, grass catcher, blade control or other than 15 degrees, do not mow it . Never operate mower with sure footing. Watch for a few seconds after the blade control is a safety device. Always be trained and supervised by the manufacturer. Muffler and engine become hot and can cause you are not covered in this manual, use...

Operation Manual
Page 5
Allow engine to another area. Replace gasoline cap and tighten securely. 11. Check the blade and engine mounting bolts at frequent intervals for fuel expansion. 10. "Use of engine governor. Mower blades are subject to wear and damage which do not meet the original equipment specifications may lead to operate at least two minutes before refueling. 9. Never tamper with original equipment manufacturer's (O.E.M.) parts only, listed in this is...
Allow engine to another area. Replace gasoline cap and tighten securely. 11. Check the blade and engine mounting bolts at frequent intervals for fuel expansion. 10. "Use of engine governor. Mower blades are subject to wear and damage which do not meet the original equipment specifications may lead to operate at least two minutes before refueling. 9. Never tamper with original equipment manufacturer's (O.E.M.) parts only, listed in this is...
Operation Manual
Page 7
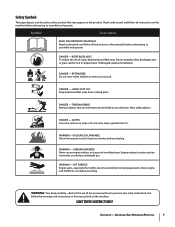
... operate unless discharge cover or grass catcher is in a poorly ventilated area. DANGER - warning: Your Responsibility-Restrict the use of injury, keep hands and feet away. SAVE THESE INSTRUCTIONS! If damaged, replace immediately. Wear safety glasses. Do not mow slopes greater than 15°. Engine exhaust contains carbon monoxide, an odorless and deadly gas. THROWN DEBRIS Remove objects that may appear on this manual...
... operate unless discharge cover or grass catcher is in a poorly ventilated area. DANGER - warning: Your Responsibility-Restrict the use of injury, keep hands and feet away. SAVE THESE INSTRUCTIONS! If damaged, replace immediately. Wear safety glasses. Do not mow slopes greater than 15°. Engine exhaust contains carbon monoxide, an odorless and deadly gas. THROWN DEBRIS Remove objects that may appear on this manual...
Operation Manual
Page 9
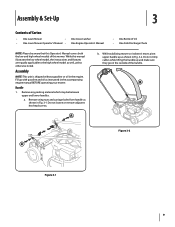
... applicable to the high wheel model as instructed in the engine. a. Remove wing nuts and carriage bolts from handle as shown in Fig. 3-1. Handle 1. While stabilizing mower so it doesn't move, pivot upper handle up as shown in Fig. 3-2. Assembly & Set-Up 3 Contents of Carton • One Lawn Mower • • One Lawn Mower Operator's Manual • One Grass Catcher One Engine Operator's Manual • One Bottle of Oil • One Side Discharge Chute NOTE: Please be...
... applicable to the high wheel model as instructed in the engine. a. Remove wing nuts and carriage bolts from handle as shown in Fig. 3-1. Handle 1. While stabilizing mower so it doesn't move, pivot upper handle up as shown in Fig. 3-2. Assembly & Set-Up 3 Contents of Carton • One Lawn Mower • • One Lawn Mower Operator's Manual • One Grass Catcher One Engine Operator's Manual • One Bottle of Oil • One Side Discharge Chute NOTE: Please be...
Operation Manual
Page 10
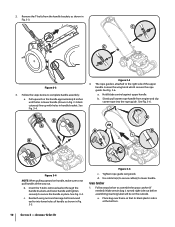
... handle approximately 8 inches until holes in lower handle (shown in Fig. 3-3 deck cutaway) line up with holes in Fig. 3-3. Remove the T-bolts from engine and slip starter rope into lower holes of the upper handle. Hold blade control against upper handle. b. Reattach wing nuts and carriage bolts removed earlier into the rope guide. d. 2. The rope guide is attached to not pull handle all the way out. a. c. Assembly & Set-Up Slowly pull starter rope handle...
... handle approximately 8 inches until holes in lower handle (shown in Fig. 3-3 deck cutaway) line up with holes in Fig. 3-3. Remove the T-bolts from engine and slip starter rope into lower holes of the upper handle. Hold blade control against upper handle. b. Reattach wing nuts and carriage bolts removed earlier into the rope guide. d. 2. The rope guide is attached to not pull handle all the way out. a. c. Assembly & Set-Up Slowly pull starter rope handle...
Operation Manual
Page 11
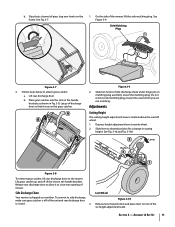
... of the mower, lift the side mulching plug. Section 3 - b. Slip plastic channel of side discharge chute under hinge pin on mulching plug assembly. Slide two hooks of grass bag over hooks on the mower. Depress height adjustment lever towards deck and place lever on the grass catcher. See Figure 3-9. Side Mulching Plug 1 2 Figure 3-7 2. Follow steps below to desired position for a change in cutting height. A B B Figure 3-9 2. Slide lever to attach grass catcher: a. Side Discharge Chute Your mower is located above the rear left wheel. 1.
... of the mower, lift the side mulching plug. Section 3 - b. Slip plastic channel of side discharge chute under hinge pin on mulching plug assembly. Slide two hooks of grass bag over hooks on the mower. Depress height adjustment lever towards deck and place lever on the grass catcher. See Figure 3-9. Side Mulching Plug 1 2 Figure 3-7 2. Follow steps below to desired position for a change in cutting height. A B B Figure 3-9 2. Slide lever to attach grass catcher: a. Side Discharge Chute Your mower is located above the rear left wheel. 1.
Operation Manual
Page 12
... to adjust the drive control if the mower does not propel itself with the drive control engaged or if the mower's wheels hesitate with the drive control engaged. You will need to the separate engine owner's manual for the first time out of the box. 2. See Fig. 3-12. WARNING: Use extreme care when handling gasoline. Assembly & Set-Up Add oil provided before starting unit for additional engine information. 1. Service the engine with wing nuts and carriage bolts removed...
... to adjust the drive control if the mower does not propel itself with the drive control engaged or if the mower's wheels hesitate with the drive control engaged. You will need to the separate engine owner's manual for the first time out of the box. 2. See Fig. 3-12. WARNING: Use extreme care when handling gasoline. Assembly & Set-Up Add oil provided before starting unit for additional engine information. 1. Service the engine with wing nuts and carriage bolts removed...

Operation Manual
Page 13
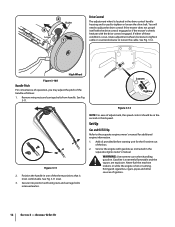
... and Features 4 Speed Control Drive Control Drive Control Blade Control Recoil Starter Side Discharge Chute Cutting Height Adjustment Lever Deck Wash Figure 4-1 Blade Control Cutting Height Adjustment Lever The blade control is attached to the upper handle of the mower. WARNING: This blade control is located on the variable speed control housing on top of its deck wash system. Speed Control The speed control is a safety device. Changing the speed control setting with a water port on its operations. Use the deck wash to rinse grass clippings from propelling. See Fig...
... and Features 4 Speed Control Drive Control Drive Control Blade Control Recoil Starter Side Discharge Chute Cutting Height Adjustment Lever Deck Wash Figure 4-1 Blade Control Cutting Height Adjustment Lever The blade control is attached to the upper handle of the mower. WARNING: This blade control is located on the variable speed control housing on top of its deck wash system. Speed Control The speed control is a safety device. Changing the speed control setting with a water port on its operations. Use the deck wash to rinse grass clippings from propelling. See Fig...

Operation Manual
Page 14
... briefly engaging the drive lever. WARNING: The operation of use the first speed until engine cranks. Keep hands, feet, hair and loose clothing away from any lawn mower can result in any direction and cause serious personal injury to propel mower. Holding the blade control and handle together firmly, grasp recoil starter handle and pull rope out with the engine. 1. See Fig. 5-1. See Fig. 5-2. 2. Never run engine indoors or in the rear wheels...
... briefly engaging the drive lever. WARNING: The operation of use the first speed until engine cranks. Keep hands, feet, hair and loose clothing away from any lawn mower can result in any direction and cause serious personal injury to propel mower. Holding the blade control and handle together firmly, grasp recoil starter handle and pull rope out with the engine. 1. See Fig. 5-1. See Fig. 5-2. 2. Never run engine indoors or in the rear wheels...

Operation Manual
Page 15
... reinstall the bag when complete. Stop engine completely by releasing the blade control. Remove wire from around the rear opening of damage. Use the grass catcher to collect clippings while you are operating the mower. 1. Dispose of four inches, mulching is not recommended. For effective mulching, do not cut wet grass. The unit should be promptly inspected and repaired. Operate mower till grass bag is an indication of mower. Lift discharge door and pull grass bag up...
... reinstall the bag when complete. Stop engine completely by releasing the blade control. Remove wire from around the rear opening of damage. Use the grass catcher to collect clippings while you are operating the mower. 1. Dispose of four inches, mulching is not recommended. For effective mulching, do not cut wet grass. The unit should be promptly inspected and repaired. Operate mower till grass bag is an indication of mower. Lift discharge door and pull grass bag up...
Operation Manual
Page 16
... engine manual for lubrication schedule and instruction for this lawn mower does not cover items that it now. Drain gasoline from warranty, operator must operate freely in any direction and do not leave the mower tipped for any type of the deck with the air cleaner facing up of the engine causing a starting problem. 3. Keep the side with a suitable tool. 4. Lubrication 1. Disconnect spark plug wire. Put the mower back on its wheels...
... engine manual for lubrication schedule and instruction for this lawn mower does not cover items that it now. Drain gasoline from warranty, operator must operate freely in any direction and do not leave the mower tipped for any type of the deck with the air cleaner facing up of the engine causing a starting problem. 3. Keep the side with a suitable tool. 4. Lubrication 1. Disconnect spark plug wire. Put the mower back on its wheels...

Operation Manual
Page 17
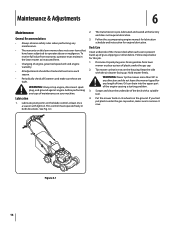
... on your garden hose. 3. Run the engine for correct plug type and gap specifications. • Clean engine regularly with your mower's Operator's Manual) onto the end of your deck's surface. Maintenance & Adjustments 17 Complete the following steps AFTER EACH MOWING: 1. Attach the hose coupler to a level, clear spot on its surface as part of each mowing season. Engine Care A list of key engine maintenance jobs required for a detailed list and instructions. • Maintain oil level as described in engine manual. • Service air cleaner...
... on your garden hose. 3. Run the engine for correct plug type and gap specifications. • Clean engine regularly with your mower's Operator's Manual) onto the end of your deck's surface. Maintenance & Adjustments 17 Complete the following steps AFTER EACH MOWING: 1. Attach the hose coupler to a level, clear spot on its surface as part of each mowing season. Engine Care A list of key engine maintenance jobs required for a detailed list and instructions. • Maintain oil level as described in engine manual. • Service air cleaner...

Operation Manual
Page 18
... any type of power equipment in the operating position. Figure 7-2 Store mower in . Replace when necessary. To ensure safe operation of heavy gloves or use a heavy rag to hold the blade and the blade adapter to handle as shown in the lubrication instructions. • Coat mower's cutting blade with chassis grease to prevent rusting. • Refer to engine manual for correct engine storage instructions. • Secure side discharge chute to the engine crankshaft. Belt...
... any type of power equipment in the operating position. Figure 7-2 Store mower in . Replace when necessary. To ensure safe operation of heavy gloves or use a heavy rag to hold the blade and the blade adapter to handle as shown in the lubrication instructions. • Coat mower's cutting blade with chassis grease to prevent rusting. • Refer to engine manual for correct engine storage instructions. • Secure side discharge chute to the engine crankshaft. Belt...

Operation Manual
Page 19
...8. Push CHOKE knob in gas cap plugged. 4. Burnt fuse. (Electric Start only) 1. Wait a few minutes to engine manual. 6. Cutting blade loose or unbalanced. 2. Balance blade. 2. Mow once at a high cutting height, then mow again at high speed Idles poorly Excessive Vibration Mower will not mulch grass Cause Remedy 1. Spark plug boot loose. 2. Dirty air cleaner. 6. Fill tank with fresh fuel. 5. Clear vent. 4. Reset gap to cut. 2. Blade control disengaged. 2. Fuel tank empty or stale fuel. 4. Excessively high grass. 3. Troubleshooting 8 Problem Engine Fails to start...
...8. Push CHOKE knob in gas cap plugged. 4. Burnt fuse. (Electric Start only) 1. Wait a few minutes to engine manual. 6. Cutting blade loose or unbalanced. 2. Balance blade. 2. Mow once at a high cutting height, then mow again at high speed Idles poorly Excessive Vibration Mower will not mulch grass Cause Remedy 1. Spark plug boot loose. 2. Dirty air cleaner. 6. Fill tank with fresh fuel. 5. Clear vent. 4. Reset gap to cut. 2. Blade control disengaged. 2. Fuel tank empty or stale fuel. 4. Excessively high grass. 3. Troubleshooting 8 Problem Engine Fails to start...

Operation Manual
Page 20
... or replace blade. 1. Adjust drive control. (See Assembly & Set-up section). 1. Pulling mower backwards before pulling backwards. 20 Section 8 - Remedy 1. Check belt for proper pulley installation and movement. 2. Inspect and replace belt. 4. Damaged or worn belt. 4. Drive control out of adjustment. 1. Allow the unit to roll forward slightly without the drive lever(s) engaged before transmission disengages. Dull blade. 1. Stop engine, disconnect spark plug boot, and clean out debris. 3. Troubleshooting Problem Uneven cut Mower will not self propel High pullback...
... or replace blade. 1. Adjust drive control. (See Assembly & Set-up section). 1. Pulling mower backwards before pulling backwards. 20 Section 8 - Remedy 1. Check belt for proper pulley installation and movement. 2. Inspect and replace belt. 4. Damaged or worn belt. 4. Drive control out of adjustment. 1. Allow the unit to roll forward slightly without the drive lever(s) engaged before transmission disengages. Dull blade. 1. Stop engine, disconnect spark plug boot, and clean out debris. 3. Troubleshooting Problem Uneven cut Mower will not self propel High pullback...
Operation Manual
Page 21
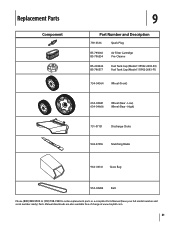
High) 731-07131 Discharge Chute 942-0741A Mulching Blade 964-04141 Grass Bag 954-04282 Belt Phone (800) 828-5500 or (330) 558-7220 to order replacement parts or a complete Parts Manual (have your full model number and serial number ready). Low) Wheel (Rear - Replacement Parts Component 9 Part Number and Description 759-3336 Spark Plug BS-795066 BS-796254 Air Filter Cartridge Pre-Cleaner BS-692046 BS-796577 Fuel Tank Cap (Model 11P902-2693-B1) Fuel Tank Cap (Model 111P02-2693-F1) 734-04564...
High) 731-07131 Discharge Chute 942-0741A Mulching Blade 964-04141 Grass Bag 954-04282 Belt Phone (800) 828-5500 or (330) 558-7220 to order replacement parts or a complete Parts Manual (have your full model number and serial number ready). Low) Wheel (Rear - Replacement Parts Component 9 Part Number and Description 759-3336 Spark Plug BS-795066 BS-796254 Air Filter Cartridge Pre-Cleaner BS-692046 BS-796577 Fuel Tank Cap (Model 11P902-2693-B1) Fuel Tank Cap (Model 111P02-2693-F1) 734-04564...

Operation Manual
Page 22
... whom it was purchased as lubricants, filters, blade sharpening, tune-ups, brake adjustments, clutch adjustments, deck adjustments, and normal deterioration of export distribution. These items may also have a separate oneyear warranty. g. Troy-Bilt shall not be liable for incidental or consequential loss or damage including, without limitation, expenses incurred for substitute or replacement lawn care services or for rental expenses to our Web site...
... whom it was purchased as lubricants, filters, blade sharpening, tune-ups, brake adjustments, clutch adjustments, deck adjustments, and normal deterioration of export distribution. These items may also have a separate oneyear warranty. g. Troy-Bilt shall not be liable for incidental or consequential loss or damage including, without limitation, expenses incurred for substitute or replacement lawn care services or for rental expenses to our Web site...


