Owner s Manual
Page 1
CMX560 PROFESSIONAL MOBILE CB RADIO Owner's Manual © 2016 Uniden America Corporation Irving, Texas U01UT392AZZ(0) Printed in Vietnam
CMX560 PROFESSIONAL MOBILE CB RADIO Owner's Manual © 2016 Uniden America Corporation Irving, Texas U01UT392AZZ(0) Printed in Vietnam
Owner s Manual
Page 3
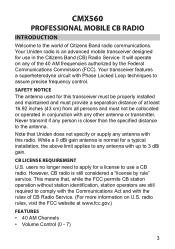
... AM Channels • Volume Control (0 - 7) 3 While a 0 dBi gain antenna is an advanced mobile transceiver designed for this radio. This means that Uniden does not specify or supply any antenna with any antenna with up to comply with the Communications Act and with Phase Locked Loop techniques to the antenna. Never transmit if any of CB Radio Service. (For more information on...
... AM Channels • Volume Control (0 - 7) 3 While a 0 dBi gain antenna is an advanced mobile transceiver designed for this radio. This means that Uniden does not specify or supply any antenna with any antenna with up to comply with the Communications Act and with Phase Locked Loop techniques to the antenna. Never transmit if any of CB Radio Service. (For more information on...

Owner s Manual
Page 4
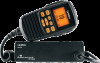
... (1 - 10) • Backlight Dimmer Control (Off, Low, and High) • Push-To-Talk (PTT) Key • S/RF Meter • RJ45 plug on transceiver for speaker/microphone • Speaker on microphone • Key Lock • Monitor Mode • Local/DX • External Speaker jack • Channel Indicator • Frequency Indicator WHAT'S IN THE BOX CMX560 Speaker/ CMX560 Transceiver Microphone Bracket 4
... (1 - 10) • Backlight Dimmer Control (Off, Low, and High) • Push-To-Talk (PTT) Key • S/RF Meter • RJ45 plug on transceiver for speaker/microphone • Speaker on microphone • Key Lock • Monitor Mode • Local/DX • External Speaker jack • Channel Indicator • Frequency Indicator WHAT'S IN THE BOX CMX560 Speaker/ CMX560 Transceiver Microphone Bracket 4

Owner s Manual
Page 5
Power Connector Cables Bracket Knobs Bracket Mounting Hardware NOT SHOWN: Owner's Manual and Other Printed Materials Microphone Hanger Microphone Hanger Mounting Hardware PARTS OF THE CMX560 Transceiver - Front RJ45 slot for Speaker/ Microphone 5
Power Connector Cables Bracket Knobs Bracket Mounting Hardware NOT SHOWN: Owner's Manual and Other Printed Materials Microphone Hanger Microphone Hanger Mounting Hardware PARTS OF THE CMX560 Transceiver - Front RJ45 slot for Speaker/ Microphone 5

Owner s Manual
Page 7
... MENU/ENTER MON SQL POWER LO/DX UP/DOWN ▲ ▼ MEM/SCAN 6 MIC 7 SPEAKER 8 VOL UP ▲ Function 1 Function 2 • Enter MENU mode • Select a function • Store new setting and finish SQ level setting Complete and accept menu selection. ON/OFF • Direct memory call • In Memory Setting mode, store new setting Microphone Speaker Volume UP...
... MENU/ENTER MON SQL POWER LO/DX UP/DOWN ▲ ▼ MEM/SCAN 6 MIC 7 SPEAKER 8 VOL UP ▲ Function 1 Function 2 • Enter MENU mode • Select a function • Store new setting and finish SQ level setting Complete and accept menu selection. ON/OFF • Direct memory call • In Memory Setting mode, store new setting Microphone Speaker Volume UP...
Owner s Manual
Page 8
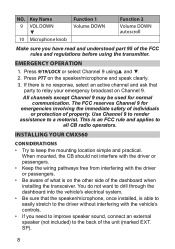
... driver or passengers. • Be aware of the dashboard when installing the transceiver. Press 9/19/LOCK or select Channel 9 using the transmitter. INSTALLING YOUR CMX560 CONSIDERATIONS • Try to a motorist. SP). 8 EMERGENCY OPERATION 1. If there is no response, select an active channel and ask that the speaker/microphone, once installed, is able to easily stretch to all CB radio...
... driver or passengers. • Be aware of the dashboard when installing the transceiver. Press 9/19/LOCK or select Channel 9 using the transmitter. INSTALLING YOUR CMX560 CONSIDERATIONS • Try to a motorist. SP). 8 EMERGENCY OPERATION 1. If there is no response, select an active channel and ask that the speaker/microphone, once installed, is able to easily stretch to all CB radio...
Owner s Manual
Page 9
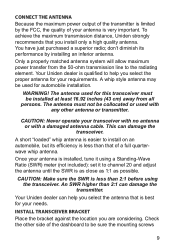
... Ratio (SWR) meter (not included): set it using the transceiver. Your Uniden dealer is qualified to channel 20 and adjust the antenna until the SWR is as close as 1:1 as possible. A short "loaded" whip antenna is easier to the radiating element. INSTALL TRANSCEIVER BRACKET Place the bracket against the location you select the proper antenna for automobile installation. CONNECT THE ANTENNA Because the maximum power output of...
... Ratio (SWR) meter (not included): set it using the transceiver. Your Uniden dealer is qualified to channel 20 and adjust the antenna until the SWR is as close as 1:1 as possible. A short "loaded" whip antenna is easier to the radiating element. INSTALL TRANSCEIVER BRACKET Place the bracket against the location you select the proper antenna for automobile installation. CONNECT THE ANTENNA Because the maximum power output of...
Owner s Manual
Page 10
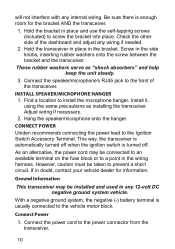
... is enough room for information. Check the other side of the transceiver. Be sure there is usually connected to the front of the dashboard and adjust any wiring if needed. 2. This way, the transceiver is automatically turned off when the ignition switch is turned off. Connect the power cord to prevent a short circuit. INSTALL SPEAKER/MICROPHONE HANGER 1. These rubber washers...
... is enough room for information. Check the other side of the transceiver. Be sure there is usually connected to the front of the dashboard and adjust any wiring if needed. 2. This way, the transceiver is automatically turned off when the ignition switch is turned off. Connect the power cord to prevent a short circuit. INSTALL SPEAKER/MICROPHONE HANGER 1. These rubber washers...

Owner s Manual
Page 11
The unit should turn on scanner status. Dimensions and layout may vary slightly. Connect the red DC power cord to • Menu mode open Squelch • Memory Setting • Monitor mode function is active Squelch is closed Squelch is inactive. USING THE CMX560 SPEAKER/MICROPHONE LCD DISPLAY TX BUSY MON BP 19 SCAN MEM HIC LOCAL 27...
The unit should turn on scanner status. Dimensions and layout may vary slightly. Connect the red DC power cord to • Menu mode open Squelch • Memory Setting • Monitor mode function is active Squelch is closed Squelch is inactive. USING THE CMX560 SPEAKER/MICROPHONE LCD DISPLAY TX BUSY MON BP 19 SCAN MEM HIC LOCAL 27...

Owner s Manual
Page 13
... the LCD screen graphic on - NA In Menu mode, Volume Menu displays. setting mode In Memory Squelch mode, Memory setting mode channel displays. ITEM Channel Indicator Frequency Indicator (EX: 27.185) MHz S/RF icon (Signal Strength/RF Power) and Meter OFF ON BLINKING NA Channel number TX error displays. indicator. (S/RF icon always (S/RF icon NA on) always on...
... the LCD screen graphic on - NA In Menu mode, Volume Menu displays. setting mode In Memory Squelch mode, Memory setting mode channel displays. ITEM Channel Indicator Frequency Indicator (EX: 27.185) MHz S/RF icon (Signal Strength/RF Power) and Meter OFF ON BLINKING NA Channel number TX error displays. indicator. (S/RF icon always (S/RF icon NA on) always on...
Owner s Manual
Page 14
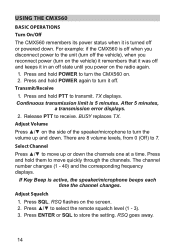
... you reconnect power (turn the CMX560 on the side of the speaker/microphone to move quickly through the channels. Adjust Volume Press ▲/▼ on . 2. The channel number changes (1 - 40) and the corresponding frequency displays. Press ▲/▼ to receive. Press and hold them to transmit. Press and hold PTT to move up and down. After 5 minutes, a transmission error displays...
... you reconnect power (turn the CMX560 on the side of the speaker/microphone to move quickly through the channels. Adjust Volume Press ▲/▼ on . 2. The channel number changes (1 - 40) and the corresponding frequency displays. Press ▲/▼ to receive. Press and hold them to transmit. Press and hold PTT to move up and down. After 5 minutes, a transmission error displays...
Owner s Manual
Page 15
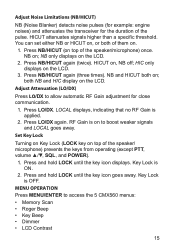
... 1. Adjust Attenuation (LO/DX) Press LO/DX to access the 5 CMX560 menus: • Memory Scan • Roger Beep • Key Beep • Dimmer • LCD Contrast 15 LOCAL displays, indicating that no RF Gain is on ; HICUT attenuates signals higher than a specific threshold. You can set either NB...microphone) prevents the keys from operating (except PTT, volume ▲/▼, SQL, and POWER). 1. Press LO/DX. RF Gain is applied. 2. Press and hold LOCK until the key icon goes away. both on to boost weaker signals and LOCAL goes away. Press LO/DX again. Set Key Lock Turning...
... 1. Adjust Attenuation (LO/DX) Press LO/DX to access the 5 CMX560 menus: • Memory Scan • Roger Beep • Key Beep • Dimmer • LCD Contrast 15 LOCAL displays, indicating that no RF Gain is on ; HICUT attenuates signals higher than a specific threshold. You can set either NB...microphone) prevents the keys from operating (except PTT, volume ▲/▼, SQL, and POWER). 1. Press LO/DX. RF Gain is applied. 2. Press and hold LOCK until the key icon goes away. both on to boost weaker signals and LOCAL goes away. Press LO/DX again. Set Key Lock Turning...
Owner s Manual
Page 16
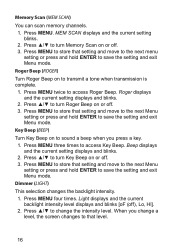
... can scan memory channels. 1. Press MENU twice to turn Roger Beep on or off . 3. Press ▲/▼ to access Roger Beep. Press ▲/▼ to turn Key Beep on to access Key Beep. Press MENU to store that setting and move to the next Menu setting or press and ...exit Menu mode. Press ▲/▼ to change a level, the screen changes to save the setting and exit Menu mode. Roger Beep (ROGER) Turn Roger Beep on or off . 3. Press MENU three times to transmit a tone when transmission is complete. 1. Dimmer (LIGHT) This selection changes the backlight intensity. ...
... can scan memory channels. 1. Press MENU twice to turn Roger Beep on or off . 3. Press ▲/▼ to access Roger Beep. Press ▲/▼ to turn Key Beep on to access Key Beep. Press MENU to store that setting and move to the next Menu setting or press and ...exit Menu mode. Press ▲/▼ to change a level, the screen changes to save the setting and exit Menu mode. Roger Beep (ROGER) Turn Roger Beep on or off . 3. Press MENU three times to transmit a tone when transmission is complete. 1. Dimmer (LIGHT) This selection changes the backlight intensity. ...
Owner s Manual
Page 17
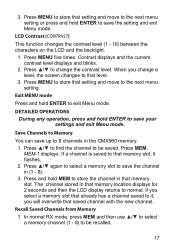
...save up to Memory You can save the channel in the CMX560 memory. 1. Save Channels to 8 channels in (1 - 8). 3. Press and hold ENTER to be saved. In normal RX mode, press MEM and then use ▲/▼ to select a memory channel (1 - 8) to save your settings and exit Menu mode. Press ▲/▼... for 2 seconds and then the LCD display returns to save the setting and exit Menu mode. Exit MENU mode Press and hold ENTER to normal. If a channel is saved to store that saved channel with the new channel. Press MENU to that memory slot. If you select a memory ...
...save up to Memory You can save the channel in the CMX560 memory. 1. Save Channels to 8 channels in (1 - 8). 3. Press and hold ENTER to be saved. In normal RX mode, press MEM and then use ▲/▼ to select a memory channel (1 - 8) to save your settings and exit Menu mode. Press ▲/▼... for 2 seconds and then the LCD display returns to save the setting and exit Menu mode. Exit MENU mode Press and hold ENTER to normal. If a channel is saved to store that saved channel with the new channel. Press MENU to that memory slot. If you select a memory ...
Owner s Manual
Page 18
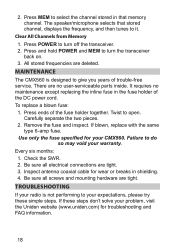
... of trouble-free service. Failure to turn the transceiver back on. 3. Every six months: 1. To replace a blown fuse: 1. Remove the fuse and inspect. Check the SWR. 2. Use only the fuse specified for wear or breaks in shielding. 4. Clear All Channels from Memory 1. Press POWER to do so may void your problem, visit the Uniden website (www.uniden.com) for troubleshooting and FAQ information. 18 Inspect antenna...
... of trouble-free service. Failure to turn the transceiver back on. 3. Every six months: 1. To replace a blown fuse: 1. Remove the fuse and inspect. Check the SWR. 2. Use only the fuse specified for wear or breaks in shielding. 4. Clear All Channels from Memory 1. Press POWER to do so may void your problem, visit the Uniden website (www.uniden.com) for troubleshooting and FAQ information. 18 Inspect antenna...

Owner s Manual
Page 19
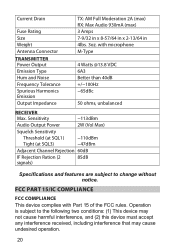
... (no power) TRY... • Check the power cord. • Check your purchase receipt for servicing and aligning this radio is the user's responsibility to specify the correct model number of this radio (CMX560). SERVICING YOUR RADIO It is operating at all times in accordance with the FCC Citizens Radio Service regulations. SERVICE AND REPAIR INFORMATION • Save your vehicle's electrical system. SPECIFICATIONS GENERAL Channels Frequency Range Frequency Control Operating Temperature Microphone Input...
... (no power) TRY... • Check the power cord. • Check your purchase receipt for servicing and aligning this radio is the user's responsibility to specify the correct model number of this radio (CMX560). SERVICING YOUR RADIO It is operating at all times in accordance with the FCC Citizens Radio Service regulations. SERVICE AND REPAIR INFORMATION • Save your vehicle's electrical system. SPECIFICATIONS GENERAL Channels Frequency Range Frequency Control Operating Temperature Microphone Input...
Owner s Manual
Page 20
... microphone M-Type 4 Watts @13.8 VDC 6A3 Better than 40dB +/−100Hz −65dBc 50 ohms, unbalanced RECEIVER Max. with Part 15 of the FCC rules. Sensitivity −113dBm Audio Output Power 2W (Vol Max) Squelch Sensitivity Threshold (at SQL1) −110dBm Tight (at SQL3) −47dBm Adjacent Channel Rejection 60dB IF Rejection Ration (2 signals) 85dB Specifications...
... microphone M-Type 4 Watts @13.8 VDC 6A3 Better than 40dB +/−100Hz −65dBc 50 ohms, unbalanced RECEIVER Max. with Part 15 of the FCC rules. Sensitivity −113dBm Audio Output Power 2W (Vol Max) Squelch Sensitivity Threshold (at SQL1) −110dBm Tight (at SQL3) −47dBm Adjacent Channel Rejection 60dB IF Rejection Ration (2 signals) 85dB Specifications...
Owner s Manual
Page 22
..., subassemblies, or any configurations not sold by Uniden, (C) improperly installed, (D) serviced or repaired by someone other than as part of any system not manufactured by Uniden, or (F) installed or programmed by anyone other cost (except shipping and handling) incurred by the owner's manual for one year, to the original retail owner, this Uniden Product to this warranty at any time while...
..., subassemblies, or any configurations not sold by Uniden, (C) improperly installed, (D) serviced or repaired by someone other than as part of any system not manufactured by Uniden, or (F) installed or programmed by anyone other cost (except shipping and handling) incurred by the owner's manual for one year, to the original retail owner, this Uniden Product to this warranty at any time while...

Owner s Manual
Page 23
... owner's manual you are certain that has caused you . Include evidence of original purchase and a note describing the defect that the Product is void outside the United States of incidental or consequential damages so the above limitation or exclusion may also have other rights which vary from state to warrantor at: Uniden America Service...
... owner's manual you are certain that has caused you . Include evidence of original purchase and a note describing the defect that the Product is void outside the United States of incidental or consequential damages so the above limitation or exclusion may also have other rights which vary from state to warrantor at: Uniden America Service...
Owner s Manual
Page 24
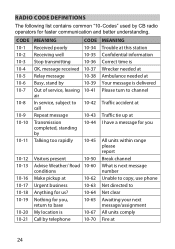
... 10-62 10-63 10-64 10-65 10-67 10-70 MEANING Trouble at this station Confidential information Correct time is Wrecker needed at Ambulance needed at Your message is delivered Please turn to channel Traffic accident at Traffic tie up at I have a message for you...poorly Receiving well Stop transmitting OK, message received Relay message Busy, stand by Out of service, leaving air In service, subject to Net clear Awaiting your next message/assignment All units comply Fire at Urgent business Anything for faster communication and better understanding. RADIO CODE DEFINITIONS The following list...
... 10-62 10-63 10-64 10-65 10-67 10-70 MEANING Trouble at this station Confidential information Correct time is Wrecker needed at Ambulance needed at Your message is delivered Please turn to channel Traffic accident at Traffic tie up at I have a message for you...poorly Receiving well Stop transmitting OK, message received Relay message Busy, stand by Out of service, leaving air In service, subject to Net clear Awaiting your next message/assignment All units comply Fire at Urgent business Anything for faster communication and better understanding. RADIO CODE DEFINITIONS The following list...


