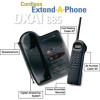
English Owners Manual
Page 1
... Controls and Keys 1 Base Unit Controls and Keys 2 Important Safety Instructions 3 Battery Safety Precautions 4 Introduction 5 Features 5 Included with the DXAI685 6 Important Electrical Considerations 7 Range 7 Telephone Line Problems 7 Radio Interference 7 More Than One Cordless Telephone 7 Installation 8 Selecting a Location ...Power to the Base Unit 9 Desk or Tabletop Installation 10 Wall Installation 12 Direct Wall Mounting 14 Setting Up Your Phone 19 Extending the Base Unit Antenna 19 Installing the Handset Battery Pack 19 Cleaning the Battery Contacts 21 Charging the ...
... Controls and Keys 1 Base Unit Controls and Keys 2 Important Safety Instructions 3 Battery Safety Precautions 4 Introduction 5 Features 5 Included with the DXAI685 6 Important Electrical Considerations 7 Range 7 Telephone Line Problems 7 Radio Interference 7 More Than One Cordless Telephone 7 Installation 8 Selecting a Location ...Power to the Base Unit 9 Desk or Tabletop Installation 10 Wall Installation 12 Direct Wall Mounting 14 Setting Up Your Phone 19 Extending the Base Unit Antenna 19 Installing the Handset Battery Pack 19 Cleaning the Battery Contacts 21 Charging the ...
English Owners Manual
Page 2
... 48 Skipping a Message 49 Deleting a Message 50 Deleting All Messages 51 Message Full Indication 52 Leaving a Memo Message 52 Remote Operation 54 Using a Touch-Tone Phone 54 Troubleshooting 55 Telephone Troubleshooting Chart 55 Answering System Troubleshooting Chart 56 Specifications 57 2
... 48 Skipping a Message 49 Deleting a Message 50 Deleting All Messages 51 Message Full Indication 52 Leaving a Memo Message 52 Remote Operation 54 Using a Touch-Tone Phone 54 Troubleshooting 55 Telephone Troubleshooting Chart 55 Answering System Troubleshooting Chart 56 Specifications 57 2
English Owners Manual
Page 5
...to waste time pushing buttons or flipping switches. AutoStandby™ allows you make or receive. Also, the AutoSecure™ feature electronically locks your phone calls. The UltraClear Plus innovative technology, together with 25 different channels, virtually eliminates background noise and provides you don't have to the Base... of your privacy by scrambling any call by other equipment, Random Code™ digital security automatically selects one of the Uniden DXAI685 Cordless Telephone. The Voice Scramble phone protects your conversations. Visit our web site at http:\\www...
...to waste time pushing buttons or flipping switches. AutoStandby™ allows you make or receive. Also, the AutoSecure™ feature electronically locks your phone calls. The UltraClear Plus innovative technology, together with 25 different channels, virtually eliminates background noise and provides you don't have to the Base... of your privacy by scrambling any call by other equipment, Random Code™ digital security automatically selects one of the Uniden DXAI685 Cordless Telephone. The Voice Scramble phone protects your conversations. Visit our web site at http:\\www...
English Owners Manual
Page 7
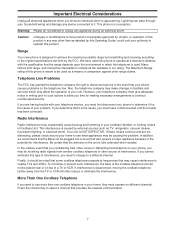
...causing the problem. Caution: Changes or modifications to this product not expressly approved by this product. We have rated this product in your phone, you need to change to unplug any way other voices or distracting transmissions on the unit is NOT DEFECTIVE. If you time for ... a means of interference, you may be impossible to use more than as detailed by Uniden, or operation of the cordless telephone should be used . This interference is no exception. Range Your new phone is the cause, you determine that it should not be receiving radio signals from the...
...causing the problem. Caution: Changes or modifications to this product not expressly approved by this product. We have rated this product in your phone, you need to change to unplug any way other voices or distracting transmissions on the unit is NOT DEFECTIVE. If you time for ... a means of interference, you may be impossible to use more than as detailed by Uniden, or operation of the cordless telephone should be used . This interference is no exception. Range Your new phone is the cause, you determine that it should not be receiving radio signals from the...
English Owners Manual
Page 8
... wired directly to interrupt its power. • Keep the Base Unit and Handset away from sources of phone outlets: Modular Jack Most phone equipment available now uses modular jacks. Phone cords are two types of electrical noise such as motors or fluorescent lighting. • Be sure there...that the tab which does not have modular phone jacks, contact your phone on the wall, make sure to both a phone jack and continuous power outlet. however, you should contact your Uniden telephone dealer or a telephone supply store for your new phone, there are some important guidelines you decide ...
... wired directly to interrupt its power. • Keep the Base Unit and Handset away from sources of phone outlets: Modular Jack Most phone equipment available now uses modular jacks. Phone cords are two types of electrical noise such as motors or fluorescent lighting. • Be sure there...that the tab which does not have modular phone jacks, contact your phone on the wall, make sure to both a phone jack and continuous power outlet. however, you should contact your Uniden telephone dealer or a telephone supply store for your new phone, there are some important guidelines you decide ...
English Owners Manual
Page 9
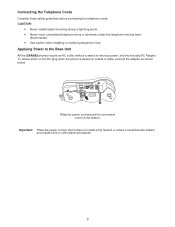
RING VOL OFF-LO-HI PULSE-TONE DC IN 9V +- TEL LINE +- Applying Power to the Base Unit All the DXAI685 phones require an AC outlet, without a switch to interrupt power, and the included AC Adapter. Wrap the power cord around the convenient notch on a desk or... table, connect the adapter as shown below. To relieve strain on the DC plug when the phone is placed on the bottom. Connecting the Telephone Cords Consider these safety guidelines before connecting the telephone cords: CAUTION: • Never install telephone wiring ...
RING VOL OFF-LO-HI PULSE-TONE DC IN 9V +- TEL LINE +- Applying Power to the Base Unit All the DXAI685 phones require an AC outlet, without a switch to interrupt power, and the included AC Adapter. Wrap the power cord around the convenient notch on a desk or... table, connect the adapter as shown below. To relieve strain on the DC plug when the phone is placed on the bottom. Connecting the Telephone Cords Consider these safety guidelines before connecting the telephone cords: CAUTION: • Never install telephone wiring ...
English Owners Manual
Page 10
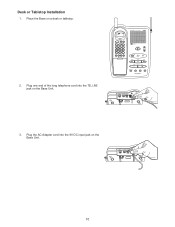
Place the Base on the Base Unit. Plug one end of the long telephone cord into the 9V DC input jack on the Base Unit. Plug the AC Adapter cord into the TEL LINE jack on a desk or tabletop. 2. Uniden talk caller id mem 25 CHANNEL ULTRACLEAR PLUS tone flash redial volume chan function pause cancel delete speaker volume new in use repeat play skip delete stop page / find ogm memo answer Extend"A"Phone 3. RING VOL PULSE-TONE DC IN 9V OFF-LO-HI TEL LINE 10 Desk or Tabletop Installation 1.
Place the Base on the Base Unit. Plug one end of the long telephone cord into the 9V DC input jack on the Base Unit. Plug the AC Adapter cord into the TEL LINE jack on a desk or tabletop. 2. Uniden talk caller id mem 25 CHANNEL ULTRACLEAR PLUS tone flash redial volume chan function pause cancel delete speaker volume new in use repeat play skip delete stop page / find ogm memo answer Extend"A"Phone 3. RING VOL PULSE-TONE DC IN 9V OFF-LO-HI TEL LINE 10 Desk or Tabletop Installation 1.
English Owners Manual
Page 11
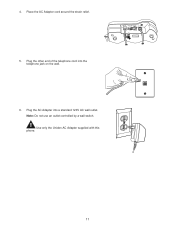
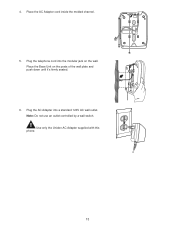
TEL LINE +- 5. Note: Do not use an outlet controlled by a wall switch. Plug the other end of the telephone cord into a standard 120V AC wall outlet. Use only the Uniden AC Adapter supplied with this phone. 11 Place the AC Adapter cord around the strain relief. Plug the AC Adapter into the telephone jack on the wall. 6. 4. RING VOL PULSE-TONE DC IN 9V OFF-LO-HI +-
TEL LINE +- 5. Note: Do not use an outlet controlled by a wall switch. Plug the other end of the telephone cord into a standard 120V AC wall outlet. Use only the Uniden AC Adapter supplied with this phone. 11 Place the AC Adapter cord around the strain relief. Plug the AC Adapter into the telephone jack on the wall. 6. 4. RING VOL PULSE-TONE DC IN 9V OFF-LO-HI +-
English Owners Manual
Page 12
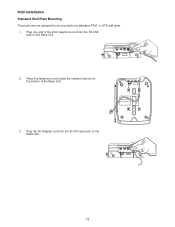
RING VOL PULSE-TONE DC IN 9V OFF-LO-HI +- Plug the AC Adapter cord into the 9V DC input jack on the bottom of the short telephone cord into the TEL LINE jack on a standard AT&T or GTE wall plate. 1. TEL LINE 3. Place the telephone cord inside the molded channel on the Base Unit. Wall Installation Standard Wall Plate Mounting These phones are designed to be mounted on the Base Unit. 2. Plug one end of the Base Unit. RING VOL PULSE-TONE DC IN 9V OFF-LO-HI TEL LINE 12
RING VOL PULSE-TONE DC IN 9V OFF-LO-HI +- Plug the AC Adapter cord into the 9V DC input jack on the bottom of the short telephone cord into the TEL LINE jack on a standard AT&T or GTE wall plate. 1. TEL LINE 3. Place the telephone cord inside the molded channel on the Base Unit. Wall Installation Standard Wall Plate Mounting These phones are designed to be mounted on the Base Unit. 2. Plug one end of the Base Unit. RING VOL PULSE-TONE DC IN 9V OFF-LO-HI TEL LINE 12
English Owners Manual
Page 13
Place the Base Unit on the wall. Note: Do not use an outlet controlled by a wall switch. RING VOL PULSE-TONE DC IN 9V OFF-LO-HI +- Plug the AC Adapter into the modular jack on the posts of the wall plate and push down until it's firmly seated. 6. Plug the telephone cord into a standard 120V AC wall outlet. Use only the Uniden AC Adapter supplied with this phone. 13 TEL LINE 5. 4. Place the AC Adapter cord inside the molded channel.
Place the Base Unit on the wall. Note: Do not use an outlet controlled by a wall switch. RING VOL PULSE-TONE DC IN 9V OFF-LO-HI +- Plug the AC Adapter into the modular jack on the posts of the wall plate and push down until it's firmly seated. 6. Plug the telephone cord into a standard 120V AC wall outlet. Use only the Uniden AC Adapter supplied with this phone. 13 TEL LINE 5. 4. Place the AC Adapter cord inside the molded channel.
English Owners Manual
Page 14
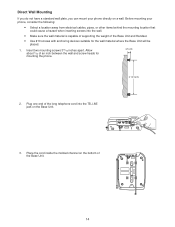
... the wall material where the Base Unit will be placed. 1. Direct Wall Mounting If you do not have a standard wall plate, you can mount your phone, consider the following: • Select a location away from electrical cables, pipes, or other items behind the mounting location that could cause a hazard when ... wall material is capable of supporting the weight of the long telephone cord into the TEL LINE jack on the Base Unit. 3. Before mounting your phone directly on a wall. Insert two mounting screws 315⁄16 inches apart. Plug one end of the Base Unit and Handset. • Use #...
... the wall material where the Base Unit will be placed. 1. Direct Wall Mounting If you do not have a standard wall plate, you can mount your phone, consider the following: • Select a location away from electrical cables, pipes, or other items behind the mounting location that could cause a hazard when ... wall material is capable of supporting the weight of the long telephone cord into the TEL LINE jack on the Base Unit. 3. Before mounting your phone directly on a wall. Insert two mounting screws 315⁄16 inches apart. Plug one end of the Base Unit and Handset. • Use #...
English Owners Manual
Page 16
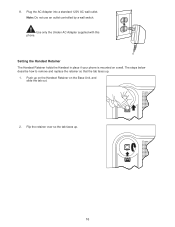
Setting the Handset Retainer The Handset Retainer holds the Handset in place if your phone is mounted on the Base Unit, and slide the tab out. 25 CHANNEL 2. Push up . 25 CHANNEL 16 Flip the retainer over so the tab faces up on the Handset Retainer on a wall. 8. The steps below describe how to remove and replace the retainer so that the tab faces up. 1. Note: Do not use an outlet controlled by a wall switch. Use only the Uniden AC Adapter supplied with this phone. Plug the AC Adapter into a standard 120V AC wall outlet.
Setting the Handset Retainer The Handset Retainer holds the Handset in place if your phone is mounted on the Base Unit, and slide the tab out. 25 CHANNEL 2. Push up . 25 CHANNEL 16 Flip the retainer over so the tab faces up on the Handset Retainer on a wall. 8. The steps below describe how to remove and replace the retainer so that the tab faces up. 1. Note: Do not use an outlet controlled by a wall switch. Use only the Uniden AC Adapter supplied with this phone. Plug the AC Adapter into a standard 120V AC wall outlet.
English Owners Manual
Page 19
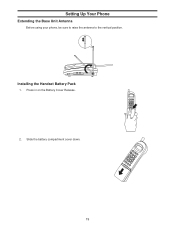
Slide the battery compartment cover down. 19 Installing the Handset Battery Pack 1. Press in on the Battery Cover Release. 2. Setting Up Your Phone Extending the Base Unit Antenna Before using your phone, be sure to raise the antenna to the vertical position.
Slide the battery compartment cover down. 19 Installing the Handset Battery Pack 1. Press in on the Battery Cover Release. 2. Setting Up Your Phone Extending the Base Unit Antenna Before using your phone, be sure to raise the antenna to the vertical position.
English Owners Manual
Page 22
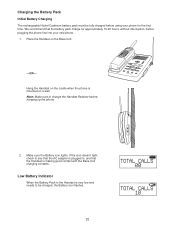
If the icon doesn't light, check to be fully charged before using your phone for approximately 15-20 hours, without interruption, before hanging up the phone. 2. Place the Handset on the cradle when the phone is plugged in, and that the battery pack charge for the first time. We ...needs to see that the AC adapter is mounted on a wall. Note: Make sure to change the Handset Retainer before plugging the phone line into your new phone. 1. Hang the Handset on the Base Unit. -OR- Charging the Battery Pack Initial Battery Charging The rechargeable Nickel-Cadmium battery ...
If the icon doesn't light, check to be fully charged before using your phone for approximately 15-20 hours, without interruption, before hanging up the phone. 2. Place the Handset on the cradle when the phone is plugged in, and that the battery pack charge for the first time. We ...needs to see that the AC adapter is mounted on a wall. Note: Make sure to change the Handset Retainer before plugging the phone line into your new phone. 1. Hang the Handset on the Base Unit. -OR- Charging the Battery Pack Initial Battery Charging The rechargeable Nickel-Cadmium battery ...
English Owners Manual
Page 23
...develop a "memory" (reduced charge capacity) caused by repeated charge and discharge cycles. Also, do to normal operation. Check with your phone to return your local phone company if you use the unit. The Handset beeps and the battery icon flashes once every 3 seconds. Return the Handset to save... power. If the Battery icon begins to flash, the phone is programmed to eliminate its functions to the Base Unit for charging. To Avoid Memory Effect At least once a month, operate the unit...
...develop a "memory" (reduced charge capacity) caused by repeated charge and discharge cycles. Also, do to normal operation. Check with your phone to return your local phone company if you use the unit. The Handset beeps and the battery icon flashes once every 3 seconds. Return the Handset to save... power. If the Battery icon begins to flash, the phone is programmed to eliminate its functions to the Base Unit for charging. To Avoid Memory Effect At least once a month, operate the unit...
English Owners Manual
Page 25
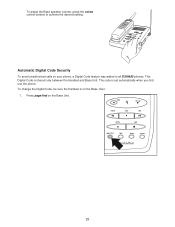
The code is shared only between the Handset and Base Unit. This Digital Code is set automatically when you first use the phone. To change the Digital Code, be sure the Handset is on the Base Unit. 25 Press page/find on the Base, then: 1. Automatic Digital Code Security To avoid unauthorized calls on your phone, a Digital Code feature was added to achieve the desired setting. To adjust the Base speaker volume, press the volume control buttons to all DXAI685 phones.
The code is shared only between the Handset and Base Unit. This Digital Code is set automatically when you first use the phone. To change the Digital Code, be sure the Handset is on the Base Unit. 25 Press page/find on the Base, then: 1. Automatic Digital Code Security To avoid unauthorized calls on your phone, a Digital Code feature was added to achieve the desired setting. To adjust the Base speaker volume, press the volume control buttons to all DXAI685 phones.
English Owners Manual
Page 29
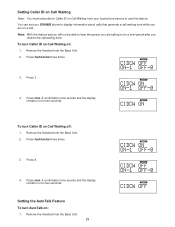
... turn Caller ID on Call Waiting on: 1. Setting the AutoTalk Feature To turn AutoTalk on: 1. Remove the Handset from your local phone service to use this feature set your DXAI685 phone to display information about calls that generate a call waiting tone while you receive the call . Setting Caller ID on Call Waiting Note...
... turn Caller ID on Call Waiting on: 1. Setting the AutoTalk Feature To turn AutoTalk on: 1. Remove the Handset from your local phone service to use this feature set your DXAI685 phone to display information about calls that generate a call waiting tone while you receive the call . Setting Caller ID on Call Waiting Note...
English Owners Manual
Page 32
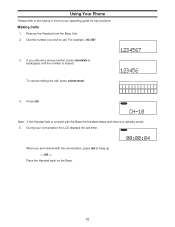
.... For example, 123-4567 3. Press talk. DELETING CH-10 Note: If the Handset fails to connect with the conversation, press talk to call. Using Your Phone Please refer to standby mode. 5. Remove the Handset from the Base Unit. 2. If you wish to hang up. - DELETING 00:00:04 When you are...
.... For example, 123-4567 3. Press talk. DELETING CH-10 Note: If the Handset fails to connect with the conversation, press talk to call. Using Your Phone Please refer to standby mode. 5. Remove the Handset from the Base Unit. 2. If you wish to hang up. - DELETING 00:00:04 When you are...
English Owners Manual
Page 33
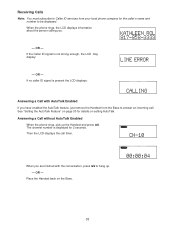
OR - Answering a Call without AutoTalk Enabled When the phone rings, pick up . - If the Caller ID signal is displayed for 2 seconds. Then... The channel number is not strong enough, the LCD may display: - OR - When the phone rings, the LCD displays information about the person calling you have enabled the AutoTalk feature, just remove the Handset from ...your local phone company for details on the Base. OR - Receiving Calls Note: You must subscribe to Caller ID...
OR - Answering a Call without AutoTalk Enabled When the phone rings, pick up . - If the Caller ID signal is displayed for 2 seconds. Then... The channel number is not strong enough, the LCD may display: - OR - When the phone rings, the LCD displays information about the person calling you have enabled the AutoTalk feature, just remove the Handset from ...your local phone company for details on the Base. OR - Receiving Calls Note: You must subscribe to Caller ID...
English Owners Manual
Page 34
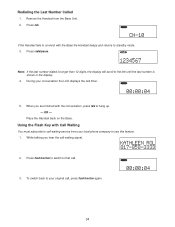
... is shown in the display. 4. DELETING 00:00:04 3. KATHLEEN ROL 817-858-3333 2. Redialing the Last Number Called 1. Remove the Handset from your local phone company to your conversation the LCD displays the call waiting service from the Base Unit. 2. Press redial/pause. DELETING 00:00:04 5. OR - While talking...
... is shown in the display. 4. DELETING 00:00:04 3. KATHLEEN ROL 817-858-3333 2. Redialing the Last Number Called 1. Remove the Handset from your local phone company to your conversation the LCD displays the call waiting service from the Base Unit. 2. Press redial/pause. DELETING 00:00:04 5. OR - While talking...

