English Owners Manual
Page 2
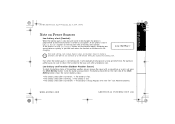
... Phone Making and Receiving Calls 35 [1] Making Calls from Speed Dial Memory 36 Making a Call from the Caller ID List 37 Adjusting the Earpiece Volume 37 Using a Headset 38 Headset installation 38 Making calls with the headset 38 Receiving calls with the headset 39 Installing the Beltclip 39 Tone Dialing Switch-over 40 Traveling Out-of-Range 40 Selecting a Different Channel 40 Finding a Lost Handset 41 Using Call Waiting 41 Voice Mail Waiting Indicator 42 Additional Information Changing the Digital Security Code 43 Note on a Wall 11 E. Connect the Base...
... Phone Making and Receiving Calls 35 [1] Making Calls from Speed Dial Memory 36 Making a Call from the Caller ID List 37 Adjusting the Earpiece Volume 37 Using a Headset 38 Headset installation 38 Making calls with the headset 38 Receiving calls with the headset 39 Installing the Beltclip 39 Tone Dialing Switch-over 40 Traveling Out-of-Range 40 Selecting a Different Channel 40 Finding a Lost Handset 41 Using Call Waiting 41 Voice Mail Waiting Indicator 42 Additional Information Changing the Digital Security Code 43 Note on a Wall 11 E. Connect the Base...
English Owners Manual
Page 3
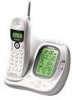
...;Backlit Displays with Contrast Control at Base • 10 Number Memory Dialing • Last Number Redial • Voice Mail Waiting Indicator at Base • English, French or Spanish Support • Pulse/Tone Dialing • Find Handset Locator • Earpiece & Ringer Volume Control • Hearing Aid Compatible • Channel Autoscan (Handset-Base) Be sure to exacting standards for reliability, long life, and outstanding performance. The color of your purchase of the Uniden cordless telephone. registered mark. www.uniden...
...;Backlit Displays with Contrast Control at Base • 10 Number Memory Dialing • Last Number Redial • Voice Mail Waiting Indicator at Base • English, French or Spanish Support • Pulse/Tone Dialing • Find Handset Locator • Earpiece & Ringer Volume Control • Hearing Aid Compatible • Channel Autoscan (Handset-Base) Be sure to exacting standards for reliability, long life, and outstanding performance. The color of your purchase of the Uniden cordless telephone. registered mark. www.uniden...
English Owners Manual
Page 4
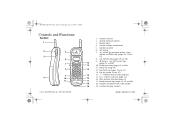
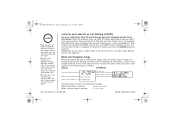
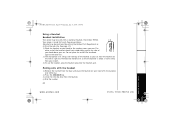
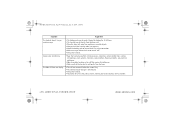
.... Talk/flash key (pages 35 and 41) 13. Delete/channel key (pages 24, 29 and 40) 18 18. UP033BH_EXI7246C.book Page 3 Wednesday, June 16, 2004 2:14 PM CONTROLS & FUNCTIONS Controls and Functions Handset 1 2 5 3 6 7 8 9 4 10 11 [3] CONTROLS & FUNCTIONS 1. Jack for optional headset 3. Handset earpiece 6. LCD display 7. / /vol/ (earpiece volume, ringer volume and scroll) key (pages 20, 22 and 37) 8. Handset charging contacts www.uniden.com Handset antenna 2. Mem (memory dial) key (page...
.... Talk/flash key (pages 35 and 41) 13. Delete/channel key (pages 24, 29 and 40) 18 18. UP033BH_EXI7246C.book Page 3 Wednesday, June 16, 2004 2:14 PM CONTROLS & FUNCTIONS Controls and Functions Handset 1 2 5 3 6 7 8 9 4 10 11 [3] CONTROLS & FUNCTIONS 1. Jack for optional headset 3. Handset earpiece 6. LCD display 7. / /vol/ (earpiece volume, ringer volume and scroll) key (pages 20, 22 and 37) 8. Handset charging contacts www.uniden.com Handset antenna 2. Mem (memory dial) key (page...

English Owners Manual
Page 11
... does not illuminate, check to see that the AC adapter is fully charged, connect the telephone line cord to set the time. See "A. Charge your outdoor weather sensor. •The base LCD will blink and prompt you to another channel and remove the batteries. Install the batteries again. 4) Replace the cover and tighten the knob with a screwdriver or a coin. 5) Place the handset in the base unit with your handset at least 15...
... does not illuminate, check to see that the AC adapter is fully charged, connect the telephone line cord to set the time. See "A. Charge your outdoor weather sensor. •The base LCD will blink and prompt you to another channel and remove the batteries. Install the batteries again. 4) Replace the cover and tighten the knob with a screwdriver or a coin. 5) Place the handset in the base unit with your handset at least 15...

English Owners Manual
Page 18
... Set the Alarm •If the alarm setting is on and the time you have set (the alarm switch is on the right of the display.) The current alarm time on the display blinks, and ALARM SET appears on the display. 2) Use the and keys to select the time you are setting the alarm time, the display shows the Caller ID message, then the phone returns to the alarm setting mode...
... Set the Alarm •If the alarm setting is on and the time you have set (the alarm switch is on the right of the display.) The current alarm time on the display blinks, and ALARM SET appears on the display. 2) Use the and keys to select the time you are setting the alarm time, the display shows the Caller ID message, then the phone returns to the alarm setting mode...
English Owners Manual
Page 20
... and number of a call id/menu key. You must subscribe to Caller ID service through your local telephone provider to press any keys. 1) With the phone in standby mode, press and hold the call that you will need to set up: AutoTalk, CIDCW (Caller ID on Call Waiting), Area Code, Dial Mode and Language. The handset returns to standby mode. The following screen appears. 2) Press the select key to turn AutoTalk on Call Waiting) Caller ID...
... and number of a call id/menu key. You must subscribe to Caller ID service through your local telephone provider to press any keys. 1) With the phone in standby mode, press and hold the call that you will need to set up: AutoTalk, CIDCW (Caller ID on Call Waiting), Area Code, Dial Mode and Language. The handset returns to standby mode. The following screen appears. 2) Press the select key to turn AutoTalk on Call Waiting) Caller ID...
English Owners Manual
Page 21
...-digit dialing. If an area code was already stored, the phone will see only the local seven digit number. The following screen appears. 2) Press the /vol/ key twice to standby mode. Entering Your Area Code If you make an error or delete the current area code, use the delete/ channel key to backspace. 5) Press the select key. A confirmation tone sounds. When reviewing Caller ID messages, you will display it. 4) Use the number keys (0 - 9) to complete the setting. UP033BH_EXI7246C.book...
...-digit dialing. If an area code was already stored, the phone will see only the local seven digit number. The following screen appears. 2) Press the /vol/ key twice to standby mode. Entering Your Area Code If you make an error or delete the current area code, use the delete/ channel key to backspace. 5) Press the select key. A confirmation tone sounds. When reviewing Caller ID messages, you will display it. 4) Use the number keys (0 - 9) to complete the setting. UP033BH_EXI7246C.book...
English Owners Manual
Page 28
...). The handset display shows the date and time also. Caller ID and Caller ID on the handset). UP033BH_EXI7246C.book Page 27 Wednesday, June 16, 2004 2:14 PM GETTING STARTED note •If you answer a call before the second ring), the Caller ID message will hear a Call Waiting tone while you are on the display (up to 30 incoming calls - When the Telephone Rings When the Caller ID message is received, the display shows the caller's phone number.
...). The handset display shows the date and time also. Caller ID and Caller ID on the handset). UP033BH_EXI7246C.book Page 27 Wednesday, June 16, 2004 2:14 PM GETTING STARTED note •If you answer a call before the second ring), the Caller ID message will hear a Call Waiting tone while you are on the display (up to 30 incoming calls - When the Telephone Rings When the Caller ID message is received, the display shows the caller's phone number.
English Owners Manual
Page 29
... the phone in standby mode, press the call id/menu key on the handset. Press the /vol/ key to view messages from the oldest to the most recent to the oldest. Once you view the new message, the number will be up to 15 characters for the name and 15 digits for more than 30 seconds, an error tone sounds and the telephone returns...
... the phone in standby mode, press the call id/menu key on the handset. Press the /vol/ key to view messages from the oldest to the most recent to the oldest. Once you view the new message, the number will be up to 15 characters for the name and 15 digits for more than 30 seconds, an error tone sounds and the telephone returns...
English Owners Manual
Page 38
... cannot make a call from the Caller ID list if your cordless phone is connected to set a long distance call, press 1. Select the phone number that you want to dial by pressing the /vol/ or /vol/ key. 2) To have the phone dial the stored area code before the displayed Caller ID number to a private branch exchange (PBX). Temporarily Mute Ringer If the handset is off the base while an incoming call is standby mode, press the call...
... cannot make a call from the Caller ID list if your cordless phone is connected to set a long distance call, press 1. Select the phone number that you want to dial by pressing the /vol/ or /vol/ key. 2) To have the phone dial the stored area code before the displayed Caller ID number to a private branch exchange (PBX). Temporarily Mute Ringer If the handset is off the base while an incoming call is standby mode, press the call...
English Owners Manual
Page 39
... arm swings over either ear. 2) Press the talk/flash key. 3) Listen for hands-free conversations. (Headset may be purchased by calling the Uniden Parts Department or visiting the web site. Making calls with the headset 1) Remove the handset from the base and place the headset on your ear. Your phone is about 2 inches away from the headset. 4) Dial the number. Do not place the end of the headband...
... arm swings over either ear. 2) Press the talk/flash key. 3) Listen for hands-free conversations. (Headset may be purchased by calling the Uniden Parts Department or visiting the web site. Making calls with the headset 1) Remove the handset from the base and place the headset on your ear. Your phone is about 2 inches away from the headset. 4) Dial the number. Do not place the end of the headband...
English Owners Manual
Page 41
... circuitry virtually eliminates background noise. USING YOUR PHONE www.uniden.com USING YOUR PHONE [40] This feature is changing to use any automated menu systems, such as tone digits. UP033BH_EXI7246C.book Page 40 Wednesday, June 16, 2004 2:14 PM Tone Dialing Switch-over If your telephone company requires pulse dialing, you can manually change the phone's channel for clear operation. If your phone is set to "Precautions" on interference, refer to pulse dialing mode, make your conversations.
... circuitry virtually eliminates background noise. USING YOUR PHONE www.uniden.com USING YOUR PHONE [40] This feature is changing to use any automated menu systems, such as tone digits. UP033BH_EXI7246C.book Page 40 Wednesday, June 16, 2004 2:14 PM Tone Dialing Switch-over If your telephone company requires pulse dialing, you can manually change the phone's channel for clear operation. If your phone is set to "Precautions" on interference, refer to pulse dialing mode, make your conversations.
English Owners Manual
Page 43
... will reset the indicator. Just dial the access number supplied by your voice mail provider to enter your voice mail access number to a speed dial number. This will provide you can program your mailbox. You can use your cordless telephone to access your phone flashes whenever you have messages waiting in order to use LED on after you have retrieved your voice mailbox. If the voice mail waiting indicator remains on the base of your voice mailbox. note You must subscribe to voice mail service...
... will reset the indicator. Just dial the access number supplied by your voice mail provider to enter your voice mail access number to a speed dial number. This will provide you can program your mailbox. You can use your cordless telephone to access your phone flashes whenever you have messages waiting in order to use LED on after you have retrieved your voice mailbox. If the voice mail waiting indicator remains on the base of your voice mailbox. note You must subscribe to voice mail service...
English Owners Manual
Page 45
... handset to the base unit for charging. Complete your conversation as quickly as possible and return the handset to the base unit after a telephone call. The battery check LED on the right side of the outdoor weather sensor, remove the cover with new "AA" size Alkaline batteries. www.uniden.com ADDITIONAL INFORMATION [44] Replace with a screwdriver or a coin and press the Check Battery button inside the battery compartment. ADDITIONAL INFORMATION UP033BH_EXI7246C.book...
... handset to the base unit for charging. Complete your conversation as quickly as possible and return the handset to the base unit after a telephone call. The battery check LED on the right side of the outdoor weather sensor, remove the cover with new "AA" size Alkaline batteries. www.uniden.com ADDITIONAL INFORMATION [44] Replace with a screwdriver or a coin and press the Check Battery button inside the battery compartment. ADDITIONAL INFORMATION UP033BH_EXI7246C.book...
English Owners Manual
Page 50
... far from the base unit. • Place the base unit away from appliances or metal objects. • Change the digital security code (see page 43). • Check the battery pack to ensure there is a secure connection. • Make sure ringer volume isn't set to turned "off." • Charge the handset. • Keep the handset away from microwave ovens, computers, remote control toys, wireless microphones, alarm systems, intercoms, room monitors, fluorescent lights, and electrical appliances. • Move...
... far from the base unit. • Place the base unit away from appliances or metal objects. • Change the digital security code (see page 43). • Check the battery pack to ensure there is a secure connection. • Make sure ringer volume isn't set to turned "off." • Charge the handset. • Keep the handset away from microwave ovens, computers, remote control toys, wireless microphones, alarm systems, intercoms, room monitors, fluorescent lights, and electrical appliances. • Move...
English Owners Manual
Page 51
... channel and remove the batteries. The outdoor temperature and humidity doesn't appear on the base display. • Check the battery status of the outdoor weather sensor. If you still have a problem. • Call our customer hotline at 1-800-297-1023. ADDITIONAL INFORMATION UP033BH_EXI7246C.book Page 50 Wednesday, June 16, 2004 2:14 PM Symptom Suggestion Voice Message Indication does not work. • Contact your local telephone...
... channel and remove the batteries. The outdoor temperature and humidity doesn't appear on the base display. • Check the battery status of the outdoor weather sensor. If you still have a problem. • Call our customer hotline at 1-800-297-1023. ADDITIONAL INFORMATION UP033BH_EXI7246C.book Page 50 Wednesday, June 16, 2004 2:14 PM Symptom Suggestion Voice Message Indication does not work. • Contact your local telephone...
English Owners Manual
Page 52
... plastic housing (i.e., liquid can damage your cordless telephone does not work, please send to: Uniden America Corporation Parts and Service Division 4700 Amon Carter Blvd. CAUTION: DO NOT use as normal. UP033BH_EXI7246C.book Page 51 Wednesday, June 16, 2004 2:14 PM ADDITIONAL INFORMATION Liquid Damage Moisture and liquid can be heard in the phone or liquid has entered the handset battery compartment...
... plastic housing (i.e., liquid can damage your cordless telephone does not work, please send to: Uniden America Corporation Parts and Service Division 4700 Amon Carter Blvd. CAUTION: DO NOT use as normal. UP033BH_EXI7246C.book Page 51 Wednesday, June 16, 2004 2:14 PM ADDITIONAL INFORMATION Liquid Damage Moisture and liquid can be heard in the phone or liquid has entered the handset battery compartment...
English Owners Manual
Page 53
... RBRC® program, Uniden makes it to qualified service personnel when service or repair work by the battery, read anything to rain or moisture. You may be toxic if swallowed. 4. WARNING: The cords on this products and/or accessories contain lead, a chemical known to the State of fire, electrical shock, or damage to the unit, DO NOT expose this program is a registered trademark of...
... RBRC® program, Uniden makes it to qualified service personnel when service or repair work by the battery, read anything to rain or moisture. You may be toxic if swallowed. 4. WARNING: The cords on this products and/or accessories contain lead, a chemical known to the State of fire, electrical shock, or damage to the unit, DO NOT expose this program is a registered trademark of...
English Owners Manual
Page 54
... for one cordless telephone in your new phone for 15-20 hours before connecting the telephone cords: Caution! • Never install telephone wiring during a lightning storm. • Never touch uninsulated telephone wires or terminals unless the telephone line has been disconnected. • Use caution when installing or modifying telephone lines. Applying Power to the Base This phone requires an AC outlet, without charge for making necessary arrangements to continue uninterrupted service. LEGAL...
... for one cordless telephone in your new phone for 15-20 hours before connecting the telephone cords: Caution! • Never install telephone wiring during a lightning storm. • Never touch uninsulated telephone wires or terminals unless the telephone line has been disconnected. • Use caution when installing or modifying telephone lines. Applying Power to the Base This phone requires an AC outlet, without charge for making necessary arrangements to continue uninterrupted service. LEGAL...
English Owners Manual
Page 56
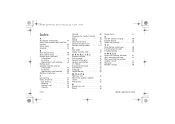
...Basic phone setup 19 Battery pack (handset) Information 47 Installing 8 Replacement and handling . . . 45 Battery pack (outdoor weather sensor) Information 47 Installing 10 Replacement and handling . . . 45 Beltclip installation 39 C Call waiting 41 Caller ID service 27 Call waiting 41 Deleting 29 Making a call 35 Redial 36 Ringer tone 22 S Set the weather display 30 Snooze feature 18 Speed dial memory 23 T, U Tone dialing switch-over 40 Traveling out-of-range 40 Troubleshooting 48 V, W, X, Y, Z Voice mail waiting indicator . . . 42 Wall mounting the base 12 Wall mounting...
...Basic phone setup 19 Battery pack (handset) Information 47 Installing 8 Replacement and handling . . . 45 Battery pack (outdoor weather sensor) Information 47 Installing 10 Replacement and handling . . . 45 Beltclip installation 39 C Call waiting 41 Caller ID service 27 Call waiting 41 Deleting 29 Making a call 35 Redial 36 Ringer tone 22 S Set the weather display 30 Snooze feature 18 Speed dial memory 23 T, U Tone dialing switch-over 40 Traveling out-of-range 40 Troubleshooting 48 V, W, X, Y, Z Voice mail waiting indicator . . . 42 Wall mounting the base 12 Wall mounting...


