English Owners Manual
Page 2
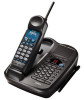
... Number Memory • 32 Digit Redial • Redial, Flash and Pause • Pulse / Tone Dialing • 7 Hour Talk Time • 7 Day Standby Battery Life • Handset Earpiece and Ringer Volume Control • Speakerphone • 3-Way Conference Operation This phone is designed to exacting standards that provide reliability, long life and outstanding... TO YOUR NEW PHONE Introduction Thank you for explanation purposes. Note: Some illustrations in this manual may differ from the actual unit for choosing the Uniden EXA 8955 cordless telephone.
... Number Memory • 32 Digit Redial • Redial, Flash and Pause • Pulse / Tone Dialing • 7 Hour Talk Time • 7 Day Standby Battery Life • Handset Earpiece and Ringer Volume Control • Speakerphone • 3-Way Conference Operation This phone is designed to exacting standards that provide reliability, long life and outstanding... TO YOUR NEW PHONE Introduction Thank you for explanation purposes. Note: Some illustrations in this manual may differ from the actual unit for choosing the Uniden EXA 8955 cordless telephone.

English Owners Manual
Page 6
... Base unit Step 3 (page 10 to11) Then, insert the battery pack into the handset. You have to reset the security code, see page 34. 3 This security code prevents other cordless handsets from making calls through your base unit. GETTING STARTED Read this first This cordless telephone ...must be assigned automatically between your base unit and handset when you want to charge the battery pack for the first ...
... Base unit Step 3 (page 10 to11) Then, insert the battery pack into the handset. You have to reset the security code, see page 34. 3 This security code prevents other cordless handsets from making calls through your base unit. GETTING STARTED Read this first This cordless telephone ...must be assigned automatically between your base unit and handset when you want to charge the battery pack for the first ...

English Owners Manual
Page 7
... sure you have received the following items in the package. If any of these items are missing or damaged, contact the Uniden Parts Department (see below). • Base unit • Handset • AC adapter (AD-420) • Rechargeable battery pack (BT-905) • Telephone line cord (2) • Wall mount adapter • This...
... sure you have received the following items in the package. If any of these items are missing or damaged, contact the Uniden Parts Department (see below). • Base unit • Handset • AC adapter (AD-420) • Rechargeable battery pack (BT-905) • Telephone line cord (2) • Wall mount adapter • This...

English Owners Manual
Page 8
...the best location • Connect the base unit • Choose the dialing mode Choose the best location Before choosing a location for your handset for 15-20 hours before using the phone. • The location should charge your new phone, read the INSTALLATION CONSIDERATIONS included in the... sure there is sufficient space to both a phone jack and continuous a power outlet which is not switchable. • Keep the base and handset away from sources of electrical noise such as a window by a street with heavy traffic Avoid microwave ovens Avoid excessive moisture, extremely low temperatures,...
...the best location • Connect the base unit • Choose the dialing mode Choose the best location Before choosing a location for your handset for 15-20 hours before using the phone. • The location should charge your new phone, read the INSTALLATION CONSIDERATIONS included in the... sure there is sufficient space to both a phone jack and continuous a power outlet which is not switchable. • Keep the base and handset away from sources of electrical noise such as a window by a street with heavy traffic Avoid microwave ovens Avoid excessive moisture, extremely low temperatures,...

English Owners Manual
Page 9
Then raise the antenna to a standard 120VAC wall outlet. 3 Set the base unit on a desk or tabletop and place the handset on the wall, see page 8. Route the cord. Connect the base unit If you want to install the base unit on the base unit. Place ...
Then raise the antenna to a standard 120VAC wall outlet. 3 Set the base unit on a desk or tabletop and place the handset on the wall, see page 8. Route the cord. Connect the base unit If you want to install the base unit on the base unit. Place ...

English Owners Manual
Page 12
Allow about 3/16 of the slot. Slide it clockwise 180 degrees. 9 Flip the retainer from front to back. Handset retainer 8 On the base unit, pull the handset retainer out of an inch between the wall and screwheads for mounting the phone. 2 Refer to steps 1 through 8 on page 8 to mount the telephone. 9...'t have a standard wall plate, you can mount your phone within 10 - 15 feet of a working phone jack to the wall. The retainer holds the handset in . 1 Insert two mounting screws into the slot so that could cause a hazard when inserting screws into the wall. • Try to mount your...
Allow about 3/16 of the slot. Slide it clockwise 180 degrees. 9 Flip the retainer from front to back. Handset retainer 8 On the base unit, pull the handset retainer out of an inch between the wall and screwheads for mounting the phone. 2 Refer to steps 1 through 8 on page 8 to mount the telephone. 9...'t have a standard wall plate, you can mount your phone within 10 - 15 feet of a working phone jack to the wall. The retainer holds the handset in . 1 Insert two mounting screws into the slot so that could cause a hazard when inserting screws into the wall. • Try to mount your...

English Owners Manual
Page 13
... correct polarity (black and red wires), then insert the battery pack into place. 4 Place the handset on the base. Make sure that the "status" LED of the base unit lights, and charging begins. Use only Uniden Battery BT-905. status LED 10 Preparing the battery pack Charge the battery pack for more...
... correct polarity (black and red wires), then insert the battery pack into place. 4 Place the handset on the base. Make sure that the "status" LED of the base unit lights, and charging begins. Use only Uniden Battery BT-905. status LED 10 Preparing the battery pack Charge the battery pack for more...
English Owners Manual
Page 14
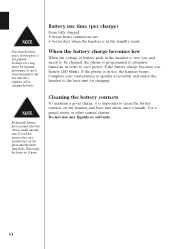
... in order to save power. When the battery charge becomes low When the voltage of battery pack in the handset is very low and needs to be sure to return the handset to the base unit after a telephone call for charging the battery. If the battery charge becomes low Battery ...LED blinks. Use a pencil eraser or other contact cleaner. Do not use . • Seven days when the handset is in the standby mode. Rechargeable batteries have a memory effect that reduces standby and talk time. For optimum performance, be charged, the phone is not...
... in order to save power. When the battery charge becomes low When the voltage of battery pack in the handset is very low and needs to be sure to return the handset to the base unit after a telephone call for charging the battery. If the battery charge becomes low Battery ...LED blinks. Use a pencil eraser or other contact cleaner. Do not use . • Seven days when the handset is in the standby mode. Rechargeable batteries have a memory effect that reduces standby and talk time. For optimum performance, be charged, the phone is not...

English Owners Manual
Page 15
... 2 Dial the phone number. 3 To hang up . The speaker LED blinks. 2 Dial the number on the handset. BASICS Other Operations To To improve reception To adjust the ear speaker volume To temporarily switch to tone dial (When ...to the base. Press * /tone . If the talk LED never stop flashing, place the handset on the base for at least three seconds and make a call , press speaker to hang up , press talk ...or return the handset to pulse mode) To enter a pause within dialing sequence Do this Press chan on the keypad. ...
... 2 Dial the phone number. 3 To hang up . The speaker LED blinks. 2 Dial the number on the handset. BASICS Other Operations To To improve reception To adjust the ear speaker volume To temporarily switch to tone dial (When ...to the base. Press * /tone . If the talk LED never stop flashing, place the handset on the base for at least three seconds and make a call , press speaker to hang up , press talk ...or return the handset to pulse mode) To enter a pause within dialing sequence Do this Press chan on the keypad. ...

English Owners Manual
Page 16
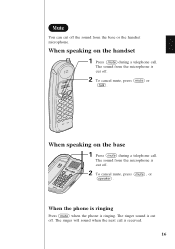
The status LED on the base flashes. 2 Press speaker . 3 Press speaker to finish the call From the handset Handset on the base 1 Phone rings. The talk LED flashes. 2 Press talk and begin speaking. 3 Press talk or return the handset to the base to the base. Receiving a call . status LED 13 From the base 1 The phone rings. Handset off the base 1 Phone rings. The talk LED flashes. 2 Pick up the handset and begin speaking. 3 To hang up, press talk or return the handset to finish the call.
The status LED on the base flashes. 2 Press speaker . 3 Press speaker to finish the call From the handset Handset on the base 1 Phone rings. The talk LED flashes. 2 Press talk and begin speaking. 3 Press talk or return the handset to the base to the base. Receiving a call . status LED 13 From the base 1 The phone rings. Handset off the base 1 Phone rings. The talk LED flashes. 2 Pick up the handset and begin speaking. 3 To hang up, press talk or return the handset to finish the call.

English Owners Manual
Page 17
...the base, adjust the volume • and volume ª button as desired. Base ringer switch This switch turns the base ringer on or off on Handset ear speaker volume The phone has four ear speaker volume levels, Normal, Medium, High, and Loud. Adjusting the ringer and ear speaker volume... after the telephone call will remain in Normal mode, error sound beeps. RINGER OFF-ON Base speaker volume To control the speaker volume of the handset. volume 14 Pressing • or ª during a telephone call has ended. ringer off on or off. Each time ringer is pressed, the ringer tone ...
...the base, adjust the volume • and volume ª button as desired. Base ringer switch This switch turns the base ringer on or off on Handset ear speaker volume The phone has four ear speaker volume levels, Normal, Medium, High, and Loud. Adjusting the ringer and ear speaker volume... after the telephone call will remain in Normal mode, error sound beeps. RINGER OFF-ON Base speaker volume To control the speaker volume of the handset. volume 14 Pressing • or ª during a telephone call has ended. ringer off on or off. Each time ringer is pressed, the ringer tone ...
English Owners Manual
Page 18
The talk LED blinks. 2 Press redial . 3 Press talk or place the handset on the base to finish the call. 15 The speaker LED blinks. 2 To call From the handset The last phone number entered can be quickly redialed. 1 Press talk . From the base 1 Press speaker . If the recently dialed number exceeds 32 digits, only the first 32 digits are retained for redialing. Redialing a call the last number dialed from the base, press redial/p . 3 Press speaker to hang up.
The talk LED blinks. 2 Press redial . 3 Press talk or place the handset on the base to finish the call. 15 The speaker LED blinks. 2 To call From the handset The last phone number entered can be quickly redialed. 1 Press talk . From the base 1 Press speaker . If the recently dialed number exceeds 32 digits, only the first 32 digits are retained for redialing. Redialing a call the last number dialed from the base, press redial/p . 3 Press speaker to hang up.
English Owners Manual
Page 19
The ringer sound is cut off . When speaking on the handset 1 Press mute during a telephone call. When the phone is ringing Press mute when the phone is received. 16 The sound from the base or the handset microphone. The ringer will sound when the next call . The sound from the microphone is cut off the sound from the microphone is cut off . 2 To cancel mute, press mute , or speaker . When speaking on the base 1 Press mute during a telephone call is ringing. Mute You can cut off . 2 To cancel mute, press mute or talk .
The ringer sound is cut off . When speaking on the handset 1 Press mute during a telephone call. When the phone is ringing Press mute when the phone is received. 16 The sound from the base or the handset microphone. The ringer will sound when the next call . The sound from the microphone is cut off the sound from the microphone is cut off . 2 To cancel mute, press mute , or speaker . When speaking on the base 1 Press mute during a telephone call is ringing. Mute You can cut off . 2 To cancel mute, press mute or talk .
English Owners Manual
Page 20
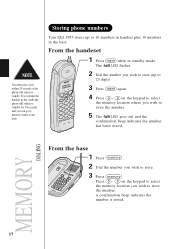
... phone numbers Your EXA 8955 stores up to 20 digits) 3 Press mem again. 4 Press 0 - 9 on the keypad to select the memory location you return the handset in standby mode. The talk LED flashes. 2 Dial the number you wish to store (up to store the number. 5 The talk LED goes out and... in the cradle the phone will return to standby. Press 0 - 9 on the keypad to select the memory location where you wish to 10 numbers in handset plus 10 numbers in the base. Press mem and you wish to store. 3 Press memory . From the base 1 Press memory . 2 Dial the number you can...
... phone numbers Your EXA 8955 stores up to 20 digits) 3 Press mem again. 4 Press 0 - 9 on the keypad to select the memory location you return the handset in standby mode. The talk LED flashes. 2 Dial the number you wish to store (up to store the number. 5 The talk LED goes out and... in the cradle the phone will return to standby. Press 0 - 9 on the keypad to select the memory location where you wish to 10 numbers in handset plus 10 numbers in the base. Press mem and you wish to store. 3 Press memory . From the base 1 Press memory . 2 Dial the number you can...
English Owners Manual
Page 21
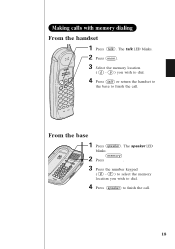
The speaker LED blinks. 2 memory Press . 3 Press the number keypad ( 0 - 9 ) to select the memory location you wish to dial. 4 Press talk or return the handset to the base to finish the call . Making calls with memory dialing From the handset 1 Press talk . From the base 1 Press speaker . The talk LED blinks. 2 Press mem . 3 Select the memory location ( 0 - 9 ) you wish to dial. 4 Press speaker to finish the call . 18
The speaker LED blinks. 2 memory Press . 3 Press the number keypad ( 0 - 9 ) to select the memory location you wish to dial. 4 Press talk or return the handset to the base to finish the call . Making calls with memory dialing From the handset 1 Press talk . From the base 1 Press speaker . The talk LED blinks. 2 Press mem . 3 Select the memory location ( 0 - 9 ) you wish to dial. 4 Press speaker to finish the call . 18
English Owners Manual
Page 22
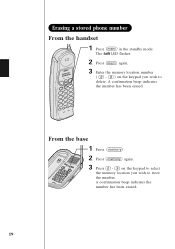
A confirmation beep indicates the number has been erased. From the base 1 Press memory . 2 Press memory again. 3 Press 0 - 9 on the keypad you wish to delete. The talk LED flashes. 2 Press mem again. 3 Enter the memory location number ( 0 - 9 ) on the keypad to select the memory location you wish to store the number. A confirmation beep indicates the number has been erased. 19 Erasing a stored phone number From the handset 1 Press mem in the standby mode.
A confirmation beep indicates the number has been erased. From the base 1 Press memory . 2 Press memory again. 3 Press 0 - 9 on the keypad you wish to delete. The talk LED flashes. 2 Press mem again. 3 Enter the memory location number ( 0 - 9 ) on the keypad to select the memory location you wish to store the number. A confirmation beep indicates the number has been erased. 19 Erasing a stored phone number From the handset 1 Press mem in the standby mode.
English Owners Manual
Page 23
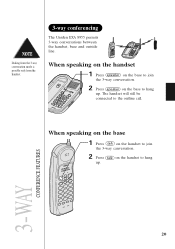
When speaking on the handset 1 Press speaker on the base to join the 3-way conversation. 2 Press speaker on the handset to hang up . The handset will still be connected to hang up . 3-WAY CONFERENCE FEATURES 20 When speaking on the base 1 Press talk on the handset to join the 3-way canversation. 2 Press talk on the base to the outline call. Dialing from the 3-way conversation mode is possible only from the handset. 3-way conferencing The Uniden EXA 8955 permits 3-way conversations between the handset, base and outside line.
When speaking on the handset 1 Press speaker on the base to join the 3-way conversation. 2 Press speaker on the handset to hang up . The handset will still be connected to hang up . 3-WAY CONFERENCE FEATURES 20 When speaking on the base 1 Press talk on the handset to join the 3-way canversation. 2 Press talk on the base to the outline call. Dialing from the 3-way conversation mode is possible only from the handset. 3-way conferencing The Uniden EXA 8955 permits 3-way conversations between the handset, base and outside line.

English Owners Manual
Page 24
Speak into the base microphone to answer the page. 3 To turn off the intercom, press talk on the handset or speaker on the base. Intercom from the base to handset 1 Press page/int'com on the base. 21 Speak into the mouthpiece to answer the base. 3 To turn off the intercom, press talk on the handset or speaker on the handset. The base beeps. 2 At the base, press page/int'com or speaker . Using your EXA 8955 intercom Intercom from the handset to base 1 Press int'c on the base. The handset beeps. 2 Press int'c or talk on the handset.
Speak into the base microphone to answer the page. 3 To turn off the intercom, press talk on the handset or speaker on the base. Intercom from the base to handset 1 Press page/int'com on the base. 21 Speak into the mouthpiece to answer the base. 3 To turn off the intercom, press talk on the handset or speaker on the handset. The base beeps. 2 At the base, press page/int'com or speaker . Using your EXA 8955 intercom Intercom from the handset to base 1 Press int'c on the base. The handset beeps. 2 Press int'c or talk on the handset.

English Owners Manual
Page 25
... hold , and the intercom tone will be sounded on the base. 2 Press page/int'com or speaker on the base. To transfer from the handset to the handset, press speaker on the base. To cancel the transfer, press talk on the base. The intercom mode is activated and you may speak to... the person at the base. 3 To complete the transfer to the handset 1 Press page/int'com on the base while speaking on the speaker phone. The line will be placed on hold , and the intercom tone will...
... hold , and the intercom tone will be sounded on the base. 2 Press page/int'com or speaker on the base. To transfer from the handset to the handset, press speaker on the base. To cancel the transfer, press talk on the base. The intercom mode is activated and you may speak to... the person at the base. 3 To complete the transfer to the handset 1 Press page/int'com on the base while speaking on the speaker phone. The line will be placed on hold , and the intercom tone will...

English Owners Manual
Page 34
The unit begins recording and the LED blinks. A beep that can record up to the stored messages. Recording a conversation You can be added to 10 minutes of conversation while you are making your call from the handset. 1 During the conversation from the handset. Press and hold voice memo on the base. 31 You cannot record a conversation while you are speaking on the base. A recorded conversation is treated as a typical message and will be heard by both parties sounds every 15 seconds. 2 To stop the recording, press voice memo or play .
The unit begins recording and the LED blinks. A beep that can record up to the stored messages. Recording a conversation You can be added to 10 minutes of conversation while you are making your call from the handset. 1 During the conversation from the handset. Press and hold voice memo on the base. 31 You cannot record a conversation while you are speaking on the base. A recorded conversation is treated as a typical message and will be heard by both parties sounds every 15 seconds. 2 To stop the recording, press voice memo or play .


