English Owners Manual
Page 2
..., electrical shock, or damage to the unit, DO NOT expose this Guide. H Do not short-circuit the battery. H Uniden voluntarily participates in an RBRC® industry program to placing used battery at the end of their useful life, when taken out of replacement nickel-cadmium batteries. Precautions! Rechargeable Nickel-Cadmium Battery Warning H This equipment contains a Rechargeable Nickel-Cadmium Battery. H Through the RBRC® program, Uniden makes...
..., electrical shock, or damage to the unit, DO NOT expose this Guide. H Do not short-circuit the battery. H Uniden voluntarily participates in an RBRC® industry program to placing used battery at the end of their useful life, when taken out of replacement nickel-cadmium batteries. Precautions! Rechargeable Nickel-Cadmium Battery Warning H This equipment contains a Rechargeable Nickel-Cadmium Battery. H Through the RBRC® program, Uniden makes...

English Owners Manual
Page 5
... 8 Telephone Line Outlets 8 Connecting the Telephone Cords 8 Applying Power to the Base Unit 9 Desk or Tabletop Installation 10 Wall Installation 10 Direct Wall Mounting 11 Setting Up Your Phone 13 Extending the Base Unit Antenna 13 Installing the Handset Battery Pack 13 Cleaning the Battery Contacts 14 Charging the Battery Pack 14 Low Battery Indicator 14 Setting the Pulse/Tone Switch 15 Automatic Digital Code Security 15 Handset Volume Controls 16 Channel Selector Button 16 Entering the Local Area Code 17 Setting the AutoTalk Feature 18 Using Your Phone 19 Making Calls...
... 8 Telephone Line Outlets 8 Connecting the Telephone Cords 8 Applying Power to the Base Unit 9 Desk or Tabletop Installation 10 Wall Installation 10 Direct Wall Mounting 11 Setting Up Your Phone 13 Extending the Base Unit Antenna 13 Installing the Handset Battery Pack 13 Cleaning the Battery Contacts 14 Charging the Battery Pack 14 Low Battery Indicator 14 Setting the Pulse/Tone Switch 15 Automatic Digital Code Security 15 Handset Volume Controls 16 Channel Selector Button 16 Entering the Local Area Code 17 Setting the AutoTalk Feature 18 Using Your Phone 19 Making Calls...

English Owners Manual
Page 9
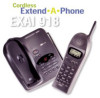
...; Voice Scramble • 900 MHz, 40 Channels • 30 Number Caller ID Memory • AutoSecure™ • Random Code™ Digital Security • Handset Ringer/Volume Controls • UltraClear Plus • Pulse/Tone Dialing • AutoTalk™ • AutoStandby™ • 20-Number Memory • 1-way Page/Find Button • Redial/Flash Key • 14 Day Battery Life The Voice Scrambled EXAI918 protects your privacy by just removing the Handset from your phone, please read this Operating Guide...
...; Voice Scramble • 900 MHz, 40 Channels • 30 Number Caller ID Memory • AutoSecure™ • Random Code™ Digital Security • Handset Ringer/Volume Controls • UltraClear Plus • Pulse/Tone Dialing • AutoTalk™ • AutoStandby™ • 20-Number Memory • 1-way Page/Find Button • Redial/Flash Key • 14 Day Battery Life The Voice Scrambled EXAI918 protects your privacy by just removing the Handset from your phone, please read this Operating Guide...

English Owners Manual
Page 10
...: Changes or modifications to this product not expressly approved by Uniden, or operation of this product. Many factors limit range, and it . Central, Monday through your authority to operate this product in any appliance during an electrical storm. caller id mem talk tone function pause delete cancel flash redial volume chan Handset Base Unit Rechargeable Battery Long Telephone Cord AC Adapter Short Telephone Cord Operating Guide Wall Mount Adapter Also included: Other Printed Material and Wall Mount...
...: Changes or modifications to this product not expressly approved by Uniden, or operation of this product. Many factors limit range, and it . Central, Monday through your authority to operate this product in any appliance during an electrical storm. caller id mem talk tone function pause delete cancel flash redial volume chan Handset Base Unit Rechargeable Battery Long Telephone Cord AC Adapter Short Telephone Cord Operating Guide Wall Mount Adapter Also included: Other Printed Material and Wall Mount...
English Owners Manual
Page 11
... is experienced, moving the cordless telephone farther away from another cordless telephone or other source of the potential for making necessary arrangements to use more than your unit. Communications between the handset and base of your problem. In addition, we recommend that the Base Unit not be received by external sources such as TV, refrigerator, vacuum cleaner, fluorescent lighting, or electrical storm. In the...
... is experienced, moving the cordless telephone farther away from another cordless telephone or other source of the potential for making necessary arrangements to use more than your unit. Communications between the handset and base of your problem. In addition, we recommend that the Base Unit not be received by external sources such as TV, refrigerator, vacuum cleaner, fluorescent lighting, or electrical storm. In the...
English Owners Manual
Page 12
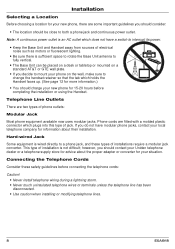
... you decide to mount your phone on the wall, make sure to interrupt its power. • Keep the Base Unit and Handset away from sources of electrical noise such as motors or fluorescent lighting. • Be sure there is not difficult; This type of installations require a modular jack converter. Connecting the Telephone Cords Consider these types of installation is sufficient space to rotate the Base Unit antenna to...
... you decide to mount your phone on the wall, make sure to interrupt its power. • Keep the Base Unit and Handset away from sources of electrical noise such as motors or fluorescent lighting. • Be sure there is not difficult; This type of installations require a modular jack converter. Connecting the Telephone Cords Consider these types of installation is sufficient space to rotate the Base Unit antenna to...
English Owners Manual
Page 15
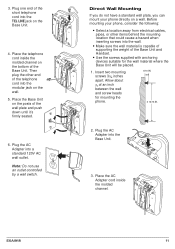
... for mounting the phone. 2. Place the AC Adapter cord inside the molded channel on the posts of the telephone cord into the Base Unit. 3. EXAI918 11 Insert two mounting screws 3 # $ inches apart. Plug one end of the Base Unit. Place the telephone cord inside the molded channel. Direct Wall Mounting If you do not have a standard wall plate, you can mount your phone, consider the following: • Select a location away from electrical cables...
... for mounting the phone. 2. Place the AC Adapter cord inside the molded channel on the posts of the telephone cord into the Base Unit. 3. EXAI918 11 Insert two mounting screws 3 # $ inches apart. Plug one end of the Base Unit. Place the telephone cord inside the molded channel. Direct Wall Mounting If you do not have a standard wall plate, you can mount your phone, consider the following: • Select a location away from electrical cables...

English Owners Manual
Page 18
... EXAI918 Make sure the Battery icon lights. Do not use any liquids or solvents. If the icon doesn't light, check to see that the Handset is mounted on the Base Unit. Cleaning the Battery Contacts To maintain a good charge, it is very low and needs to be fully charged before using your new phone. 1. Charging the Battery Pack Initial Battery Charging The rechargeable Nickel-Cadmium battery pack must be charged, the Battery icon flashes. Low Battery Indicator...
... EXAI918 Make sure the Battery icon lights. Do not use any liquids or solvents. If the icon doesn't light, check to see that the Handset is mounted on the Base Unit. Cleaning the Battery Contacts To maintain a good charge, it is very low and needs to be fully charged before using your new phone. 1. Charging the Battery Pack Initial Battery Charging The rechargeable Nickel-Cadmium battery pack must be charged, the Battery icon flashes. Low Battery Indicator...

English Owners Manual
Page 19
... first use the phone. This Digital Code is in the TONE position. 2. Return the Handset to fully recharge. To change or reset the Digital Code, be able to indicate that the Digital Security Code is set automatically when you are Tone dialing. This memory effect can develop a "memory effect." Then, charge the battery for charging. If the Battery icon begins to flash, the phone is programmed to eliminate its functions to 20 hours. make a call as possible. Setting the Pulse/Tone...
... first use the phone. This Digital Code is in the TONE position. 2. Return the Handset to fully recharge. To change or reset the Digital Code, be able to indicate that the Digital Security Code is set automatically when you are Tone dialing. This memory effect can develop a "memory effect." Then, charge the battery for charging. If the Battery icon begins to flash, the phone is programmed to eliminate its functions to 20 hours. make a call as possible. Setting the Pulse/Tone...
English Owners Manual
Page 21
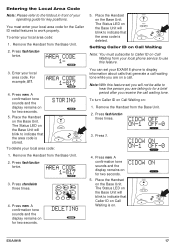
... talking to use this feature. To turn Caller ID on Call Waiting on the Base Unit. Remove the Handset from the Base Unit. 2. CIDCW OFF ON-1 OFF-0 3. CIDCW ON ON-1 OFF-0 4. To delete your local area code: 1. Press 1. AREA CODE 1- 3. Place the Handset on : 1. Press flash/function twice. Note: With this feature set your local phone service to for the Caller ID redial features to indicate that the area code is deleted. EXAI918 17...
... talking to use this feature. To turn Caller ID on Call Waiting on the Base Unit. Remove the Handset from the Base Unit. 2. CIDCW OFF ON-1 OFF-0 3. CIDCW ON ON-1 OFF-0 4. To delete your local area code: 1. Press 1. AREA CODE 1- 3. Place the Handset on : 1. Press flash/function twice. Note: With this feature set your local phone service to for the Caller ID redial features to indicate that the area code is deleted. EXAI918 17...

English Owners Manual
Page 23
... NAME 817-858-3333 - OR - Dial the number you wish to Caller ID services from the Base Unit. 2. During your operating guide for two LINE ERROR CALLING rings. Place the Handset back on until the number is in front of the person calling is not available, this screen remains on the Base Unit. When the phone rings, the LCD displays a calling screen for key positions. OR - OR - OR - EXAI918 - OR - 19 For CIDCW ON example...
... NAME 817-858-3333 - OR - Dial the number you wish to Caller ID services from the Base Unit. 2. During your operating guide for two LINE ERROR CALLING rings. Place the Handset back on until the number is in front of the person calling is not available, this screen remains on the Base Unit. When the phone rings, the LCD displays a calling screen for key positions. OR - OR - OR - EXAI918 - OR - 19 For CIDCW ON example...
English Owners Manual
Page 24
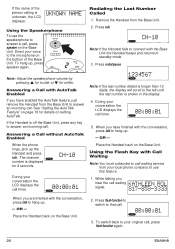
... the Base Unit. Using the Flash Key with the Base Unit the Handset beeps and returns to answer a call . Direct your local phone company to answer an incoming call timer. Press talk. CIDCW ON 1234567 Note: If the last number dialed is unknown, the LCD displays: UKNOWN NAME PRIVATE NUM. Remove the Handset from your voice to the left until the last number is off the Base Unit, press any key to use the speakerphone to standby mode. 3. To...
... the Base Unit. Using the Flash Key with the Base Unit the Handset beeps and returns to answer a call . Direct your local phone company to answer an incoming call timer. Press talk. CIDCW ON 1234567 Note: If the last number dialed is unknown, the LCD displays: UKNOWN NAME PRIVATE NUM. Remove the Handset from your voice to the left until the last number is off the Base Unit, press any key to use the speakerphone to standby mode. 3. To...
English Owners Manual
Page 28
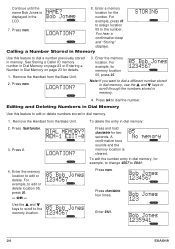
... you want to dial a different number stored in dial memory, use the L and M keys to scroll through the numbers stored in dial memory. 1. Editing and Deleting Numbers in Dial Memory Use this feature to edit or delete numbers stored in memory. 4. Remove the Handset from the Base Unit. 2. Press flash/function. 3. Press 0. Bob Jones 1234567 Press chan/delete four times. Calling a Number Stored in Memory STORING 6 CALLS Use this feature to dial a number previously stored in dial memory: 2. Remove the Handset from the Base Unit. Press talk...
... you want to dial a different number stored in dial memory, use the L and M keys to scroll through the numbers stored in dial memory. 1. Editing and Deleting Numbers in Dial Memory Use this feature to edit or delete numbers stored in memory. 4. Remove the Handset from the Base Unit. 2. Press flash/function. 3. Press 0. Bob Jones 1234567 Press chan/delete four times. Calling a Number Stored in Memory STORING 6 CALLS Use this feature to dial a number previously stored in dial memory: 2. Remove the Handset from the Base Unit. Press talk...
English Owners Manual
Page 30
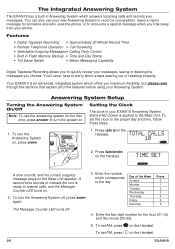
... answers incoming calls and records your messages. Answering System Setup Turning the Answering System On/Off Note: To use your new Answering System to record a conversation, leave a memo message for someone else who uses the phone, or to announce a special message when you'll be away from your phone. To set PM, press # on the Handset. To turn the Answering System off . 3. Press flash/function on the Base Unit speaker. Setting the Clock The clock in your EXAI918 Answering...
... answers incoming calls and records your messages. Answering System Setup Turning the Answering System On/Off Note: To use your new Answering System to record a conversation, leave a memo message for someone else who uses the phone, or to announce a special message when you'll be away from your phone. To set PM, press # on the Handset. To turn the Answering System off . 3. Press flash/function on the Base Unit speaker. Setting the Clock The clock in your EXAI918 Answering...
English Owners Manual
Page 31
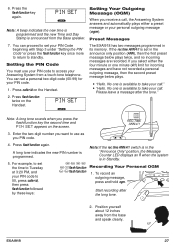
...-tone telephone. If you press the flash/function key the second time and PIN SET appears on the screen. 3. Note: A long tone sounds when you select either a preset message or your Answering System from the Base speaker. 7. Start recording after the tone." Press the flash/function key again. Note: A beep indicates the new time is programmed and the new Time and Day Stamp is set a personal two-digit code (00-99) for incoming messages and have not recorded a personal outgoing message...
...-tone telephone. If you press the flash/function key the second time and PIN SET appears on the screen. 3. Note: A long tone sounds when you select either a preset message or your Answering System from the Base speaker. 7. Start recording after the tone." Press the flash/function key again. Note: A beep indicates the new time is programmed and the new Time and Day Stamp is set a personal two-digit code (00-99) for incoming messages and have not recorded a personal outgoing message...
English Owners Manual
Page 32
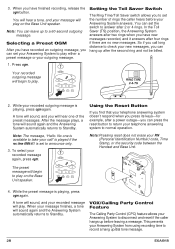
... Calling Party Control (CPC) feature allows your PIN (Personal Identification Number) code, Time Stamp, or the security code between the Handset and Base Unit. Note: Pressing reset does not erase your Answering System to record a hang up after 2 or 4 rings. A tone will sound, and your new messages, you will begin to check your recorded message will play . To select your outgoing message. When you to set to play on the Base Unit speaker. You will hear a tone...
... Calling Party Control (CPC) feature allows your PIN (Personal Identification Number) code, Time Stamp, or the security code between the Handset and Base Unit. Note: Pressing reset does not erase your Answering System to record a hang up after 2 or 4 rings. A tone will sound, and your new messages, you will begin to check your recorded message will play . To select your outgoing message. When you to set to play on the Base Unit speaker. You will hear a tone...
English Owners Manual
Page 35
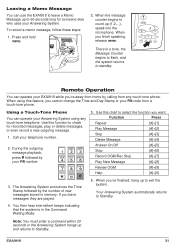
...-tone phone. Your Answering System automatically returns to check for someone else who uses your Answering System. EXAI918 31 Function Press Repeat [#]+[1] Play Message [#]+[2] Skip [#]+[3] Delete Message [#]+[4] Answer On/Off [#]+[5] Stop [#]+[6] Record OGM/Rec Stop [#]+[7] Play New Message [#]+[8] Review OGM [#]+[9] Help [#]+[0] 3. When the message counter begins to count up and returns to select the function you cannot change the Time and Day Stamp or your PIN code from any touch-tone telephone. During the outgoing message...
...-tone phone. Your Answering System automatically returns to check for someone else who uses your Answering System. EXAI918 31 Function Press Repeat [#]+[1] Play Message [#]+[2] Skip [#]+[3] Delete Message [#]+[4] Answer On/Off [#]+[5] Stop [#]+[6] Record OGM/Rec Stop [#]+[7] Play New Message [#]+[8] Review OGM [#]+[9] Help [#]+[0] 3. When the message counter begins to count up and returns to select the function you cannot change the Time and Day Stamp or your PIN code from any touch-tone telephone. During the outgoing message...
English Owners Manual
Page 36
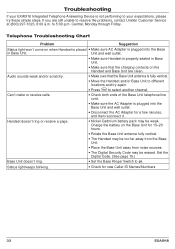
... the Base Unit. • Place the Base Unit away from noise sources. • The Digital Security Code may be erased. Telephone Troubleshooting Chart Problem Suggestion Status light won't come on . Status light keeps blinking. • Check for a few minutes, and then reconnect it. Troubleshooting If your EXAI918 Integrated Telephone Answering Device is not performing to your expectations, please try again. • Press C to select another channel. Unit and wall outlet. • Make sure Handset is...
... the Base Unit. • Place the Base Unit away from noise sources. • The Digital Security Code may be erased. Telephone Troubleshooting Chart Problem Suggestion Status light won't come on . Status light keeps blinking. • Check for a few minutes, and then reconnect it. Troubleshooting If your EXAI918 Integrated Telephone Answering Device is not performing to your expectations, please try again. • Press C to select another channel. Unit and wall outlet. • Make sure Handset is...
English Owners Manual
Page 37
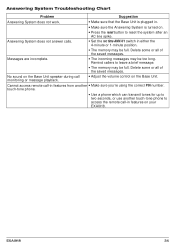
...'re using the correct PIN number. Messages are incomplete. • The incoming messages may be full. Delete some or all of the saved messages. EXAI918 34 Cannot access remote call -in features on your EXAI918. Answering System Troubleshooting Chart Problem Suggestion Answering System does not work. • Make sure that the Base Unit is plugged in. • Make sure the Answering System is turned on. • Press the reset button to leave a brief message. • The memory may...
...'re using the correct PIN number. Messages are incomplete. • The incoming messages may be full. Delete some or all of the saved messages. EXAI918 34 Cannot access remote call -in features on your EXAI918. Answering System Troubleshooting Chart Problem Suggestion Answering System does not work. • Make sure that the Base Unit is plugged in. • Make sure the Answering System is turned on. • Press the reset button to leave a brief message. • The memory may...
English Owners Manual
Page 38
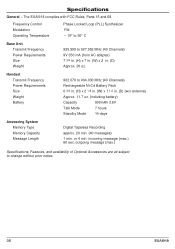
... message (max.) Specifications, Features, and availability of Optional Accessories are all subject to 927.952 MHz (40 Channels) 9V 350 mA (from AC adapter) 7 3/4 in. (H) x 7 in. (W) x 2 in . (D) (w/o antenna) Approx. 11.7 oz. (including battery) Capacity 600mAh 3.6V Talk Mode 7 hours Standby Mode 14 days Answering System Memory Type Memory Capacity Message Length Digital Tapeless Recording approx. 20 min. (40 messages) 1 min. incoming message (max.) 60 sec. Frequency Control Modulation Operating Temperature...
... message (max.) Specifications, Features, and availability of Optional Accessories are all subject to 927.952 MHz (40 Channels) 9V 350 mA (from AC adapter) 7 3/4 in. (H) x 7 in. (W) x 2 in . (D) (w/o antenna) Approx. 11.7 oz. (including battery) Capacity 600mAh 3.6V Talk Mode 7 hours Standby Mode 14 days Answering System Memory Type Memory Capacity Message Length Digital Tapeless Recording approx. 20 min. (40 messages) 1 min. incoming message (max.) 60 sec. Frequency Control Modulation Operating Temperature...


