

English Owners Manual
Page 5
Contents Important Safety Instructions 3 Battery Safety Precautions 4 Introduction 5 Features 5 Included with the EXAI918 6 Important Electrical Considerations 6 Range 6 Telephone Line Problems 6 Radio Interference 7 More Than One Cordless Telephone 7 Cordless Telephone Privacy 7 Installation 8 Selecting a Location 8 Telephone Line Outlets 8 Connecting the ... the Answering System On/Off 26 Setting the Clock 26 Setting the PIN Code 27 Setting Your Outgoing Message (OGM 27 Selecting a Preset OGM 28 EXAI918 1
Contents Important Safety Instructions 3 Battery Safety Precautions 4 Introduction 5 Features 5 Included with the EXAI918 6 Important Electrical Considerations 6 Range 6 Telephone Line Problems 6 Radio Interference 7 More Than One Cordless Telephone 7 Cordless Telephone Privacy 7 Installation 8 Selecting a Location 8 Telephone Line Outlets 8 Connecting the ... the Answering System On/Off 26 Setting the Clock 26 Setting the PIN Code 27 Setting Your Outgoing Message (OGM 27 Selecting a Preset OGM 28 EXAI918 1

English Owners Manual
Page 6
Setting the Toll Saver Switch 28 Using the Reset Button 28 VOX/Calling Party Control Feature 28 Using Your Answering System 29 Playing New Messages 29 Playing Old Messages 29 Repeating a Message 29 Skipping a Message 29 Deleting a Message 30 Deleting All Messages 30 Message Full Indication 30 Leaving a Memo Message 31 Remote Operation 31 Troubleshooting 32 Telephone Troubleshooting Chart 32 Answering System Troubleshooting Chart 33 Specifications 34 2 EXAI918
Setting the Toll Saver Switch 28 Using the Reset Button 28 VOX/Calling Party Control Feature 28 Using Your Answering System 29 Playing New Messages 29 Playing Old Messages 29 Repeating a Message 29 Skipping a Message 29 Deleting a Message 30 Deleting All Messages 30 Message Full Indication 30 Leaving a Memo Message 31 Remote Operation 31 Troubleshooting 32 Telephone Troubleshooting Chart 32 Answering System Troubleshooting Chart 33 Specifications 34 2 EXAI918

English Owners Manual
Page 7
... on it to your home, consult your telephone equipment, these openings must not be blocked or covered. B. If liquid has been spilled into this product. C. EXAI918 3 This product should never be placed near a swimming pool. 5. If you to the unit. 6. Never spill liquid of other risks. If the product does not...
... on it to your home, consult your telephone equipment, these openings must not be blocked or covered. B. If liquid has been spilled into this product. C. EXAI918 3 This product should never be placed near a swimming pool. 5. If you to the unit. 6. Never spill liquid of other risks. If the product does not...

English Owners Manual
Page 8
... rings, bracelets, and keys. Released electrolyte is corrosive and may overheat and cause burns. 5. Do not open or mutilate the Battery Pack. SAVE THESE INSTRUCTIONS 4 EXAI918 Do not dispose of fire or injury to the eyes or skin. The cell may be toxic if swallowed. 4. The battery or conductor may cause...
... rings, bracelets, and keys. Released electrolyte is corrosive and may overheat and cause burns. 5. Do not open or mutilate the Battery Pack. SAVE THESE INSTRUCTIONS 4 EXAI918 Do not dispose of fire or injury to the eyes or skin. The cell may be toxic if swallowed. 4. The battery or conductor may cause...

English Owners Manual
Page 9
...conversations. AutoTalk™ allows you don't have to the Base Unit. Also be sure to visit our Internet site at: http:\\www.uniden.com EXAI918 5 Be sure to complete the Product Registration form and mail it difficult for the Handset and Base Units. To protect you with an ...together with 40 different channels, virtually eliminates background noise and provides you against misbilled calls which might result from your purchase of the EXAI918 telephone with the best possible reception during all of your privacy by changing the RF signal between the Handset and Base Unit when you...
...conversations. AutoTalk™ allows you don't have to the Base Unit. Also be sure to visit our Internet site at: http:\\www.uniden.com EXAI918 5 Be sure to complete the Product Registration form and mail it difficult for the Handset and Base Units. To protect you with an ...together with 40 different channels, virtually eliminates background noise and provides you against misbilled calls which might result from your purchase of the EXAI918 telephone with the best possible reception during all of your privacy by changing the RF signal between the Handset and Base Unit when you...

English Owners Manual
Page 10
...the variables in our rating. Many factors limit range, and it . Caution: Changes or modifications to this product not expressly approved by Uniden, or operation of this product. The Maximum Range rating of this phone is meant to operate this product in which the telephone is ... Operating Guide, could void your household wiring and damage any device connected to 5:00 p.m. Included with the EXAI918 If any of these items are missing or damaged, contact Uniden Parts at a maximum distance with the qualification that the range depends upon the environment in any way other ...
...the variables in our rating. Many factors limit range, and it . Caution: Changes or modifications to this product not expressly approved by Uniden, or operation of this product. The Maximum Range rating of this phone is meant to operate this product in which the telephone is ... Operating Guide, could void your household wiring and damage any device connected to 5:00 p.m. Included with the EXAI918 If any of these items are missing or damaged, contact Uniden Parts at a maximum distance with the qualification that the range depends upon the environment in any way other ...
English Owners Manual
Page 11
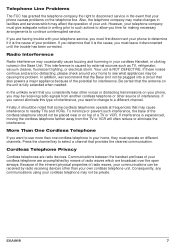
... too distracting, please check around your cordless telephone may not be noted that some cordless telephones operate at frequencies that the antenna on different channels. EXAI918 7 This interference is the cause, you need to change to nearby TVs and VCRs. If interference is NOT DEFECTIVE. If you are having trouble with...
... too distracting, please check around your cordless telephone may not be noted that some cordless telephones operate at frequencies that the antenna on different channels. EXAI918 7 This interference is the cause, you need to change to nearby TVs and VCRs. If interference is NOT DEFECTIVE. If you are having trouble with...
English Owners Manual
Page 12
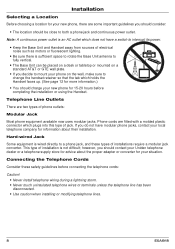
... telephone wires or terminals unless the telephone line has been disconnected. • Use caution when installing or modifying telephone lines. 8 EXAI918 Connecting the Telephone Cords Consider these types of electrical noise such as motors or fluorescent lighting. • Be sure there is sufficient...change the handset retainer so that the tab which does not have modular phone jacks, contact your local telephone company for your Uniden telephone dealer or a telephone supply store for advice about the proper adapter or converter for information about their installation. Note: ...
... telephone wires or terminals unless the telephone line has been disconnected. • Use caution when installing or modifying telephone lines. 8 EXAI918 Connecting the Telephone Cords Consider these types of electrical noise such as motors or fluorescent lighting. • Be sure there is sufficient...change the handset retainer so that the tab which does not have modular phone jacks, contact your local telephone company for your Uniden telephone dealer or a telephone supply store for advice about the proper adapter or converter for information about their installation. Note: ...

English Owners Manual
Page 13
Applying Power to the Base Unit The EXAI918 phones require an AC outlet, without a switch to interrupt power, and the included AC adapter. Important: Place the power cord so that it does not create a trip hazard, or where it could become chafed and create a fire or other electrical hazards. ' EXAI918 9 Wrap the power cord around the convenient notch on a desk or table, connect the adapter as shown below. To relieve strain on the DC plug when the phone is placed on the bottom.
Applying Power to the Base Unit The EXAI918 phones require an AC outlet, without a switch to interrupt power, and the included AC adapter. Important: Place the power cord so that it does not create a trip hazard, or where it could become chafed and create a fire or other electrical hazards. ' EXAI918 9 Wrap the power cord around the convenient notch on a desk or table, connect the adapter as shown below. To relieve strain on the DC plug when the phone is placed on the bottom.

English Owners Manual
Page 14
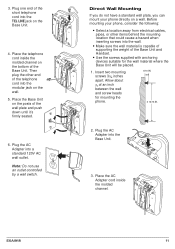
... end of the long telephone cord into the TEL LINE jack on the Base Unit. Place the AC Adapter cord inside the molded channel. 10 EXAI918 Note: Do not use an outlet controlled by a wall switch. 3. Wall Installation Standard Wall Plate Mounting These phones are designed to be mounted on the...
... end of the long telephone cord into the TEL LINE jack on the Base Unit. Place the AC Adapter cord inside the molded channel. 10 EXAI918 Note: Do not use an outlet controlled by a wall switch. 3. Wall Installation Standard Wall Plate Mounting These phones are designed to be mounted on the...
English Owners Manual
Page 15
... a wall. Place the telephone cord inside the molded channel. Note: Do not use an outlet controlled by a wall switch. Insert two mounting screws 3 # $ inches apart. EXAI918 11 Before mounting your phone directly on the Base Unit. 4. 3. Plug one end of the Base Unit and Handset. • Use the screws supplied with...
... a wall. Place the telephone cord inside the molded channel. Note: Do not use an outlet controlled by a wall switch. Insert two mounting screws 3 # $ inches apart. EXAI918 11 Before mounting your phone directly on the Base Unit. 4. 3. Plug one end of the Base Unit and Handset. • Use the screws supplied with...

English Owners Manual
Page 16
Plug one end of the telephone line cord into the wall jack. 8. EXAI918 Plug the other end of the long telephone cord into place. Note: Do not use an outlet controlled by a wall switch. 12 Setting the Handset ...
Plug one end of the telephone line cord into the wall jack. 8. EXAI918 Plug the other end of the long telephone cord into place. Note: Do not use an outlet controlled by a wall switch. 12 Setting the Handset ...

English Owners Manual
Page 17
... old battery pack and install a new one without losing any numbers stored in memory. Installing the Handset Battery Pack 1. Slide the battery compartment cover down. EXAI918 13 Note: The built-in Memory Backup feature allows up to 3 minutes to the vertical position.
... old battery pack and install a new one without losing any numbers stored in memory. Installing the Handset Battery Pack 1. Slide the battery compartment cover down. EXAI918 13 Note: The built-in Memory Backup feature allows up to 3 minutes to the vertical position.

English Owners Manual
Page 18
.... 1. Note: Make sure to be fully charged before hanging up . -OR- Note: You can place the Handset face down or face up the phone. 14 EXAI918 Low Battery Indicator When the Battery Pack in , and that the AC adapter is plugged in the Handset is mounted on a wall. 2.
.... 1. Note: Make sure to be fully charged before hanging up . -OR- Note: You can place the Handset face down or face up the phone. 14 EXAI918 Low Battery Indicator When the Battery Pack in , and that the AC adapter is plugged in the Handset is mounted on a wall. 2.

English Owners Manual
Page 19
...the Pulse/Tone Switch Be sure the PULSE/TONE switch is on your call . To change or reset the Digital Code, be able to all EXAI918 phones. Note: Most phone systems are not sure whether your phone to save power. Complete your phone, a Digital Code feature was added to quickly... will operate. This Digital Code is set to 20 hours. To Avoid this Memory Effect Use the phone until the "Battery Low" indicator appears. EXAI918 15 The table below describes what to do to return your system is set automatically when you are Tone dialing. The code is shared only...
...the Pulse/Tone Switch Be sure the PULSE/TONE switch is on your call . To change or reset the Digital Code, be able to all EXAI918 phones. Note: Most phone systems are not sure whether your phone to save power. Complete your phone, a Digital Code feature was added to quickly... will operate. This Digital Code is set to 20 hours. To Avoid this Memory Effect Use the phone until the "Battery Low" indicator appears. EXAI918 15 The table below describes what to do to return your system is set automatically when you are Tone dialing. The code is shared only...
English Owners Manual
Page 20
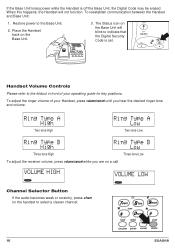
... this happens, the Handset will blink to the foldout in front of your operating guide for key positions. Restore power to select a clearer channel. 16 EXAI918 Place the Handset back on a call. Two-tone High Two-tone Low Three-tone High Three-tone Low To adjust the receiver volume, press volume...
... this happens, the Handset will blink to the foldout in front of your operating guide for key positions. Restore power to select a clearer channel. 16 EXAI918 Place the Handset back on a call. Two-tone High Two-tone Low Three-tone High Three-tone Low To adjust the receiver volume, press volume...
English Owners Manual
Page 21
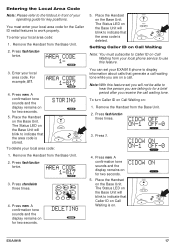
... tone sounds and the display remains on for two seconds. The Status LED on the Base Unit will blink to use this feature set your EXAI918 phone to for the Caller ID redial features to indicate that Caller ID on . AREA CODE 1- 3. Place the Handset on the Base Unit. To turn... Waiting Note: You must enter your local phone service to indicate that the area code is on Call Waiting is deleted. Place the Handset on : 1. EXAI918 17 DELETING 1-817 5. The Status LED on for key positions. You can set you will blink to the foldout in front of your local area...
... tone sounds and the display remains on for two seconds. The Status LED on the Base Unit will blink to use this feature set your EXAI918 phone to for the Caller ID redial features to indicate that Caller ID on . AREA CODE 1- 3. Place the Handset on the Base Unit. To turn... Waiting Note: You must enter your local phone service to indicate that the area code is on Call Waiting is deleted. Place the Handset on : 1. EXAI918 17 DELETING 1-817 5. The Status LED on for key positions. You can set you will blink to the foldout in front of your local area...

English Owners Manual
Page 22
... : 1. Press 0. 3. Press mem. A confirmation tone sounds and the display remains on the Base Unit will blink to indicate that the setting has been stored. 18 EXAI918 The Status LED on for two seconds. AUTOTALK OFF ON-1 OFF-0 5. Press 1. Press mem. The Status LED on the Base Unit will blink to indicate...
... : 1. Press 0. 3. Press mem. A confirmation tone sounds and the display remains on the Base Unit will blink to indicate that the setting has been stored. 18 EXAI918 The Status LED on for two seconds. AUTOTALK OFF ON-1 OFF-0 5. Press 1. Press mem. The Status LED on the Base Unit will blink to indicate...

English Owners Manual
Page 23
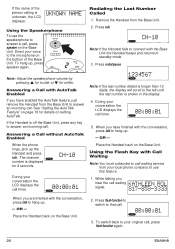
...Caller ID services from the Base Unit. 2. Place the Handset back on until the number is not available, this screen remains on the Base Unit. EXAI918 - OR - 19 Remove the Handset from your conversation the LCD displays the call . - When you have connected power and a telephone line to your... EXAI918, the phone is UKNOWN NAME unknown, the LCD displays: UKNOWN NUM. For CIDCW ON example, 123-4567 1234567 3. CIDCW ON 00:00:01 When you...
...Caller ID services from the Base Unit. 2. Place the Handset back on until the number is not available, this screen remains on the Base Unit. EXAI918 - OR - 19 Remove the Handset from your conversation the LCD displays the call . - When you have connected power and a telephone line to your... EXAI918, the phone is UKNOWN NAME unknown, the LCD displays: UKNOWN NUM. For CIDCW ON example, 123-4567 1234567 3. CIDCW ON 00:00:01 When you...
English Owners Manual
Page 24
..., the display will scroll to hang up . - When the phone rings, pick up , press speaker again. During your original call, press flash/function again. 20 EXAI918 Place the Handset back on the Base Unit. CH-10 CH-10 Note: If the Handset fails to standby mode. 3. CIDCW ON 00:00:01...
..., the display will scroll to hang up . - When the phone rings, pick up , press speaker again. During your original call, press flash/function again. 20 EXAI918 Place the Handset back on the Base Unit. CH-10 CH-10 Note: If the Handset fails to standby mode. 3. CIDCW ON 00:00:01...