
English Owners Manual
Page 1
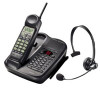
EXAI 985HS 900 MHz Cordless Phone with Digital Answering System Caller ID and Call Waiting Operation 3-Way Conference Operation
EXAI 985HS 900 MHz Cordless Phone with Digital Answering System Caller ID and Call Waiting Operation 3-Way Conference Operation
English Owners Manual
Page 2
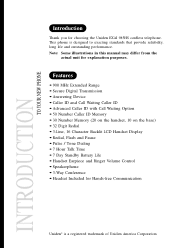
This phone is a registered trademark of Uniden America Corporation Note: Some illustrations in this manual may differ from the actual unit for explanation purposes. • 900 MHz Extended Range • ... Day Standby Battery Life • Handset Earpiece and Ringer Volume Control • Speakerphone • 3-Way Conference • Headset Included for choosing the Uniden EXAI 985HS cordless telephone. INTRODUCTION TO YOUR NEW PHONE Thank you for Hands-free Communication Uniden® is designed to exacting standards that provide reliability, long life and outstanding performance.
This phone is a registered trademark of Uniden America Corporation Note: Some illustrations in this manual may differ from the actual unit for explanation purposes. • 900 MHz Extended Range • ... Day Standby Battery Life • Handset Earpiece and Ringer Volume Control • Speakerphone • 3-Way Conference • Headset Included for choosing the Uniden EXAI 985HS cordless telephone. INTRODUCTION TO YOUR NEW PHONE Thank you for Hands-free Communication Uniden® is designed to exacting standards that provide reliability, long life and outstanding performance.
English Owners Manual
Page 4
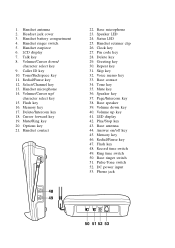
.... Volume up / character select key 15. Delete/Intercom key 18. 1. Memory key 17. Base antenna 44. Handset antenna 2. Cursor forward key 19. Base microphone 23. Phone jack
.... Volume up / character select key 15. Delete/Intercom key 18. 1. Memory key 17. Base antenna 44. Handset antenna 2. Cursor forward key 19. Base microphone 23. Phone jack
English Owners Manual
Page 5
...-of-range 20 Using your EXAI 985HS intercom 21 Transferring a call 22 Memory Dialing Storing phone numbers and names 23 Making calls with memory dialing 26 Editing a stored name and/or phone number ...28 Erasing a stored name and phone number........30 3-way Conference Feature 3-way conferencing 32 Caller ID Features Caller ID service...
...-of-range 20 Using your EXAI 985HS intercom 21 Transferring a call 22 Memory Dialing Storing phone numbers and names 23 Making calls with memory dialing 26 Editing a stored name and/or phone number ...28 Erasing a stored name and phone number........30 3-way Conference Feature 3-way conferencing 32 Caller ID Features Caller ID service...
English Owners Manual
Page 6
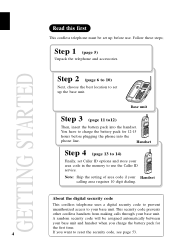
... and store your area code in the memory to set up the base unit. A random security code will be set up before plugging the phone into the handset. Note: Skip the setting of area code if your base unit. This security code prevents other cordless handsets from making calls...accessories. You have to reset the security code, see page 53. Base unit Step 3 (page 11 to12) Then, insert the battery pack into the phone line. About the digital security code This cordless telephone uses a digital security code to prevent unauthorized access to your base unit and handset when you...
... and store your area code in the memory to set up the base unit. A random security code will be set up before plugging the phone into the handset. Note: Skip the setting of area code if your base unit. This security code prevents other cordless handsets from making calls...accessories. You have to reset the security code, see page 53. Base unit Step 3 (page 11 to12) Then, insert the battery pack into the phone line. About the digital security code This cordless telephone uses a digital security code to prevent unauthorized access to your base unit and handset when you...
English Owners Manual
Page 8
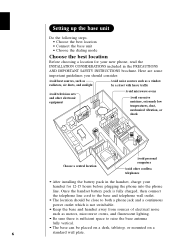
.... • Be sure there is sufficient space to raise the base antenna fully vertical. • The base can be close to both a phone jack and a continuous power outlet which is not switchable. • Keep the base and handset away from sources of electrical noise such as a... the dialing mode Choose the best location Before choosing a location for your new phone, read the INSTALLATION CONSIDERATIONS included in the handset, charge your handset for 12-15 hours before plugging the phone into the phone line. Here are some important guidelines you should be placed on a desk, tabletop...
.... • Be sure there is sufficient space to raise the base antenna fully vertical. • The base can be close to both a phone jack and a continuous power outlet which is not switchable. • Keep the base and handset away from sources of electrical noise such as a... the dialing mode Choose the best location Before choosing a location for your new phone, read the INSTALLATION CONSIDERATIONS included in the handset, charge your handset for 12-15 hours before plugging the phone into the phone line. Here are some important guidelines you should be placed on a desk, tabletop...
English Owners Manual
Page 11
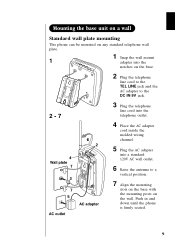
Push in and down until the phone is firmly seated. 9 Standard wall plate mounting This phone can be mounted on any standard telephone wall plate. 1 1 Snap the wall mount adapter into the notches on the base. 2 Plug the telephone line cord ...
Push in and down until the phone is firmly seated. 9 Standard wall plate mounting This phone can be mounted on any standard telephone wall plate. 1 1 Snap the wall mount adapter into the notches on the base. 2 Plug the telephone line cord ...

English Owners Manual
Page 12
...location, that the lip of the slot. Direct wall plate mounting If you don't have a standard wall plate, you can mount your phone within 10 - 15 feet of a working phone jack to the wall. Allow about 1/8 of 1-3/8 inches) with their appropriate anchoring device), 3-15/16 inches apart. 8 On the... 1 Insert two mounting screws into the slot so that could cause a hazard when inserting screws into the wall. • Try to mount your phone directly to avoid excessive cord lengths. • Make sure the wall material is down. Slide it clockwise 180 degrees. 9 Flip the retainer from ...
...location, that the lip of the slot. Direct wall plate mounting If you don't have a standard wall plate, you can mount your phone within 10 - 15 feet of a working phone jack to the wall. Allow about 1/8 of 1-3/8 inches) with their appropriate anchoring device), 3-15/16 inches apart. 8 On the... 1 Insert two mounting screws into the slot so that could cause a hazard when inserting screws into the wall. • Try to mount your phone directly to avoid excessive cord lengths. • Make sure the wall material is down. Slide it clockwise 180 degrees. 9 Flip the retainer from ...
English Owners Manual
Page 13
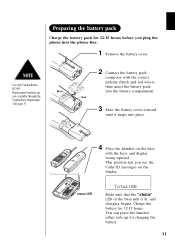
...polarity (black and red wires), then insert the battery pack into the battery compartment. 3 Slide the battery cover forward until it snaps into the phone line. 1 Remove the battery cover. Make sure that the "status" LED of the base unit is lit, and charging begins. This position ...lets you plug the phone into place. 4 Place the handset on the display. Replacement batteries are also available through the Uniden Parts Department. (See page 5) 2 Connect the battery pack connector with the keys and display facing upward...
...polarity (black and red wires), then insert the battery pack into the battery compartment. 3 Slide the battery cover forward until it snaps into the phone line. 1 Remove the battery cover. Make sure that the "status" LED of the base unit is lit, and charging begins. This position ...lets you plug the phone into place. 4 Place the handset on the display. Replacement batteries are also available through the Uniden Parts Department. (See page 5) 2 Connect the battery pack connector with the keys and display facing upward...
English Owners Manual
Page 14
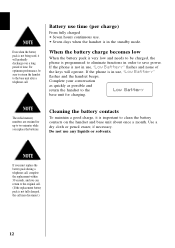
... used, it is not in use, "Low Battery" flashes and none of time. If the phone is important to clean the battery contacts on the handset and base unit about once a month. If the phone is not fully charged, the call , complete the replacement within 30 seconds, and you replace the... batteries. If you must replace the battery pack during a telephone call may disconnect.) 12 For optimum performance, be charged, the phone is in the standby mode. When the battery charge becomes low When the battery pack is very low and needs to the original call . Complete...
... used, it is not in use, "Low Battery" flashes and none of time. If the phone is important to clean the battery contacts on the handset and base unit about once a month. If the phone is not fully charged, the call , complete the replacement within 30 seconds, and you replace the... batteries. If you must replace the battery pack during a telephone call may disconnect.) 12 For optimum performance, be charged, the phone is in the standby mode. When the battery charge becomes low When the battery pack is very low and needs to the original call . Complete...
English Owners Manual
Page 15
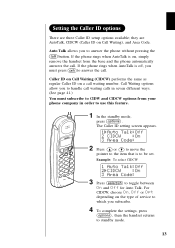
... Waiting options allow you subscribe. 4 To complete the settings, press , then the handset returns to CIDW and CIDCW options from the base and the phone automatically answers the call waiting number. For CIDCW, choose On, Off or Opt depending on Call Waiting), and Area Code. Caller ID on Call Waiting... AutoTalk is off, you to use this feature. 1 In the standby mode, press . Example: To select CIDCW 3 Press to be set. If the phone rings when AutoTalk is to toggle between On and Off for Auto Talk. The Caller ID setting screen appears. 2 Press or to move the pointer ...
... Waiting options allow you subscribe. 4 To complete the settings, press , then the handset returns to CIDW and CIDCW options from the base and the phone automatically answers the call waiting number. For CIDCW, choose On, Off or Opt depending on Call Waiting), and Area Code. Caller ID on Call Waiting... AutoTalk is off, you to use this feature. 1 In the standby mode, press . Example: To select CIDCW 3 Press to be set. If the phone rings when AutoTalk is to toggle between On and Off for Auto Talk. The Caller ID setting screen appears. 2 Press or to move the pointer ...
English Owners Manual
Page 16
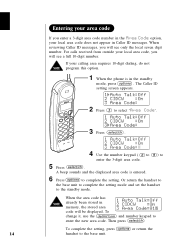
If your calling area requires 10-digit dialing, do not program this option. 1 When the phone is entered. 6 Press to complete the setting. Or return the handset to the base unit to complete the setting mode and set the handset to ...
If your calling area requires 10-digit dialing, do not program this option. 1 When the phone is entered. 6 Press to complete the setting. Or return the handset to the base unit to complete the setting mode and set the handset to ...
English Owners Manual
Page 17
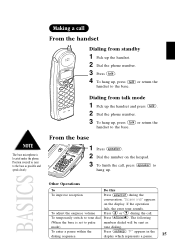
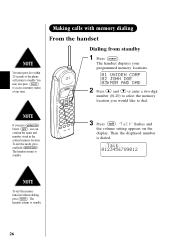
... base microphone is set to pulse numbers dialed will be sent as possible and speak clearly. Dialing from standby 1 Pick up the handset. 2 Dial the phone number. 3 Press . 4 To hang up, press handset to the base. or return the From the base 1 Press . 2 Dial the number on the display. ...during the call , press to tone dial Press . The following (When the base is located under the phone. From the handset Dialing from talk mode 1 Pick up the handset and press . 2 Dial the phone number. 3 To hang up, press handset to the base. Position yourself as near to the base as...
... base microphone is set to pulse numbers dialed will be sent as possible and speak clearly. Dialing from standby 1 Pick up the handset. 2 Dial the phone number. 3 Press . 4 To hang up, press handset to the base. or return the From the base 1 Press . 2 Dial the number on the display. ...during the call , press to tone dial Press . The following (When the base is located under the phone. From the handset Dialing from talk mode 1 Pick up the handset and press . 2 Dial the phone number. 3 To hang up, press handset to the base. Position yourself as near to the base as...

English Owners Manual
Page 18
... or the base does not ring, check each ringer switch to make sure they are set to hang up , press . 16 From the base 1 The phone rings. Then the earpiece volume is not loud enough, adjust the speaker volume on ". The status LED on the speaker... phone is displayed for 2 seconds. 3 The call time will be displayed for about 5 seconds. "Incoming Call" appears on the display. If audio on the base flashes. 2 ...
... or the base does not ring, check each ringer switch to make sure they are set to hang up , press . 16 From the base 1 The phone rings. Then the earpiece volume is not loud enough, adjust the speaker volume on ". The status LED on the speaker... phone is displayed for 2 seconds. 3 The call time will be displayed for about 5 seconds. "Incoming Call" appears on the display. If audio on the base flashes. 2 ...
English Owners Manual
Page 19
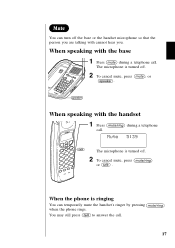
When speaking with cannot hear you are talking with the base 1 Press during a telephone The microphone is turned off . 2 To cancel mute, press , or . You can temporarily mute the handset's ringer by pressing when the phone rings. When speaking with the handset 1 Press call . 17 You may still press to answer the call . during a telephone call. When the phone is turned off . 2 To cancel mute, press or . The microphone is ringing You can turn off the base or the handset microphone so that the person you .
When speaking with cannot hear you are talking with the base 1 Press during a telephone The microphone is turned off . 2 To cancel mute, press , or . You can temporarily mute the handset's ringer by pressing when the phone rings. When speaking with the handset 1 Press call . 17 You may still press to answer the call . during a telephone call. When the phone is turned off . 2 To cancel mute, press or . The microphone is ringing You can turn off the base or the handset microphone so that the person you .
English Owners Manual
Page 21
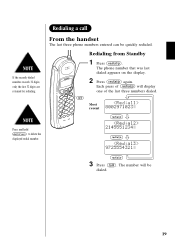
Redialing from Standby 1 Press . Most recent Press and hold to delete the displayed redial number. 3 Press dialed. . From the handset The last three phone numbers entered can be 19 Each press of the last three numbers dialed. The number will display one of will be quickly redialed. If the recently dialed number exceeds 32 digits, only the first 32 digits are retained for redialing. The phone number that was last dialed appears on the display. 2 Press again.
Redialing from Standby 1 Press . Most recent Press and hold to delete the displayed redial number. 3 Press dialed. . From the handset The last three phone numbers entered can be 19 Each press of the last three numbers dialed. The number will display one of will be quickly redialed. If the recently dialed number exceeds 32 digits, only the first 32 digits are retained for redialing. The phone number that was last dialed appears on the display. 2 Press again.
English Owners Manual
Page 24
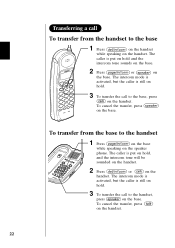
... cancel the transfer, press on the handset. 22 To transfer from the handset to the handset 1 Press on the base while speaking on the speaker phone. To cancel the transfer, press on the base. The intercom mode is activated, but the caller is still on hold . 3 To transfer the call to...
... cancel the transfer, press on the handset. 22 To transfer from the handset to the handset 1 Press on the base while speaking on the speaker phone. To cancel the transfer, press on the base. The intercom mode is activated, but the caller is still on hold . 3 To transfer the call to...
English Owners Manual
Page 25
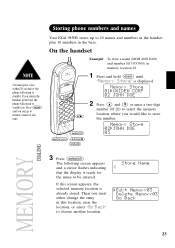
... "Go Back" to store the number. Press and you would like to choose another location. 23 Then you return the handset in the base the phone will return to standby too. You must either change the entry in this screen appears, the selected memory location is already stored. If you must...
... "Go Back" to store the number. Press and you would like to choose another location. 23 Then you return the handset in the base the phone will return to standby too. You must either change the entry in this screen appears, the selected memory location is already stored. If you must...
English Owners Manual
Page 26
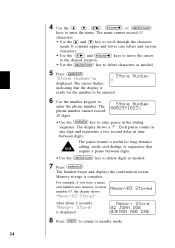
...The pause feature is complete. For example, if you store a name and number into memory location number 03, the display shows "Memory03 Stored". The phone number cannot exceed 20 digits. • Use the key to enter pause in time between digits. • Use the key to standby mode. ... case letters and various characters. • Use the and keys to move the cursor to the desired location. • Use the key to enter the phone number. 4 Use the , , , , or keys to scroll through the character menu. Memory storage is useful for the number to be entered. 6...
...The pause feature is complete. For example, if you store a name and number into memory location number 03, the display shows "Memory03 Stored". The phone number cannot exceed 20 digits. • Use the key to enter pause in time between digits. • Use the key to standby mode. ... case letters and various characters. • Use the and keys to move the cursor to the desired location. • Use the key to enter the phone number. 4 Use the , , , , or keys to scroll through the character menu. Memory storage is useful for the number to be entered. 6...
English Owners Manual
Page 28
... confirm the name and number stored in the selected memory location. The handset returns to dial. You must press key within 20 seconds or the phone will return to standby. If you press before , you would like to standby. 26 To exit this mode, press and hold .
... confirm the name and number stored in the selected memory location. The handset returns to dial. You must press key within 20 seconds or the phone will return to standby. If you press before , you would like to standby. 26 To exit this mode, press and hold .

