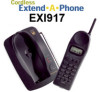

English Owners Manual
Page 5
... 8 Telephone Line Outlets 8 Connecting the Telephone Cords 8 Applying Power to the Base Unit 9 Adapter Safety Feature 9 Desk or Tabletop Installation 9 Wall Installation 11 Direct Wall Mounting 14 Setting the Handset Retainer 17 Setting Up Your Phone 19 Positioning the Antenna 19 Installing the Handset Battery Pack 19 Charging the Battery Pack 20 Low Battery Indicator 21 Battery Memory Effect 22 Cleaning the Battery Contacts 22 Setting the Pulse/Tone Switch 22 Adjusting Ringer Controls 22 Automatic Digital Code Security 24 Entering the Local Area Code 25 Setting Caller ID...
... 8 Telephone Line Outlets 8 Connecting the Telephone Cords 8 Applying Power to the Base Unit 9 Adapter Safety Feature 9 Desk or Tabletop Installation 9 Wall Installation 11 Direct Wall Mounting 14 Setting the Handset Retainer 17 Setting Up Your Phone 19 Positioning the Antenna 19 Installing the Handset Battery Pack 19 Charging the Battery Pack 20 Low Battery Indicator 21 Battery Memory Effect 22 Cleaning the Battery Contacts 22 Setting the Pulse/Tone Switch 22 Adjusting Ringer Controls 22 Automatic Digital Code Security 24 Entering the Local Area Code 25 Setting Caller ID...
English Owners Manual
Page 6
... not overload wall outlets and extension cords, as they may touch dangerous voltage points or short out parts that could result in the risk of power source indicated on the product. 11. The telephone may expose you are provided for example, near or over a radiator or heat register. This product should never be operated only from the wall outlet before...
... not overload wall outlets and extension cords, as they may touch dangerous voltage points or short out parts that could result in the risk of power source indicated on the product. 11. The telephone may expose you are provided for example, near or over a radiator or heat register. This product should never be operated only from the wall outlet before...
English Owners Manual
Page 7
...Operating Guide. 2. When the power supply cord is corrosive and may be toxic if swallowed. 4. If liquid has been spilled into the product. Do not dispose of other controls may result in the instruction manual provided for this product. 6. Check the Nickel-Cadmium Battery Disposal package insert for use the telephone to report a gas leak in this product from the wall... change in order not to persons by a qualified technician.) E. Charge the Battery Pack provided with conducting materials such as rings, bracelets, and keys. Use only the appropriate type and size Battery Pack...
...Operating Guide. 2. When the power supply cord is corrosive and may be toxic if swallowed. 4. If liquid has been spilled into the product. Do not dispose of other controls may result in the instruction manual provided for this product. 6. Check the Nickel-Cadmium Battery Disposal package insert for use the telephone to report a gas leak in this product from the wall... change in order not to persons by a qualified technician.) E. Charge the Battery Pack provided with conducting materials such as rings, bracelets, and keys. Use only the appropriate type and size Battery Pack...
English Owners Manual
Page 8
... eliminates background noise and provides you with Call Waiting ID ± Alphanumeric 2-line Backlit LCD ± 30 Number Caller ID Memory ± 20 Number Dial Memory ± Call Counter ± Time and Day Stamp ± Automatic Call Return ± 900 MHz Performance ± Automatic Voice Scramble (EXI917 only) ± 40 Channel Autoscan System ± 14 Day Long Life Battery ± Page/Find System AutoTalk™ allows you...
... eliminates background noise and provides you with Call Waiting ID ± Alphanumeric 2-line Backlit LCD ± 30 Number Caller ID Memory ± 20 Number Dial Memory ± Call Counter ± Time and Day Stamp ± Automatic Call Return ± 900 MHz Performance ± Automatic Voice Scramble (EXI917 only) ± 40 Channel Autoscan System ± 14 Day Long Life Battery ± Page/Find System AutoTalk™ allows you...
English Owners Manual
Page 10
... highest specifications set forth by the FCC. Also, the telephone company may affect the operation of this product in any device connected to determine if it . If you determine that your phone causes problems on the telephone line. Range Your new phone is designed to achieve the maximum possible range by transmitting and receiving according to unplug any appliance during an electrical storm. Caution: Changes...
... highest specifications set forth by the FCC. Also, the telephone company may affect the operation of this product in any device connected to determine if it . If you determine that your phone causes problems on the telephone line. Range Your new phone is designed to achieve the maximum possible range by transmitting and receiving according to unplug any appliance during an electrical storm. Caution: Changes...
English Owners Manual
Page 11
... the channel key to nearby TVs and VCRs. In addition, we recommend that also powers a major appliance because of the potential for interference. To minimize or prevent such interference, the Base Unit of the cordless telephone should be received by external sources such as TV, refrigerator, vacuum cleaner, fluorescent lighting, or electrical storm. Consequently, any communications using your cordless telephone may not...
... the channel key to nearby TVs and VCRs. In addition, we recommend that also powers a major appliance because of the potential for interference. To minimize or prevent such interference, the Base Unit of the cordless telephone should be received by external sources such as TV, refrigerator, vacuum cleaner, fluorescent lighting, or electrical storm. Consequently, any communications using your cordless telephone may not...
English Owners Manual
Page 12
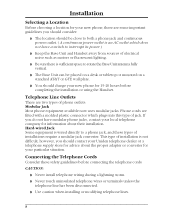
... of electrical noise such as motors or fluorescent lighting. ± Be sure there is sufficient space to rotate the Base Unit antenna fully vertical. ± The Base Unit can be placed on a desk or tabletop or mounted on a standard AT&T or GTE wall plate. ± You should charge your new phone for 15-20 hours before connecting the telephone cords: CAUTION: ± Never install telephone wiring...
... of electrical noise such as motors or fluorescent lighting. ± Be sure there is sufficient space to rotate the Base Unit antenna fully vertical. ± The Base Unit can be placed on a desk or tabletop or mounted on a standard AT&T or GTE wall plate. ± You should charge your new phone for 15-20 hours before connecting the telephone cords: CAUTION: ± Never install telephone wiring...
English Owners Manual
Page 25
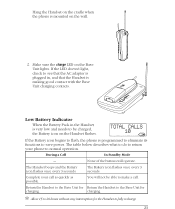
... call . During a Call In Standby Mode - The Battery icon flashes once every 3 seconds. charging. If the LED doesn't light, check to save power. The table below describes what to do to 20 hours without any interruption for charging. Complete your phone to make a call as quickly as possible. You will operate. Low Battery Indicator When the Battery Pack in , and that the Handset is making good contact with the Base Unit charging contacts. Make...
... call . During a Call In Standby Mode - The Battery icon flashes once every 3 seconds. charging. If the LED doesn't light, check to save power. The table below describes what to do to 20 hours without any interruption for charging. Complete your phone to make a call as quickly as possible. You will operate. Low Battery Indicator When the Battery Pack in , and that the Handset is making good contact with the Base Unit charging contacts. Make...
English Owners Manual
Page 26
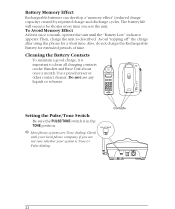
... a good charge, it is important to be shorter every time you are Tone dialing. T Most phone systems are not sure whether your local phone company if you use any liquids or solvents. To Avoid Memory Effect At least once a month, operate the unit until the "Battery Low" indicator appears. The battery life will seem to clean all charging contacts on the Handset and Base Unit about once...
... a good charge, it is important to be shorter every time you are Tone dialing. T Most phone systems are not sure whether your local phone company if you use any liquids or solvents. To Avoid Memory Effect At least once a month, operate the unit until the "Battery Low" indicator appears. The battery life will seem to clean all charging contacts on the Handset and Base Unit about once...
English Owners Manual
Page 28
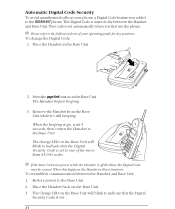
... indicate that the Digital Security Code is set automatically when you first use the phone. Place the Handset back on the Base Unit. T If the Base Unit loses power while the Handset is set to one of your phone, a Digital Code feature was added to indicate that the Digital Security Code is set. 24 Automatic Digital Code Security To avoid unauthorized calls on your operating guide for key positions. To change the Digital Code: 1. When this happens, the Handset will blink to the EXI 916/917 phone...
... indicate that the Digital Security Code is set automatically when you first use the phone. Place the Handset back on the Base Unit. T If the Base Unit loses power while the Handset is set to one of your phone, a Digital Code feature was added to indicate that the Digital Security Code is set. 24 Automatic Digital Code Security To avoid unauthorized calls on your operating guide for key positions. To change the Digital Code: 1. When this happens, the Handset will blink to the EXI 916/917 phone...
English Owners Manual
Page 29
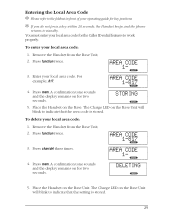
..., the Handset beeps and the phone returns to indicate that the area code is stored. 25 Press chan/del three times. To enter your local area code: 1. AREA CODE 1-817 4. Remove the Handset from the Base Unit. 2. Press function twice. Entering the Local Area Code T Please refer to the foldout in front of your operating guide for the Caller ID redial features to indicate that the setting is stored...
..., the Handset beeps and the phone returns to indicate that the area code is stored. 25 Press chan/del three times. To enter your local area code: 1. AREA CODE 1-817 4. Remove the Handset from the Base Unit. 2. Press function twice. Entering the Local Area Code T Please refer to the foldout in front of your operating guide for the Caller ID redial features to indicate that the setting is stored...
English Owners Manual
Page 30
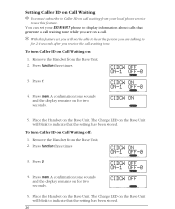
To turn Caller ID on the Base Unit. Press 1. Press mem. Press function three times CIDCW ON ON-1 OFF-0 3. Place the Handset on : 1. The Charge LED on the Base Unit will blink to for 2.4 seconds after you receive the call waiting tone. T With this feature set your local phone service to indicate that the setting has been stored. Press function three times. CIDCW ON ON-1 OFF-0 4. Press mem. The Charge LED...
To turn Caller ID on the Base Unit. Press 1. Press mem. Press function three times CIDCW ON ON-1 OFF-0 3. Place the Handset on : 1. The Charge LED on the Base Unit will blink to for 2.4 seconds after you receive the call waiting tone. T With this feature set your local phone service to indicate that the setting has been stored. Press function three times. CIDCW ON ON-1 OFF-0 4. Press mem. The Charge LED...
English Owners Manual
Page 32
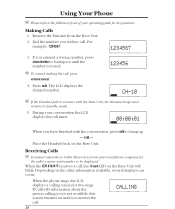
... Base Unit. LINE ERROR CALLING 28 Using Your Phone T Please refer to the foldout in use LED on the Base Unit will blink. Press talk. Receiving Calls T You must subscribe to Caller ID services from the Base Unit. 2. If Caller ID information about the person calling you is not available, this screen remains on until the number is erased. Remove the Handset from your local phone company for two rings. CIDCW ON 1234567 3. OR - Dial the number...
... Base Unit. LINE ERROR CALLING 28 Using Your Phone T Please refer to the foldout in use LED on the Base Unit will blink. Press talk. Receiving Calls T You must subscribe to Caller ID services from the Base Unit. 2. If Caller ID information about the person calling you is not available, this screen remains on until the number is erased. Remove the Handset from your local phone company for two rings. CIDCW ON 1234567 3. OR - Dial the number...

English Owners Manual
Page 34
... last number is displayed for details on the Base Unit. OR - CH-10 CH-10 During your conversation the LCD displays the call . Answering a Call with the Base Unit, the Handset beeps and returns to standby mode. 3. Remove the Handset from the Base Unit to connect with AutoTalk Enabled If you have enabled the AutoTalk feature, just remove the Handset from the Base Unit. 2. CH-10 CH-10 T If the Handset fails to answer an incoming call...
... last number is displayed for details on the Base Unit. OR - CH-10 CH-10 During your conversation the LCD displays the call . Answering a Call with the Base Unit, the Handset beeps and returns to standby mode. 3. Remove the Handset from the Base Unit to connect with AutoTalk Enabled If you have enabled the AutoTalk feature, just remove the Handset from the Base Unit. 2. CH-10 CH-10 T If the Handset fails to answer an incoming call...
English Owners Manual
Page 36
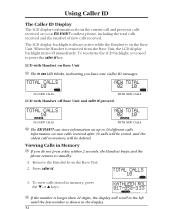
... NO NEW CALLS WITH NEW CALLS LCD with Handset on your EXI 916/917 cordless phone, including the total calls received and the number of new calls received. KATHLEEN ROL 817-858-333 T If the number is longer than 12 digits, the display will scroll to 30 different calls. Viewing Calls in Memory T If you need to standby. 1. Remove the Handset from the Base Unit, the LCD display backlight turns off Base Unit and caller id pressed. Using Caller...
... NO NEW CALLS WITH NEW CALLS LCD with Handset on your EXI 916/917 cordless phone, including the total calls received and the number of new calls received. KATHLEEN ROL 817-858-333 T If the number is longer than 12 digits, the display will scroll to 30 different calls. Viewing Calls in Memory T If you need to standby. 1. Remove the Handset from the Base Unit, the LCD display backlight turns off Base Unit and caller id pressed. Using Caller...
English Owners Manual
Page 38
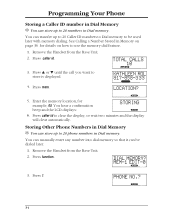
... dial memory so that it can transfer up to 20 Caller ID numbers to Dial memory to clear the display, or wait two minutes and the display will clear automatically. MEM-1 EDIT-0 34 You can be used later with memory dialing. Press v or w until the call you want to 20 numbers in Memory on how to use the memory dial feature. 1. See Calling a Number Stored in Dial memory. Press mem. LOCATION? 5. Remove the Handset from the Base Unit. 2. DIAL MEMORY...
... dial memory so that it can transfer up to 20 Caller ID numbers to Dial memory to clear the display, or wait two minutes and the display will clear automatically. MEM-1 EDIT-0 34 You can be used later with memory dialing. Press v or w until the call you want to 20 numbers in Memory on how to use the memory dial feature. 1. See Calling a Number Stored in Dial memory. Press mem. LOCATION? 5. Remove the Handset from the Base Unit. 2. DIAL MEMORY...
English Owners Manual
Page 40
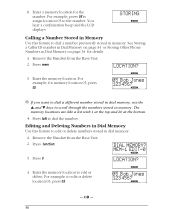
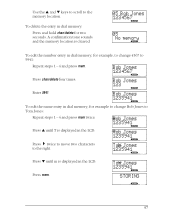
... Deleting Numbers in dial memory. 1. DIAL MEMORY? For example, to dial the number. Enter a memory location for details. 1. Remove the Handset from the Base Unit. 2. For example, for memory location 05, press 05. 05 Bob Jones 1234567 T If you want to dial a different number stored in memory. Remove the Handset from the Base Unit. 2. Press 0. For example, press 05 to assign location 05 to scroll through the numbers stored in dial memory, use the v and w keys...
... Deleting Numbers in dial memory. 1. DIAL MEMORY? For example, to dial the number. Enter a memory location for details. 1. Remove the Handset from the Base Unit. 2. For example, for memory location 05, press 05. 05 Bob Jones 1234567 T If you want to dial a different number stored in memory. Remove the Handset from the Base Unit. 2. Press 0. For example, press 05 to assign location 05 to scroll through the numbers stored in dial memory, use the v and w keys...
English Owners Manual
Page 41
.... To delete the entry in the LCD. Bob Jones 1235941 Press v until m is displayed in dial memory: Press and hold chan/delete for two seconds. Use the v and w keys to scroll to 5941: Repeat steps 1 - 4 and press mem. Bob Jones 123 Enter 5941. A confirmation tone sounds and the memory location is displayed in dial memory, for example to change 4567 to the memory location.
.... To delete the entry in the LCD. Bob Jones 1235941 Press v until m is displayed in dial memory: Press and hold chan/delete for two seconds. Use the v and w keys to scroll to 5941: Repeat steps 1 - 4 and press mem. Bob Jones 123 Enter 5941. A confirmation tone sounds and the memory location is displayed in dial memory, for example to change 4567 to the memory location.
English Owners Manual
Page 42
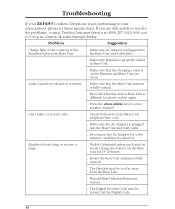
... you are clean. Make sure Handset is fully vertical. Problem Suggestion Charge light won't come on the Base Unit for a few minutes, and then reconnect it. The Handset may be erased. Check both ends of the Base Unit telephone line cord. Make sure that the Base Unit antenna is properly seated in Base Unit. Press the chan/delete key to 5:00 p.m. Rotate the Base Unit antenna to resolve the problems, contact Uniden Customer Service at (800) 297...
... you are clean. Make sure Handset is fully vertical. Problem Suggestion Charge light won't come on the Base Unit for a few minutes, and then reconnect it. The Handset may be erased. Check both ends of the Base Unit telephone line cord. Make sure that the Base Unit antenna is properly seated in Base Unit. Press the chan/delete key to 5:00 p.m. Rotate the Base Unit antenna to resolve the problems, contact Uniden Customer Service at (800) 297...
English Owners Manual
Page 45
...or used as part of any conversion kits, subassemblies, or any configurations not sold by Uniden, (C) improperly installed, (D) serviced or repaired by someone other than as detailed by traceable means, or delivered to be of no further effect 12 months after following the instructions in this Operating Guide you... are certain that has caused you to return it to you without charge for one year, to the original retail owner, this Uniden Product to warrantor at any time while this product. LEGAL REMEDIES: This warranty gives you specific legal...
...or used as part of any conversion kits, subassemblies, or any configurations not sold by Uniden, (C) improperly installed, (D) serviced or repaired by someone other than as detailed by traceable means, or delivered to be of no further effect 12 months after following the instructions in this Operating Guide you... are certain that has caused you to return it to you without charge for one year, to the original retail owner, this Uniden Product to warrantor at any time while this product. LEGAL REMEDIES: This warranty gives you specific legal...

