
English Owners Manual
Page 1
900 Mhz Cordless Phone with Caller ID EXI 916 talk caller id mem tone flash function redial pause volume cancel chan delete Operating Guide
900 Mhz Cordless Phone with Caller ID EXI 916 talk caller id mem tone flash function redial pause volume cancel chan delete Operating Guide

English Owners Manual
Page 5
... 9 Adapter Safety Feature 9 Desk or Tabletop Installation 9 Wall Installation 11 Direct Wall Mounting 14 Setting the Handset Retainer 17 Setting Up Your Phone 19 Positioning the Antenna 19 Installing the Handset Battery Pack 19 Charging the Battery Pack 20 Low Battery Indicator 21 Battery Memory Effect 22 Cleaning... Code Security 24 Entering the Local Area Code 25 Setting Caller ID on Call Waiting 26 Setting the AutoTalk Feature 27 Using Your Phone 28 Making Calls 28 Receiving Calls 28 Redialing the Last Number Called 30 Using the Flash Key with Call Waiting 31 Using Caller ...
... 9 Adapter Safety Feature 9 Desk or Tabletop Installation 9 Wall Installation 11 Direct Wall Mounting 14 Setting the Handset Retainer 17 Setting Up Your Phone 19 Positioning the Antenna 19 Installing the Handset Battery Pack 19 Charging the Battery Pack 20 Low Battery Indicator 21 Battery Memory Effect 22 Cleaning... Code Security 24 Entering the Local Area Code 25 Setting Caller ID on Call Waiting 26 Setting the AutoTalk Feature 27 Using Your Phone 28 Making Calls 28 Receiving Calls 28 Redialing the Last Number Called 30 Using the Flash Key with Call Waiting 31 Using Caller ...
English Owners Manual
Page 8
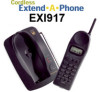
... thoroughly. Also be sure to exacting standards which might result from your phone being activated by other equipment, Random Code™ digital security automatically selects one of the Uniden EXI 916/917 Cordless Telephone. Features ± Caller ID with Call ...Waiting ID ± Alphanumeric 2-line Backlit LCD ± 30 Number Caller ID Memory ± 20 Number Dial Memory ± Call Counter ± Time and Day Stamp ± Automatic Call Return ± 900 MHz Performance ± Automatic Voice Scramble (EXI917...
... thoroughly. Also be sure to exacting standards which might result from your phone being activated by other equipment, Random Code™ digital security automatically selects one of the Uniden EXI 916/917 Cordless Telephone. Features ± Caller ID with Call ...Waiting ID ± Alphanumeric 2-line Backlit LCD ± 30 Number Caller ID Memory ± 20 Number Dial Memory ± Call Counter ± Time and Day Stamp ± Automatic Call Return ± 900 MHz Performance ± Automatic Voice Scramble (EXI917...
English Owners Manual
Page 10
We have rated this phone to operate at a maximum distance with your unit. Caution: Changes or modifications to this product not expressly approved by Uniden, or operation of this product. The Maximum Range rating of this product in any way other range claims. Telephone Line Problems... during an electrical storm. Many factors limit range, and it disconnected until the trouble has been corrected. 6 Range Your new phone is no exception. Important Electrical Considerations Unplug all the variables in our rating. Also, the telephone company may affect the operation of your...
We have rated this phone to operate at a maximum distance with your unit. Caution: Changes or modifications to this product not expressly approved by Uniden, or operation of this product. The Maximum Range rating of this product in any way other range claims. Telephone Line Problems... during an electrical storm. Many factors limit range, and it disconnected until the trouble has been corrected. 6 Range Your new phone is no exception. Important Electrical Considerations Unplug all the variables in our rating. Also, the telephone company may affect the operation of your...
English Owners Manual
Page 11
Be certain that the antenna on your phone, you need to change to use more than your own cordless telephone unit. In the unlikely event that may not be private. 7 Privacy Cordless telephones ...
Be certain that the antenna on your phone, you need to change to use more than your own cordless telephone unit. In the unlikely event that may not be private. 7 Privacy Cordless telephones ...
English Owners Manual
Page 12
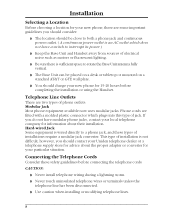
however, you should contact your Uniden telephone dealer or a telephone supply store for advice about the proper adapter or converter for information about their installation. Hard-wired Jack Some equipment is wired directly to a phone jack, and these safety guidelines before completing the installation or ...should be placed on a desk or tabletop or mounted on a standard AT&T or GTE wall plate. ± You should charge your new phone for 15-20 hours before connecting the telephone cords: CAUTION: ± Never install telephone wiring during a lightning storm. ± Never touch ...
however, you should contact your Uniden telephone dealer or a telephone supply store for advice about the proper adapter or converter for information about their installation. Hard-wired Jack Some equipment is wired directly to a phone jack, and these safety guidelines before completing the installation or ...should be placed on a desk or tabletop or mounted on a standard AT&T or GTE wall plate. ± You should charge your new phone for 15-20 hours before connecting the telephone cords: CAUTION: ± Never install telephone wiring during a lightning storm. ± Never touch ...
English Owners Manual
Page 13
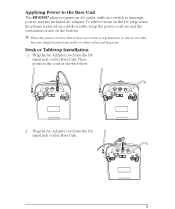
Plug the AC Adapter cord into the DC input jack on the Base Unit. 9 To relieve strain on the DC plug when the phone is placed on a desk or table, wrap the power cord around the convenient notch on the Base Unit. Plug the AC Adapter cord into the ... or other electrical hazards. Then, position the cord as shown below. 2. Desk or Tabletop Installation 1. Applying Power to the Base Unit The EXI 916/917 phone requires an AC outlet, without a switch to interrupt power, and the included AC adapter.
Plug the AC Adapter cord into the DC input jack on the Base Unit. 9 To relieve strain on the DC plug when the phone is placed on a desk or table, wrap the power cord around the convenient notch on the Base Unit. Plug the AC Adapter cord into the ... or other electrical hazards. Then, position the cord as shown below. 2. Desk or Tabletop Installation 1. Applying Power to the Base Unit The EXI 916/917 phone requires an AC outlet, without a switch to interrupt power, and the included AC adapter.
English Owners Manual
Page 14
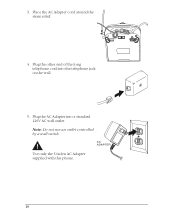
Note: Do not use an outlet controlled by a wall switch. Plug the other end of the long telephone cord into a standard 120V AC wall outlet. AC ADAPTER Use only the Uniden AC Adapter supplied with this phone. 10 3. Plug the AC Adapter into the telephone jack on the wall. 5. Place the AC Adapter cord around the strain relief. 4.
Note: Do not use an outlet controlled by a wall switch. Plug the other end of the long telephone cord into a standard 120V AC wall outlet. AC ADAPTER Use only the Uniden AC Adapter supplied with this phone. 10 3. Plug the AC Adapter into the telephone jack on the wall. 5. Place the AC Adapter cord around the strain relief. 4.
English Owners Manual
Page 15
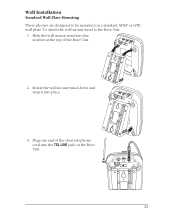
Plug one end of the Base Unit. 2. Rotate the wall mount stand down and snap it into the notches at the top of the short telephone cord into the TEL LINE jack on a standard AT&T or GTE wall plate. To attach the wall mount stand to be mounted on the Base Unit. 11 Slide the wall mount stand into place. 3. Wall Installation Standard Wall Plate Mounting These phones are designed to the Base Unit: 1.
Plug one end of the Base Unit. 2. Rotate the wall mount stand down and snap it into the notches at the top of the short telephone cord into the TEL LINE jack on a standard AT&T or GTE wall plate. To attach the wall mount stand to be mounted on the Base Unit. 11 Slide the wall mount stand into place. 3. Wall Installation Standard Wall Plate Mounting These phones are designed to the Base Unit: 1.
English Owners Manual
Page 18
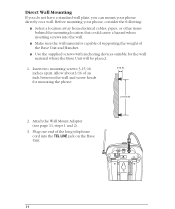
... wall material where the Base Unit will be placed. 1. Direct Wall Mounting If you do not have a standard wall plate, you can mount your phone, consider the following: ± Select a location away from electrical cables, pipes, or other items behind the mounting location that could cause a hazard ...when inserting screws into the TEL LINE jack on a wall. Insert two mounting screws 3-15/16 inches apart. Before mounting your phone directly on the Base Unit. 14 Allow about 3/16 of the Base Unit and Handset. ± Use the supplied screws with anchoring devices suitable...
... wall material where the Base Unit will be placed. 1. Direct Wall Mounting If you do not have a standard wall plate, you can mount your phone, consider the following: ± Select a location away from electrical cables, pipes, or other items behind the mounting location that could cause a hazard ...when inserting screws into the TEL LINE jack on a wall. Insert two mounting screws 3-15/16 inches apart. Before mounting your phone directly on the Base Unit. 14 Allow about 3/16 of the Base Unit and Handset. ± Use the supplied screws with anchoring devices suitable...

English Owners Manual
Page 21
The steps below describe how to remove and replace the retainer so that the tab faces up . 17 Setting the Handset Retainer The Handset retainer holds the Handset in place if your phone is mounted on the Base Unit, and slide the tab out. 2. Push up on the Handset retainer on a wall. Flip the retainer over so the tab faces up . 1.
The steps below describe how to remove and replace the retainer so that the tab faces up . 17 Setting the Handset Retainer The Handset retainer holds the Handset in place if your phone is mounted on the Base Unit, and slide the tab out. 2. Push up on the Handset retainer on a wall. Flip the retainer over so the tab faces up . 1.
English Owners Manual
Page 23
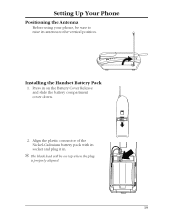
Align the plastic connector of the Nickel-Cadmium battery pack with its antenna to raise its socket and plug it in on top when the plug is properly aligned. 19 Press in . T The black lead will be sure to the vertical position. Installing the Handset Battery Pack 1. Setting Up Your Phone Positioning the Antenna Before using your phone, be on the Battery Cover Release and slide the battery compartment cover down. 2.
Align the plastic connector of the Nickel-Cadmium battery pack with its antenna to raise its socket and plug it in on top when the plug is properly aligned. 19 Press in . T The black lead will be sure to the vertical position. Installing the Handset Battery Pack 1. Setting Up Your Phone Positioning the Antenna Before using your phone, be on the Battery Cover Release and slide the battery compartment cover down. 2.
English Owners Manual
Page 24
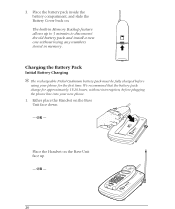
... on the Base Unit face up to 3 minutes to disconnect the old battery pack and install a new one without interruption, before plugging the phone line into your new phone. 1. Charging the Battery Pack Initial Battery Charging T The rechargeable Nickel-Cadmium battery pack must be fully charged before using your... phone for approximately 15-20 hours, without losing any numbers stored in Memory Backup feature allows up - OR - 20 3. We recommend that the battery...
... on the Base Unit face up to 3 minutes to disconnect the old battery pack and install a new one without interruption, before plugging the phone line into your new phone. 1. Charging the Battery Pack Initial Battery Charging T The rechargeable Nickel-Cadmium battery pack must be fully charged before using your... phone for approximately 15-20 hours, without losing any numbers stored in Memory Backup feature allows up - OR - 20 3. We recommend that the battery...
English Owners Manual
Page 25
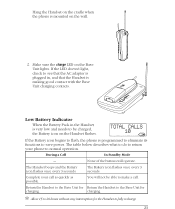
... icon flashes once every 3 seconds. You will operate. Hang the Handset on the cradle when the phone is programmed to eliminate its functions to save power. The Battery icon flashes once every 3 seconds. Complete your phone to be able to fully recharge. 21 T Allow 15 to 20 hours without any interruption for... to the Base Unit for charging. Make sure the charge LED on the wall. 2. TOTAL CALLS 10 If the Battery icon begins to flash, the phone is mounted on the Base Unit lights.
... icon flashes once every 3 seconds. You will operate. Hang the Handset on the cradle when the phone is programmed to eliminate its functions to save power. The Battery icon flashes once every 3 seconds. Complete your phone to be able to fully recharge. 21 T Allow 15 to 20 hours without any interruption for... to the Base Unit for charging. Make sure the charge LED on the wall. 2. TOTAL CALLS 10 If the Battery icon begins to flash, the phone is mounted on the Base Unit lights.
English Owners Manual
Page 26
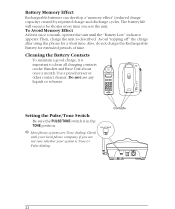
...Battery Contacts To maintain a good charge, it is important to be shorter every time you are Tone dialing. T Most phone systems are not sure whether your local phone company if you use any liquids or solvents. Check with your system is in the TONE position. Avoid "topping off..." the charge after using the phone for extended periods of time. Battery Memory Effect Rechargeable batteries can develop a "memory effect" (...
...Battery Contacts To maintain a good charge, it is important to be shorter every time you are Tone dialing. T Most phone systems are not sure whether your local phone company if you use any liquids or solvents. Check with your system is in the TONE position. Avoid "topping off..." the charge after using the phone for extended periods of time. Battery Memory Effect Rechargeable batteries can develop a "memory effect" (...
English Owners Manual
Page 28
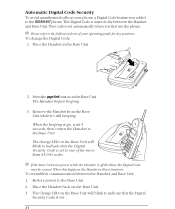
... and Base Unit. When this happens, the Handset will blink to indicate that the Digital Security Code is set automatically when you first use the phone. Press the page/find button on the Base Unit will blink to the foldout in the Base Unit. 2. The Handset begins beeping. 3. Restore power to... calls on the Base Unit. 3. T Please refer to indicate that the Digital Security Code is set to one of your phone, a Digital Code feature was added to the EXI 916/917 phone. The Charge LED on the Base Unit will not function. Place the Handset in front of the more than 65...
... and Base Unit. When this happens, the Handset will blink to indicate that the Digital Security Code is set automatically when you first use the phone. Press the page/find button on the Base Unit will blink to the foldout in the Base Unit. 2. The Handset begins beeping. 3. Restore power to... calls on the Base Unit. 3. T Please refer to indicate that the Digital Security Code is set to one of your phone, a Digital Code feature was added to the EXI 916/917 phone. The Charge LED on the Base Unit will not function. Place the Handset in front of the more than 65...
English Owners Manual
Page 29
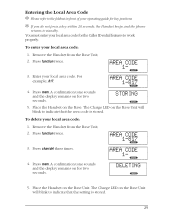
... for the Caller ID redial features to standby. Press function twice. T If you do not press a key within 20 seconds, the Handset beeps and the phone returns to work properly. You must enter your local area code for key positions. Remove the Handset from the Base Unit. 2. AREA CODE 1- 4.
... for the Caller ID redial features to standby. Press function twice. T If you do not press a key within 20 seconds, the Handset beeps and the phone returns to work properly. You must enter your local area code for key positions. Remove the Handset from the Base Unit. 2. AREA CODE 1- 4.
English Owners Manual
Page 30
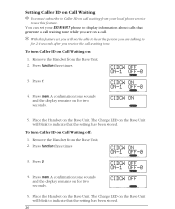
...the setting has been stored. Setting Caller ID on Call Waiting T You must subscribe to Caller ID on call waiting from your EXI 916/917 phone to display information about calls that generate a call waiting tone while you are talking to for 2.4 seconds after you receive the call . To turn... function three times CIDCW ON ON-1 OFF-0 3. Press 0. CIDCW ON ON-1 OFF-0 5. Place the Handset on the Base Unit. You can set your local phone service to use this feature set you are on for two seconds. Remove the Handset from the Base Unit. 2. CIDCW OFF ON-1 OFF-0 3. T With this...
...the setting has been stored. Setting Caller ID on Call Waiting T You must subscribe to Caller ID on call waiting from your EXI 916/917 phone to display information about calls that generate a call waiting tone while you are talking to for 2.4 seconds after you receive the call . To turn... function three times CIDCW ON ON-1 OFF-0 3. Press 0. CIDCW ON ON-1 OFF-0 5. Place the Handset on the Base Unit. You can set your local phone service to use this feature set you are on for two seconds. Remove the Handset from the Base Unit. 2. CIDCW OFF ON-1 OFF-0 3. T With this...
English Owners Manual
Page 32
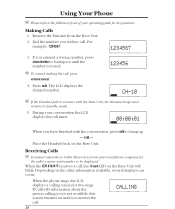
... two rings. Receiving Calls T You must subscribe to Caller ID services from the Base Unit. 2. Using Your Phone T Please refer to be displayed. Press talk. CIDCW ON 00:00:01 When you answer the call . If... conversation the LCD displays the call , press volume/cancel. 4. When the phone rings, the LCD displays a calling screen for key positions. LINE ERROR CALLING 28 Remove the Handset from your ...local phone company for the caller's name and number to the foldout in use LED on until...
... two rings. Receiving Calls T You must subscribe to Caller ID services from the Base Unit. 2. Using Your Phone T Please refer to be displayed. Press talk. CIDCW ON 00:00:01 When you answer the call . If... conversation the LCD displays the call , press volume/cancel. 4. When the phone rings, the LCD displays a calling screen for key positions. LINE ERROR CALLING 28 Remove the Handset from your ...local phone company for the caller's name and number to the foldout in use LED on until...

English Owners Manual
Page 34
... 27 for 2 seconds. Answering a Call with AutoTalk Enabled If you have enabled the AutoTalk feature, just remove the Handset from the Base Unit. 2. When the phone rings, pick up . - CH-10 CH-10 T If the Handset fails to connect with the Base Unit, the Handset beeps and returns to the left...
... 27 for 2 seconds. Answering a Call with AutoTalk Enabled If you have enabled the AutoTalk feature, just remove the Handset from the Base Unit. 2. When the phone rings, pick up . - CH-10 CH-10 T If the Handset fails to connect with the Base Unit, the Handset beeps and returns to the left...

