English Owners Manual
Page 2
... in Memory Dialing 9 • Storing Mixed Tone/Pulse Numbers 9 • Dialing a Stored Number 10 • One-Touch Dialing 10 • Chain Dialing 10 • Erasing a Stored Number 10 • Replacing a Stored Number 10 • Selecting a Different Channel 10 • Using the Flash Button 10 • Using the Page/Find Feature 10 Troubleshooting 11 Specifications 11 Introduction The Uniden® EXP 7900 Series 900 MHz cordless phones are changed, making it in the base. AutoTalk allows you to answer a call you...
... in Memory Dialing 9 • Storing Mixed Tone/Pulse Numbers 9 • Dialing a Stored Number 10 • One-Touch Dialing 10 • Chain Dialing 10 • Erasing a Stored Number 10 • Replacing a Stored Number 10 • Selecting a Different Channel 10 • Using the Flash Button 10 • Using the Page/Find Feature 10 Troubleshooting 11 Specifications 11 Introduction The Uniden® EXP 7900 Series 900 MHz cordless phones are changed, making it in the base. AutoTalk allows you to answer a call you...
English Owners Manual
Page 3
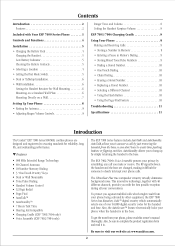
... Your EXP 7900 Series Phone 900 MHz status page/find Base talk batt lo talk flash mem 1 2 abc 3 def 4 ghi 5 jkl 6mno 7 8 pqus tuv tone 8oper 9wxyz redial pause chan volume m1 m2 m3 Handset Rechargeable Battery AC Adapter Telephone Cord Also included: • This Owner’s Manual • Other Printed Material • Precautions and Important Safety Instructions EXP7903/7904 Only: Charging Cradle and Power Supply If any...
... Your EXP 7900 Series Phone 900 MHz status page/find Base talk batt lo talk flash mem 1 2 abc 3 def 4 ghi 5 jkl 6mno 7 8 pqus tuv tone 8oper 9wxyz redial pause chan volume m1 m2 m3 Handset Rechargeable Battery AC Adapter Telephone Cord Also included: • This Owner’s Manual • Other Printed Material • Precautions and Important Safety Instructions EXP7903/7904 Only: Charging Cradle and Power Supply If any...

English Owners Manual
Page 4
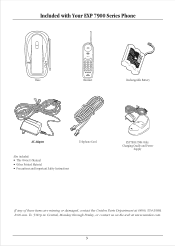
... channel for wall mounting. 12. holds handset in memory locations 1, 2, and 3 for one-touch dialing 11. talk/batt - mem - page/find 12 13 4 chan - m1, m2, m3 - accesses stored numbers in base for clearer reception 10. locates the handset 11 900 MHz status page/find - switches to tone dialing in use or the handset is in pulse dial mode 3. status LED - accesses call waiting (if available) 7. handset retainer - answers or places calls 2. */tone - flash - talk - pause - volume...
... channel for wall mounting. 12. holds handset in memory locations 1, 2, and 3 for one-touch dialing 11. talk/batt - mem - page/find 12 13 4 chan - m1, m2, m3 - accesses stored numbers in base for clearer reception 10. locates the handset 11 900 MHz status page/find - switches to tone dialing in use or the handset is in pulse dial mode 3. status LED - accesses call waiting (if available) 7. handset retainer - answers or places calls 2. */tone - flash - talk - pause - volume...
English Owners Manual
Page 5
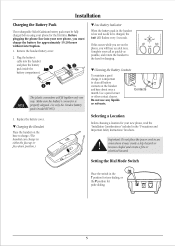
... the power cord in the T position for tone dialing, or the P position for pulse dialing. 5 Use a pencil eraser or other contact cleaner. Installation Charging the Battery Pack The rechargeable Nickel-Cadmium battery pack must charge the battery for approximately 15-20 hours without interruption. 1. Before plugging the phone line into the handset and place the battery pack inside the 1 2 battery compartment. 3 The plastic connectors will hear an alert tone. Remove the handset battery cover...
... the power cord in the T position for tone dialing, or the P position for pulse dialing. 5 Use a pencil eraser or other contact cleaner. Installation Charging the Battery Pack The rechargeable Nickel-Cadmium battery pack must charge the battery for approximately 15-20 hours without interruption. 1. Before plugging the phone line into the handset and place the battery pack inside the 1 2 battery compartment. 3 The plastic connectors will hear an alert tone. Remove the handset battery cover...
English Owners Manual
Page 6
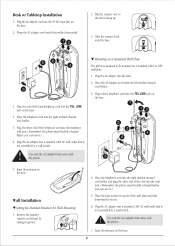
... so the tab is designed to secure. 6. Plug the other end of the telephone cord into the telephone wall jack. (Remember, the phone must be fully charged before you can use it.) 5. Raise the antenna on the base. 6 Wall Installation w Setting the Handset Retainer for Wall Mounting 1. Place the base on the two posts of the long telephone cord into a standard 120V AC wall outlet that is not controlled...
... so the tab is designed to secure. 6. Plug the other end of the telephone cord into the telephone wall jack. (Remember, the phone must be fully charged before you can use it.) 5. Raise the antenna on the base. 6 Wall Installation w Setting the Handset Retainer for Wall Mounting 1. Place the base on the two posts of the long telephone cord into a standard 120V AC wall outlet that is not controlled...

English Owners Manual
Page 7
... with the phone. 2. Make sure the wall material is not controlled by a wall switch. ! Plug the AC adapter into the TEL LINE jack on the base. 5. otherwise, damage to the unit could cause a hazard when inserting screws into the telephone wall jack. (Remember, the phone must be placed. 1. w Mounting Directly on a Wall If you do not have a standard wall plate, you can mount the phone directly on a wall. Use #10 screws...
... with the phone. 2. Make sure the wall material is not controlled by a wall switch. ! Plug the AC adapter into the TEL LINE jack on the base. 5. otherwise, damage to the unit could cause a hazard when inserting screws into the telephone wall jack. (Remember, the phone must be placed. 1. w Mounting Directly on a Wall If you do not have a standard wall plate, you can mount the phone directly on a wall. Use #10 screws...
English Owners Manual
Page 8
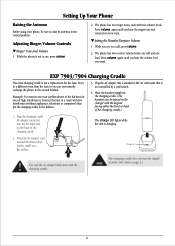
Setting Up Your Phone Raising the Antenna Before using your cordless phone in a different room than the base so you want to use , press volume . 2. While the phone is not controlled by a wall switch. 4. The phone has two ringer tones, each with the charging cradle. w Setting the Handset Earpiece Volume 1. Connect the base in a room with low interference (without appliances, televisions or computers) then put the charging cradle in the charger with...
Setting Up Your Phone Raising the Antenna Before using your cordless phone in a different room than the base so you want to use , press volume . 2. While the phone is not controlled by a wall switch. 4. The phone has two ringer tones, each with the charging cradle. w Setting the Handset Earpiece Volume 1. Connect the base in a room with low interference (without appliances, televisions or computers) then put the charging cradle in the charger with...
English Owners Manual
Page 9
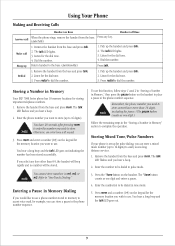
... number. Remove the handset from the base and press talk. 2. Press mem and a number (0-9) on the keypad for the memory location you hear a beep. 2. Using Your Phone Making and Receiving Calls Handset on Base Answer call Hang up to 16 digits). You hear a long beep and the talk LED goes out indicating the number has been stored successfully. Return handset to complete the operation. Pick up the handset and press talk. 2. The */tone button...
... number. Remove the handset from the base and press talk. 2. Press mem and a number (0-9) on the keypad for the memory location you hear a beep. 2. Using Your Phone Making and Receiving Calls Handset on Base Answer call Hang up to 16 digits). You hear a long beep and the talk LED goes out indicating the number has been stored successfully. Return handset to complete the operation. Pick up the handset and press talk. 2. The */tone button...
English Owners Manual
Page 10
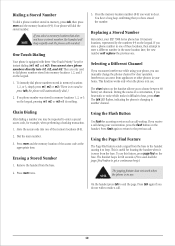
... chan button on the keypad, pressing m1, m2, or m3 will not dial. Store the access code into m1, m2, and m3. If you can come from the base. To use . You cannot store phone numbers directly into one . This function works only when the phone is in memory locations 1, 2, or 3 on the handset allows you want to choose between 40 factory set channels. Dialing a Stored Number To dial a phone number...
... chan button on the keypad, pressing m1, m2, or m3 will not dial. Store the access code into m1, m2, and m3. If you can come from the base. To use . You cannot store phone numbers directly into one . This function works only when the phone is in memory locations 1, 2, or 3 on the handset allows you want to choose between 40 factory set channels. Dialing a Stored Number To dial a phone number...

English Owners Manual
Page 11
Troubleshooting If your EXP 7900 Series cordless telephone is not performing to your place of the telephone line cord. • Make sure the AC adapter is plugged into the base and wall outlet. • Make sure the handset is properly seated in the base. • Make sure the rechargeable battery pack is properly connected in the handset. • Make sure that the phone has been reset. Servicing must be weak. The audio sounds...
Troubleshooting If your EXP 7900 Series cordless telephone is not performing to your place of the telephone line cord. • Make sure the AC adapter is plugged into the base and wall outlet. • Make sure the handset is properly seated in the base. • Make sure the rechargeable battery pack is properly connected in the handset. • Make sure that the phone has been reset. Servicing must be weak. The audio sounds...

