
English Owners Manual
Page 1
...placed in a built-in a risk of fire, electrical shock, and injury to rest on it. 9. Important Safety Instructions When using your telephone equipment, basic safety precautions should always be placed near or over a radiator or heat register. Follow all instructions. 2. for cleaning. 4. This... product should never be followed to reduce the risk of fire or electric shock. The telephone may touch dangerous voltage points or short out parts that could result in installation unless proper ventilation is provided. 7. Do not allow ...
...placed in a built-in a risk of fire, electrical shock, and injury to rest on it. 9. Important Safety Instructions When using your telephone equipment, basic safety precautions should always be placed near or over a radiator or heat register. Follow all instructions. 2. for cleaning. 4. This... product should never be followed to reduce the risk of fire or electric shock. The telephone may touch dangerous voltage points or short out parts that could result in installation unless proper ventilation is provided. 7. Do not allow ...
English Owners Manual
Page 2
... product. If the product does not operate normally when following conditions: A. Exercise care in handling the battery in the instruction manual provided for use the telephone to normal operation. B. C. D. If the product exhibits a distinct change in a fire. Released electrolyte is damaged or frayed. If the product has been exposed to the...
... product. If the product does not operate normally when following conditions: A. Exercise care in handling the battery in the instruction manual provided for use the telephone to normal operation. B. C. D. If the product exhibits a distinct change in a fire. Released electrolyte is damaged or frayed. If the product has been exposed to the...

English Owners Manual
Page 4
What's Included with Your EXP900 900MHz POWER CHARGE IN USE PAGE EXP900 Base Base Stand CH VOL MUTE TALK RINGER 2ABC 3DEF 6MNO 1 GH I 4 JKL 5 TUV 8 9WXY 7PRS 0OPER 8 REDIAL EXP900 Handset ® Operating Guide BATT LOW TALK CH VOL MEM TALK 2 ABC 3DEF 1 4GH I 5 JKL 6 MNO 9 WXY 7PRS 8 TUV 0OPER TONE FLASH REDIAL 900MHz POWER CHARGE IN USE PAGE Operating Guide Belt Clip AC Power Adapter Lead-Acid Battery Short and Long Telephone Cords If any of these items are missing or damaged, contact your place of purchase. 4
What's Included with Your EXP900 900MHz POWER CHARGE IN USE PAGE EXP900 Base Base Stand CH VOL MUTE TALK RINGER 2ABC 3DEF 6MNO 1 GH I 4 JKL 5 TUV 8 9WXY 7PRS 0OPER 8 REDIAL EXP900 Handset ® Operating Guide BATT LOW TALK CH VOL MEM TALK 2 ABC 3DEF 1 4GH I 5 JKL 6 MNO 9 WXY 7PRS 8 TUV 0OPER TONE FLASH REDIAL 900MHz POWER CHARGE IN USE PAGE Operating Guide Belt Clip AC Power Adapter Lead-Acid Battery Short and Long Telephone Cords If any of these items are missing or damaged, contact your place of purchase. 4
English Owners Manual
Page 5
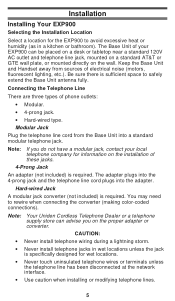
...CAUTION: • Never install telephone wiring during a lightning storm. • Never install telephone jacks in wet locations unless the jack is required. Note: Your Uniden Cordless Telephone Dealer or a telephone supply store can advise you do not have a modular jack, contact your EXP900 can be placed on a ...desk or tabletop near a standard 120V AC outlet and telephone line jack, mounted on a standard AT...
...CAUTION: • Never install telephone wiring during a lightning storm. • Never install telephone jacks in wet locations unless the jack is required. Note: Your Uniden Cordless Telephone Dealer or a telephone supply store can advise you do not have a modular jack, contact your EXP900 can be placed on a ...desk or tabletop near a standard 120V AC outlet and telephone line jack, mounted on a standard AT...
English Owners Manual
Page 6
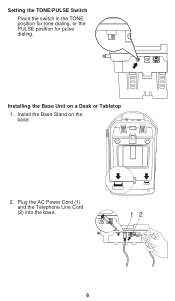
Plug the AC Power Cord (1) and the Telephone Line Cord (2) into the base. 12 6 Install the Base Stand on a Desk or Tabletop 1. Installing the Base Unit on the base. 2. Setting the TONE/PULSE Switch Place the switch in the TONE position for tone dialing, or the PULSE position for pulse dialing.
Plug the AC Power Cord (1) and the Telephone Line Cord (2) into the base. 12 6 Install the Base Stand on a Desk or Tabletop 1. Installing the Base Unit on the base. 2. Setting the TONE/PULSE Switch Place the switch in the TONE position for tone dialing, or the PULSE position for pulse dialing.
English Owners Manual
Page 7
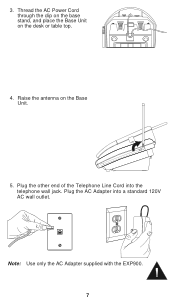
Plug the AC Adapter into the telephone wall jack. Thread the AC Power Cord through the clip on the base stand, and place the Base Unit on the Base Unit. 5. 3. Note: Use only the AC Adapter supplied with the EXP900. 7 Plug the other end of the Telephone Line Cord into a standard 120V AC wall outlet. Raise the antenna on the desk or table top. 4.
Plug the AC Adapter into the telephone wall jack. Thread the AC Power Cord through the clip on the base stand, and place the Base Unit on the Base Unit. 5. 3. Note: Use only the AC Adapter supplied with the EXP900. 7 Plug the other end of the Telephone Line Cord into a standard 120V AC wall outlet. Raise the antenna on the desk or table top. 4.
English Owners Manual
Page 8
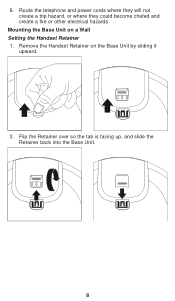
Mounting the Base Unit on the Base Unit by sliding it upward. 2. Flip the Retainer over so the tab is facing up, and slide the Retainer back into the Base Unit. 8 Remove the Handset Retainer on a Wall Setting the Handset Retainer 1. Route the telephone and power cords where they will not create a trip hazard, or where they could become chafed and create a fire or other electrical hazards. 6.
Mounting the Base Unit on the Base Unit by sliding it upward. 2. Flip the Retainer over so the tab is facing up, and slide the Retainer back into the Base Unit. 8 Remove the Handset Retainer on a Wall Setting the Handset Retainer 1. Route the telephone and power cords where they will not create a trip hazard, or where they could become chafed and create a fire or other electrical hazards. 6.
English Owners Manual
Page 9
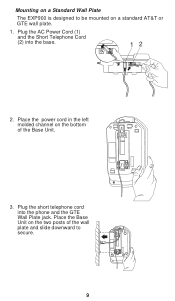
Plug the AC Power Cord (1) and the Short Telephone Cord (2) into the phone and the GTE Wall Plate jack. Place the Base Unit on the bottom of the wall plate and slide downward to be mounted on a standard AT&T or GTE wall plate. 1. Place the power cord in the left molded channel on the two posts of the Base Unit. 3. Plug the short telephone cord into the base. 12 2. Mounting on a Standard Wall Plate The EXP900 is designed to secure. 9
Plug the AC Power Cord (1) and the Short Telephone Cord (2) into the phone and the GTE Wall Plate jack. Place the Base Unit on the bottom of the wall plate and slide downward to be mounted on a standard AT&T or GTE wall plate. 1. Place the power cord in the left molded channel on the two posts of the Base Unit. 3. Plug the short telephone cord into the base. 12 2. Mounting on a Standard Wall Plate The EXP900 is designed to secure. 9
English Owners Manual
Page 11
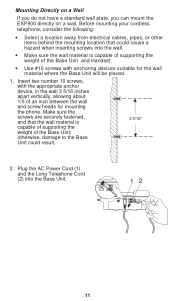
...the appropriate anchor device, in the wall 3 5/16 inches apart vertically, allowing about 1/5 of the Base Unit; Plug the AC Power Cord (1) and the Long Telephone Cord (2) into the wall. • Make sure the wall material is capable of supporting the weight of an inch between the wall and screw heads... are securely fastened, and that could result. 3 5/16" 2. Mounting Directly on a Wall If you do not have a standard wall plate, you can mount the EXP900 directly on a wall. otherwise, damage to the Base Unit could cause a hazard when inserting screws into the Base Unit. 12 11
...the appropriate anchor device, in the wall 3 5/16 inches apart vertically, allowing about 1/5 of the Base Unit; Plug the AC Power Cord (1) and the Long Telephone Cord (2) into the wall. • Make sure the wall material is capable of supporting the weight of an inch between the wall and screw heads... are securely fastened, and that could result. 3 5/16" 2. Mounting Directly on a Wall If you do not have a standard wall plate, you can mount the EXP900 directly on a wall. otherwise, damage to the Base Unit could cause a hazard when inserting screws into the Base Unit. 12 11
English Owners Manual
Page 12
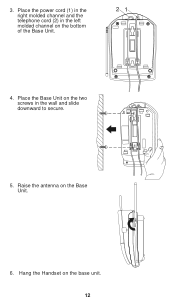
Place the Base Unit on the two screws in the left molded channel on the bottom of the Base Unit. 21 4. Hang the Handset on the Base Unit. 6. Place the power cord (1) in the right molded channel and the telephone cord (2) in the wall and slide downward to secure. 5. 3. Raise the antenna on the base unit. 12
Place the Base Unit on the two screws in the left molded channel on the bottom of the Base Unit. 21 4. Hang the Handset on the Base Unit. 6. Place the power cord (1) in the right molded channel and the telephone cord (2) in the wall and slide downward to secure. 5. 3. Raise the antenna on the base unit. 12
English Owners Manual
Page 13
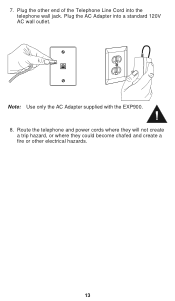
Route the telephone and power cords where they will not create a trip hazard, or where they could become chafed and create a fire or other end of the Telephone Line Cord into a standard 120V AC wall outlet. Plug the AC Adapter into the telephone wall jack. Note: Use only the AC Adapter supplied with the EXP900. 8. 7. Plug the other electrical hazards. 13
Route the telephone and power cords where they will not create a trip hazard, or where they could become chafed and create a fire or other end of the Telephone Line Cord into a standard 120V AC wall outlet. Plug the AC Adapter into the telephone wall jack. Note: Use only the AC Adapter supplied with the EXP900. 8. 7. Plug the other electrical hazards. 13

English Owners Manual
Page 14
... Battery Pack Note: The built-in Memory Backup feature allows up to 3 minutes after disconnecting the old Battery Pack to place the handset in the telephone's memory. Remove the handset battery cover and install the Lead Acid battery. Installing the Belt Clip Push the Belt Clip onto the handset until it...
... Battery Pack Note: The built-in Memory Backup feature allows up to 3 minutes after disconnecting the old Battery Pack to place the handset in the telephone's memory. Remove the handset battery cover and install the Lead Acid battery. Installing the Belt Clip Push the Belt Clip onto the handset until it...
English Owners Manual
Page 23
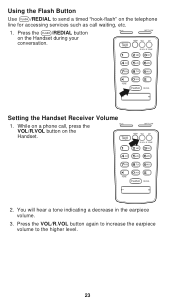
... 7PRS 8 TUV 9 WXY TONE 0 OPER FLASH REDIAL 2. Press the VOL/R.VOL button again to increase the earpiece volume to send a timed "hook-flash" on the telephone line for accessing services such as call , press the TALK VOL/R.VOL button on the Handset. Using the Flash Button Use /REDIAL to the higher...
... 7PRS 8 TUV 9 WXY TONE 0 OPER FLASH REDIAL 2. Press the VOL/R.VOL button again to increase the earpiece volume to send a timed "hook-flash" on the telephone line for accessing services such as call , press the TALK VOL/R.VOL button on the Handset. Using the Flash Button Use /REDIAL to the higher...
English Owners Manual
Page 35
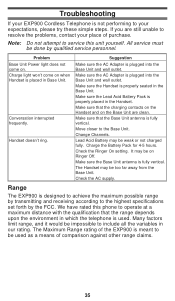
...may be on when Handset is properly seated in which the telephone is fully vertical. The Maximum Range rating of the EXP900 is meant to your expectations, please try these simple steps. Troubleshooting If your EXP900 Cordless Telephone is not performing to be used . Note: Do not ...attempt to the highest specifications set forth by the FCC. Handset doesn't ring. Change Channels. Make sure the Lead Acid Battery Pack is fully vertical. Range The EXP900 is plugged into ...
...may be on when Handset is properly seated in which the telephone is fully vertical. The Maximum Range rating of the EXP900 is meant to your expectations, please try these simple steps. Troubleshooting If your EXP900 Cordless Telephone is not performing to be used . Note: Do not ...attempt to the highest specifications set forth by the FCC. Handset doesn't ring. Change Channels. Make sure the Lead Acid Battery Pack is fully vertical. Range The EXP900 is plugged into ...
English Owners Manual
Page 39
EXP900 Cordless Telephone Operating Guide BATT LOW TALK CH VOL MEM TALK 2 ABC 3DEF 1 4GH I 7PRS 5 JKL 8 TUV 6 MNO 9 WXY 0OPER TONE FLASH REDIAL 900MHz POWER CHARGE IN USE PAGE UDZZ01804ZZ
EXP900 Cordless Telephone Operating Guide BATT LOW TALK CH VOL MEM TALK 2 ABC 3DEF 1 4GH I 7PRS 5 JKL 8 TUV 6 MNO 9 WXY 0OPER TONE FLASH REDIAL 900MHz POWER CHARGE IN USE PAGE UDZZ01804ZZ

English Owners Manual
Page 43
... Contents Base Controls and Indicators Inside Front Cover Handset Controls Foldout Important Safety Instructions 1 Introduction 3 About the EXP900 3 Features 3 What's Included with Your EXP900 4 Installation 5 Installing Your EXP900 5 Selecting the Installation Location 5 Connecting the Telephone Line 5 Setting the TONE/PULSE Switch 6 Installing the Base Unit on a Desk or Tabletop 6 Mounting the... 35 Radio Interference 36 Optional Accessories and Replacement Parts 37 Specifications 38 General 38 Base Unit 38 Handset 38 Battery 38 Uniden® is a registered trademark of...
... Contents Base Controls and Indicators Inside Front Cover Handset Controls Foldout Important Safety Instructions 1 Introduction 3 About the EXP900 3 Features 3 What's Included with Your EXP900 4 Installation 5 Installing Your EXP900 5 Selecting the Installation Location 5 Connecting the Telephone Line 5 Setting the TONE/PULSE Switch 6 Installing the Base Unit on a Desk or Tabletop 6 Mounting the... 35 Radio Interference 36 Optional Accessories and Replacement Parts 37 Specifications 38 General 38 Base Unit 38 Handset 38 Battery 38 Uniden® is a registered trademark of...
English Owners Manual
Page 44
...illegible entries. This is allowed. As one winner will be entered in our drawing held every six months for a free Uniden Cordless Telephone. residents at winning an additional phone, mail your completed registration card and you'll be randomly selected from all taxes. ...us to better serve you , by law. Winner is necessary to U.S. Open to participate. The information on the number of a Uniden Cordless Telephone. There's nothing like the convenience of eligible entries received. For a notice of eligibility. Entries must agree to promptly execute an ...
...illegible entries. This is allowed. As one winner will be entered in our drawing held every six months for a free Uniden Cordless Telephone. residents at winning an additional phone, mail your completed registration card and you'll be randomly selected from all taxes. ...us to better serve you , by law. Winner is necessary to U.S. Open to participate. The information on the number of a Uniden Cordless Telephone. There's nothing like the convenience of eligible entries received. For a notice of eligibility. Entries must agree to promptly execute an ...


