
English Owners Manual
Page 2
...; 2.4 GHz Spread Spectrum Technology • Secure Digital Transmission • Integrated Telephone Answering Device (ITAD) • Caller ID and Call Waiting Caller ID (CIDCW) • 50 Number Caller ID Memory • 10 Enhanced Memory Dial Locations • 32 Digit Redial • Lighted Keypad • 3-Line, 16 Character Backlit LCD Handset Display • Redial, Flash and Pause • Pulse / Tone Dialing • 4 Hour Talk Time • 7 Day Standby Battery Life • Handset Earpiece and Ringer Volume Control • Speakerphone • 3-Way Conference Operation...
...; 2.4 GHz Spread Spectrum Technology • Secure Digital Transmission • Integrated Telephone Answering Device (ITAD) • Caller ID and Call Waiting Caller ID (CIDCW) • 50 Number Caller ID Memory • 10 Enhanced Memory Dial Locations • 32 Digit Redial • Lighted Keypad • 3-Line, 16 Character Backlit LCD Handset Display • Redial, Flash and Pause • Pulse / Tone Dialing • 4 Hour Talk Time • 7 Day Standby Battery Life • Handset Earpiece and Ringer Volume Control • Speakerphone • 3-Way Conference Operation...

English Owners Manual
Page 4
.... Phone jack 46 47 48 49 50 Headset jack cover 4. Volume/Cursor down key 28. Flash/Cursor forward key 16. Delete key 19. Repeat key 31. Greeting key 32. Base antenna 38. Record time switch 45. Intercom key 13. Base charging contact 33. Voice memo key 43. Handset battery compartment 5. Tone key 11. Setup/Pause key 20. Status LED 29. Delete key 30. Pin code key 34. Play/Stop key 41. Pulse-Tone switch 49. Base speaker 24. Clock key 35. Answer on/off -on switch 48. Message counter display 40. Desktop/Wall mount adapter...
.... Phone jack 46 47 48 49 50 Headset jack cover 4. Volume/Cursor down key 28. Flash/Cursor forward key 16. Delete key 19. Repeat key 31. Greeting key 32. Base antenna 38. Record time switch 45. Intercom key 13. Base charging contact 33. Voice memo key 43. Handset battery compartment 5. Tone key 11. Setup/Pause key 20. Status LED 29. Delete key 30. Pin code key 34. Play/Stop key 41. Pulse-Tone switch 49. Base speaker 24. Clock key 35. Answer on/off -on switch 48. Message counter display 40. Desktop/Wall mount adapter...

English Owners Manual
Page 5
... base unit 4 Mounting the base unit on a wall ...........7 Step 3: Preparing the battery pack 9 Step 4: Setting the Caller ID options 11 Entering your area code 12 Basics Making a call 13 Receiving a call 15 Adjusting ringer and earpiece volume 16 Redialing a call 17 Using the speaker phone 18 Using your EXR 2480 intercom 19 Transferring a call 20 Memory Dialing Storing phone numbers and names 21 Making calls with memory dialing 23 Editing a stored name and/or phone number ...25 Erasing a stored name and phone number........27 3-Way Conference...
... base unit 4 Mounting the base unit on a wall ...........7 Step 3: Preparing the battery pack 9 Step 4: Setting the Caller ID options 11 Entering your area code 12 Basics Making a call 13 Receiving a call 15 Adjusting ringer and earpiece volume 16 Redialing a call 17 Using the speaker phone 18 Using your EXR 2480 intercom 19 Transferring a call 20 Memory Dialing Storing phone numbers and names 21 Making calls with memory dialing 23 Editing a stored name and/or phone number ...25 Erasing a stored name and phone number........27 3-Way Conference...

English Owners Manual
Page 6
... 12) Finally, set up the base unit. You must be set Caller ID options and store your Handset calling area requires 10 digit dialing. 2 GETTING STARTED Read this first This cordless telephone must charge the battery pack for use . Step 1 (page 3) Unpack and check the telephone and accessories. Note: Skip the setting of area code if your area code in memory for at least 17 hours before use with Caller ID service. Follow these...
... 12) Finally, set up the base unit. You must be set Caller ID options and store your Handset calling area requires 10 digit dialing. 2 GETTING STARTED Read this first This cordless telephone must charge the battery pack for use . Step 1 (page 3) Unpack and check the telephone and accessories. Note: Skip the setting of area code if your area code in memory for at least 17 hours before use with Caller ID service. Follow these...

English Owners Manual
Page 7
..., contact the Uniden Parts Department (see below). • Base unit • Handset • AC adapter (AD-9500) • Rechargeable battery pack (BT-2499) • Telephone line cord (2) • Wall mount adapter • Beltclip • • This Owner's Manual • Quick Reference Guide • Precautions and Important Safety Instructions • Registration Card Wall mounting screws (2) Uniden Parts Department (800) 554-3988 Hours: M-F 8:30 AM to 5:00 PM CST. Checking the package contents Make sure you have...
..., contact the Uniden Parts Department (see below). • Base unit • Handset • AC adapter (AD-9500) • Rechargeable battery pack (BT-2499) • Telephone line cord (2) • Wall mount adapter • Beltclip • • This Owner's Manual • Quick Reference Guide • Precautions and Important Safety Instructions • Registration Card Wall mounting screws (2) Uniden Parts Department (800) 554-3988 Hours: M-F 8:30 AM to 5:00 PM CST. Checking the package contents Make sure you have...

English Owners Manual
Page 13
You can place the handset either side up for at least 17 hours. Use only Uniden Battery BT-2499 supplied with the label down. 3 Slide the battery cover forward until it snaps into place. Label face 2 Install the battery pack with your phone. 1 Remove the battery cover. Make sure that the "status" LED of the base unit lights, and charging begins. Charge the battery for charging the battery. 9 Preparing the battery pack Charge the battery pack for more than 17 hours before you start using your phone. status LED 4 Place the handset on the base.
You can place the handset either side up for at least 17 hours. Use only Uniden Battery BT-2499 supplied with the label down. 3 Slide the battery cover forward until it snaps into place. Label face 2 Install the battery pack with your phone. 1 Remove the battery cover. Make sure that the "status" LED of the base unit lights, and charging begins. Charge the battery for charging the battery. 9 Preparing the battery pack Charge the battery pack for more than 17 hours before you start using your phone. status LED 4 Place the handset on the base.

English Owners Manual
Page 16
... not appear in Caller ID messages. To change it, use the delete and keypad to the standby mode. When reviewing Caller ID messages, you will see a full 10-digit number. 1 When the phone is entered. 6 Press setup/pause to enter the 3-digit area code. 5 Press select . Or return the handset to the base unit to complete the setting mode and set the handset to enter the new area code. For calls received from outside your...
... not appear in Caller ID messages. To change it, use the delete and keypad to the standby mode. When reviewing Caller ID messages, you will see a full 10-digit number. 1 When the phone is entered. 6 Press setup/pause to enter the 3-digit area code. 5 Press select . Or return the handset to the base unit to complete the setting mode and set the handset to enter the new area code. For calls received from outside your...
English Owners Manual
Page 17
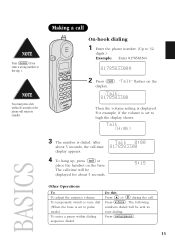
Talk 8178583300 Then the volume setting is set to pulse mode) To enter a pause within 20 seconds or the phone will be sent as tone dialing. Press * /tone . Making a call -time display appears. For example, if the volume is displayed. Talk 0:00 8178583300 4 To hang up, press talk or place the handset on the display. "Talk" flashes on the base. After about 5 seconds. 5:15 Other Operations To To adjust the earpiece...
Talk 8178583300 Then the volume setting is set to pulse mode) To enter a pause within 20 seconds or the phone will be sent as tone dialing. Press * /tone . Making a call -time display appears. For example, if the volume is displayed. Talk 0:00 8178583300 4 To hang up, press talk or place the handset on the display. "Talk" flashes on the base. After about 5 seconds. 5:15 Other Operations To To adjust the earpiece...

English Owners Manual
Page 18
Example: Enter 8178583300 Talk 0:17 8178583300 3 To hang up, press talk or place the handset in the base. Talk Then the volume setting is set to high the display shows: Talk 2 Dial the phone number. "Talk" flashes on the display. The call-time will be displayed for about 5 seconds. 10:03 14 For example, if the volume is displayed. Off-hook dialing 1 Press talk .
Example: Enter 8178583300 Talk 0:17 8178583300 3 To hang up, press talk or place the handset in the base. Talk Then the volume setting is set to high the display shows: Talk 2 Dial the phone number. "Talk" flashes on the display. The call-time will be displayed for about 5 seconds. 10:03 14 For example, if the volume is displayed. Off-hook dialing 1 Press talk .

English Owners Manual
Page 21
... dialed appears on the display, then the volume setting is displayed. 3 Then the selected number is dialed. Off-hook redialing 1 Press talk . 2 Press redial/0 . Redialing a call -time will be quickly redialed. "Talk" appears flashing on the display. 2 Press talk . The last number dialed will be displayed for about 5 seconds. The call The last phone number entered can be dialed. 3 To hang up , press talk or place the handset on the base...
... dialed appears on the display, then the volume setting is displayed. 3 Then the selected number is dialed. Off-hook redialing 1 Press talk . 2 Press redial/0 . Redialing a call -time will be quickly redialed. "Talk" appears flashing on the display. 2 Press talk . The last number dialed will be displayed for about 5 seconds. The call The last phone number entered can be dialed. 3 To hang up , press talk or place the handset on the base...
English Owners Manual
Page 26
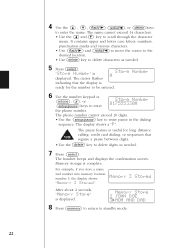
... cursor flashes indicating that the display is useful for the number to be entered. 6 Use the number keypad or * /tone , # , or setup/pause keys to enter Store Number 817555330 the phone number. Memory Store 2 JOHN DOE 3 MOM AND DAD 8 Press memory to return to enter pause in the dialing sequence. Memory 3 Stored After about 2 seconds, "Memory Store" is displayed. The phone number cannot exceed 20 digits. • Use the setup/pause key to standby mode. 22...
... cursor flashes indicating that the display is useful for the number to be entered. 6 Use the number keypad or * /tone , # , or setup/pause keys to enter Store Number 817555330 the phone number. Memory Store 2 JOHN DOE 3 MOM AND DAD 8 Press memory to return to enter pause in the dialing sequence. Memory 3 Stored After about 2 seconds, "Memory Store" is displayed. The phone number cannot exceed 20 digits. • Use the setup/pause key to standby mode. 22...

English Owners Manual
Page 34
CALLER ID FEATURES Caller ID service You must subscribe to the Caller ID service from your telephone company to view the caller's name and phone number on the display before you can dial the displayed number, and store the information for memory dialing. 30 When the telephone rings, the Caller ID feature allows you to use this feature. Additionally, you answer the phone. The handset displays the phone number of the incoming call, the name, time, and the number of calls.
CALLER ID FEATURES Caller ID service You must subscribe to the Caller ID service from your telephone company to view the caller's name and phone number on the display before you can dial the displayed number, and store the information for memory dialing. 30 When the telephone rings, the Caller ID feature allows you to use this feature. Additionally, you answer the phone. The handset displays the phone number of the incoming call, the name, time, and the number of calls.
English Owners Manual
Page 42
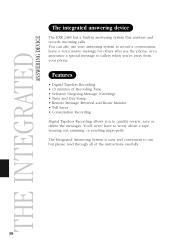
...-in answering system that answers and records incoming calls. The Integrated Answering System is easy and convenient to use the phone, or to announce a special message to callers when you to quickly review, save or delete the messages. You'll never have to record a conversation, leave a voice memo message for others who use , but please read through all of Recording Time • Selective Outgoing Message (Greeting) • Time and Day Stamp • Remote Message Retrieval and...
...-in answering system that answers and records incoming calls. The Integrated Answering System is easy and convenient to use the phone, or to announce a special message to callers when you to quickly review, save or delete the messages. You'll never have to record a conversation, leave a voice memo message for others who use , but please read through all of Recording Time • Selective Outgoing Message (Greeting) • Time and Day Stamp • Remote Message Retrieval and...
English Owners Manual
Page 43
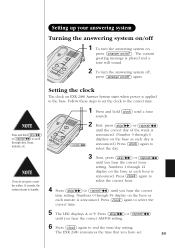
... to the correct time. Numbers 1 through 59 display on EXR 2480 Answer System starts when power is announced. Press skip/ or repeat/ until you do not press a next key within 15 seconds, the system returns to set . 39 Press clock again to the base. The current greeting message is played and a tone will sound. 2 To turn the answering system on, press answer on/off...
... to the correct time. Numbers 1 through 59 display on EXR 2480 Answer System starts when power is announced. Press skip/ or repeat/ until you do not press a next key within 15 seconds, the system returns to set . 39 Press clock again to the base. The current greeting message is played and a tone will sound. 2 To turn the answering system on, press answer on/off...
English Owners Manual
Page 47
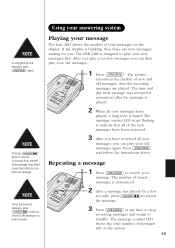
... message you have reviewed all new messages have played, a long tone is designed to standby. Using your answering system Playing your new messages you can then play your old messages. 1 Press play /stop again. The message counter LED stops flashing to repeat the message. 3 Press play your old messages again. The number of new and old messages, then the incoming messages are new messages waiting for a few seconds, press repeat/ to indicate that all of messages...
... message you have reviewed all new messages have played, a long tone is designed to standby. Using your answering system Playing your new messages you can then play your old messages. 1 Press play /stop again. The message counter LED stops flashing to repeat the message. 3 Press play your old messages again. The number of new and old messages, then the incoming messages are new messages waiting for a few seconds, press repeat/ to indicate that all of messages...

English Owners Manual
Page 48
... goes to delete a message, press delete anytime during the message. The number of messages on the base speaker. ª Deleting all messages Press and hold skip/ to find the message you want to the next message. 3 Press play /stop to review your message. 2 If you are cleared. A tone sounds when all messages at any time to stop to standby. Skipping a message 1 Press play . The message counter LED shows the total number of messages is...
... goes to delete a message, press delete anytime during the message. The number of messages on the base speaker. ª Deleting all messages Press and hold skip/ to find the message you want to the next message. 3 Press play /stop to review your message. 2 If you are cleared. A tone sounds when all messages at any time to stop to standby. Skipping a message 1 Press play . The message counter LED shows the total number of messages is...

English Owners Manual
Page 50
... will only playback messages for recorded messages, to play or delete messages, even to record a new greeting, and to monitor sounds in the room. 1 Call your telephone number. 2 While the answering machine is activated, press # and your PIN code. 3 The answering system announces the time and day stamp and the number of your messages have played, or the playback time exceeds 4 minutes, you may select a command from a remote location using any touch-tone telephone.
... will only playback messages for recorded messages, to play or delete messages, even to record a new greeting, and to monitor sounds in the room. 1 Call your telephone number. 2 While the answering machine is activated, press # and your PIN code. 3 The answering system announces the time and day stamp and the number of your messages have played, or the playback time exceeds 4 minutes, you may select a command from a remote location using any touch-tone telephone.

English Owners Manual
Page 54
... dampened with the telephone. Power Failure During the period that the power is recharged, please replace the battery. Caution Do not use paint thinner, benzene, alcohol, or other contact cleaner. 50 RECYCLING NICKELCADMIUM BATTERIES NICKELCADMIUM BATTERIES MUST BE DISPOSED OF PROPERLY. Caution • Use the specified battery pack. • Do not remove the battery from the handset to make or receive calls with diluted, neutral...
... dampened with the telephone. Power Failure During the period that the power is recharged, please replace the battery. Caution Do not use paint thinner, benzene, alcohol, or other contact cleaner. 50 RECYCLING NICKELCADMIUM BATTERIES NICKELCADMIUM BATTERIES MUST BE DISPOSED OF PROPERLY. Caution • Use the specified battery pack. • Do not remove the battery from the handset to make or receive calls with diluted, neutral...

English Owners Manual
Page 56
... be full. Cannot access remote call base unit. The outgoing message • Record your greeting again. The answering system does not work. • Make sure the base unit is plugged in. • Make sure that the answering system is turned on the unit speaker during call -in features from another touch-tone phone. • Make sure you 're using the correct PIN number. • Make sure that the message record time is deleted. The preset messages should remain. Delete some or all...
... be full. Cannot access remote call base unit. The outgoing message • Record your greeting again. The answering system does not work. • Make sure the base unit is plugged in. • Make sure that the answering system is turned on the unit speaker during call -in features from another touch-tone phone. • Make sure you 're using the correct PIN number. • Make sure that the message record time is deleted. The preset messages should remain. Delete some or all...
English Owners Manual
Page 58
... switch 15 Battery pack Preparing and charging ...9 Replacement and handling 50 C Caller ID Caller ID service 30 Call Waiting 37 Deleting 33 Using 35 Viewing 32 Connection 5 D Dialing mode 6 Digital security code 48 E, F, G Earpiece volume 16 H Handset ringer volume ........16 Headset installation 48 I, J, K, L Intercom 19 Installing the beltclip............49 M, N, O Maintenance 50 Making a call 13 Memory dialing Making calls with memory dialing......23 Erasing a stored name and phone number ........27 Storing phone numbers and names.......21 Mounting the base unit on a wall...
... switch 15 Battery pack Preparing and charging ...9 Replacement and handling 50 C Caller ID Caller ID service 30 Call Waiting 37 Deleting 33 Using 35 Viewing 32 Connection 5 D Dialing mode 6 Digital security code 48 E, F, G Earpiece volume 16 H Handset ringer volume ........16 Headset installation 48 I, J, K, L Intercom 19 Installing the beltclip............49 M, N, O Maintenance 50 Making a call 13 Memory dialing Making calls with memory dialing......23 Erasing a stored name and phone number ........27 Storing phone numbers and names.......21 Mounting the base unit on a wall...

