
English Owners Manual
Page 1
.../Tabletop Installation 3 • Wall Installation 4 • Installing the Handset Battery Pack 9 • Charging the Battery Pack 10 • Cleaning the Battery Contacts 11 • Page 11 • Setting the Pulse/Tone Switch 12 • Adjusting the Ringer Controls 12 • Changing the Handset Ringer 12 • Installing the Beltclip 13 • Headset Installation 14 • Automatic Digital Code Security 14 Using Your New Phone 15 • Making and Receiving Calls 15 • Flash and Call Waiting 15 • Adjusting Volume During a Call...
.../Tabletop Installation 3 • Wall Installation 4 • Installing the Handset Battery Pack 9 • Charging the Battery Pack 10 • Cleaning the Battery Contacts 11 • Page 11 • Setting the Pulse/Tone Switch 12 • Adjusting the Ringer Controls 12 • Changing the Handset Ringer 12 • Installing the Beltclip 13 • Headset Installation 14 • Automatic Digital Code Security 14 Using Your New Phone 15 • Making and Receiving Calls 15 • Flash and Call Waiting 15 • Adjusting Volume During a Call...

English Owners Manual
Page 2
This phone is a more secure conversation with Optional Battery Pack • Redial, Flash, and Pause • Pulse/Tone Dialing • Page • 7 Day Standby Battery Time • 4 Hour Talk Time • Handset Earpiece and Ringer Volume Control • Hearing Aid Compatible Digital Spread Spectrum Technology utilizes a "wider frequency band" vs. The result is designed for the handset and base. Random CodeTM digital security automatically selects one of over 65,000 codes for...
This phone is a more secure conversation with Optional Battery Pack • Redial, Flash, and Pause • Pulse/Tone Dialing • Page • 7 Day Standby Battery Time • 4 Hour Talk Time • Handset Earpiece and Ringer Volume Control • Hearing Aid Compatible Digital Spread Spectrum Technology utilizes a "wider frequency band" vs. The result is designed for the handset and base. Random CodeTM digital security automatically selects one of over 65,000 codes for...
English Owners Manual
Page 3
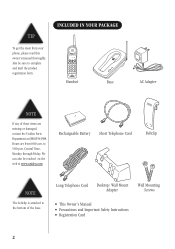
... Battery Short Telephone Cord Beltclip NOTE The beltclip is attached to the bottom of these items are from your phone, please read this owner’s manual thoroughly. Long Telephone Cord Desktop/ Wall Mount Adapter Wall Mounting Screws • This Owner’s Manual • Precautions and Important Safety Instructions • Registration Card 2 Hours are missing or damaged, contact the Uniden Parts Department at www.uniden.com. to complete and mail the product registration...
... Battery Short Telephone Cord Beltclip NOTE The beltclip is attached to the bottom of these items are from your phone, please read this owner’s manual thoroughly. Long Telephone Cord Desktop/ Wall Mount Adapter Wall Mounting Screws • This Owner’s Manual • Precautions and Important Safety Instructions • Registration Card 2 Hours are missing or damaged, contact the Uniden Parts Department at www.uniden.com. to complete and mail the product registration...
English Owners Manual
Page 4
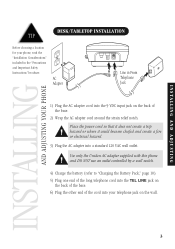
... VAC wall outlet. INSTALLING AND ADJUSTING YOUR PHONE INSTALLING AND ADJUSTING TIP Installing and Adjusting Your Phone DESK/TABLETOP INSTALLATION Before choosing a location for your telephone jack on the wall. 3 Use only the Uniden AC adapter supplied with this phone and DO NOT use an outlet controlled by a wall switch. 4) Charge the battery (refer to "Charging the Battery Pack," page 10). 5) Plug one end of the long telephone cord into the TEL LINE...
... VAC wall outlet. INSTALLING AND ADJUSTING YOUR PHONE INSTALLING AND ADJUSTING TIP Installing and Adjusting Your Phone DESK/TABLETOP INSTALLATION Before choosing a location for your telephone jack on the wall. 3 Use only the Uniden AC adapter supplied with this phone and DO NOT use an outlet controlled by a wall switch. 4) Charge the battery (refer to "Charging the Battery Pack," page 10). 5) Plug one end of the long telephone cord into the TEL LINE...
English Owners Manual
Page 5
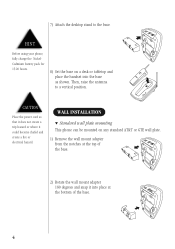
... Before using your phone, fully charge the NickelCadmium battery pack for 15-20 hours. 8) Set the base on any standard AT&T or GTE wall plate. 1) Remove the wall mount adapter from the notches at the bottom of the base. 4 CAUTION Place the power cord so that it does not create a trip hazard or where it into the base as shown. WALL INSTALLATION w Standard wall plate mounting This phone can be mounted...
... Before using your phone, fully charge the NickelCadmium battery pack for 15-20 hours. 8) Set the base on any standard AT&T or GTE wall plate. 1) Remove the wall mount adapter from the notches at the bottom of the base. 4 CAUTION Place the power cord so that it does not create a trip hazard or where it into the base as shown. WALL INSTALLATION w Standard wall plate mounting This phone can be mounted...

English Owners Manual
Page 6
... plug the other end of the telephone cord into the modular jack on the wall, charge the battery (refer to "Charging the Battery Pack," page 10). 5) Plug one end of the short telephone cord into the TEL LINE jack on the wall, then push in and down until the phone is firmly seated. 7) On the base unit, pull the handset retainer out of the slot and...
... plug the other end of the telephone cord into the modular jack on the wall, charge the battery (refer to "Charging the Battery Pack," page 10). 5) Plug one end of the short telephone cord into the TEL LINE jack on the wall, then push in and down until the phone is firmly seated. 7) On the base unit, pull the handset retainer out of the slot and...
English Owners Manual
Page 7
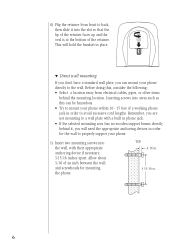
...handset in phone jack. • If the selected mounting area has no wooden support beams directly behind the mounting location. Allow about 3/16 of an inch between the wall and screwheads for the wall to properly support your phone. 1) Insert two mounting screws into areas such as this can mount your phone...mounting to mount your phone directly to avoid excessive cord lengths. 8) Flip the retainer from electrical cables, pipes, or other items behind it into the slot so that the lip of the retainer faces up and the oval is at the bottom of a working phone jack in order to the wall...
...handset in phone jack. • If the selected mounting area has no wooden support beams directly behind the mounting location. Allow about 3/16 of an inch between the wall and screwheads for the wall to properly support your phone. 1) Insert two mounting screws into areas such as this can mount your phone...mounting to mount your phone directly to avoid excessive cord lengths. 8) Flip the retainer from electrical cables, pipes, or other items behind it into the slot so that the lip of the retainer faces up and the oval is at the bottom of a working phone jack in order to the wall...
English Owners Manual
Page 9
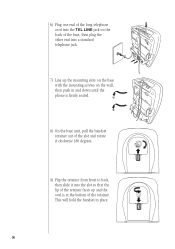
6) Plug one end of the long telephone cord into the TEL LINE jack on the back of the base, then plug the other end into the slot so that the lip of the retainer faces up and the oval is at the bottom of the slot and rotate it clockwise 180 degrees. 9) Flip the retainer from front to back, then slide it into a standard telephone jack. 7) Line up the mounting slots on the base with the mounting screws on the wall, then push in place. 8 This will hold the handset in and down until the phone is firmly seated. 8) On the base unit, pull the handset retainer out of the retainer.
6) Plug one end of the long telephone cord into the TEL LINE jack on the back of the base, then plug the other end into the slot so that the lip of the retainer faces up and the oval is at the bottom of the slot and rotate it clockwise 180 degrees. 9) Flip the retainer from front to back, then slide it into a standard telephone jack. 7) Line up the mounting slots on the base with the mounting screws on the wall, then push in place. 8 This will hold the handset in and down until the phone is firmly seated. 8) On the base unit, pull the handset retainer out of the retainer.
English Owners Manual
Page 10
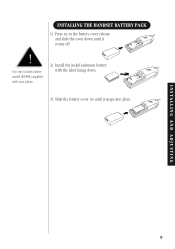
Use only Uniden battery model (BT-990) supplied with your phone. 2) Install the nickel-cadmium battery with the label facing down. 3) Slide the battery cover on the battery cover release and slide the cover down until it comes off. ! INSTALLING AND ADJUSTING 9 INSTALLING THE HANDSET BATTERY PACK 1) Press in on until it snaps into place.
Use only Uniden battery model (BT-990) supplied with your phone. 2) Install the nickel-cadmium battery with the label facing down. 3) Slide the battery cover on the battery cover release and slide the cover down until it comes off. ! INSTALLING AND ADJUSTING 9 INSTALLING THE HANDSET BATTERY PACK 1) Press in on until it snaps into place.
English Owners Manual
Page 11
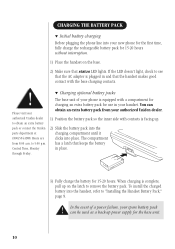
... extra battery pack or contact the Uniden parts department at (800)554-3988. w Charging optional battery packs Please visit your handset. To install the charged battery into the handset, refer to 5:00 p.m. You can be used as a back-up on the base. 2) Make sure that the AC adapter is complete, pull up power supply for the base unit. 10 The base unit of a power failure, your spare battery pack can obtain an extra battery...
... extra battery pack or contact the Uniden parts department at (800)554-3988. w Charging optional battery packs Please visit your handset. To install the charged battery into the handset, refer to 5:00 p.m. You can be used as a back-up on the base. 2) Make sure that the AC adapter is complete, pull up power supply for the base unit. 10 The base unit of a power failure, your spare battery pack can obtain an extra battery...
English Owners Manual
Page 12
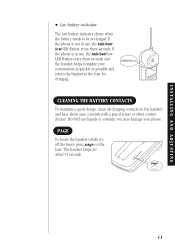
.... 11 If the phone is not in use, the talk/batt low LED flashes every three seconds and the handset beeps.Complete your phone. The handset beeps for charging. CLEANING THE BATTERY CONTACTS To maintain a good charge, clean all charging contacts on the base. INSTALLING AND ADJUSTING w Low battery indicator The low battery indicator shows when the battery needs to be re-charged If the phone is in use, the talk/batt...
.... 11 If the phone is not in use, the talk/batt low LED flashes every three seconds and the handset beeps.Complete your phone. The handset beeps for charging. CLEANING THE BATTERY CONTACTS To maintain a good charge, clean all charging contacts on the base. INSTALLING AND ADJUSTING w Low battery indicator The low battery indicator shows when the battery needs to be re-charged If the phone is in use, the talk/batt...
English Owners Manual
Page 13
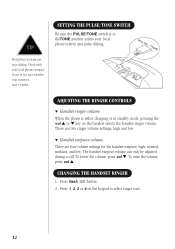
... and low. SETTING THE PULSE/TONE SWITCH Be sure the PULSE/TONE switch is tone or pulse. LED flashes. 2. To lower the volume, press vol w. Check with your local phone company if you're not sure whether your system is in standby mode, pressing the vol v or w key on the keypad to select ringer tone. 12 ADJUSTING THE RINGER CONTROLS w Handset ringer volume When the phone is either charging or in...
... and low. SETTING THE PULSE/TONE SWITCH Be sure the PULSE/TONE switch is tone or pulse. LED flashes. 2. To lower the volume, press vol w. Check with your local phone company if you're not sure whether your system is in standby mode, pressing the vol v or w key on the keypad to select ringer tone. 12 ADJUSTING THE RINGER CONTROLS w Handset ringer volume When the phone is either charging or in...
English Owners Manual
Page 15
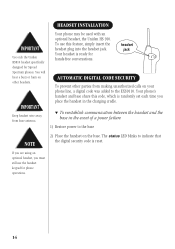
... charging cradle. IMPORTANT Keep headset wire away from making unauthorized calls on your phone line, a digital code was added to the EXS9110. headset jack AUTOMATIC DIGITAL CODE SECURITY To prevent other headsets. You will hear a buzz or hum on the base. If you are using an optional headset, you place the handset in the event of a power failure 1) Restore power to indicate that the digital security code is reset. Your phone may be used with an optional headset, the Uniden...
... charging cradle. IMPORTANT Keep headset wire away from making unauthorized calls on your phone line, a digital code was added to the EXS9110. headset jack AUTOMATIC DIGITAL CODE SECURITY To prevent other headsets. You will hear a buzz or hum on the base. If you are using an optional headset, you place the handset in the event of a power failure 1) Restore power to indicate that the digital security code is reset. Your phone may be used with an optional headset, the Uniden...
English Owners Manual
Page 16
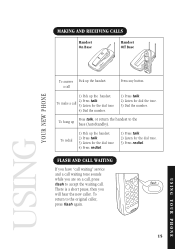
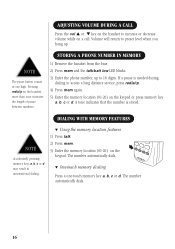
... hear the new caller. To hang up the handset. FLASH AND CALL WAITING If you have "call waiting" service and a call , press flash to the base (AutoStandby). To return to the original caller, press flash again. 15 USING YOUR PHONE Using Your New Phone MAKING AND RECEIVING CALLS Handset On Base Handset Off Base USING YOUR NEW PHONE To answer Pick up the handset. 2) Press talk. 3) Listen for the dial tone. 4) Press redial. 1) Press talk. 2) Listen for dial the tone. 3) Dial the number. a call Press any button. 1) Pick...
... hear the new caller. To hang up the handset. FLASH AND CALL WAITING If you have "call waiting" service and a call , press flash to the base (AutoStandby). To return to the original caller, press flash again. 15 USING YOUR PHONE Using Your New Phone MAKING AND RECEIVING CALLS Handset On Base Handset Off Base USING YOUR NEW PHONE To answer Pick up the handset. 2) Press talk. 3) Listen for the dial tone. 4) Press redial. 1) Press talk. 2) Listen for dial the tone. 3) Dial the number. a call Press any button. 1) Pick...
English Owners Manual
Page 17
... 16 digits. STORING A PHONE NUMBER IN MEMORY 1) Remove the handset from the base. 2) Press mem and the talk/batt low LED blinks. 3) Enter the phone number, up . w Using the memory location features 1) Press talk. 2) Press mem. 3) Enter the memory location (01-20) on the handset, more than once increases the length of pause between numbers. w One-touch memory dialing Press a one digit. If a pause is stored. A tone indicates that the number...
... 16 digits. STORING A PHONE NUMBER IN MEMORY 1) Remove the handset from the base. 2) Press mem and the talk/batt low LED blinks. 3) Enter the phone number, up . w Using the memory location features 1) Press talk. 2) Press mem. 3) Enter the memory location (01-20) on the handset, more than once increases the length of pause between numbers. w One-touch memory dialing Press a one digit. If a pause is stored. A tone indicates that the number...
English Owners Manual
Page 18
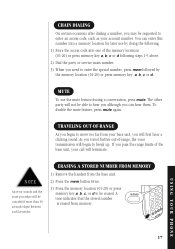
... erased. ERASING A STORED NUMBER FROM MEMORY 1) Remove the handset from memory. MUTE To use by the memory location (01-20) or press memory key a, b, c or d. To disable the mute feature, press mute again. TRAVELING OUT-OF-RANGE As you begin to hear you although you can enter this number into a memory location for later use the mute feature during a conversation, press mute. A tone indicates that the stored number is erased from the base unit. 2) Press the mem button...
... erased. ERASING A STORED NUMBER FROM MEMORY 1) Remove the handset from memory. MUTE To use by the memory location (01-20) or press memory key a, b, c or d. To disable the mute feature, press mute again. TRAVELING OUT-OF-RANGE As you begin to hear you although you can enter this number into a memory location for later use the mute feature during a conversation, press mute. A tone indicates that the stored number is erased from the base unit. 2) Press the mem button...
English Owners Manual
Page 19
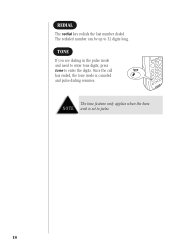
Once the call has ended, the tone mode is set to pulse. 18 The redialed number can be up to enter the digits. TONE If you are dialing in the pulse mode and need to enter tone digits, press tone to 32 digits long. The tone feature only applies when the base NOTE unit is canceled and pulse dialing resumes. REDIAL The redial key redials the last number dialed.
Once the call has ended, the tone mode is set to pulse. 18 The redialed number can be up to enter the digits. TONE If you are dialing in the pulse mode and need to enter tone digits, press tone to 32 digits long. The tone feature only applies when the base NOTE unit is canceled and pulse dialing resumes. REDIAL The redial key redials the last number dialed.
English Owners Manual
Page 20
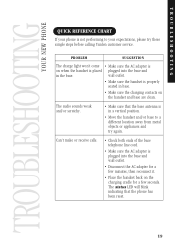
.... wall outlet. • Make sure the handset is properly seated in the base. TROUBLESHOOTING YOUR NEW PHONE TROUBLESHOOTING Troubleshooting QUICK REFERENCE CHART If your phone is not performing to a different location away from metal objects or appliances and try these simple steps before calling Uniden customer service. The audio sounds weak and/or scratchy. • Make sure that the phone has been reset. 19 PROBLEM SUGGESTION The charge light won...
.... wall outlet. • Make sure the handset is properly seated in the base. TROUBLESHOOTING YOUR NEW PHONE TROUBLESHOOTING Troubleshooting QUICK REFERENCE CHART If your phone is not performing to a different location away from metal objects or appliances and try these simple steps before calling Uniden customer service. The audio sounds weak and/or scratchy. • Make sure that the phone has been reset. 19 PROBLEM SUGGESTION The charge light won...
English Owners Manual
Page 21
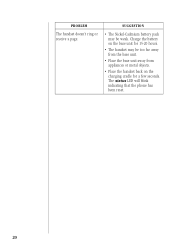
Charge the battery on the base unit for 15-20 hours. • The handset may be too far away from the base unit. • Place the base unit away from appliances or metal objects. • Place the handset back on the charging cradle for a few seconds. PROBLEM The handset doesn't ring or receive a page. SUGGESTION • The Nickel-Cadmium battery pack may be weak. The status LED will blink indicating that the phone has been reset. 20
Charge the battery on the base unit for 15-20 hours. • The handset may be too far away from the base unit. • Place the base unit away from appliances or metal objects. • Place the handset back on the charging cradle for a few seconds. PROBLEM The handset doesn't ring or receive a page. SUGGESTION • The Nickel-Cadmium battery pack may be weak. The status LED will blink indicating that the phone has been reset. 20
English Owners Manual
Page 22
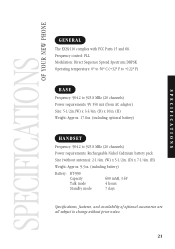
Frequency control: PLL Modulation: Direct Sequence Spread Spectrum; SPECIFICATIONS OF YOUR NEW PHONE SPECIFICATIONS Specifications GENERAL The EXS9110 complies with FCC Parts 15 and 68. DBPSK Operating temperature: 0º to 50º C (+32º F to +122º F) BASE Frequency: 904.2 to 925.8 MHz (20 channels) Power requirements: 9V 350 mA (from AC adapter) Size: 5-1/2in.(W) x 3-3/4in. (D) x 10in. (H) Weight: Approx. 17.8oz. (including optional battery) HANDSET Frequency: 904.2 to 925.8 MHz (20 channels) Power requirements...
Frequency control: PLL Modulation: Direct Sequence Spread Spectrum; SPECIFICATIONS OF YOUR NEW PHONE SPECIFICATIONS Specifications GENERAL The EXS9110 complies with FCC Parts 15 and 68. DBPSK Operating temperature: 0º to 50º C (+32º F to +122º F) BASE Frequency: 904.2 to 925.8 MHz (20 channels) Power requirements: 9V 350 mA (from AC adapter) Size: 5-1/2in.(W) x 3-3/4in. (D) x 10in. (H) Weight: Approx. 17.8oz. (including optional battery) HANDSET Frequency: 904.2 to 925.8 MHz (20 channels) Power requirements...

