English Owners Manual
Page 2
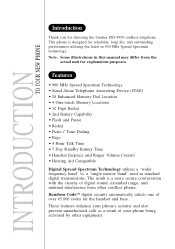
... Alone Telephone Answering Device (STAD) • 20 Enhanced Memory Dial Location • 4 One-touch Memory Locations • 32 Digit Redial • 2nd Battery Capability • Flash and Pause • Redial • Pulse / Tone Dialing • Page • 4 Hour Talk Time • 7 Day Standby Battery Time • Handset Earpiece and Ringer Volume Control • Hearing Aid Compatible Digital Spread Spectrum Technology utilizes a "wider frequency band" vs. INTRODUCTION TO YOUR NEW PHONE Introduction Thank...
... Alone Telephone Answering Device (STAD) • 20 Enhanced Memory Dial Location • 4 One-touch Memory Locations • 32 Digit Redial • 2nd Battery Capability • Flash and Pause • Redial • Pulse / Tone Dialing • Page • 4 Hour Talk Time • 7 Day Standby Battery Time • Handset Earpiece and Ringer Volume Control • Hearing Aid Compatible Digital Spread Spectrum Technology utilizes a "wider frequency band" vs. INTRODUCTION TO YOUR NEW PHONE Introduction Thank...

English Owners Manual
Page 4
.... Voice memo record key 40. Pulse-Tone switch 44. Tel line jack ANN/4/1 RING TIME REC TIME 2/4/TS 40 41 42 43 44 45 Volume up key 36. Clock key 33. Page key 34. DC power input 45. Talk key 8. Mute key 10. One-touch memory keys 17. Talk/Batt LED 7. Flash key 14. Spare battery compartment 26. Base charge contacts 30. Volume up key 13. Handset retainer clip 22. Play/Stop key 38. Base antenna 35. Delete key 27. Answer on /off key 31. 1. Handset battery compartment 4. Greeting key...
.... Voice memo record key 40. Pulse-Tone switch 44. Tel line jack ANN/4/1 RING TIME REC TIME 2/4/TS 40 41 42 43 44 45 Volume up key 36. Clock key 33. Page key 34. DC power input 45. Talk key 8. Mute key 10. One-touch memory keys 17. Talk/Batt LED 7. Flash key 14. Spare battery compartment 26. Base charge contacts 30. Volume up key 13. Handset retainer clip 22. Play/Stop key 38. Base antenna 35. Delete key 27. Answer on /off key 31. 1. Handset battery compartment 4. Greeting key...

English Owners Manual
Page 5
... the base unit 5 Mounting the base unit on a wall ...........8 Step 3: Installing the handset battery pack........10 Charging optional battery packs 11 Automatic digital code security 12 Basics Making a call 13 Receiving a call 14 Flash and Call Waiting 15 Adjusting the ringer and earpiece volume .........15 Redialing a call 16 Mute 16 Memory Dialing Storing phone numbers 17 Making calls with memory dialing 18 Erasing a stored phone number 19 3-way Conference Features Using page feature 20 3-way conferencing 21 The Integrated Answering Device Features 22 Setting up your answering...
... the base unit 5 Mounting the base unit on a wall ...........8 Step 3: Installing the handset battery pack........10 Charging optional battery packs 11 Automatic digital code security 12 Basics Making a call 13 Receiving a call 14 Flash and Call Waiting 15 Adjusting the ringer and earpiece volume .........15 Redialing a call 16 Mute 16 Memory Dialing Storing phone numbers 17 Making calls with memory dialing 18 Erasing a stored phone number 19 3-way Conference Features Using page feature 20 3-way conferencing 21 The Integrated Answering Device Features 22 Setting up your answering...

English Owners Manual
Page 6
... 1 (page 4) Unpack and check the telephone and accessories. backupobpaetntery Base unit Step 3 (page 10 to12) Then, insert the battery pack into the handset. This security code prevents other cordless handsets from making calls through your base unit. Follow these steps; Handset About the digital security code This cordless telephone uses a digital security code to prevent unauthorized access to set up the base unit. Step 2 (page 5 to 9) Next, choose the best location to your base unit. A random security code will be set up before using the phone.
... 1 (page 4) Unpack and check the telephone and accessories. backupobpaetntery Base unit Step 3 (page 10 to12) Then, insert the battery pack into the handset. This security code prevents other cordless handsets from making calls through your base unit. Follow these steps; Handset About the digital security code This cordless telephone uses a digital security code to prevent unauthorized access to set up the base unit. Step 2 (page 5 to 9) Next, choose the best location to your base unit. A random security code will be set up before using the phone.
English Owners Manual
Page 7
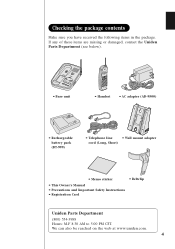
... web at www.uniden.com. 4 Checking the package contents Make sure you have received the following items in the package. backupobpaetntery • Base unit • Handset • AC adapter (AD-9500) • Rechargeable battery pack (BT-999) • Telephone line • Wall mount adapter cord (Long, Short) • Memo sticker • Beltclip • This Owner's Manual • Precautions and Important Safety Instructions • Registration Card Uniden Parts Department (800) 554...
... web at www.uniden.com. 4 Checking the package contents Make sure you have received the following items in the package. backupobpaetntery • Base unit • Handset • AC adapter (AD-9500) • Rechargeable battery pack (BT-999) • Telephone line • Wall mount adapter cord (Long, Short) • Memo sticker • Beltclip • This Owner's Manual • Precautions and Important Safety Instructions • Registration Card Uniden Parts Department (800) 554...
English Owners Manual
Page 8
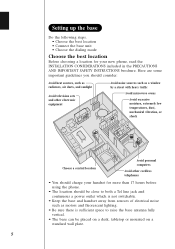
Setting up the base Do the following steps. • Choose the best location • Connect the base unit • Choose the dialing mode Choose the best location Before choosing a location for your handset for more than 17 hours before using the phone. • The location should charge your new phone, read the INSTALLATION CONSIDERATIONS included in the PRECAUTIONS AND IMPORTANT SAFETY INSTRUCTIONS brochure. Here are some...
Setting up the base Do the following steps. • Choose the best location • Connect the base unit • Choose the dialing mode Choose the best location Before choosing a location for your handset for more than 17 hours before using the phone. • The location should charge your new phone, read the INSTALLATION CONSIDERATIONS included in the PRECAUTIONS AND IMPORTANT SAFETY INSTRUCTIONS brochure. Here are some...

English Owners Manual
Page 14
... return the handset to "Installing the handset battery pack", page 10. To avoid this memory effect, on the handset and base unit about once a month. Put the battery pack in order to save power. Central Time, Monday through Friday. backuoppebnattery 2. Battery use time (per charge) From fully charged • Four hours coutinuous use the phone until the talk/batt LED blinks. to obtain an extra battery pack or contact the Uniden parts department...
... return the handset to "Installing the handset battery pack", page 10. To avoid this memory effect, on the handset and base unit about once a month. Put the battery pack in order to save power. Central Time, Monday through Friday. backuoppebnattery 2. Battery use time (per charge) From fully charged • Four hours coutinuous use the phone until the talk/batt LED blinks. to obtain an extra battery pack or contact the Uniden parts department...

English Owners Manual
Page 16
... lights. 2 Dial the phone number. 3 To hang up to the base. Press * tone . Other Operations To To adjust the ear speaker volume To temporarily switch to tone dial (When the base is set to pulse mode) To enter a pause within dialing sequence Do this Press • or ª during the call 1 Press talk . The following numbers dialed will be up , press talk or return the handset to 32 digits. BASICS 13 Making a call...
... lights. 2 Dial the phone number. 3 To hang up to the base. Press * tone . Other Operations To To adjust the ear speaker volume To temporarily switch to tone dial (When the base is set to pulse mode) To enter a pause within dialing sequence Do this Press • or ª during the call 1 Press talk . The following numbers dialed will be up , press talk or return the handset to 32 digits. BASICS 13 Making a call...

English Owners Manual
Page 18
... earpiece volume of 1 - 4 . This setting will remain in Normal mode, error sound beeps. To turn off the ringer, set the ringer on/off switch to off on a call, press flash to the original caller, press flash again. When you press • in Hac mode or press ª in effect after the telephone call has ended. Flash and Call Waiting If you have "Call Waiting" service and a call waiting tone sounds while you will hear the new caller. RINGER...
... earpiece volume of 1 - 4 . This setting will remain in Normal mode, error sound beeps. To turn off the ringer, set the ringer on/off switch to off on a call, press flash to the original caller, press flash again. When you press • in Hac mode or press ª in effect after the telephone call has ended. Flash and Call Waiting If you have "Call Waiting" service and a call waiting tone sounds while you will hear the new caller. RINGER...
English Owners Manual
Page 20
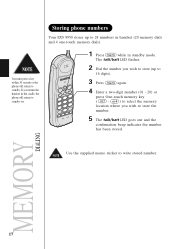
... to standby. Storing phone numbers Your EXS 9950 stores up to store the number. 5 The talk/batt LED goes out and the confirmation beep indicates the number has been stored. If you wish to 16 digits). 3 Press mem again. 4 Enter a two-digit number (01 - 20) or press One-touch memory key ( m1 - The talk/batt LED flashes. 2 Dial the number you wish to store...
... to standby. Storing phone numbers Your EXS 9950 stores up to store the number. 5 The talk/batt LED goes out and the confirmation beep indicates the number has been stored. If you wish to 16 digits). 3 Press mem again. 4 Enter a two-digit number (01 - 20) or press One-touch memory key ( m1 - The talk/batt LED flashes. 2 Dial the number you wish to store...

English Owners Manual
Page 21
The talk/batt LED lights. 2 Press mem . 3 Enter a two digit number (01 - 20) to select the memory location you wish to dial. 2 To hang up , press talk or return the handset to the basel. 18 m4 ) you wish to dial. 4 To hang up , press talk or return the handset to the base. Making calls with memory dialing Memory dialing 1 Press talk . One-touch memory dialing 1 Press one of the One-touch memory keys ( m1 -
The talk/batt LED lights. 2 Press mem . 3 Enter a two digit number (01 - 20) to select the memory location you wish to dial. 2 To hang up , press talk or return the handset to the basel. 18 m4 ) you wish to dial. 4 To hang up , press talk or return the handset to the base. Making calls with memory dialing Memory dialing 1 Press talk . One-touch memory dialing 1 Press one of the One-touch memory keys ( m1 -

English Owners Manual
Page 24
... the 3-way conversation. 2 To hang up, press speaker on the handset. 21 3-way conferencing The Uniden EXS 9950 permits 3-way conversations between the handset, base and outside line. If you pick up , press talk on the base. backupobpaetntery Dialing is possible only from the base while speaking on the base, the call . When speaking on the handset 1 Press speaker on the base to the...
... the 3-way conversation. 2 To hang up, press speaker on the handset. 21 3-way conferencing The Uniden EXS 9950 permits 3-way conversations between the handset, base and outside line. If you pick up , press talk on the base. backupobpaetntery Dialing is possible only from the base while speaking on the base, the call . When speaking on the handset 1 Press speaker on the base to the...

English Owners Manual
Page 25
... convenient to use the phone, or to announce a special message to callers when you to quickly review, save or delete the messages. Features • Digital Tapeless Recording • 15 minutes of the instructions carefully. 22 You'll never have to record a conversation, leave a voice memo message for others who use , but please read through all of Recording Time • Selective Greetings (Outgoing Messages) • Time and Day Stamp • Remote Message Retrieval and...
... convenient to use the phone, or to announce a special message to callers when you to quickly review, save or delete the messages. Features • Digital Tapeless Recording • 15 minutes of the instructions carefully. 22 You'll never have to record a conversation, leave a voice memo message for others who use , but please read through all of Recording Time • Selective Greetings (Outgoing Messages) • Time and Day Stamp • Remote Message Retrieval and...
English Owners Manual
Page 28
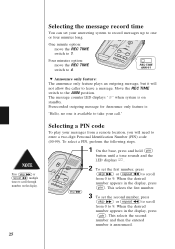
... Identification Number (PIN) code (00-99). Four minutes option: move the REC TIME backupobpaetntery switch to leave a message. Selecting a PIN code To play your call." skip/ 3 To set the first number, press backupobpaetntery skip or repeat to scroll from a remote location, you will not allow the caller to 1. The message counter LED displays " " when system is on the display. 25 Selecting the message record time You can set your answering...
... Identification Number (PIN) code (00-99). Four minutes option: move the REC TIME backupobpaetntery switch to leave a message. Selecting a PIN code To play your call." skip/ 3 To set the first number, press backupobpaetntery skip or repeat to scroll from a remote location, you will not allow the caller to 1. The message counter LED displays " " when system is on the display. 25 Selecting the message record time You can set your answering...

English Owners Manual
Page 29
... billing charges. 26 Wait until your greeting is complete before the answering system plays your conversation. If you answer at the handset or base. In the TS (Toll Saver) position, the answering system picks up the call long distance to check your messages, you can set the number of backupobpaetntery rings the caller hears before starting your outgoing message. Once the greeting has started, you can stop the message. Setting ring time...
... billing charges. 26 Wait until your greeting is complete before the answering system plays your conversation. If you answer at the handset or base. In the TS (Toll Saver) position, the answering system picks up the call long distance to check your messages, you can set the number of backupobpaetntery rings the caller hears before starting your outgoing message. Once the greeting has started, you can stop the message. Setting ring time...

English Owners Manual
Page 34
... to exit the system. Use this time from the chart above. 6 When you will only playback messages for recorded messages, to play or delete messages, even to record a new outgoing message, and to monitor sounds in the room. 1 Call your telephone number. 2 During the answering machine is in memory. You must enter a command within 15 seconds Remote access away from home You can operate your answering system from a remote location using any touch-tone telephone.
... to exit the system. Use this time from the chart above. 6 When you will only playback messages for recorded messages, to play or delete messages, even to record a new outgoing message, and to monitor sounds in the room. 1 Call your telephone number. 2 During the answering machine is in memory. You must enter a command within 15 seconds Remote access away from home You can operate your answering system from a remote location using any touch-tone telephone.

English Owners Manual
Page 37
Power Failure During the period that recycles nickelcadmium batteries. Caution • Use the specified battery pack. • Do not remove the battery from the handset to make or receive calls with the telephone. When the charging terminals become dirty Wipe with a soft, dry cloth. Doing so may discolor the surface of purchase for a replacement battery. With normal usage, your place of the telephone and damage...
Power Failure During the period that recycles nickelcadmium batteries. Caution • Use the specified battery pack. • Do not remove the battery from the handset to make or receive calls with the telephone. When the charging terminals become dirty Wipe with a soft, dry cloth. Doing so may discolor the surface of purchase for a replacement battery. With normal usage, your place of the telephone and damage...

English Owners Manual
Page 38
...; Check both ends of the base unit telephone line cord. • Make sure the AC adapter is plugged into the base unit and wall outlet. • Disconnect the AC adapter for more than 17 hours. • The handset may be too far away from the base unit. • Place the base unit away from metal objects or appliances and try these simple steps first. Charge the battery on the base unit...
...; Check both ends of the base unit telephone line cord. • Make sure the AC adapter is plugged into the base unit and wall outlet. • Disconnect the AC adapter for more than 17 hours. • The handset may be too far away from the base unit. • Place the base unit away from metal objects or appliances and try these simple steps first. Charge the battery on the base unit...

English Owners Manual
Page 39
Cannot access remote call base unit. monitoring or message playback. If it cannnot, you may have to use another touch-tone phone. • Make sure you 're using the correct PIN number. • Make sure that the answering system is deleted. • Record your message. 36 Remind callers to access your greeting again. Delete some or all of the saved messages. After a power failure, the outgoing message is turned on the unit speaker during call -in . • Make sure that the...
Cannot access remote call base unit. monitoring or message playback. If it cannnot, you may have to use another touch-tone phone. • Make sure you 're using the correct PIN number. • Make sure that the answering system is deleted. • Record your message. 36 Remind callers to access your greeting again. Delete some or all of the saved messages. After a power failure, the outgoing message is turned on the unit speaker during call -in . • Make sure that the...
English Owners Manual
Page 41
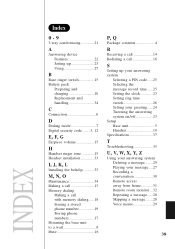
... phone numbers 17 Mounting the base unit to a wall 8 Mute 16 P, Q Package contents 4 R Receiving a call 14 Redialing a call 16 S Setting up your answering system Selecting a PIN code......25 Selecting the message record time ......25 Setting the clock 23 Setting ring time switch 26 Setting your greeting......24 Tuerning the answering system on/off 23 Setup Base unit 5 Handset 10 Specifications 37 T Troubleshooting 35 U, V, W, X, Y, Z Using your answering system Deleting a message ........29 Playing your message ....27 Recording a conversation 30 Remote access away from home...
... phone numbers 17 Mounting the base unit to a wall 8 Mute 16 P, Q Package contents 4 R Receiving a call 14 Redialing a call 16 S Setting up your answering system Selecting a PIN code......25 Selecting the message record time ......25 Setting the clock 23 Setting ring time switch 26 Setting your greeting......24 Tuerning the answering system on/off 23 Setup Base unit 5 Handset 10 Specifications 37 T Troubleshooting 35 U, V, W, X, Y, Z Using your answering system Deleting a message ........29 Playing your message ....27 Recording a conversation 30 Remote access away from home...

