

English Owners Manual
Page 1
If you have any questions about the information in this document, please call our Customer Service Department at 1-800-648-4921 or visit us on the web at http://bcs.uniden.com. UIP200 User's Manual Revision 1.0 © Uniden America Corp., May, 2004 This manual contains instructions for installing and operating your UIP200 SIP IP phone. It provides a description of the telephone's hardware, features, LCD displays, and explains setup, configuration, and basic operation.
If you have any questions about the information in this document, please call our Customer Service Department at 1-800-648-4921 or visit us on the web at http://bcs.uniden.com. UIP200 User's Manual Revision 1.0 © Uniden America Corp., May, 2004 This manual contains instructions for installing and operating your UIP200 SIP IP phone. It provides a description of the telephone's hardware, features, LCD displays, and explains setup, configuration, and basic operation.
English Owners Manual
Page 2
...-003 6 Hearing-Aid Compatibility 6 Recording Conversations 6 What's New?...6 Important Safety Considerations 7 Important Electrical Considerations 8 The FCC Wants You to Know 8 AC Adapter ...9 Power over Ethernet (PoE 9 Product Description 10 Features ...10 VoIP Specific Features 10 Operational Features...11 Control and Functions...11 Function Keys ...12 LED Status ...12 Specifications...12 Physical Interface ...13 Power Supply ...13 Speaker ...13 Installation and Basic Setup Instructions 14 Wall-Mounting the Telephone 14 Connecting the Telephone 15 Basic Telephone Operations 16...
...-003 6 Hearing-Aid Compatibility 6 Recording Conversations 6 What's New?...6 Important Safety Considerations 7 Important Electrical Considerations 8 The FCC Wants You to Know 8 AC Adapter ...9 Power over Ethernet (PoE 9 Product Description 10 Features ...10 VoIP Specific Features 10 Operational Features...11 Control and Functions...11 Function Keys ...12 LED Status ...12 Specifications...12 Physical Interface ...13 Power Supply ...13 Speaker ...13 Installation and Basic Setup Instructions 14 Wall-Mounting the Telephone 14 Connecting the Telephone 15 Basic Telephone Operations 16...
English Owners Manual
Page 3
...16 Using the Speakerphone or a Headset (Hands-free 16 Using On-Hook Dialing 17 Receiving Calls ...17 Adjusting the Volume ...17 Changing the Handset Volume 17 Changing the Headset Volume 18 Changing the Speakerphone Volume 18 Changing the Ringer Volume 18 Transferring a Call ...19 Call Waiting Operation ...19 Hold 19 Feature Operations 20 Programmable and Fixed Function Keys 20 1-Touch Dialing ...20 2 -Touch Dialing ...21 DND ...21 Voice Message Access 21 Mute...22 Dial (fixed key) ...22 Emergency Proxy...22 Configuring the Telephone 23 Navigating the Menus ...23 Speed Dial Sub-Menu...
...16 Using the Speakerphone or a Headset (Hands-free 16 Using On-Hook Dialing 17 Receiving Calls ...17 Adjusting the Volume ...17 Changing the Handset Volume 17 Changing the Headset Volume 18 Changing the Speakerphone Volume 18 Changing the Ringer Volume 18 Transferring a Call ...19 Call Waiting Operation ...19 Hold 19 Feature Operations 20 Programmable and Fixed Function Keys 20 1-Touch Dialing ...20 2 -Touch Dialing ...21 DND ...21 Voice Message Access 21 Mute...22 Dial (fixed key) ...22 Emergency Proxy...22 Configuring the Telephone 23 Navigating the Menus ...23 Speed Dial Sub-Menu...
English Owners Manual
Page 6
... attempt to monitoring or recording any telephone conversation. Attempting repairs will damage the equipment and void your legal counsel prior to make such connections themselves, but should contact the appropriate electric inspection authority, or electrician, as appropriate. Rev. 1.0, © UAC, May, 2004 UIP200 User's Manual Page 6 of 27 Regulatory Information FCC Part 15 This product complies with the limits for this...
... attempt to monitoring or recording any telephone conversation. Attempting repairs will damage the equipment and void your legal counsel prior to make such connections themselves, but should contact the appropriate electric inspection authority, or electrician, as appropriate. Rev. 1.0, © UAC, May, 2004 UIP200 User's Manual Page 6 of 27 Regulatory Information FCC Part 15 This product complies with the limits for this...
English Owners Manual
Page 7
... register. Contact qualified service personnel when some service or repair work is provided. # This product should be operated only from the wall outlet and network connection before cleaning. This product should never be damaged by people walking on it. # Do not overload wall outlets and extension cords, as they may expose you are not sure of the type of power supply to your home...
... register. Contact qualified service personnel when some service or repair work is provided. # This product should be operated only from the wall outlet and network connection before cleaning. This product should never be damaged by people walking on it. # Do not overload wall outlets and extension cords, as they may expose you are not sure of the type of power supply to your home...

English Owners Manual
Page 10
... Manual Page 10 of 27 Product Description Features # 11 LED indicators (8 programmable keys, Headset/speaker, Hold, and Receive Signaling Lamp) # 12-key dial pad # 16 specific keys (Eight programmable keys, Menu, Cancel, Dial, Transfer, Headset/speaker, Hold, Volume Up/Down) # Volume control for speaker, handset, headset and ringer # 4 One-Touch speed dial numbers # 10 Two-touch speed dial numbers # Automatic Ringdown (Hotline feature) # Call Waiting # Call Transfer (Blind and Consultation) # Do Not Disturb (DND) # DTMF generation # Hold, Mute, Redial # Hands free talking via headset # 2-line...
... Manual Page 10 of 27 Product Description Features # 11 LED indicators (8 programmable keys, Headset/speaker, Hold, and Receive Signaling Lamp) # 12-key dial pad # 16 specific keys (Eight programmable keys, Menu, Cancel, Dial, Transfer, Headset/speaker, Hold, Volume Up/Down) # Volume control for speaker, handset, headset and ringer # 4 One-Touch speed dial numbers # 10 Two-touch speed dial numbers # Automatic Ringdown (Hotline feature) # Call Waiting # Call Transfer (Blind and Consultation) # Do Not Disturb (DND) # DTMF generation # Hold, Mute, Redial # Hands free talking via headset # 2-line...

English Owners Manual
Page 11
... make phone operations easier and to avoid user confusion, many required functions are 8 fixed function keys in the UIP200. Transfers the call In the setup menu Operation Turns speakerphone/headset on and off Places the remote party on the line Call waiting tone sounds Standby Entering numbers Standby Within a sub-menu Manual configuration When a phone number has dialed but not connected When entering character strings or digits Setup menus UP ▲ and DOWN ▼ On a call to the previous menu. Operational Features # Terminal configuration # Firmware update...
... make phone operations easier and to avoid user confusion, many required functions are 8 fixed function keys in the UIP200. Transfers the call In the setup menu Operation Turns speakerphone/headset on and off Places the remote party on the line Call waiting tone sounds Standby Entering numbers Standby Within a sub-menu Manual configuration When a phone number has dialed but not connected When entering character strings or digits Setup menus UP ▲ and DOWN ▼ On a call to the previous menu. Operational Features # Terminal configuration # Firmware update...
English Owners Manual
Page 12
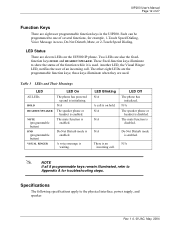
... speaker. Specifications The following specifications apply to Appendix A for example, 1-Touch Speed Dialing, Voice Message Access, Do Not Disturb, Mute, or 2-Touch Speed Dialing. these keys illuminate when they are the programmable function keys; The mute function is waiting. There is used . UIP200 User's Manual Page 12 of 27 Function Keys There are also the fixedfunction keys HOLD and HEADSET/SPEAKER. Another LED, the Visual Ringer LED, notifies the user of the function while it is an N/A incoming call . A voice message is enabled...
... speaker. Specifications The following specifications apply to Appendix A for example, 1-Touch Speed Dialing, Voice Message Access, Do Not Disturb, Mute, or 2-Touch Speed Dialing. these keys illuminate when they are the programmable function keys; The mute function is waiting. There is used . UIP200 User's Manual Page 12 of 27 Function Keys There are also the fixedfunction keys HOLD and HEADSET/SPEAKER. Another LED, the Visual Ringer LED, notifies the user of the function while it is an N/A incoming call . A voice message is enabled...
English Owners Manual
Page 16
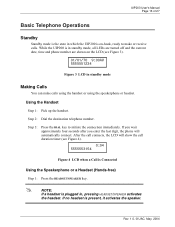
... standby mode Making Calls You can make or receive calls. Step 3: Press the DIAL key to make calls using the handset or using the speakerphone or headset. Rev. 1.0, © UAC, May, 2004 UIP200 User's Manual Page 16 of 27 Basic Telephone Operations Standby Standby mode is the state in which the UIP200 is on the LCD (see Figure 4). 0:04 5555553154 Figure 4 LCD when a Call is Connected Using the Speakerphone or a Headset (Hands-free) Step 1: Press the HEADSET/SPEAKER key. ! After the call connects...
... standby mode Making Calls You can make or receive calls. Step 3: Press the DIAL key to make calls using the handset or using the speakerphone or headset. Rev. 1.0, © UAC, May, 2004 UIP200 User's Manual Page 16 of 27 Basic Telephone Operations Standby Standby mode is the state in which the UIP200 is on the LCD (see Figure 4). 0:04 5555553154 Figure 4 LCD when a Call is Connected Using the Speakerphone or a Headset (Hands-free) Step 1: Press the HEADSET/SPEAKER key. ! After the call connects...
English Owners Manual
Page 17
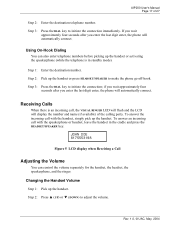
UIP200 User's Manual Page 17 of the calling party. If you wait approximately four seconds after you enter the last digit enter, the phone will automatically connect. Using On-Hook Dialing You can control the volume separately for the handset, the headset, the speakerphone, and the ringer. Receiving Calls When there is in the cradle and press the HEADSET/SPEAKER key. To answer the incoming call , the VISUAL RINGER LED will flash and the LCD will display the...
UIP200 User's Manual Page 17 of the calling party. If you wait approximately four seconds after you enter the last digit enter, the phone will automatically connect. Using On-Hook Dialing You can control the volume separately for the handset, the headset, the speakerphone, and the ringer. Receiving Calls When there is in the cradle and press the HEADSET/SPEAKER key. To answer the incoming call , the VISUAL RINGER LED will flash and the LCD will display the...

English Owners Manual
Page 18
UIP200 User's Manual Page 18 of 27 Step 3: When you reach the volume level you want, wait for 2.5 seconds. Step 2: Press the HEADSET/SPEAKER key. Step 5: The new volume setting is saved Changing the Speakerphone Volume Step 1: If a headset is saved. Step 3: Press ▲ (UP) or ▼ (DOWN) to adjust the volume. Step 4: When you reach the volume level you want, wait for 2.5 seconds. Step 5: The new volume setting is plugged into the phone, unplug...
UIP200 User's Manual Page 18 of 27 Step 3: When you reach the volume level you want, wait for 2.5 seconds. Step 2: Press the HEADSET/SPEAKER key. Step 5: The new volume setting is saved Changing the Speakerphone Volume Step 1: If a headset is saved. Step 3: Press ▲ (UP) or ▼ (DOWN) to adjust the volume. Step 4: When you reach the volume level you want, wait for 2.5 seconds. Step 5: The new volume setting is plugged into the phone, unplug...

English Owners Manual
Page 19
... XFR/FLASH key. NOTE: If you disconnect one outside of transferring a call to speak with the new caller. The HOLD key will blink continuously, and the LCD will display the duration timer and phone number of the party on the line. Step 2: Dial the number you to any number, even one party, you will hear a fast ring, indicating there is enabled, you will hear a call waiting tone when another call . Call Waiting Operation Step 1: If the call-waiting feature is another call...
... XFR/FLASH key. NOTE: If you disconnect one outside of transferring a call to speak with the new caller. The HOLD key will blink continuously, and the LCD will display the duration timer and phone number of the party on the line. Step 2: Dial the number you to any number, even one party, you will hear a fast ring, indicating there is enabled, you will hear a call waiting tone when another call . Call Waiting Operation Step 1: If the call-waiting feature is another call...
English Owners Manual
Page 20
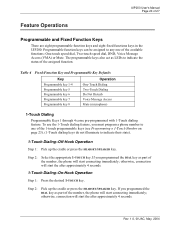
... part of the number, the phone will start the after approximately 4 seconds. If you must program a phone number to one of 27 Feature Operations Programmable and Fixed Function Keys There are eight programmable function keys and eight fixed functions keys in the UIP200. Step 2: Pick up the cradle or press the HEADSET/SPEAKER key. UIP200 User's Manual Page 20 of the available functions: One-touch speed dial, Two-touch speed dial, DND, Voice Message Access (VMA) or Mute...
... part of the number, the phone will start the after approximately 4 seconds. If you must program a phone number to one of 27 Feature Operations Programmable and Fixed Function Keys There are eight programmable function keys and eight fixed functions keys in the UIP200. Step 2: Pick up the cradle or press the HEADSET/SPEAKER key. UIP200 User's Manual Page 20 of the available functions: One-touch speed dial, Two-touch speed dial, DND, Voice Message Access (VMA) or Mute...
English Owners Manual
Page 21
... the HEADSET/SPEAKER key. otherwise, connection will start the after approximately 4 seconds. 2-Touch Dialing-On-Hook Operation Step 1: Press the 2-TOUCH key. When DND is activated, the DND LED remains on an incoming call, nor will not ring on . UIP200 User's Manual Page 21 of 27 2 -Touch Dialing Users can make calls by pressing a key that has been previously programmed for 2-touch dialing. To use the 2-touch dialing feature, you to indicate their state). 2-Touch Dialing-Off-Hook Operation Step...
... the HEADSET/SPEAKER key. otherwise, connection will start the after approximately 4 seconds. 2-Touch Dialing-On-Hook Operation Step 1: Press the 2-TOUCH key. When DND is activated, the DND LED remains on an incoming call, nor will not ring on . UIP200 User's Manual Page 21 of 27 2 -Touch Dialing Users can make calls by pressing a key that has been previously programmed for 2-touch dialing. To use the 2-touch dialing feature, you to indicate their state). 2-Touch Dialing-Off-Hook Operation Step...
English Owners Manual
Page 22
... VISUAL RINGER LED illuminates to notify you can press MUTE to disable the microphone on . Emergency Proxy The UIP200 provides an Emergency Proxy feature that a new message is waiting. To access your voice mail, follow the steps below: Step 1: Pick up the cradle or press the HEADSET/SPEAKER key. UIP200 User's Manual Page 22 of the number, the phone will start connecting immediately; Step 2: Select the appropriate 1-TOUCH key. Dial (fixed key) The DIAL key sends dialed digits without...
... VISUAL RINGER LED illuminates to notify you can press MUTE to disable the microphone on . Emergency Proxy The UIP200 provides an Emergency Proxy feature that a new message is waiting. To access your voice mail, follow the steps below: Step 1: Pick up the cradle or press the HEADSET/SPEAKER key. UIP200 User's Manual Page 22 of the number, the phone will start connecting immediately; Step 2: Select the appropriate 1-TOUCH key. Dial (fixed key) The DIAL key sends dialed digits without...
English Owners Manual
Page 23
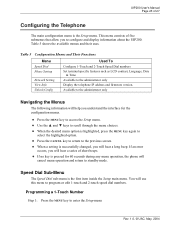
... uses. You will hear a long beep. Table 5 Configuration Menus and Their Functions Menu Speed Dial Phone Setting Network Setting View Info Unlock Config Used To Configure 1-Touch and 2-Touch Speed Dial numbers Set terminal specific features such as LCD contrast, Language, Date & Time Available to enter the Setup menu Rev. 1.0, © UAC, May, 2004 Available to the administrator only Navigating the Menus The following information will help you understand the interface for 60 seconds during any menu operation...
... uses. You will hear a long beep. Table 5 Configuration Menus and Their Functions Menu Speed Dial Phone Setting Network Setting View Info Unlock Config Used To Configure 1-Touch and 2-Touch Speed Dial numbers Set terminal specific features such as LCD contrast, Language, Date & Time Available to enter the Setup menu Rev. 1.0, © UAC, May, 2004 Available to the administrator only Navigating the Menus The following information will help you understand the interface for 60 seconds during any menu operation...
English Owners Manual
Page 24
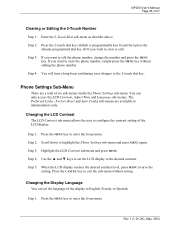
... 5: The phone will hear a long beep confirming your changes to enter the Setup menu Step 2: Highlight the Speed Dial sub-menu and press MENU again. If you to eliminate the four-second pause before dialing, press the DIAL key at anytime to clear the entered digits and return to the 1-Touch Dial sub-menu. You will hear a long beep, and the phone number is stored. UIP200 User's Manual Page 24 of 32 digits. Press...
... 5: The phone will hear a long beep confirming your changes to enter the Setup menu Step 2: Highlight the Speed Dial sub-menu and press MENU again. If you to eliminate the four-second pause before dialing, press the DIAL key at anytime to clear the entered digits and return to the 1-Touch Dial sub-menu. You will hear a long beep, and the phone number is stored. UIP200 User's Manual Page 24 of 32 digits. Press...
English Owners Manual
Page 25
... access the LCD Contrast, Adjust Time and Language sub-menus. You can set the LCD display to edit the phone number, change the number and press the MENU key. Step 1: Press the MENU key to enter the Setup menu Step 2: Scroll down to enter the Setup menu Rev. 1.0, © UAC, May, 2004 UIP200 User's Manual Page 25 of six sub-menus inside the Phone Settings sub-menu. Step 1: Press the MENU key to highlight the Phone Settings sub-menu...
... access the LCD Contrast, Adjust Time and Language sub-menus. You can set the LCD display to edit the phone number, change the number and press the MENU key. Step 1: Press the MENU key to enter the Setup menu Step 2: Scroll down to enter the Setup menu Rev. 1.0, © UAC, May, 2004 UIP200 User's Manual Page 25 of six sub-menus inside the Phone Settings sub-menu. Step 1: Press the MENU key to highlight the Phone Settings sub-menu...

English Owners Manual
Page 26
... saving. Step 3: Highlight the Adjust Time sub-menu and press MENU. Step 7: If necessary, use the number keys to edit the hour. Rev. 1.0, © UAC, May, 2004 Step 4: If necessary, use the number keys to save the date and time setting. Select the correct setting and press MENU. UIP200 User's Manual Page 26 of hours your community does not observe DST, select DISABLED. The phone will prompt you lived in the...
... saving. Step 3: Highlight the Adjust Time sub-menu and press MENU. Step 7: If necessary, use the number keys to edit the hour. Rev. 1.0, © UAC, May, 2004 Step 4: If necessary, use the number keys to save the date and time setting. Select the correct setting and press MENU. UIP200 User's Manual Page 26 of hours your community does not observe DST, select DISABLED. The phone will prompt you lived in the...
English Owners Manual
Page 27
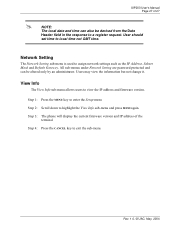
... MENU key to enter the Setup menu Step 2: Scroll down to exit the sub-menu. View Info The View Info sub-menu allows users to local time not GMT time. User should set time to view the IP address and firmware version. Step 3: The phone will display the current firmware version and IP address of 27 ! Network Setting The Network Setting sub-menu is used to a register request. Users may view the information but not change it. UIP200 User's Manual Page...
... MENU key to enter the Setup menu Step 2: Scroll down to exit the sub-menu. View Info The View Info sub-menu allows users to local time not GMT time. User should set time to view the IP address and firmware version. Step 3: The phone will display the current firmware version and IP address of 27 ! Network Setting The Network Setting sub-menu is used to a register request. Users may view the information but not change it. UIP200 User's Manual Page...


