
English Owners Manual
Page 1
... a Location 9 Telephone Line Outlets 9 Connecting the Telephone Cords 10 Applying Power to the Base Unit 10 Installing the Backup Battery 11 Desk or Tabletop Installation 12 Wall Installation 14 Direct Wall Mounting 17 Setting up Your Phone 22 Extending the Antenna 22 Installing the Handset Battery Pack 22 Cleaning the Battery Contacts 24 Charging the Handset Battery Pack 25 Low Battery Indicator 26 Setting the Pulse/Tone Switch 27 Adjusting Ringer Controls 27 Automatic Digital Code Security 29 Using Your Phone 31 Making and Receiving Calls 31 Changing Channels, Flash, and...
... a Location 9 Telephone Line Outlets 9 Connecting the Telephone Cords 10 Applying Power to the Base Unit 10 Installing the Backup Battery 11 Desk or Tabletop Installation 12 Wall Installation 14 Direct Wall Mounting 17 Setting up Your Phone 22 Extending the Antenna 22 Installing the Handset Battery Pack 22 Cleaning the Battery Contacts 24 Charging the Handset Battery Pack 25 Low Battery Indicator 26 Setting the Pulse/Tone Switch 27 Adjusting Ringer Controls 27 Automatic Digital Code Security 29 Using Your Phone 31 Making and Receiving Calls 31 Changing Channels, Flash, and...

English Owners Manual
Page 2
... 59 Setting the Toll Saver Switch 59 Using the Reset Button 60 Using Your Answering System 61 Selecting a Mailbox 61 Playing a Message 62 Repeating a Message 64 Skipping a Message 66 Deleting a Message 69 Deleting All Messages in a Maibox 74 Message Full Indication 76 Voice Guided Help Menu 77 Screening Incoming Calls 78 Leaving a Memo Message 79 Recording a Telephone Conversation 81 Remote Operation 82 Setting Your PIN Code 82 Using a Touch Tone Phone 84 Troubleshooting 86 Telephone Troubleshooting Chart 86 Answering System Troubleshooting Chart 87 Specifications 88...
... 59 Setting the Toll Saver Switch 59 Using the Reset Button 60 Using Your Answering System 61 Selecting a Mailbox 61 Playing a Message 62 Repeating a Message 64 Skipping a Message 66 Deleting a Message 69 Deleting All Messages in a Maibox 74 Message Full Indication 76 Voice Guided Help Menu 77 Screening Incoming Calls 78 Leaving a Memo Message 79 Recording a Telephone Conversation 81 Remote Operation 82 Setting Your PIN Code 82 Using a Touch Tone Phone 84 Troubleshooting 86 Telephone Troubleshooting Chart 86 Answering System Troubleshooting Chart 87 Specifications 88...

English Owners Manual
Page 4
... the wall outlet and refer servicing to report a gas leak in damage and will often require extensive repair work by a qualified technician.) E. The cell may be toxic if swallowed. 4. SAVE THESE INSTRUCTIONS 4 B. If the product exhibits a distinct change in a fire. Observe proper polarity orientation between the Battery Pack and battery charger. If the product does not operate normally when following conditions: A. F. Check...
... the wall outlet and refer servicing to report a gas leak in damage and will often require extensive repair work by a qualified technician.) E. The cell may be toxic if swallowed. 4. SAVE THESE INSTRUCTIONS 4 B. If the product exhibits a distinct change in a fire. Observe proper polarity orientation between the Battery Pack and battery charger. If the product does not operate normally when following conditions: A. F. Check...
English Owners Manual
Page 5
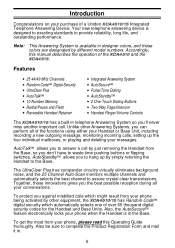
... miss another important call. Accordingly, this Operating Guide thoroughly. Features • 25 44/49 MHz Channels • Random Code™ Digital Security • UltraClear Plus • AutoTalk™ • 10 Number Memory • Redial/Pause and Flash • Reversible Handset Retainer • Integrated Answering System • AutoSecure™ • Pulse/Tone Dialing • AutoStandby™ • 2 One-Touch Dialing Buttons • Two-Way Page/Intercom • Handset Ringer/Volume Controls The XCA4510...
... miss another important call. Accordingly, this Operating Guide thoroughly. Features • 25 44/49 MHz Channels • Random Code™ Digital Security • UltraClear Plus • AutoTalk™ • 10 Number Memory • Redial/Pause and Flash • Reversible Handset Retainer • Integrated Answering System • AutoSecure™ • Pulse/Tone Dialing • AutoStandby™ • 2 One-Touch Dialing Buttons • Two-Way Page/Intercom • Handset Ringer/Volume Controls The XCA4510...

English Owners Manual
Page 6
Handset Base Unit AC Adapter Long Telephone Cord Rechargeable Handset Battery Short Telephone Cord Operating Guide 9V Backup Battery Other Printed Material 6 Instead contact Uniden Customer Service at: (800) 297-1023, 8:00 am to 5:00 pm, Central Standard Time, Monday through Friday. Included with Your XCA4510/15 If any of these items are missing or damaged, do not contact the place of purchase.
Handset Base Unit AC Adapter Long Telephone Cord Rechargeable Handset Battery Short Telephone Cord Operating Guide 9V Backup Battery Other Printed Material 6 Instead contact Uniden Customer Service at: (800) 297-1023, 8:00 am to 5:00 pm, Central Standard Time, Monday through Friday. Included with Your XCA4510/15 If any of these items are missing or damaged, do not contact the place of purchase.
English Owners Manual
Page 7
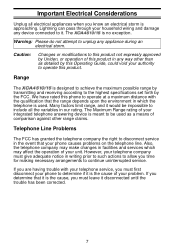
... must first disconnect your phone to the highest specifications set forth by this Operating Guide, could void your integrated telephone answering device is no exception. Range The XCA4510/15 is the cause of your problem. Also, the telephone company may affect the operation of your unit. However, your household wiring and damage any device connected to continue uninterrupted service. Important Electrical Considerations Unplug all the...
... must first disconnect your phone to the highest specifications set forth by this Operating Guide, could void your integrated telephone answering device is no exception. Range The XCA4510/15 is the cause of your problem. Also, the telephone company may affect the operation of your unit. However, your household wiring and damage any device connected to continue uninterrupted service. Important Electrical Considerations Unplug all the...
English Owners Manual
Page 10
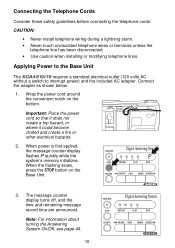
... power cord around the convenient notch on the Base Unit. 3. The message counter display turns off, and the time and remaining message record time are announced. Connect the adapter as shown below. 1. When the flashing slows, press the STOP button on the bottom. Connecting the Telephone Cords Consider these safety guidelines before connecting the telephone cords: CAUTION: • Never install telephone wiring during a lightning storm. • Never touch uninsulated telephone wires or terminals unless the telephone line...
... power cord around the convenient notch on the Base Unit. 3. The message counter display turns off, and the time and remaining message record time are announced. Connect the adapter as shown below. 1. When the flashing slows, press the STOP button on the bottom. Connecting the Telephone Cords Consider these safety guidelines before connecting the telephone cords: CAUTION: • Never install telephone wiring during a lightning storm. • Never touch uninsulated telephone wires or terminals unless the telephone line...
English Owners Manual
Page 26
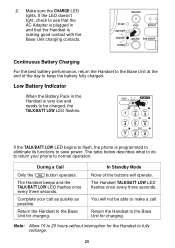
... battery performance, return the Handset to the Base Unit at the end of the buttons will not be charged, the TALK/BATT LOW LED flashes. TDuring a Call Only the button operates. In Standby Mode None of the day to be able to return your call . The Handset TALK/BATT LOW LED flashes once every three seconds. 2. If the LED doesn't light, check to save power. TALK TALK REMOTE...
... battery performance, return the Handset to the Base Unit at the end of the buttons will not be charged, the TALK/BATT LOW LED flashes. TDuring a Call Only the button operates. In Standby Mode None of the day to be able to return your call . The Handset TALK/BATT LOW LED flashes once every three seconds. 2. If the LED doesn't light, check to save power. TALK TALK REMOTE...
English Owners Manual
Page 29
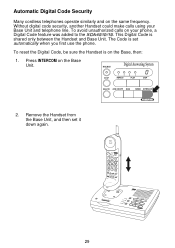
... Digital Code is on your Base Unit and telephone line. Automatic Digital Code Security Many cordless telephones operate similarly and on the Base Unit. 2. To reset the Digital Code, be sure the Handset is shared only between the Handset and Base Unit. Remove the Handset from the Base Unit, and then set automatically when you first use the phone. To avoid unauthorized calls on the Base, then: 1. The Code is set it down again. Press INTERCOM on the same frequency. Without digital code security, another Handset could make calls using your phone, a Digital Code...
... Digital Code is on your Base Unit and telephone line. Automatic Digital Code Security Many cordless telephones operate similarly and on the Base Unit. 2. To reset the Digital Code, be sure the Handset is shared only between the Handset and Base Unit. Remove the Handset from the Base Unit, and then set automatically when you first use the phone. To avoid unauthorized calls on the Base, then: 1. The Code is set it down again. Press INTERCOM on the same frequency. Without digital code security, another Handset could make calls using your phone, a Digital Code...
English Owners Manual
Page 31
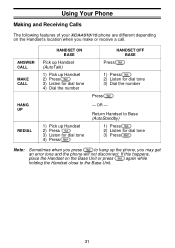
... dial tone 4) Press Return Handset to Base (AutoStandby) 1) Press 2) Listen for dial tone 3) Press T Note: Sometimes when you make or receive a call. Using Your Phone Making and Receiving Calls The following features of your XCA4510/15 phone are different depending on the Base Unit or press again while holding the Handset close to hang up Handset 2) Press 3) Listen for dial tone 4) Dial the number HANDSET OFF BASE T Press T 1) Press 2) Listen for dial tone T3) Dial the number...
... dial tone 4) Press Return Handset to Base (AutoStandby) 1) Press 2) Listen for dial tone 3) Press T Note: Sometimes when you make or receive a call. Using Your Phone Making and Receiving Calls The following features of your XCA4510/15 phone are different depending on the Base Unit or press again while holding the Handset close to hang up Handset 2) Press 3) Listen for dial tone 4) Dial the number HANDSET OFF BASE T Press T 1) Press 2) Listen for dial tone T3) Dial the number...
English Owners Manual
Page 38
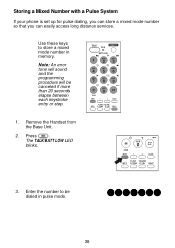
Note: An error tone will sound and the programming procedure will be dialed in memory. OPR 0 TONE MEM 1 2 & CHAN FLASH VOLUME INT'C R. Press . TALK REMOTE TALK 7 1 BATT LOW 2 1 ABC 2 6 GHI JKL 45 1 DEF 3 3 MNO 6 4 PRS 7 8 95 TUV WXY 89 ?& OPR 0 TONE MEM 1 2 CHAN FLASH VOLUME INT'C R. TONE R. M Remove the Handset from the Base Unit. TONE R. Enter the number to store a mixed mode number in pulse mode. 5551212 38 Use these keys to be canceled if more...
Note: An error tone will sound and the programming procedure will be dialed in memory. OPR 0 TONE MEM 1 2 & CHAN FLASH VOLUME INT'C R. Press . TALK REMOTE TALK 7 1 BATT LOW 2 1 ABC 2 6 GHI JKL 45 1 DEF 3 3 MNO 6 4 PRS 7 8 95 TUV WXY 89 ?& OPR 0 TONE MEM 1 2 CHAN FLASH VOLUME INT'C R. TONE R. M Remove the Handset from the Base Unit. TONE R. Enter the number to store a mixed mode number in pulse mode. 5551212 38 Use these keys to be canceled if more...

English Owners Manual
Page 43
... outgoing message. By simply pressing one button, you choose. You can have to quickly review your fingertips. There is an advanced, integrated system which answers incoming calls and records your phone. Your XCA4510/15 is also a Voice Guided Help Menu available when operating the remote Handset. Features • Digital Tapeless Recording • Remote Operation from your messages. You'll never have callers leave their messages for someone else who will use your Answering System...
... outgoing message. By simply pressing one button, you choose. You can have to quickly review your fingertips. There is an advanced, integrated system which answers incoming calls and records your phone. Your XCA4510/15 is also a Voice Guided Help Menu available when operating the remote Handset. Features • Digital Tapeless Recording • Remote Operation from your messages. You'll never have callers leave their messages for someone else who will use your Answering System...

English Owners Manual
Page 47
... steps to set PM, press # Note: A beep indicates the new time is programmed, and the new time is announced in your XCA4510/15 Answering System starts when power is applied to the Base Unit. The TALK/BATT LOW LED lights orange. To set AM, press * To set the clock to the day. 3. Press * Then enter the number which corresponds to the correct time. 1. TALK REMOTE TALK BATT LOW...
... steps to set PM, press # Note: A beep indicates the new time is programmed, and the new time is announced in your XCA4510/15 Answering System starts when power is applied to the Base Unit. The TALK/BATT LOW LED lights orange. To set AM, press * To set the clock to the day. 3. Press * Then enter the number which corresponds to the correct time. 1. TALK REMOTE TALK BATT LOW...

English Owners Manual
Page 49
...-1 RING SW PULSE-TONE CPC REC TIME RING VOL 2-5-TS OFF-ON ANN-1 OFF-LO-HI TEL-LINE DC IN 9V +- Press STOP The speaker beeps, and the time is set in Standby. 49 If the switch is announced followed by the remaining recording time available. Setting Your Outgoing Message (OGM) When you receive a call . If the REC TIME/ANN-1 switch is available to one is in its memory...
...-1 RING SW PULSE-TONE CPC REC TIME RING VOL 2-5-TS OFF-ON ANN-1 OFF-LO-HI TEL-LINE DC IN 9V +- Press STOP The speaker beeps, and the time is set in Standby. 49 If the switch is announced followed by the remaining recording time available. Setting Your Outgoing Message (OGM) When you receive a call . If the REC TIME/ANN-1 switch is available to one is in its memory...
English Owners Manual
Page 59
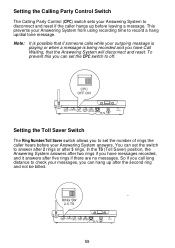
... your Answering System from using recording time to set the number of rings the caller hears before leaving a message. RESET Setting the Toll Saver Switch The Ring Number/Toll Saver switch allows you to record a hang up/dial tone message. Note: It is possible that if someone calls while your outgoing message is playing or when a message is being recorded and you have messages recorded, and it answers after 5 rings. RING SW 2-5-TS RING SW PULSE-TONE CPC REC TIME RING...
... your Answering System from using recording time to set the number of rings the caller hears before leaving a message. RESET Setting the Toll Saver Switch The Ring Number/Toll Saver switch allows you to record a hang up/dial tone message. Note: It is possible that if someone calls while your outgoing message is playing or when a message is being recorded and you have messages recorded, and it answers after 5 rings. RING SW 2-5-TS RING SW PULSE-TONE CPC REC TIME RING...
English Owners Manual
Page 77
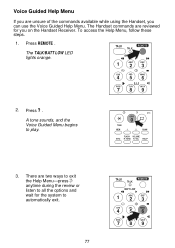
... access the Help Menu, follow these steps. 1. TALK REMOTE TALK BATT LOW 2 1 1 ABC DEF 23 6 3 GHI JKL MNO 4 56 4 95 PRS TUV WXY 7 89 2. OPR 0 TONE MEM 1 2 & CHAN FLASH VOLUME INT'C R. There are two ways to exit the Help Menu-press 3 anytime during the reveiw or listen to all the options and wait for you can use the Voice Guided Help Menu. TONE...
... access the Help Menu, follow these steps. 1. TALK REMOTE TALK BATT LOW 2 1 1 ABC DEF 23 6 3 GHI JKL MNO 4 56 4 95 PRS TUV WXY 7 89 2. OPR 0 TONE MEM 1 2 & CHAN FLASH VOLUME INT'C R. There are two ways to exit the Help Menu-press 3 anytime during the reveiw or listen to all the options and wait for you can use the Voice Guided Help Menu. TONE...

English Owners Manual
Page 86
.... Base Unit doesn't ring or receive a page. Set the Digital Code. • Set the Base Unit Ringer switch to your XCA4510/15 Integrated Telephone Answering Device is placed in Base Unit. • Make sure that the Base Unit antenna is properly seated in Base Unit. to resolve the problems, contact Uniden Customer Service at (800) 297-1023, 8:00 a.m. Telephone Troubleshooting Chart Problem Charge light won't come on the Handset to select another channel. • Check both ends of the Base Unit telephone line cord. • Make...
.... Base Unit doesn't ring or receive a page. Set the Digital Code. • Set the Base Unit Ringer switch to your XCA4510/15 Integrated Telephone Answering Device is placed in Base Unit. • Make sure that the Base Unit antenna is properly seated in Base Unit. to resolve the problems, contact Uniden Customer Service at (800) 297-1023, 8:00 a.m. Telephone Troubleshooting Chart Problem Charge light won't come on the Handset to select another channel. • Check both ends of the Base Unit telephone line cord. • Make...

English Owners Manual
Page 87
... tone phone. Delete some or all of the saved messages. • The incoming messages may be full. The Handset Receiver volume is deleted. After a power failure, the OGM is not loud enough. No sound on the Base Unit flashes. VOL key when using the correct PIN number. • Make sure that the Base Unit is plugged in. • Make sure the Answering System is turned on. • Press the RESET button to reset the Answering System. • Replace...
... tone phone. Delete some or all of the saved messages. • The incoming messages may be full. The Handset Receiver volume is deleted. After a power failure, the OGM is not loud enough. No sound on the Base Unit flashes. VOL key when using the correct PIN number. • Make sure that the Base Unit is plugged in. • Make sure the Answering System is turned on. • Press the RESET button to reset the Answering System. • Replace...

English Owners Manual
Page 88
... Talk Mode 6 hours Standby Mode 7 days Battery Save Mode 5 weeks Answering System Memory Type Memory Capacity Message Length Digital Tapeless Recording 27 min. 32 sec. (40 messages) 1 min. OGM-Mailboxes 2, 3, 4 (max.) Specifications, Features, and availability of Optional Accessories are all subject to 49.99 MHz (25 Channels) Rechargeable Ni-Cd Battery Pack 2 3 in. (W) x 2 11 in. (D) x 12 3 in . (H) 8 32 8 Approx. 18.9 oz. Incoming Message (max.) 1 min. Specifications General - Handset Receive Frequency Transmit Frequency Power Requirements...
... Talk Mode 6 hours Standby Mode 7 days Battery Save Mode 5 weeks Answering System Memory Type Memory Capacity Message Length Digital Tapeless Recording 27 min. 32 sec. (40 messages) 1 min. OGM-Mailboxes 2, 3, 4 (max.) Specifications, Features, and availability of Optional Accessories are all subject to 49.99 MHz (25 Channels) Rechargeable Ni-Cd Battery Pack 2 3 in. (W) x 2 11 in. (D) x 12 3 in . (H) 8 32 8 Approx. 18.9 oz. Incoming Message (max.) 1 min. Specifications General - Handset Receive Frequency Transmit Frequency Power Requirements...

English Owners Manual
Page 93
... 23 22 21 20 19 18 11 12 13 14 15 16 17 1. Mailbox LED/Select Button 24. Message Delete Button 9. Base Unit Antenna 23. Microphone Ringer Volume Switch 18. Telephone Line Jack 19. Reset Button 21. Memo Button 5. Handset Retainer 22. Charge LED 11. Battery LED 12. Message Play Button 2. Message Repeat Button 26. In Use LED 13. Intercom Button 4. DC Power Jack 20. Answering System On/Off Button 7. Message Skip Button 3. Calling Party Control Switch 16. Outgoing Message Button 6. Stop Button 8.
... 23 22 21 20 19 18 11 12 13 14 15 16 17 1. Mailbox LED/Select Button 24. Message Delete Button 9. Base Unit Antenna 23. Microphone Ringer Volume Switch 18. Telephone Line Jack 19. Reset Button 21. Memo Button 5. Handset Retainer 22. Charge LED 11. Battery LED 12. Message Play Button 2. Message Repeat Button 26. In Use LED 13. Intercom Button 4. DC Power Jack 20. Answering System On/Off Button 7. Message Skip Button 3. Calling Party Control Switch 16. Outgoing Message Button 6. Stop Button 8.

