
English Owners Manual
Page 1
...the Base Unit 10 Installing the Backup Battery 11 Desk or Tabletop Installation 12 Wall Installation 14 Direct Wall Mounting 17 Setting up Your Phone 22 Extending the Antenna 22 Installing the Handset Battery Pack 22 Cleaning the Battery Contacts 24 Charging the Handset Battery Pack 25 Low ... Calls 31 Changing Channels, Flash, and Page/Find 32 Using the Two-Way Intercom 33 Two-Way Paging 33 Room Monitor Feature 35 Programming Your Phone 36 Storing a Number in Memory 36 Storing a Mixed Number with a Pulse System 38 Storing One-Touch Dialing Numbers 40 Dialing a Stored Number...
...the Base Unit 10 Installing the Backup Battery 11 Desk or Tabletop Installation 12 Wall Installation 14 Direct Wall Mounting 17 Setting up Your Phone 22 Extending the Antenna 22 Installing the Handset Battery Pack 22 Cleaning the Battery Contacts 24 Charging the Handset Battery Pack 25 Low ... Calls 31 Changing Channels, Flash, and Page/Find 32 Using the Two-Way Intercom 33 Two-Way Paging 33 Room Monitor Feature 35 Programming Your Phone 36 Storing a Number in Memory 36 Storing a Mixed Number with a Pulse System 38 Storing One-Touch Dialing Numbers 40 Dialing a Stored Number...

English Owners Manual
Page 2
... Menu 77 Screening Incoming Calls 78 Leaving a Memo Message 79 Recording a Telephone Conversation 81 Remote Operation 82 Setting Your PIN Code 82 Using a Touch Tone Phone 84 Troubleshooting 86 Telephone Troubleshooting Chart 86 Answering System Troubleshooting Chart 87 Specifications 88 2
... Menu 77 Screening Incoming Calls 78 Leaving a Memo Message 79 Recording a Telephone Conversation 81 Remote Operation 82 Setting Your PIN Code 82 Using a Touch Tone Phone 84 Troubleshooting 86 Telephone Troubleshooting Chart 86 Answering System Troubleshooting Chart 87 Specifications 88 2
English Owners Manual
Page 5
...telephone Answering System so you the best possible reception during all of the functions using either your purchase of the XCA4510 and the XCA4515. Also, the AutoSecure™ feature electronically locks your messages. To get the most from the Base, so you against misbilled...Handset and Base Units. Accordingly, this Operating Guide thoroughly. AutoTalk™ allows you can perform all your phone, please read this manual describes the operation of a Uniden XCA4510/15 Integrated Telephone Answering Device. Also be sure to complete the Product Registration Form and mail it ...
...telephone Answering System so you the best possible reception during all of the functions using either your purchase of the XCA4510 and the XCA4515. Also, the AutoSecure™ feature electronically locks your messages. To get the most from the Base, so you against misbilled...Handset and Base Units. Accordingly, this Operating Guide thoroughly. AutoTalk™ allows you can perform all your phone, please read this manual describes the operation of a Uniden XCA4510/15 Integrated Telephone Answering Device. Also be sure to complete the Product Registration Form and mail it ...
English Owners Manual
Page 7
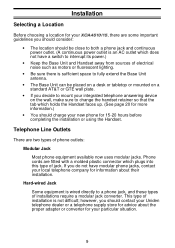
...on the telephone line. Warning: Please do not attempt to unplug any device connected to it is the cause, you must first disconnect your phone to operate at a maximum distance with your telephone service, you must leave it would be used . Important Electrical Considerations Unplug all the variables... in writing prior to such actions to allow you time for making necessary arrangements to the highest specifications set forth by Uniden, or operation of your household wiring and damage any appliance during an electrical storm. Caution: Changes or modifications to this...
...on the telephone line. Warning: Please do not attempt to unplug any device connected to it is the cause, you must first disconnect your phone to operate at a maximum distance with your telephone service, you must leave it would be used . Important Electrical Considerations Unplug all the variables... in writing prior to such actions to allow you time for making necessary arrangements to the highest specifications set forth by Uniden, or operation of your household wiring and damage any appliance during an electrical storm. Caution: Changes or modifications to this...
English Owners Manual
Page 8
... Handset or clicking noises in your home, they must operate on different channels. If these noises continue and are too distracting, please check around your phone, you consistently hear other source of the potential for interference. If you want to nearby TVs and VCRs; More Than One Cordless Telephone If you...
... Handset or clicking noises in your home, they must operate on different channels. If these noises continue and are too distracting, please check around your phone, you consistently hear other source of the potential for interference. If you want to nearby TVs and VCRs; More Than One Cordless Telephone If you...
English Owners Manual
Page 9
...a modular jack converter. If you should contact your Uniden telephone dealer or a telephone supply store for advice about their installation. This type of installation is wired directly to a phone jack, and these types of jack. Phone cords are two types of electrical noise such as motors... you do not have a switch to interrupt its power.) • Keep the Base Unit and Handset away from sources of phone outlets: Modular Jack Most phone equipment available now uses modular jacks. Installation Selecting a Location Before choosing a location for your XCA4510/15, there are some important ...
...a modular jack converter. If you should contact your Uniden telephone dealer or a telephone supply store for advice about their installation. This type of installation is wired directly to a phone jack, and these types of jack. Phone cords are two types of electrical noise such as motors... you do not have a switch to interrupt its power.) • Keep the Base Unit and Handset away from sources of phone outlets: Modular Jack Most phone equipment available now uses modular jacks. Installation Selecting a Location Before choosing a location for your XCA4510/15, there are some important ...
English Owners Manual
Page 11
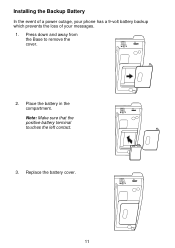
Press down and away from the Base to remove the cover. 2. Note: Make sure that the positive battery terminal touches the left contact. 3. Replace the battery cover. 11 Place the battery in the compartment. Installing the Backup Battery In the event of a power outage, your phone has a 9-volt battery backup which prevents the loss of your messages. 1.
Press down and away from the Base to remove the cover. 2. Note: Make sure that the positive battery terminal touches the left contact. 3. Replace the battery cover. 11 Place the battery in the compartment. Installing the Backup Battery In the event of a power outage, your phone has a 9-volt battery backup which prevents the loss of your messages. 1.
English Owners Manual
Page 14
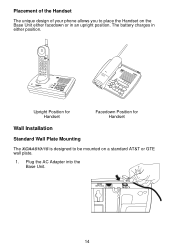
Plug the AC Adapter into the Base Unit. 14 Placement of the Handset The unique design of your phone allows you to be mounted on the Base Unit either facedown or in either position. 1 2 3 4 1234 Upright Position for Handset Facedown Position for Handset Wall Installation Standard Wall Plate Mounting The XCA4510/15 is designed to place the Handset on a standard AT&T or GTE wall plate. 1. The battery charges in an upright position.
Plug the AC Adapter into the Base Unit. 14 Placement of the Handset The unique design of your phone allows you to be mounted on the Base Unit either facedown or in either position. 1 2 3 4 1234 Upright Position for Handset Facedown Position for Handset Wall Installation Standard Wall Plate Mounting The XCA4510/15 is designed to place the Handset on a standard AT&T or GTE wall plate. 1. The battery charges in an upright position.
English Owners Manual
Page 17
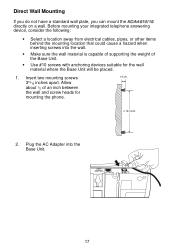
Allow about 1⁄5 of the Base Unit. • Use #10 screws with anchoring devices suitable for mounting the phone. 3 15/16 IN. 2. Insert two mounting screws 1/5 IN. 315⁄16 inches apart. Before mounting your integrated telephone answering device, consider the following: • Select a ...
Allow about 1⁄5 of the Base Unit. • Use #10 screws with anchoring devices suitable for mounting the phone. 3 15/16 IN. 2. Insert two mounting screws 1/5 IN. 315⁄16 inches apart. Before mounting your integrated telephone answering device, consider the following: • Select a ...
English Owners Manual
Page 20
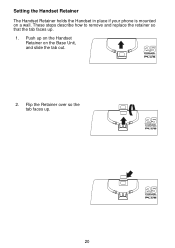
These steps describe how to remove and replace the retainer so that the tab faces up . 20 Setting the Handset Retainer The Handset Retainer holds the Handset in place if your phone is mounted on the Base Unit, and slide the tab out. 2. Flip the Retainer over so the tab faces up . 1. Push up on the Handset Retainer on a wall.
These steps describe how to remove and replace the retainer so that the tab faces up . 20 Setting the Handset Retainer The Handset Retainer holds the Handset in place if your phone is mounted on the Base Unit, and slide the tab out. 2. Flip the Retainer over so the tab faces up . 1. Push up on the Handset Retainer on a wall.
English Owners Manual
Page 22
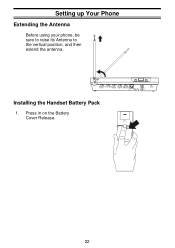
BLK RED WARNING ! RESET Installing the Handset Battery Pack 1. Always Install Battery Cable with Black Wire closest to the vertical position, and then extend the antenna. Press in on the Battery NOTE Cover Release. RING SW PULSE-TONE CPC REC TIME RING VOL 2-5-TS OFF-ON ANN-1 OFF-LO-HI TEL-LINE DC IN 9V +- Setting up Your Phone Extending the Antenna Before using your phone, be sure to raise its Antenna to the left 22
BLK RED WARNING ! RESET Installing the Handset Battery Pack 1. Always Install Battery Cable with Black Wire closest to the vertical position, and then extend the antenna. Press in on the Battery NOTE Cover Release. RING SW PULSE-TONE CPC REC TIME RING VOL 2-5-TS OFF-ON ANN-1 OFF-LO-HI TEL-LINE DC IN 9V +- Setting up Your Phone Extending the Antenna Before using your phone, be sure to raise its Antenna to the left 22
English Owners Manual
Page 23
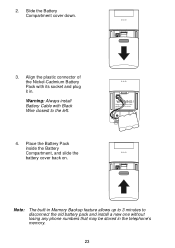
... to the left . Warning: Always install Battery Cable with Black Wire closest to disconnect the old battery pack and install a new one without losing any phone numbers that may be stored in .
... to the left . Warning: Always install Battery Cable with Black Wire closest to disconnect the old battery pack and install a new one without losing any phone numbers that may be stored in .
English Owners Manual
Page 24
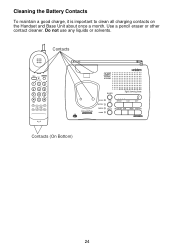
... 1 2 CHAN FLASH VOLUME INT'C R. VOL RDL/P ® CHANNEL ULTRACLEAR PLUS IN USE BATTERY MAILBOX STOP Digital Answering System 1 2 34 REPEAT PLAY 0 SKIP Extend•A•Phone HQ SERIES CHARGE POWER DELETE ANS ON/OFF OGM MEMO INTERCOM MIC PAG E / F I N D Contacts (On Bottom) 24 Do not use any liquids or solvents. TONE...
... 1 2 CHAN FLASH VOLUME INT'C R. VOL RDL/P ® CHANNEL ULTRACLEAR PLUS IN USE BATTERY MAILBOX STOP Digital Answering System 1 2 34 REPEAT PLAY 0 SKIP Extend•A•Phone HQ SERIES CHARGE POWER DELETE ANS ON/OFF OGM MEMO INTERCOM MIC PAG E / F I N D Contacts (On Bottom) 24 Do not use any liquids or solvents. TONE...
English Owners Manual
Page 25
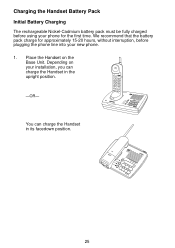
Place the Handset on your new phone. 1. We recommend that the battery pack charge for the first time. Depending on the Base Unit. Charging the Handset Battery Pack Initial Battery Charging The rechargeable Nickel-Cadmium battery pack must be fully charged before using your phone for approximately 15-20 hours, without interruption, before plugging the phone line into your installation, you can charge the Handset in the upright position. -OR- 1 2 3 4 You can charge the Handset in its facedown position. 1234 25
Place the Handset on your new phone. 1. We recommend that the battery pack charge for the first time. Depending on the Base Unit. Charging the Handset Battery Pack Initial Battery Charging The rechargeable Nickel-Cadmium battery pack must be fully charged before using your phone for approximately 15-20 hours, without interruption, before plugging the phone line into your installation, you can charge the Handset in the upright position. -OR- 1 2 3 4 You can charge the Handset in its facedown position. 1234 25
English Owners Manual
Page 26
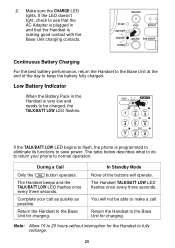
Complete your phone to fully recharge. 26 Return the Handset to the Base Unit for the Handset to normal operation. In Standby Mode None of the day to ... BATT LOW 21 7 1 1 ABC DEF 23 6 3 GHI JKL MNO 4 56 4 95 PRS TUV WXY 7 89 If the TALK/BATT LOW LED begins to flash, the phone is programmed to eliminate its functions to see that the AC Adapter is plugged in the Handset is making good contact with the Base Unit...
Complete your phone to fully recharge. 26 Return the Handset to the Base Unit for the Handset to normal operation. In Standby Mode None of the day to ... BATT LOW 21 7 1 1 ABC DEF 23 6 3 GHI JKL MNO 4 56 4 95 PRS TUV WXY 7 89 If the TALK/BATT LOW LED begins to flash, the phone is programmed to eliminate its functions to see that the AC Adapter is plugged in the Handset is making good contact with the Base Unit...
English Owners Manual
Page 27
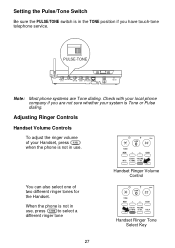
...DC IN 9V +- Adjusting Ringer Controls L Handset Volume Controls To adjust the ringer volume of two different ringer tones for O the Handset. TONE R. When the phone is not in use , press to select a different ringer tone 8 ? OPR 0 TONE MEM 1 2 & CHAN FLASH VOLUME INT'C R. TONE R. VOL ... is Tone or Pulse dialing. OPR 0 TONE MEM 1 2 & CHAN FLASH VOLUME INT'C R. RESET Note: Most phone systems are not sure whether your Handset, press when the phone is not in use . 8 ? VOL RDL/P Handset Ringer Tone Select Key 27 Setting the Pulse/Tone Switch Be...
...DC IN 9V +- Adjusting Ringer Controls L Handset Volume Controls To adjust the ringer volume of two different ringer tones for O the Handset. TONE R. When the phone is not in use , press to select a different ringer tone 8 ? OPR 0 TONE MEM 1 2 & CHAN FLASH VOLUME INT'C R. TONE R. VOL ... is Tone or Pulse dialing. OPR 0 TONE MEM 1 2 & CHAN FLASH VOLUME INT'C R. RESET Note: Most phone systems are not sure whether your Handset, press when the phone is not in use . 8 ? VOL RDL/P Handset Ringer Tone Select Key 27 Setting the Pulse/Tone Switch Be...
English Owners Manual
Page 29
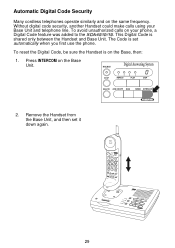
... Unit. To avoid unauthorized calls on the Base Unit. 2. Remove the Handset from the Base Unit, and then set automatically when you first use the phone. Without digital code security, another Handset could make calls using your...
... Unit. To avoid unauthorized calls on the Base Unit. 2. Remove the Handset from the Base Unit, and then set automatically when you first use the phone. Without digital code security, another Handset could make calls using your...
English Owners Manual
Page 31
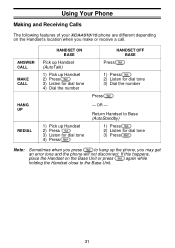
... happens, T place the Handset on the Handset's location when you may get an error tone and the phone will not disconnect. Using Your Phone Making and Receiving Calls The following features of your XCA4510/15 phone are different depending on the Base Unit or press again while holding the Handset close to hang...) 1) Press 2) Listen for dial tone T3) Dial the number Press HANG - ANSWER CALL MAKE CALL HANDSET ON BASE Pick up Handset T (AutoTalk) 1) Pick up the phone, you make or receive a call. OR -
... happens, T place the Handset on the Handset's location when you may get an error tone and the phone will not disconnect. Using Your Phone Making and Receiving Calls The following features of your XCA4510/15 phone are different depending on the Base Unit or press again while holding the Handset close to hang...) 1) Press 2) Listen for dial tone T3) Dial the number Press HANG - ANSWER CALL MAKE CALL HANDSET ON BASE Pick up Handset T (AutoTalk) 1) Pick up the phone, you make or receive a call. OR -
English Owners Manual
Page 32
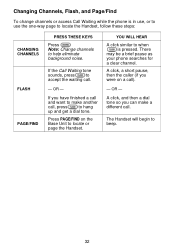
... the caller (if you can make another call . F If the Call Waiting tone sounds, press to beep. 32 There may be a brief pause as your phone searches for a clear channel. OR - Press PAGE/FIND on a call . OR - Changing Channels, Flash, and Page/Find To change channels or access Call Waiting while...
... the caller (if you can make another call . F If the Call Waiting tone sounds, press to beep. 32 There may be a brief pause as your phone searches for a clear channel. OR - Press PAGE/FIND on a call . OR - Changing Channels, Flash, and Page/Find To change channels or access Call Waiting while...
English Owners Manual
Page 36
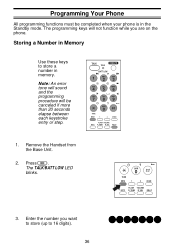
... Use these keys to 16 digits). 36 5551212 The TALK/BATT LOW LED blinks. 8 ? Enter the number you are on the phone. The programming keys will be completed when your phone is in memory. TALK REMOTE TALK 7 1 BATT LOW 2 1 ABC 2 6 GHI JKL 45 1 DEF 3 3 MNO 6 4 PRS 7 8 95 TUV WXY 89 ?& ... and the programming procedure will not function while you want to store (up to store a number in the Standby mode. Programming Your Phone All programming functions must be canceled if more than 20 seconds elapse between each keystroke entry or step. M the Base Unit.
... Use these keys to 16 digits). 36 5551212 The TALK/BATT LOW LED blinks. 8 ? Enter the number you are on the phone. The programming keys will be completed when your phone is in memory. TALK REMOTE TALK 7 1 BATT LOW 2 1 ABC 2 6 GHI JKL 45 1 DEF 3 3 MNO 6 4 PRS 7 8 95 TUV WXY 89 ?& ... and the programming procedure will not function while you want to store (up to store a number in the Standby mode. Programming Your Phone All programming functions must be canceled if more than 20 seconds elapse between each keystroke entry or step. M the Base Unit.

