
User Manual
Page 6
... 3-1 Entering Setup 3-2 Control Keys 3-2 Getting Help 3-3 The Main Menu 3-4 Standard CMOS Features 3-6 Advanced BIOS Features 3-8 Advanced Chipset Features 3-11 Integrated Peripherals 3-15 Power Management Setup 3-20 PNP/PCI Configurations 3-26 PC Health Status 3-29 Load Fail-Safe Defaults 3-30 ...
... 3-1 Entering Setup 3-2 Control Keys 3-2 Getting Help 3-3 The Main Menu 3-4 Standard CMOS Features 3-6 Advanced BIOS Features 3-8 Advanced Chipset Features 3-11 Integrated Peripherals 3-15 Power Management Setup 3-20 PNP/PCI Configurations 3-26 PC Health Status 3-29 Load Fail-Safe Defaults 3-30 ...

User Manual
Page 12
... CMOS jumper See p. 2-14 Host Frequency Select See p. 2-15 Auto Reboot Function Setting See p. 2-16 CPU Strapping Function Setting See p. 2-16 Disk On Chip (DOC) BIOS See p. 2-17 RCA Video / S/P DIF See p. 2-17 Connecting to expansion cards See p. 2-18 1-5
... CMOS jumper See p. 2-14 Host Frequency Select See p. 2-15 Auto Reboot Function Setting See p. 2-16 CPU Strapping Function Setting See p. 2-16 Disk On Chip (DOC) BIOS See p. 2-17 RCA Video / S/P DIF See p. 2-17 Connecting to expansion cards See p. 2-18 1-5

User Manual
Page 29
Hardware Setup DOC BIOS Select (J4) This jumper enables or disables the Disk on the dual purpose port. 31 42 1-2: RCA Video 3-4: S/P DIF 2-17 Therefore the DOC function may not be present on the mainboard you have purchased. 1 1-2: Disable 2-3: Enable RCA Video or S/P DIF Select (J11) This jumper selects either RCA Video or S/P DIF as the enabled function on Chip (DOC) BIOS Select Function. The DOC function is not a standard option on this mainboard and is a manufacturing option only.
Hardware Setup DOC BIOS Select (J4) This jumper enables or disables the Disk on the dual purpose port. 31 42 1-2: RCA Video 3-4: S/P DIF 2-17 Therefore the DOC function may not be present on the mainboard you have purchased. 1 1-2: Disable 2-3: Enable RCA Video or S/P DIF Select (J11) This jumper selects either RCA Video or S/P DIF as the enabled function on Chip (DOC) BIOS Select Function. The DOC function is not a standard option on this mainboard and is a manufacturing option only.

User Manual
Page 30
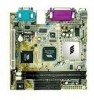
When adding or removing expansion cards, make any necessary hardware or software settings for the expansion card to insert PCI expansion card. Chapter 2 PCI Slot Slots The PCI slot allows you to make sure that you unplug the power supply first. For two PCI slot solution, a PCI Riser Card module can be used. For reference design please consult with VIA Technologies, Inc. 2-18 Meanwhile, read the documentation for the expansion card, such as jumpers, switches or BIOS configuration.
When adding or removing expansion cards, make any necessary hardware or software settings for the expansion card to insert PCI expansion card. Chapter 2 PCI Slot Slots The PCI slot allows you to make sure that you unplug the power supply first. For two PCI slot solution, a PCI Riser Card module can be used. For reference design please consult with VIA Technologies, Inc. 2-18 Meanwhile, read the documentation for the expansion card, such as jumpers, switches or BIOS configuration.

User Manual
Page 32
BIOS Setup This chapter gives detailed explaination of the following topics: Entering Setup 3-2 Control Keys 3-2 Getting Help 3-3 The Main Menu 3-4 Standard CMOS Features 3-6 Advanced BIOS Features 3-8 Advanced Chipset Features 3-11 Integrated Peripherals 3-15 Power Management Setup 3-20 PNP/PCI Configurations 3-26 PC Health Status 3-29 Load Fail-Safe Defaults 3-30 Load Optimized Defaults 3-31 Set Supervisor/User Password 3-32 Save & Exit Setup 3-34 Exit Without Saving 3-35 3-1 It consists of the BIOS setup functions. BIOS Setup 3.
BIOS Setup This chapter gives detailed explaination of the following topics: Entering Setup 3-2 Control Keys 3-2 Getting Help 3-3 The Main Menu 3-4 Standard CMOS Features 3-6 Advanced BIOS Features 3-8 Advanced Chipset Features 3-11 Integrated Peripherals 3-15 Power Management Setup 3-20 PNP/PCI Configurations 3-26 PC Health Status 3-29 Load Fail-Safe Defaults 3-30 Load Optimized Defaults 3-31 Set Supervisor/User Password 3-32 Save & Exit Setup 3-34 Exit Without Saving 3-35 3-1 It consists of the BIOS setup functions. BIOS Setup 3.

User Manual
Page 33
If you missed the BIOS setup entry point, you may restart the system and try again. Chapter 3 Entering Setup Power on the computer and press DEL straight away to re ... from a subm enu In c re a s e th e n u m e ric v a lu e o r m a k e c h a n g e s D e c re a s e th e n u m e ric va lu e o r m a k e c h a n g e s G e n e ra l h e lp , o n ly fo r Sta tu s P a g e S e tu p M e n u a n d O p tio n P a g e S e tu p M e n u R e s to enter the BIOS setup menu.
If you missed the BIOS setup entry point, you may restart the system and try again. Chapter 3 Entering Setup Power on the computer and press DEL straight away to re ... from a subm enu In c re a s e th e n u m e ric v a lu e o r m a k e c h a n g e s D e c re a s e th e n u m e ric va lu e o r m a k e c h a n g e s G e n e ra l h e lp , o n ly fo r Sta tu s P a g e S e tu p M e n u a n d O p tio n P a g e S e tu p M e n u R e s to enter the BIOS setup menu.

User Manual
Page 34
...use control keys (LK) to highlight the field and press to select any menu/sub-menu by pressing . You can use and navigate the BIOS setup. The help screen. 3-3 To return from any item/sub-menu. IDE Primary Master IDE Primary Slave IDE Secondary Master IDE Secondary Slave General... program provides a General Help screen. Use the control keys (LK) to enter the submenu. Main Menu The main menu displays all BIOS setup categories. The sub-menu contains additional options. A description of the selected/ highlighted category is available. You can call up this means a sub...
...use control keys (LK) to highlight the field and press to select any menu/sub-menu by pressing . You can use and navigate the BIOS setup. The help screen. 3-3 To return from any item/sub-menu. IDE Primary Master IDE Primary Slave IDE Secondary Master IDE Secondary Slave General... program provides a General Help screen. Use the control keys (LK) to enter the submenu. Main Menu The main menu displays all BIOS setup categories. The sub-menu contains additional options. A description of the selected/ highlighted category is available. You can call up this means a sub...

User Manual
Page 35
... specific features and optimize system performance. Use arrow keys to select the items and press to set the advanced features available on your system. Advanced BIOS Features Use this menu to accept or enter the sub-menu. Chapter 3 The Main Menu The Main Menu contains eleven setup functions and two exit...
... specific features and optimize system performance. Use arrow keys to select the items and press to set the advanced features available on your system. Advanced BIOS Features Use this menu to accept or enter the sub-menu. Chapter 3 The Main Menu The Main Menu contains eleven setup functions and two exit...

User Manual
Page 36
Set Supervisor Password Use this menu to set user password. Set User Password Use this menu to set supervisor password. Save & Exit Setup Save BIOS setting changes and exit setup. Load Optimized Defaults Use this menu to load BIOS default settings for minimal and stable system operations. Exit Without Saving Abandon all BIOS setting changes and exit setup. 3-5 BIOS Setup PC Health Status This menu shows the PC health status. Load Fail-Safe Defaults Use this menu to load the BIOS default settings for optimal and high performance system operations.
Set Supervisor Password Use this menu to set user password. Set User Password Use this menu to set supervisor password. Save & Exit Setup Save BIOS setting changes and exit setup. Load Optimized Defaults Use this menu to load BIOS default settings for minimal and stable system operations. Exit Without Saving Abandon all BIOS setting changes and exit setup. 3-5 BIOS Setup PC Health Status This menu shows the PC health status. Load Fail-Safe Defaults Use this menu to load the BIOS default settings for optimal and high performance system operations.

User Manual
Page 38
... are CHS, LBA, Large, Auto. Number of the storage device. Select Auto whenever possible. The formatted size of sectors. 3-7 Write precompensation. Cylinder location of cylinders. BIOS Setup All, But Diskette error). All, But Disk/Key error) System halts for all errors (except diskette System halts for this category. The hard disk...
... are CHS, LBA, Large, Auto. Number of the storage device. Select Auto whenever possible. The formatted size of sectors. 3-7 Write precompensation. Cylinder location of cylinders. BIOS Setup All, But Diskette error). All, But Disk/Key error) System halts for all errors (except diskette System halts for this category. The hard disk...

User Manual
Page 39
... IDE Hard Disk boot sector protection. Settings: Enabled and Disabled. First/Second/Third Boot Device Set the boot device sequence as BIOS attempts to skip some check items during POST. CPU Internal Cache Enable the CPU Internal Cache. The settings are: 3-8 External ...Cache Enable the CPU L2 Cache. Allow BIOS to load the disk operating system. Chapter 3 Advanced BIOS Features Virus Warning Set the Virus Warning feature for Level 2 cache. Facilitates error detection/correction when data passes...
... IDE Hard Disk boot sector protection. Settings: Enabled and Disabled. First/Second/Third Boot Device Set the boot device sequence as BIOS attempts to skip some check items during POST. CPU Internal Cache Enable the CPU Internal Cache. The settings are: 3-8 External ...Cache Enable the CPU L2 Cache. Allow BIOS to load the disk operating system. Chapter 3 Advanced BIOS Features Virus Warning Set the Virus Warning feature for Level 2 cache. Facilitates error detection/correction when data passes...

User Manual
Page 40
BIOS Setup LS120 HDD-0 SCSI CD-ROM HDD-1 HDD-2 HDD-3 ZIP100 USB-FDD USB-ZIP USB-CDROM USB-HDD LAN Disabled The system will boot from ...
BIOS Setup LS120 HDD-0 SCSI CD-ROM HDD-1 HDD-2 HDD-3 ZIP100 USB-FDD USB-ZIP USB-CDROM USB-HDD LAN Disabled The system will boot from ...

User Manual
Page 41
... are described below: Option Setup Description The password prompt appears only when end users try to run Setup. Video BIOS Shadow Enable shadow for the Video BIOS. C8000-CBFFF Shadow Enable shadow in the DC000-DFFFF region. Settings: Disabled and Enabled. Settings: Disabled and Enabled...the computer is implemented. CC000-CFFFF Shadow Enable shadow in the D4000-D7FFF region. Chapter 3 Security Option Specifies the type of BIOS password protection that is powered on or when end users try to run Setup. Settings: Disabled and Enabled. Settings: Disabled and...
... are described below: Option Setup Description The password prompt appears only when end users try to run Setup. Video BIOS Shadow Enable shadow for the Video BIOS. C8000-CBFFF Shadow Enable shadow in the DC000-DFFFF region. Settings: Disabled and Enabled. Settings: Disabled and Enabled...the computer is implemented. CC000-CFFFF Shadow Enable shadow in the D4000-D7FFF region. Chapter 3 Security Option Specifies the type of BIOS password protection that is powered on or when end users try to run Setup. Settings: Disabled and Enabled. Settings: Disabled and...

User Manual
Page 42
... for optimizing the chipset functions. Video RAM Cacheable Cache the Video RAM. TV Dot Crawl Type Set the TV Dot Crawl Type. System BIOS Cacheable Cache the System Bios. TV Standard Set the TV Standard of the TV output. Note: Change these settings only if you are familiar with the chipset. Settings...
... for optimizing the chipset functions. Video RAM Cacheable Cache the Video RAM. TV Dot Crawl Type Set the TV Dot Crawl Type. System BIOS Cacheable Cache the System Bios. TV Standard Set the TV Standard of the TV output. Note: Change these settings only if you are familiar with the chipset. Settings...

User Manual
Page 44
Settings: 256M, 128M, 64M, 32M, 16M, 8M and 4M. Settings: Disabled and Enabled. 3-13 BIOS Setup AGP & P2P Bridge Control Press to enter the sub-menu and the following screen appears: AGP Aperture Size Set the AGP Aperture Size. Settings: Disabled and Enabled. AGP Master 1 WS Read Set the AGP Master 1 WS Read. AGP Master 1 WS Write Set the AGP Master 1 WS Write.
Settings: 256M, 128M, 64M, 32M, 16M, 8M and 4M. Settings: Disabled and Enabled. 3-13 BIOS Setup AGP & P2P Bridge Control Press to enter the sub-menu and the following screen appears: AGP Aperture Size Set the AGP Aperture Size. Settings: Disabled and Enabled. AGP Master 1 WS Read Set the AGP Master 1 WS Read. AGP Master 1 WS Write Set the AGP Master 1 WS Write.

User Manual
Page 46
... OnChip USB. IDE HDD Block Mode This setting specifies if the IDE hard drive supports block mode. Integrated Peripherals BIOS Setup Init Display First This setting specifies which VGA card is neccessay for BIOS to provide support for USB Keyboard. Settings: Disabled and Enabled. USB Keyboard Support This setting specifies whether it...
... OnChip USB. IDE HDD Block Mode This setting specifies if the IDE hard drive supports block mode. Integrated Peripherals BIOS Setup Init Display First This setting specifies which VGA card is neccessay for BIOS to provide support for USB Keyboard. Settings: Disabled and Enabled. USB Keyboard Support This setting specifies whether it...

User Manual
Page 48
... audio codec. Settings: Disabled and Auto. VIA OnChip PCI Device Press to enter the sub-menu and the following screen appears: VIA-3058 AC97 Audio Set the VIA-3058 AC97 Audio codec. VIA-3043 OnChip LAN Set the VIA -3043 OnChip LAN. Settings: Disabled and... Enabled. automatically detect the presence of audio codec. Settings: Disabled and Enabled. 3-17 Setings: Disabled and Enabled. Disabled - Secondary Master/Slave UDMA These settings specifies the UDMA mode for Primary Master/Slave IDE devices. BIOS...
... audio codec. Settings: Disabled and Auto. VIA OnChip PCI Device Press to enter the sub-menu and the following screen appears: VIA-3058 AC97 Audio Set the VIA-3058 AC97 Audio codec. VIA-3043 OnChip LAN Set the VIA -3043 OnChip LAN. Settings: Disabled and... Enabled. automatically detect the presence of audio codec. Settings: Disabled and Enabled. 3-17 Setings: Disabled and Enabled. Disabled - Secondary Master/Slave UDMA These settings specifies the UDMA mode for Primary Master/Slave IDE devices. BIOS...

User Manual
Page 50
...is set to "EPP". Settings: 1 and 3. This field is only available if Parallel Mode is set to "ECP". Selecting Auto allows BIOS to support both the ECP and EPP modes simultaneously. Parallel Port EPP Type Set the parallel port EPP type. Onboard Parallel Mode Set the ... floppy disk drive. Onboard Serial Port 1 Set the base I /O port address and IRQ of the onboard FIR. Settings: Disabled and Enabled. 3-19 BIOS Setup Onboard FDD Controller Enable the onboard floppy controller. Settings: Disabled, 3F8/IRQ4, 2F8/IRQ3, 3E8/IRQ4, 2E8/IRQ3 and Auto. Onboard Parallel Port ...
...is set to "EPP". Settings: 1 and 3. This field is only available if Parallel Mode is set to "ECP". Selecting Auto allows BIOS to support both the ECP and EPP modes simultaneously. Parallel Port EPP Type Set the parallel port EPP type. Onboard Parallel Mode Set the ... floppy disk drive. Onboard Serial Port 1 Set the base I /O port address and IRQ of the onboard FIR. Settings: Disabled and Enabled. 3-19 BIOS Setup Onboard FDD Controller Enable the onboard floppy controller. Settings: Disabled, 3F8/IRQ4, 2F8/IRQ3, 3E8/IRQ4, 2E8/IRQ3 and Auto. Onboard Parallel Port ...

User Manual
Page 52
... Screen, V/H SYNC + Blank and DPMS Support. Video Off Method Select the method of the system when resume from AC power loss. Soft-Off by modem. BIOS Setup Video Off Option Select whether or not to turn off the screen when system enters power saving mode, ACPI OS such as a normal power...
... Screen, V/H SYNC + Blank and DPMS Support. Video Off Method Select the method of the system when resume from AC power loss. Soft-Off by modem. BIOS Setup Video Off Option Select whether or not to turn off the screen when system enters power saving mode, ACPI OS such as a normal power...

User Manual
Page 54
... Mouse wakeup function. Settings: Off and ON. Settings: Disabled and Enabled. LPT & COM Decide whether or not the power management unit should monitor VGA activities. BIOS Setup Wake Up Events Press to enter the sub-menu and the following screen appears: PS2 KB Wakeup from S3 Decide whether to enable PS2...
... Mouse wakeup function. Settings: Off and ON. Settings: Disabled and Enabled. LPT & COM Decide whether or not the power management unit should monitor VGA activities. BIOS Setup Wake Up Events Press to enter the sub-menu and the following screen appears: PS2 KB Wakeup from S3 Decide whether to enable PS2...