

CD4233 Datasheet
Page 1
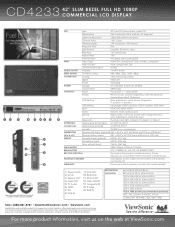
... make messages stand out in any installation. from video, to 5x5 > RS-232 daisy-chain capable > VGA and DVI inputs/outputs for flexible connectivity and control > Remote and panel control lock out > 7 day on/off scheduling > Screen saver/image sticking protection > Built-in 5Wx2 speaker with ultimate HD clarity. CD4233 42" SLIM BEZEL FULL HD 1080P COMMERCIAL LCD DISPLAY Grand Format for Large, Crisp Digital Signage Images ViewSonic's 42" CD4233...
... make messages stand out in any installation. from video, to 5x5 > RS-232 daisy-chain capable > VGA and DVI inputs/outputs for flexible connectivity and control > Remote and panel control lock out > 7 day on/off scheduling > Screen saver/image sticking protection > Built-in 5Wx2 speaker with ultimate HD clarity. CD4233 42" SLIM BEZEL FULL HD 1080P COMMERCIAL LCD DISPLAY Grand Format for Large, Crisp Digital Signage Images ViewSonic's 42" CD4233...
CD4233 Datasheet
Page 2
...Output RS-232 AUDIO OUTPUT Amplifier 7-watt / 8 ohm INPUT SIGNAL TV/Video Comp. 480i, 480p, 720p, 1080i, 1080p CONNECTOR Analog 15-pin mini D-sub (VGA) Digital HDMI, DVI Power 3-pin plug POWER Voltage AC 100-240V (universal), 50-60Hz Consumption 280W (typ) CONTROLS Panel Power, Exit, +, -, Menu/Enter Picture Picture mode, contrast, brightness, color temperature, temperature adjust, sharpness VGA Setting Auto adjustment, clock, phase, sharpness, H. Copyright © 2010 ViewSonic Corporation. C D 4 2 3 3 42" SLIM BEZEL FULL HD 1080P COMMERCIAL LCD DISPLAY...
...Output RS-232 AUDIO OUTPUT Amplifier 7-watt / 8 ohm INPUT SIGNAL TV/Video Comp. 480i, 480p, 720p, 1080i, 1080p CONNECTOR Analog 15-pin mini D-sub (VGA) Digital HDMI, DVI Power 3-pin plug POWER Voltage AC 100-240V (universal), 50-60Hz Consumption 280W (typ) CONTROLS Panel Power, Exit, +, -, Menu/Enter Picture Picture mode, contrast, brightness, color temperature, temperature adjust, sharpness VGA Setting Auto adjustment, clock, phase, sharpness, H. Copyright © 2010 ViewSonic Corporation. C D 4 2 3 3 42" SLIM BEZEL FULL HD 1080P COMMERCIAL LCD DISPLAY...
CD4233 User Guide (English)
Page 4
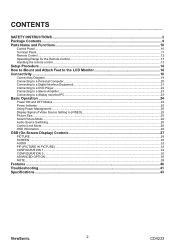
... remote control ...13 Setup Procedure ...14 How to Mount and Attach Feet to the LCD Monitor 16 Connectivity ...19 Connectivity Diagram ...19 Connecting to a Personal Computer ...20 Connecting to a Digital Interface Equipment ...21 Connecting to a DVD Player...22 Connecting to a Stereo Amplifier ...23 Connecting to a display mounted PC ...23 Basic Operation ...24 Power ON and OFF Modes ...24 Power Indicator...25 Using Power Management ...25 Display Signal of Video Source Setting to [VIDEO 25 Picture Size...25 Smart Picture Mode...26 Audio Source Switching...26 Control Lock Mode...
... remote control ...13 Setup Procedure ...14 How to Mount and Attach Feet to the LCD Monitor 16 Connectivity ...19 Connectivity Diagram ...19 Connecting to a Personal Computer ...20 Connecting to a Digital Interface Equipment ...21 Connecting to a DVD Player...22 Connecting to a Stereo Amplifier ...23 Connecting to a display mounted PC ...23 Basic Operation ...24 Power ON and OFF Modes ...24 Power Indicator...25 Using Power Management ...25 Display Signal of Video Source Setting to [VIDEO 25 Picture Size...25 Smart Picture Mode...26 Audio Source Switching...26 Control Lock Mode...
CD4233 User Guide (English)
Page 5
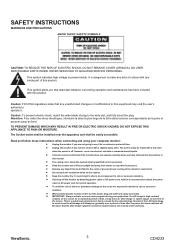
... instructions when connecting and using your application. z If turning off . z Remove any unauthorized changes or modifications to make sure the power plug and outlet are not going to the set do not expose it with a dry cloth when the power is dangerous to this manual. If a still image in the LCD technology. ViewSonic 3 CD4233 The Socket-outlet shall be installed near the apparatus and shall be opened...
... instructions when connecting and using your application. z If turning off . z Remove any unauthorized changes or modifications to make sure the power plug and outlet are not going to the set do not expose it with a dry cloth when the power is dangerous to this manual. If a still image in the LCD technology. ViewSonic 3 CD4233 The Socket-outlet shall be installed near the apparatus and shall be opened...

CD4233 User Guide (English)
Page 12
.... Main Power Switch : To turn red when the LCD is POWER OFF. To recover back to activate the OSD menu when the OSD menu is off . Remote control sensor, Power indicator and ambient light sensor : To receive the IR signal from the remote control. If the indicator blinks red , it tells that a failure is off . Parts Name and Functions Control Panel POWER button ( ) : To switch the power on/off . MUTE button : To switch the audio mute...
.... Main Power Switch : To turn red when the LCD is POWER OFF. To recover back to activate the OSD menu when the OSD menu is off . Remote control sensor, Power indicator and ambient light sensor : To receive the IR signal from the remote control. If the indicator blinks red , it tells that a failure is off . Parts Name and Functions Control Panel POWER button ( ) : To switch the power on/off . MUTE button : To switch the audio mute...

CD4233 User Guide (English)
Page 13
... pin) To input analog RGB signals from external equipment such as a DVD player, HDTV device, or Laser disc player. Note that BNC and RCA are connected. VIDEO OUT connector (BNC): To output the composite video signal from a digital equipment or computer. AC IN connector To connect with the supplied power cord. The same RS232C commands can be looped through RS232C commands (refer to the RS232C remote control user manual), connect the RS232C...
... pin) To input analog RGB signals from external equipment such as a DVD player, HDTV device, or Laser disc player. Note that BNC and RCA are connected. VIDEO OUT connector (BNC): To output the composite video signal from a digital equipment or computer. AC IN connector To connect with the supplied power cord. The same RS232C commands can be looped through RS232C commands (refer to the RS232C remote control user manual), connect the RS232C...

CD4233 User Guide (English)
Page 14
... "PIP" mode. AUTO SETUP button To execute the AUTO ADJUST function. MUTE button To turn the mute function on/off . ViewSonic 12 CD4233 Remote Control POWER button To turn the power on/off . MENU button To turn the OSD menu on/off the setting information displayed on /off . AUDIO SOURCE button To activate audio selection menu, and push "S" or "T" to select audio source from [HDMI], [DVI-D], [VGA],[COMPONENT], [S-VIDEO] and [VIDEO], and then push "ENTER" to switch to adjust the value. PICTURE MODE button To select smart picture mode from [FULL...
... "PIP" mode. AUTO SETUP button To execute the AUTO ADJUST function. MUTE button To turn the mute function on/off . ViewSonic 12 CD4233 Remote Control POWER button To turn the power on/off . MENU button To turn the OSD menu on/off the setting information displayed on /off . AUDIO SOURCE button To activate audio selection menu, and push "S" or "T" to select audio source from [HDMI], [DVI-D], [VGA],[COMPONENT], [S-VIDEO] and [VIDEO], and then push "ENTER" to switch to adjust the value. PICTURE MODE button To select smart picture mode from [FULL...
CD4233 User Guide (English)
Page 16
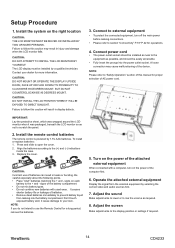
.... Adjust the sound Make adjustments to lower or to prevent battery liquid from the external equipment by selecting the correct video and audio sources first. 7. The LCD display must be installed by 1.5V AAA batteries. CAUTION: DO NOT INSTALL THE LCD MONITOR WHERE IT WILL BE EXPOSED TO DIRECT SUNLIGHT. Replace the cover. signs of batteries. • Remove dead batteries immediately to rise the volume as not to use of batteries can...
.... Adjust the sound Make adjustments to lower or to prevent battery liquid from the external equipment by selecting the correct video and audio sources first. 7. The LCD display must be installed by 1.5V AAA batteries. CAUTION: DO NOT INSTALL THE LCD MONITOR WHERE IT WILL BE EXPOSED TO DIRECT SUNLIGHT. Replace the cover. signs of batteries. • Remove dead batteries immediately to rise the volume as not to use of batteries can...
CD4233 User Guide (English)
Page 25
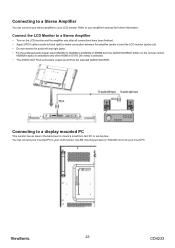
... RCA connectors output sound from the AUDIO SOURCE button on the LCD monitor and the amplifier only after all connections have been finished. • Apply 2 RCA cables (audio left and right jacks. • For the preferred audio signal, select [AUIDO1], [AUDIO2], [AUDIO3] or [HDMI] from the selected AUDIO SOURCE. Refer to your mount PC. Connect the LCD Monitor to a Stereo Amplifier • Turn on the remote control. Use M4 mounting...
... RCA connectors output sound from the AUDIO SOURCE button on the LCD monitor and the amplifier only after all connections have been finished. • Apply 2 RCA cables (audio left and right jacks. • For the preferred audio signal, select [AUIDO1], [AUDIO2], [AUDIO3] or [HDMI] from the selected AUDIO SOURCE. Refer to your mount PC. Connect the LCD Monitor to a Stereo Amplifier • Turn on the remote control. Use M4 mounting...

CD4233 User Guide (English)
Page 27
... active display area. Standby mode: Push the power button on the remote control or on the remote control to set video source to [VIDEO]. Display Signal of the LCD monitor. ZOOM ZOOM ViewSonic 25 CD4233 This could potentially increase the life and decrease the power consumption of Video Source Setting to [VIDEO] Use the input button on the front panel or the VIDEO SOURCE button on the monitor to your video format. DYNAMIC: Expand 4:3 pictures to enter the power off the LCD monitor when...
... active display area. Standby mode: Push the power button on the remote control or on the remote control to set video source to [VIDEO]. Display Signal of the LCD monitor. ZOOM ZOOM ViewSonic 25 CD4233 This could potentially increase the life and decrease the power consumption of Video Source Setting to [VIDEO] Use the input button on the front panel or the VIDEO SOURCE button on the monitor to your video format. DYNAMIC: Expand 4:3 pictures to enter the power off the LCD monitor when...

CD4233 User Guide (English)
Page 36
... to power management mode after about 10 minutes delay from original position; COOLING FAN: The cooling fan will go to reset all configuration settings. Select "YES" and press "ENTER" button to cancel and return the previous menu. Press " EXIT " button to restore the factory preset data. Select "Yes" and press "ENTER" button to cancel and return the previous menu. 34 CD4233 ViewSonic Main-Menu CONFIGURATION 1 AUTO ADJUST * : INPUT...
... to power management mode after about 10 minutes delay from original position; COOLING FAN: The cooling fan will go to reset all configuration settings. Select "YES" and press "ENTER" button to cancel and return the previous menu. Press " EXIT " button to restore the factory preset data. Select "Yes" and press "ENTER" button to cancel and return the previous menu. 34 CD4233 ViewSonic Main-Menu CONFIGURATION 1 AUTO ADJUST * : INPUT...

CD4233 User Guide (English)
Page 38
... expand the screen. V MONITORS: Select number of horizontal monitors. LOCK: Disable the monitor control by choice or automatically. NORMAL: The monitor will be changed. It refers to 25 monitors. This feature provides a single large screen using up to the brightness performance curve of the tile bezels in order to match display capabilities by infrared remote controller. ViewSonic Main-Menu ADVANCED OPTION INPUT RESOLUTION * : INPUT VGA only This feature makes the display controlling the...
... expand the screen. V MONITORS: Select number of horizontal monitors. LOCK: Disable the monitor control by choice or automatically. NORMAL: The monitor will be changed. It refers to 25 monitors. This feature provides a single large screen using up to the brightness performance curve of the tile bezels in order to match display capabilities by infrared remote controller. ViewSonic Main-Menu ADVANCED OPTION INPUT RESOLUTION * : INPUT VGA only This feature makes the display controlling the...

CD4233 User Guide (English)
Page 39
.... DATE AND TIME Adjusts the current date and time for normal use "SCHEDULE". ADVANCED OPTION RESET Selecting ADVANCED OPTION RESET allows you to reset all OSD settings from ADVANCED OPTION settings, except for remote control are assigned to monitor the heat status. GAMMA SELECTION is reset when carrying out the PICTURE RESET in the PICTURE. 37 CD4233 MONITOR ID ID numbers for GAMMA SELECTION, DATE AND TIME, SCHEDULE, HDMI INPUT MODE, DVI-D INPUT MODE,MONITOR ID...
.... DATE AND TIME Adjusts the current date and time for normal use "SCHEDULE". ADVANCED OPTION RESET Selecting ADVANCED OPTION RESET allows you to reset all OSD settings from ADVANCED OPTION settings, except for remote control are assigned to monitor the heat status. GAMMA SELECTION is reset when carrying out the PICTURE RESET in the PICTURE. 37 CD4233 MONITOR ID ID numbers for GAMMA SELECTION, DATE AND TIME, SCHEDULE, HDMI INPUT MODE, DVI-D INPUT MODE,MONITOR ID...

CD4233 User Guide (English)
Page 40
... screen is disabled. Image Persistence occurs when residual or "ghost" image of the schedule. As with your monitor. Use the ( ) and ( ) buttons to further reduce the risk of monitor. The "ENTER" button is no input selected ("--" showing in the OFF time slot. If there is used . To select which input source the monitor will increase the life of your remote control, or use Power Management Function or use "SCREEN SAVER Mode...
... screen is disabled. Image Persistence occurs when residual or "ghost" image of the schedule. As with your monitor. Use the ( ) and ( ) buttons to further reduce the risk of monitor. The "ENTER" button is no input selected ("--" showing in the OFF time slot. If there is used . To select which input source the monitor will increase the life of your remote control, or use Power Management Function or use "SCREEN SAVER Mode...

CD4233 User Guide (English)
Page 41
... multi-connected monitors. 4. These modes do not function, however, when the screen size is being displayed on the PRIMARY monitor, press the DISPLAY button on the control panel of its screen. ID numbers 1 to 26 are set the remote control mode wrongly and remote control operation becomes unavailable, press MENU button on the remote controller again to assign sequential ID numbers from 1 and up. 2. Direct the remote controller at the remote control signal sensor of signal inputs under which the "PIP" and "POP" modes function...
... multi-connected monitors. 4. These modes do not function, however, when the screen size is being displayed on the PRIMARY monitor, press the DISPLAY button on the control panel of its screen. ID numbers 1 to 26 are set the remote control mode wrongly and remote control operation becomes unavailable, press MENU button on the remote controller again to assign sequential ID numbers from 1 and up. 2. Direct the remote controller at the remote control signal sensor of signal inputs under which the "PIP" and "POP" modes function...

CD4233 User Guide (English)
Page 42
...LCD displays. Smart insert Professional PC's are part of 25 displays by long cable lengths. Compliant with high ambient light conditions due to control and adjust monitors remotely through RS232C protocol. High brightness Allows daylight viewing even in large public environments with RoHS standards Viewsonic designs and produces display products in most public signage installations. In addition it offers provisions for tiled matrix video walls...picture quality for HD input signals with optimum brightness and superb colors. It produces brilliant flicker-free progressive scan pictures...
...LCD displays. Smart insert Professional PC's are part of 25 displays by long cable lengths. Compliant with high ambient light conditions due to control and adjust monitors remotely through RS232C protocol. High brightness Allows daylight viewing even in large public environments with RoHS standards Viewsonic designs and produces display products in most public signage installations. In addition it offers provisions for tiled matrix video walls...picture quality for HD input signals with optimum brightness and superb colors. It produces brilliant flicker-free progressive scan pictures...
CD4233 User Guide (English)
Page 43
... to the computer. • Use the OSD Image Adjust controls to turn off for one hour and a residual image remains, the monitor should be avoided. ViewSonic 41 CD4233 Troubleshooting No picture • The signal cable should be completely connected to the graphics card/computer. • Front Power Switch and computer power switch should be in the ON position. • Check to make sure that a supported mode has been selected on...
... to the computer. • Use the OSD Image Adjust controls to turn off for one hour and a residual image remains, the monitor should be avoided. ViewSonic 41 CD4233 Troubleshooting No picture • The signal cable should be completely connected to the graphics card/computer. • Front Power Switch and computer power switch should be in the ON position. • Check to make sure that a supported mode has been selected on...
CD4233 User Guide (English)
Page 45
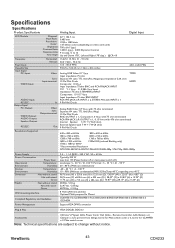
...-3-2/EN61000-3-3 /CE/NOM Power Management Support VESA DPMS convention Plug & Play VESA DDC2B, DDC/CI Accessories CD User's Manual, QSG, Power Cord, VGA Cable, , Remote Controller, AAA Battery x 2, Clamper x 2 (To prevent from falling), Screw for Main switch cover x 6, Screw for CLAMPER x 2, Main switch cover. Specifications Specifications Product Specifications Analog Input Digital Input LCD Module Diagonal: 42" / 106.7 cm Pixel Pitch: 0.485 mm Resolution: 1920 x 1080 dots Color: 1.07 billion colors (depending on video card used) Brightness: 700 cd...
...-3-2/EN61000-3-3 /CE/NOM Power Management Support VESA DPMS convention Plug & Play VESA DDC2B, DDC/CI Accessories CD User's Manual, QSG, Power Cord, VGA Cable, , Remote Controller, AAA Battery x 2, Clamper x 2 (To prevent from falling), Screw for Main switch cover x 6, Screw for CLAMPER x 2, Main switch cover. Specifications Specifications Product Specifications Analog Input Digital Input LCD Module Diagonal: 42" / 106.7 cm Pixel Pitch: 0.485 mm Resolution: 1920 x 1080 dots Color: 1.07 billion colors (depending on video card used) Brightness: 700 cd...

CD4233 User Guide (English)
Page 47
... product. Removal, installation, and set-up service charges. Any damage of the product due to the cost of repair or replacement of implied warranties: There are warranted for 3 years for all parts excluding the light source and 3 years for this product in material and workmanship, under normal use of the U.S.A. Limited Warranty VIEWSONIC LCD Commercial Display What the warranty covers: ViewSonic warrants its sole option, repair or replace...
... product. Removal, installation, and set-up service charges. Any damage of the product due to the cost of repair or replacement of implied warranties: There are warranted for 3 years for all parts excluding the light source and 3 years for this product in material and workmanship, under normal use of the U.S.A. Limited Warranty VIEWSONIC LCD Commercial Display What the warranty covers: ViewSonic warrants its sole option, repair or replace...
CD4233 User Guide (English)
Page 48
Replacement product or parts may include remanufactured or refurbished parts or components & accessories. Removal, installation, insurance, and set-up service charges. If a product proves to be defective in material or workmanship during the warranty period. How to get service: For information about receiving service under normal use, during the warranty period, ViewSonic will need to support your future use. Please retain your receipt of proof of the product. 2. Round trip...
Replacement product or parts may include remanufactured or refurbished parts or components & accessories. Removal, installation, insurance, and set-up service charges. If a product proves to be defective in material or workmanship during the warranty period. How to get service: For information about receiving service under normal use, during the warranty period, ViewSonic will need to support your future use. Please retain your receipt of proof of the product. 2. Round trip...

