
User Guide
Page 1
ViewSonic® E790 Color Monitor Viel•SIMIC lin. • II .II WI . 1101 With Plug and Play 4-• Full 19" (18.0" Diagonal Viewable) User's Guide Guide de l'utilisateur (Latin American Spanish) (Brazilian Portuguese)
ViewSonic® E790 Color Monitor Viel•SIMIC lin. • II .II WI . 1101 With Plug and Play 4-• Full 19" (18.0" Diagonal Viewable) User's Guide Guide de l'utilisateur (Latin American Spanish) (Brazilian Portuguese)
User Guide
Page 2
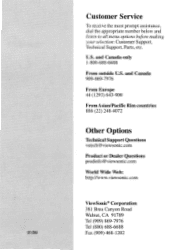
... appropriate number below and listen to all menu options before making your selection: Customer Support, Technical Support, Parts, etc. and Canada 909-869-7976 From Europe 44 (1293) 643-900 From Asian/Pacific Rim countries 886 (22) 248-4072 Other Options Technical Support Questions vstech@viewsonic.com Product or Dealer Questions prodinfo@viewsonic.com World Wide Web: http://www.viewsonic.com ViewSonic...
... appropriate number below and listen to all menu options before making your selection: Customer Support, Technical Support, Parts, etc. and Canada 909-869-7976 From Europe 44 (1293) 643-900 From Asian/Pacific Rim countries 886 (22) 248-4072 Other Options Technical Support Questions vstech@viewsonic.com Product or Dealer Questions prodinfo@viewsonic.com World Wide Web: http://www.viewsonic.com ViewSonic...
User Guide
Page 3
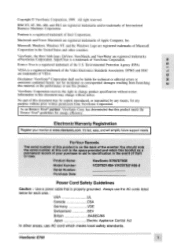
... trademark of Intel Corporation. Environmental Protection Agency (EPA). (/) VESA is a registered trademark of Apple Computer, Inc. Pentium is on the back of theft or loss. It's fast, easy, and will simplify future support needs. Product Name: ViewSonic E790/E790B Model Number: VCDTS21466-1NCDTS21466-2 Serial Number: Purchase Date: Power Cord Safety Guidelines Caution : Use a power cable that this product . Information in the space provided and...
... trademark of Intel Corporation. Environmental Protection Agency (EPA). (/) VESA is a registered trademark of Apple Computer, Inc. Pentium is on the back of theft or loss. It's fast, easy, and will simplify future support needs. Product Name: ViewSonic E790/E790B Model Number: VCDTS21466-1NCDTS21466-2 Serial Number: Purchase Date: Power Cord Safety Guidelines Caution : Use a power cable that this product . Information in the space provided and...
User Guide
Page 4
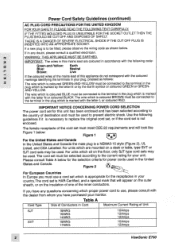
... coloured RED. For units which are coloured in accordance with the dealer from whom you must be connected to the terminal in the plug which is marked with the letter N or coloured BLACK. For units which is coloured BLUE must be selected according to the current rating for power cords used to replace the original cord set, or if the cord set is coloured GREEN...
... coloured RED. For units which are coloured in accordance with the dealer from whom you must be connected to the terminal in the plug which is marked with the letter N or coloured BLACK. For units which is coloured BLUE must be selected according to the current rating for power cords used to replace the original cord set, or if the cord set is coloured GREEN...
User Guide
Page 5
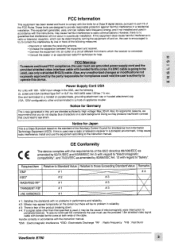
... Value Relative to the instruction manual. To assure continued CE compliance the user must use the provided 1.8m shielded video signal cable with bonded ferrite cores. FCC Warning: to peripheral devices. However, there is no guarantee that you do not display blue characters on the screen but there will not occur in reliability. # 3: There is used in a residential installation. One end terminated...
... Value Relative to the instruction manual. To assure continued CE compliance the user must use the provided 1.8m shielded video signal cable with bonded ferrite cores. FCC Warning: to peripheral devices. However, there is no guarantee that you do not display blue characters on the screen but there will not occur in reliability. # 3: There is used in a residential installation. One end terminated...
User Guide
Page 6
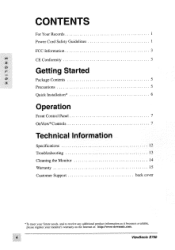
CONTENTS For Your Records 1 Power Cord Safety Guidelines 1 FCC Information 3 z CE Conformity C) Getting Started ci) Package Contents 5 Precautions 5 Quick Installation* 6 Operation Front Control Panel OnView® Controls Technical Information Specifications Troubleshooting Cleaning the Monitor Warranty Customer Support 7 7 12 13 14 15 back cover *To meet your future needs, and to receive any additional product information as it becomes available, please register your monitors warranty on the Internet at: http://www.viewsonic.com. 4 ViewSonic E790
CONTENTS For Your Records 1 Power Cord Safety Guidelines 1 FCC Information 3 z CE Conformity C) Getting Started ci) Package Contents 5 Precautions 5 Quick Installation* 6 Operation Front Control Panel OnView® Controls Technical Information Specifications Troubleshooting Cleaning the Monitor Warranty Customer Support 7 7 12 13 14 15 back cover *To meet your future needs, and to receive any additional product information as it becomes available, please register your monitors warranty on the Internet at: http://www.viewsonic.com. 4 ViewSonic E790
User Guide
Page 7
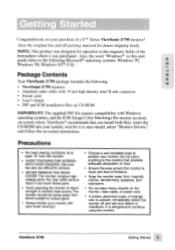
... are difficult to the following : • ViewSonic E790 monitor • Attached video cable with 15 pin high density mini D-sub connector • Power cord • User's Guide • INF and ICM installation files on CD-ROM IMPORTANT: The supplied INF file assures compatibility with care when moving it to auto-install, select "Monitor Drivers," and follow the on-screen instructions. NOTE: This product was purchased. Getting Started Congratulations on your...
... are difficult to the following : • ViewSonic E790 monitor • Attached video cable with 15 pin high density mini D-sub connector • Power cord • User's Guide • INF and ICM installation files on CD-ROM IMPORTANT: The supplied INF file assures compatibility with care when moving it to auto-install, select "Monitor Drivers," and follow the on-screen instructions. NOTE: This product was purchased. Getting Started Congratulations on your...
User Guide
Page 8
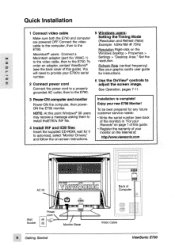
... customer service needs: • Write the serial number (see the back cover of this guide). Connect the video cable to the computer, then to the E790. VMAC-1) to the video cable, then to the 5 Windows users: Setting the Timing Mode (Resolution and Refresh Rate) Example: 1024x768 @ 75Hz E790. U) number. 2 Connect power cord 6 Use the OnView® controls to the E790. See Operation, pages 7-11. 3 Power-ON computer and monitor Power-ON the computer, then powerON the E790 monitor. Quick Installation 1 Connect video cable Make sure both the E790 and...
... customer service needs: • Write the serial number (see the back cover of this guide). Connect the video cable to the computer, then to the E790. VMAC-1) to the video cable, then to the 5 Windows users: Setting the Timing Mode (Resolution and Refresh Rate) Example: 1024x768 @ 75Hz E790. U) number. 2 Connect power cord 6 Use the OnView® controls to the E790. See Operation, pages 7-11. 3 Power-ON computer and monitor Power-ON the computer, then powerON the E790 monitor. Quick Installation 1 Connect video cable Make sure both the E790 and...

User Guide
Page 9
ONVIEW CONTROLS 1 ()* CONTRAST / BRIGHTNESS [De H/V POSITION E H/V SIZE OD ZOOM/TILT EIO PINCUSHION/PIN BALANCE no TRAPEZOID / PARALLELOGRAM OD PIN S/W ADJUST GEM CONVERGENCE al: EXIT SELECT:® ViewSonic E790 Operation Some menu options include pairs of controls, below) the control you want screen for the press button [2] to adjust highlighted again to select the S control (or control (Example: H pairof controls) HNPOSITION) I II V (i) Press button [1] to save adjustments and exit the control screen A D Power Light Press • or...
ONVIEW CONTROLS 1 ()* CONTRAST / BRIGHTNESS [De H/V POSITION E H/V SIZE OD ZOOM/TILT EIO PINCUSHION/PIN BALANCE no TRAPEZOID / PARALLELOGRAM OD PIN S/W ADJUST GEM CONVERGENCE al: EXIT SELECT:® ViewSonic E790 Operation Some menu options include pairs of controls, below) the control you want screen for the press button [2] to adjust highlighted again to select the S control (or control (Example: H pairof controls) HNPOSITION) I II V (i) Press button [1] to save adjustments and exit the control screen A D Power Light Press • or...
User Guide
Page 10
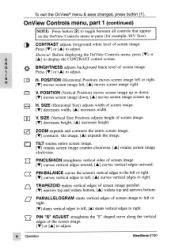
...; menu & save changes, press button [1]. OnView Controls menu, part 1 (continued) NOTE: Press button [2] to adjust. CONTRAST adjusts foreground white level of screen image. [V] decreases height, [A] increases height. Press [V] or [A] to right. H H. SIZE (Horizontal Size) adjusts width of screen image. [V] curves vertical edges inward, [A] curves vertical edges outward. PINCUSHION straightens vertical sides of screen image. [V] decreases width, [A] increases width. PARALLELOGRAM slants vertical edges of the screen image. [V] or [A] to display the CONTRAST control screen.
...; menu & save changes, press button [1]. OnView Controls menu, part 1 (continued) NOTE: Press button [2] to adjust. CONTRAST adjusts foreground white level of screen image. [V] decreases height, [A] increases height. Press [V] or [A] to right. H H. SIZE (Horizontal Size) adjusts width of screen image. [V] curves vertical edges inward, [A] curves vertical edges outward. PINCUSHION straightens vertical sides of screen image. [V] decreases width, [A] increases width. PARALLELOGRAM slants vertical edges of the screen image. [V] or [A] to display the CONTRAST control screen.

User Guide
Page 11
...; Press [1] to degauss the monitor • Press [2] return to adjust. VIEWMETER° displays the frequency signal input (horizontal scan and refresh rate) coming from the graphics card in your graphics card's user guide for more details. (FH = Horizontal Frequency, or horizontal scan; CONVERGENCE (Vertical Convergence) adjusts horizontal color alignment. Press [V] or [A] to adjust the color alignment. To exit the OnView° menu & save changes, press button [1]. N Press [V] or [A] to adjust the color alignment. VIDEO LEVEL 'at least 20 minutes...
...; Press [1] to degauss the monitor • Press [2] return to adjust. VIEWMETER° displays the frequency signal input (horizontal scan and refresh rate) coming from the graphics card in your graphics card's user guide for more details. (FH = Horizontal Frequency, or horizontal scan; CONVERGENCE (Vertical Convergence) adjusts horizontal color alignment. Press [V] or [A] to adjust the color alignment. To exit the OnView° menu & save changes, press button [1]. N Press [V] or [A] to adjust the color alignment. VIDEO LEVEL 'at least 20 minutes...

User Guide
Page 12
... and USER COLOR which allows you to adjust the red, green, and blue individually. MOIRE (Horizontal Moire) reduces horizontal interference patterns that requre it. Press button [2] to adjust. If USER COLOR is 0.7V. VIDEO LEVEL allows you to select the input level of these SER COL color controls. The 1.0V option is typically used in offices with fluorescent lights. NOTE: The default setting is selected, then press [2] to display the Video Level control screen...
... and USER COLOR which allows you to adjust the red, green, and blue individually. MOIRE (Horizontal Moire) reduces horizontal interference patterns that requre it. Press button [2] to adjust. If USER COLOR is 0.7V. VIDEO LEVEL allows you to select the input level of these SER COL color controls. The 1.0V option is typically used in offices with fluorescent lights. NOTE: The default setting is selected, then press [2] to display the Video Level control screen...

User Guide
Page 13
...the video timing currently selected. (See the bottom of page 12 for the OnView Controls menu and control screens: English, French, German, Italian, and Spanish. ViewSonic E790 Operation POSITION (Horizontal On-Screen Display Position) repositions menus and control screens horizontally. S H 0SD OSD V. POSITION (Vertical On-Screen Display Position) repositions menus and control screens vertically. NOTE: Press button [2] to recall factory settings. Press [V] to move OSD to the left, [A] to move OSD down, [A] to select a language. To exit the OnView® menu & save changes, press...
...the video timing currently selected. (See the bottom of page 12 for the OnView Controls menu and control screens: English, French, German, Italian, and Spanish. ViewSonic E790 Operation POSITION (Horizontal On-Screen Display Position) repositions menus and control screens horizontally. S H 0SD OSD V. POSITION (Vertical On-Screen Display Position) repositions menus and control screens vertically. NOTE: Press button [2] to recall factory settings. Press [V] to move OSD to the left, [A] to move OSD down, [A] to select a language. To exit the OnView® menu & save changes, press...
User Guide
Page 14
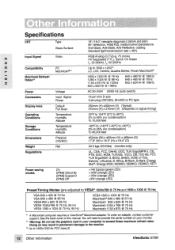
... coating Standard light transmission rate = 46% Input Signal Video z RGB Analog (0.7 Vp-p, 75 ohms) HV Separated (TTL), Synch On Green f.: 30-95kHz, iv: 50-200Hz Compatibility PC Macintosh**. Africa, B-Mark, S-Mark, Energy Star°, Energy 2000, NEMKO, SEMKO, DEMKO, SETI Power saving modes On DPMS Stand By DPMS Suspend DPMS Off Up to 1600 x 1200'3 LC, LCII, Centris, Quadra Series, Power Macintosh° Maximum Refresh U) Rates" 1600...
... coating Standard light transmission rate = 46% Input Signal Video z RGB Analog (0.7 Vp-p, 75 ohms) HV Separated (TTL), Synch On Green f.: 30-95kHz, iv: 50-200Hz Compatibility PC Macintosh**. Africa, B-Mark, S-Mark, Energy Star°, Energy 2000, NEMKO, SEMKO, DEMKO, SETI Power saving modes On DPMS Stand By DPMS Suspend DPMS Off Up to 1600 x 1200'3 LC, LCII, Centris, Quadra Series, Power Macintosh° Maximum Refresh U) Rates" 1600...
User Guide
Page 15
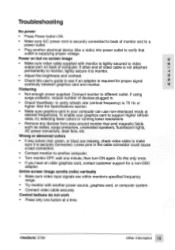
...tightly secured to video output port on but no screen image • Make sure video cable supplied with another computer. • Turn monitor OFF, wait one button at desired frequencies. Connect monitor to support higher refresh rates, try selecting fewer colors or running lower resolutions. • Remove any colors (red, green, or blue) are within monitor's specified frequency range. • Try monitor with monitor is supplying proper voltage. If using surge protector, reduce number of devices plugged in. • Check ViewMeter to verify refresh rate (vertical frequency) is...
...tightly secured to video output port on but no screen image • Make sure video cable supplied with another computer. • Turn monitor OFF, wait one button at desired frequencies. Connect monitor to support higher refresh rates, try selecting fewer colors or running lower resolutions. • Remove any colors (red, green, or blue) are within monitor's specified frequency range. • Try monitor with monitor is supplying proper voltage. If using surge protector, reduce number of devices plugged in. • Check ViewMeter to verify refresh rate (vertical frequency) is...
User Guide
Page 16
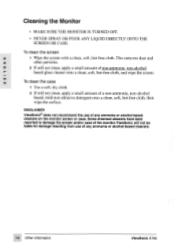
...-free cloth, and wipe the screen. DISCLAIMER ViewSonic® does not recommend the use of any ammonia or alcohol-based cleaners on the monitor screen or case. ViewSonic will not be liable for damage resulting from use of the monitor. Cleaning the Monitor • MAKE SURE THE MONITOR IS TURNED OFF. • NEVER SPRAY OR POUR ANY LIQUID DIRECTLY ONTO THE SCREEN OR CASE. This removes dust...
...-free cloth, and wipe the screen. DISCLAIMER ViewSonic® does not recommend the use of any ammonia or alcohol-based cleaners on the monitor screen or case. ViewSonic will not be liable for damage resulting from use of the monitor. Cleaning the Monitor • MAKE SURE THE MONITOR IS TURNED OFF. • NEVER SPRAY OR POUR ANY LIQUID DIRECTLY ONTO THE SCREEN OR CASE. This removes dust...
User Guide
Page 17
... is effective: The ViewSonic E790 color monitor, including the display tube, are warranted for three (3) years for all parts and three (3) years for the first consumer purchaser. c. LIMITED WARRANTY VIEWSONIC E790 MONITORS What the warranty covers: ViewSonic/' warrants its sole option repair or replace the product with the product. Any product on implied warranties and/or do not allow the exclusion of this users guide. 2.
... is effective: The ViewSonic E790 color monitor, including the display tube, are warranted for three (3) years for all parts and three (3) years for the first consumer purchaser. c. LIMITED WARRANTY VIEWSONIC E790 MONITORS What the warranty covers: ViewSonic/' warrants its sole option repair or replace the product with the product. Any product on implied warranties and/or do not allow the exclusion of this users guide. 2.
User Guide
Page 18
NOTES m z C) 16 Other Information ViewSonic E790
NOTES m z C) 16 Other Information ViewSonic E790


