User Guide
Page 7
... assures compatibility with care when moving it. • Choose a well ventilated area to position your monitor. ViewSonic E790 Getting Started 5 The monitor contains highvoltage parts. Precautions • For best viewing conditions sit at least 18...from the skin are difficult to remove. • NEVER REMOVE THE REAR COVER. fA Package Contents 0 z Your ViewSonic E790 package includes the following Microsoft® operating systems: Windows '95, Windows '98, Windows NT® (5.0). The ...for it to auto-install, select "Monitor Drivers," and follow the on-screen instructions.
... assures compatibility with care when moving it. • Choose a well ventilated area to position your monitor. ViewSonic E790 Getting Started 5 The monitor contains highvoltage parts. Precautions • For best viewing conditions sit at least 18...from the skin are difficult to remove. • NEVER REMOVE THE REAR COVER. fA Package Contents 0 z Your ViewSonic E790 package includes the following Microsoft® operating systems: Windows '95, Windows '98, Windows NT® (5.0). The ...for it to auto-install, select "Monitor Drivers," and follow the on-screen instructions.
User Guide
Page 8
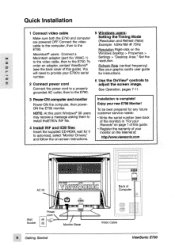
...the monitor) in "For your monitor on page 1 of Computer Video Cable If ViewSonic E790 See Operation, pages 7-11. 3 Power-ON computer and monitor Power-ON the computer, then powerON the E790 monitor. VMAC-1) to the video cable, then to the 5 Windows users: Setting ...the Timing Mode (Resolution and Refresh Rate) Example: 1024x768 @ 75Hz E790. U) number. 2 Connect power cord 6 Use the OnView® controls to auto-load, select "Monitor Drivers," and follow the on the Macintosit users: Connect a Windows desktop > Properties > m z Macintosh ...
...the monitor) in "For your monitor on page 1 of Computer Video Cable If ViewSonic E790 See Operation, pages 7-11. 3 Power-ON computer and monitor Power-ON the computer, then powerON the E790 monitor. VMAC-1) to the video cable, then to the 5 Windows users: Setting ...the Timing Mode (Resolution and Refresh Rate) Example: 1024x768 @ 75Hz E790. U) number. 2 Connect power cord 6 Use the OnView® controls to auto-load, select "Monitor Drivers," and follow the on the Macintosit users: Connect a Windows desktop > Properties > m z Macintosh ...


