
User Guide
Page 2
ENGLISH Contents Important Safety Instructions 1 Copyright Information 2 Product Registration 2 Antenna Installation Instructions 3 Cleaning the LCD TV 3 Getting Started Package Contents 4 Fixing ViewSonic LCD TV to the Wall 4 Front View of the Product 5 Rear View of the product 6 Remote Control 7 Installation ...9 Basic Operation 13 OSD Functions Video Menu ...15 Audio Menu ...15 TV Menu...16 Setup Menu ...16 VGA Menu...18 PIP/POP ...18 Other Information Specifications 20 Troubleshooting 21 Limited Warranty 22 ViewSonic N3250w
ENGLISH Contents Important Safety Instructions 1 Copyright Information 2 Product Registration 2 Antenna Installation Instructions 3 Cleaning the LCD TV 3 Getting Started Package Contents 4 Fixing ViewSonic LCD TV to the Wall 4 Front View of the Product 5 Rear View of the product 6 Remote Control 7 Installation ...9 Basic Operation 13 OSD Functions Video Menu ...15 Audio Menu ...15 TV Menu...16 Setup Menu ...16 VGA Menu...18 PIP/POP ...18 Other Information Specifications 20 Troubleshooting 21 Limited Warranty 22 ViewSonic N3250w
User Guide
Page 3
... by the manufacturer, or sold with a cart, stand, tripod, bracket, or table specified by the manufacturer. 12. Do not attempt to avoid injury from the equipment. Use only with the apparatus. Unplug this equipment near the equipment so that the power outlet is located near water. ViewSonic 1 N3250w If the plug does not fit into the unit, if the...
... by the manufacturer, or sold with a cart, stand, tripod, bracket, or table specified by the manufacturer. 12. Do not attempt to avoid injury from the equipment. Use only with the apparatus. Unplug this equipment near the equipment so that the power outlet is located near water. ViewSonic 1 N3250w If the plug does not fit into the unit, if the...
User Guide
Page 5
... the LCD TV screen or case. ViewSonic 3 N3250w If still not clean, apply a small amount of a non-ammonia, non-alcohol based, mild non-abrasive detergent onto a clean, soft, lint-free cloth, then wipe the surface. ENGLISH Antenna Installation Instructions 1. Lightning For added protection for this product during a heavy storm lighting may strike while you are holding the cable cord, causing serious injury; ViewSonic will...
... the LCD TV screen or case. ViewSonic 3 N3250w If still not clean, apply a small amount of a non-ammonia, non-alcohol based, mild non-abrasive detergent onto a clean, soft, lint-free cloth, then wipe the surface. ENGLISH Antenna Installation Instructions 1. Lightning For added protection for this product during a heavy storm lighting may strike while you are holding the cable cord, causing serious injury; ViewSonic will...

User Guide
Page 6
... for free-standing operation, you need to first remove the stand before mounting the device to the wall. • The wall-mount screw type: M6 x L10 ViewSonic 4 N3250w Use only approved wall-mounting brackets advised by ViewSonic or your LCD TV is already set up for future use the following guidelines: • Read the Important Safety Instructions, at opposing ends of the base (perpendicular to the TV rear panel), and a single screw is mounted on the underside of each supporting...
... for free-standing operation, you need to first remove the stand before mounting the device to the wall. • The wall-mount screw type: M6 x L10 ViewSonic 4 N3250w Use only approved wall-mounting brackets advised by ViewSonic or your LCD TV is already set up for future use the following guidelines: • Read the Important Safety Instructions, at opposing ends of the base (perpendicular to the TV rear panel), and a single screw is mounted on the underside of each supporting...
User Guide
Page 7
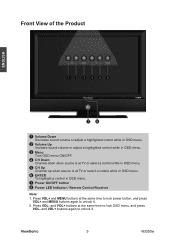
...- ViewSonic 5 N3250w Front View of the Product ENGLISH 1 23456 78 1 Volume Down Decrease sound volume or adjust a highlighted control while in OSD menu. 2 Volume Up Increase sound volume or adjust a highlighted control while in OSD menu. 3 Menu Turn OSD menu ON/OFF. 4 CH Down Channel down when source is at TV or select a control while in OSD menu. 5 CH Up Channel up when source is at the same time to lock power button, and press VOL+ and MENU buttons again to unlock...
...- ViewSonic 5 N3250w Front View of the Product ENGLISH 1 23456 78 1 Volume Down Decrease sound volume or adjust a highlighted control while in OSD menu. 2 Volume Up Increase sound volume or adjust a highlighted control while in OSD menu. 3 Menu Turn OSD menu ON/OFF. 4 CH Down Channel down when source is at TV or select a control while in OSD menu. 5 CH Up Channel up when source is at the same time to lock power button, and press VOL+ and MENU buttons again to unlock...
User Guide
Page 10
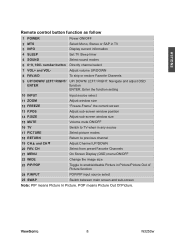
... Remote control button function as follow 1 POWER Power ON/OFF 2 MTS 3 INFO 4 SLEEP 5 SOUND 6 0~9, 100/- POP means Picture Out Of Picture. ViewSonic 8 N3250w number button 7 VOL+ and VOL8 FAV.A/D Select Mono, Stereo or SAP in Picture/Picture Out of Picture function 24 P.INPUT 25 SWAP POP/PIP input source select Switch between main screen and sub-screen Note: PIP means Picture In Picture. CH 21 MENU 22 WIDE Input source select Adjust window size "Freeze-Frame" the current screen Adjust sub-screen window position Adjust...
... Remote control button function as follow 1 POWER Power ON/OFF 2 MTS 3 INFO 4 SLEEP 5 SOUND 6 0~9, 100/- POP means Picture Out Of Picture. ViewSonic 8 N3250w number button 7 VOL+ and VOL8 FAV.A/D Select Mono, Stereo or SAP in Picture/Picture Out of Picture function 24 P.INPUT 25 SWAP POP/PIP input source select Switch between main screen and sub-screen Note: PIP means Picture In Picture. CH 21 MENU 22 WIDE Input source select Adjust window size "Freeze-Frame" the current screen Adjust sub-screen window position Adjust...

User Guide
Page 11
... battery compartment. 3 Reattach the battery cover. This may result in accordance with Auto Scan function when using an antenna or cable TV system without a cable connecter box (See page 16). RF Cable or Adapter (not supplied) ViewSonic 9 N3250w Insert Remote Control Batteries 1 Remove the battery cover by pulling then lifting the knob on the cover. 2 Insert the batteries, corresponding to TV antenna or set-top-box with 75-ohm coaxial cable. ENGLISH Installation 1.
... battery compartment. 3 Reattach the battery cover. This may result in accordance with Auto Scan function when using an antenna or cable TV system without a cable connecter box (See page 16). RF Cable or Adapter (not supplied) ViewSonic 9 N3250w Insert Remote Control Batteries 1 Remove the battery cover by pulling then lifting the knob on the cover. 2 Insert the batteries, corresponding to TV antenna or set-top-box with 75-ohm coaxial cable. ENGLISH Installation 1.
User Guide
Page 12
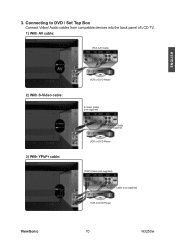
3. Connecting to DVD / Set Top Box Connect Video/ Audio cables from compatible devices into the back panel of LCD TV. 1) With AV cable: RCA A/V Cable ENGLISH 2) With S-Video cable: 3) With YPbPr cable: VCR or DVD Player S-Video Cable (not supplied) Audio in Cable (not supplied) VCR or DVD Player YPbPr Cable (not supplied) Audio in Cable (not supplied) VCR or DVD Player ViewSonic 10 N3250w
3. Connecting to DVD / Set Top Box Connect Video/ Audio cables from compatible devices into the back panel of LCD TV. 1) With AV cable: RCA A/V Cable ENGLISH 2) With S-Video cable: 3) With YPbPr cable: VCR or DVD Player S-Video Cable (not supplied) Audio in Cable (not supplied) VCR or DVD Player YPbPr Cable (not supplied) Audio in Cable (not supplied) VCR or DVD Player ViewSonic 10 N3250w

User Guide
Page 13
Headphone (not supplied) ViewSonic 11 N3250w Connecting to the Headphone Connect the headphone to the headphone output terminal of the LCD TV. (Headphone sold separately). Audio in terminal of the LCD TV to LCD TV Sound Connect the audio output terminal of the stereo system (stereo system sold separately). Connecting to External Stereo System to Listen to audio in Cable (not supplied) Stereo system 5. 4) With HDMI cable: ENGLISH HDMI Cable (not supplied) VCR or DVD Player (DVD Player should have the HDMI output terminal) 4.
Headphone (not supplied) ViewSonic 11 N3250w Connecting to the Headphone Connect the headphone to the headphone output terminal of the LCD TV. (Headphone sold separately). Audio in terminal of the LCD TV to LCD TV Sound Connect the audio output terminal of the stereo system (stereo system sold separately). Connecting to External Stereo System to Listen to audio in Cable (not supplied) Stereo system 5. 4) With HDMI cable: ENGLISH HDMI Cable (not supplied) VCR or DVD Player (DVD Player should have the HDMI output terminal) 4.
User Guide
Page 14
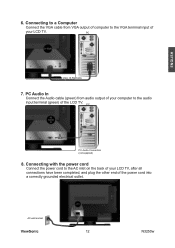
... Audio Connection (not supplied) 8. PC Audio In Connect the Audio cable (green) from VGA output of computer to the AC inlet on the back of your LCD TV, after all connections have been completed, and plug the other end of the LCD TV. Connecting with the power cord Connect the power cord to the VGA terminal input of your computer to the audio input terminal (green) of the power cord into a correctly grounded electrical outlet. AC wall socket ViewSonic...
... Audio Connection (not supplied) 8. PC Audio In Connect the Audio cable (green) from VGA output of computer to the AC inlet on the back of your LCD TV, after all connections have been completed, and plug the other end of the LCD TV. Connecting with the power cord Connect the power cord to the VGA terminal input of your computer to the audio input terminal (green) of the power cord into a correctly grounded electrical outlet. AC wall socket ViewSonic...
User Guide
Page 15
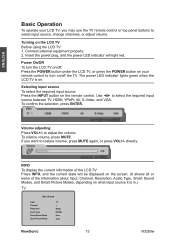
... will light red. The power LED indicator lights green when the LCD TV is in.) TV Main Window Input Channel Resolution Audio Type Smart Sound Mode Smart Picture Mode TV 1 NTSC MONO User User ViewSonic 13 N3250w Selecting input source To select the required input source: Press the INPUT button on . directly. Use ◄► to adjust the volume. If you may use the TV remote control or top panel buttons to restore volume, press MUTE again, or press VOL+/- To confirm the selection, press ENTER. Connect external equipment...
... will light red. The power LED indicator lights green when the LCD TV is in.) TV Main Window Input Channel Resolution Audio Type Smart Sound Mode Smart Picture Mode TV 1 NTSC MONO User User ViewSonic 13 N3250w Selecting input source To select the required input source: Press the INPUT button on . directly. Use ◄► to adjust the volume. If you may use the TV remote control or top panel buttons to restore volume, press MUTE again, or press VOL+/- To confirm the selection, press ENTER. Connect external equipment...
User Guide
Page 16
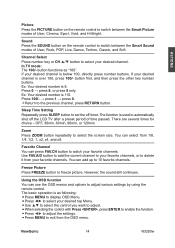
... menu. The basic operation is below 100, directly press number buttons. If your favorite channels. ViewSonic 14 N3250w If your favorite channels. Sleep Time Setting Repeatedly press SLEEP button to delete it from your desired channel is as "100". ENGLISH Picture Press the PICTURE button on the remote control to switch between the Smart Picture modes of User, Cinema, Sport, Vivid, and Hi-Bright. Sound Press the SOUND button on the remote control to switch between the Smart Sound modes of User...
... menu. The basic operation is below 100, directly press number buttons. If your favorite channels. ViewSonic 14 N3250w If your favorite channels. Sleep Time Setting Repeatedly press SLEEP button to delete it from your desired channel is as "100". ENGLISH Picture Press the PICTURE button on the remote control to switch between the Smart Picture modes of User, Cinema, Sport, Vivid, and Hi-Bright. Sound Press the SOUND button on the remote control to switch between the Smart Sound modes of User...

User Guide
Page 17
... remote control) Audio Menu - Adjusting the picture quality Video Menu is active in all but the VGA input source. • Bass: To adjust bass. • Treble: To adjust the treble. • Balance: To adjust left : softer.) Note: To adjust the Video settings, Smart Picture must be set to the User mode. (Select through the Picture button on the remote control) ViewSonic 15 N3250w OSD MENU Video Menu - Note: To adjust the Audio settings, Smart Sound must be set the audio quality and status Audio Menu is playing. • Audio...
... remote control) Audio Menu - Adjusting the picture quality Video Menu is active in all but the VGA input source. • Bass: To adjust bass. • Treble: To adjust the treble. • Balance: To adjust left : softer.) Note: To adjust the Video settings, Smart Picture must be set to the User mode. (Select through the Picture button on the remote control) ViewSonic 15 N3250w OSD MENU Video Menu - Note: To adjust the Audio settings, Smart Sound must be set the audio quality and status Audio Menu is playing. • Audio...

User Guide
Page 18
... OK. ViewSonic 16 N3250w ENGLISH • Tuner Mode: To select Cable or Air as the TV source. • Auto Scan: To auto scan the TV channels. Press ◄► to change channel. • Channel Add/Del.: Select Delete to skip the channel appointed, or select Add to restore the channel appointed. • Channel Edit: Press ENTER to edit a name for TV It is active in TV source. TV Menu - Setup Menu - To set up for the channel appointed...
... OK. ViewSonic 16 N3250w ENGLISH • Tuner Mode: To select Cable or Air as the TV source. • Auto Scan: To auto scan the TV channels. Press ◄► to change channel. • Channel Add/Del.: Select Delete to skip the channel appointed, or select Add to restore the channel appointed. • Channel Edit: Press ENTER to edit a name for TV It is active in TV source. TV Menu - Setup Menu - To set up for the channel appointed...
User Guide
Page 19
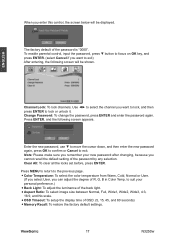
... select User, you enter this control, the screen below will be displayed. Enter the new password, use ▼ to move the cursor down, and then enter the new password again, press OK to confirm or Cancel to suit your new password after changing, because you cannot recall the default setting of the password is "0000". Press MENU to return to lock or unlock it...
... select User, you enter this control, the screen below will be displayed. Enter the new password, use ▼ to move the cursor down, and then enter the new password again, press OK to confirm or Cancel to suit your new password after changing, because you cannot recall the default setting of the password is "0000". Press MENU to return to lock or unlock it...

User Guide
Page 20
... picture) Press PIP/POP on the remote control repeatedly. The screen will change from different sources at the same time. (PIP is picture out of the picture PIP/POP PIP/POP button allows you to select input source for computer It is only active in picture; PIP Screen POP Screen • PIP Input Source Select 1. Main Screen Available Sub-Screen Input Source TV HDMI / YPbPr / VGA HDMI TV / YPbPr / AV / S-Video / VGA YPbPr TV / HDMI / AV / S-Video AV HDMI / YPbPr / VGA S-Video HDMI / YPbPr / VGA VGA TV / HDMI / AV / S-Video ViewSonic 18 N3250w...
... picture) Press PIP/POP on the remote control repeatedly. The screen will change from different sources at the same time. (PIP is picture out of the picture PIP/POP PIP/POP button allows you to select input source for computer It is only active in picture; PIP Screen POP Screen • PIP Input Source Select 1. Main Screen Available Sub-Screen Input Source TV HDMI / YPbPr / VGA HDMI TV / YPbPr / AV / S-Video / VGA YPbPr TV / HDMI / AV / S-Video AV HDMI / YPbPr / VGA S-Video HDMI / YPbPr / VGA VGA TV / HDMI / AV / S-Video ViewSonic 18 N3250w...

User Guide
Page 21
... function only acts on PIP. • PIP Position Select: Press P.POS to select the size of sub-screen. The function only acts on PIP. ENGLISH 2. Use ◄► to select the sub-input source and press ENTER to sub-screen, including video and sound. The function is the screen you select to move the index between the main screen and the sub-screen. ViewSonic 19 N3250w
... function only acts on PIP. • PIP Position Select: Press P.POS to select the size of sub-screen. The function only acts on PIP. ENGLISH 2. Use ◄► to select the sub-input source and press ENTER to sub-screen, including video and sound. The function is the screen you select to move the index between the main screen and the sub-screen. ViewSonic 19 N3250w

User Guide
Page 22
... 90% (no condensation) To 40,000 feet (12,000m) Dimensions Physical 808mm (W) x 627mm (H) x 242mm (D) 31.8'' (W) x 24.7'' (H) x 9.5'' (D) Weight Net 21.7 kg (47.74 Ib) Regulations Power consumption On Stand by NOM, TÜV/ARGENTINA < 180 W (green LED) < 3 W (red LED) Preset Timing Mode (Pre-adjusted to GTF® 1360 x 768 @ 60 Hz) Warning: Do not set the graphics card in permanent damage to the LCD TV. ViewSonic 20 N3250w
... 90% (no condensation) To 40,000 feet (12,000m) Dimensions Physical 808mm (W) x 627mm (H) x 242mm (D) 31.8'' (W) x 24.7'' (H) x 9.5'' (D) Weight Net 21.7 kg (47.74 Ib) Regulations Power consumption On Stand by NOM, TÜV/ARGENTINA < 180 W (green LED) < 3 W (red LED) Preset Timing Mode (Pre-adjusted to GTF® 1360 x 768 @ 60 Hz) Warning: Do not set the graphics card in permanent damage to the LCD TV. ViewSonic 20 N3250w
User Guide
Page 23
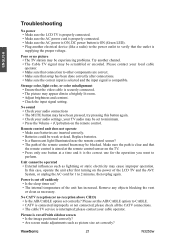
... contact your TV audio may be scrambled or encoded. Picture is compatible. ViewSonic 21 N3250w Replace batteries. • Is a fluorescent light illuminated near the remote control sensor? • The path of the remote control beam may be operated • External in a brightly lit room. • Adjust brightness and contrast. • Check the input signal setting. Please set the AIR/CABLE option to CABLE. • CATV is securely connected. • The picture may appear...
... contact your TV audio may be scrambled or encoded. Picture is compatible. ViewSonic 21 N3250w Replace batteries. • Is a fluorescent light illuminated near the remote control sensor? • The path of the remote control beam may be operated • External in a brightly lit room. • Adjust brightness and contrast. • Check the input signal setting. Please set the AIR/CABLE option to CABLE. • CATV is securely connected. • The picture may appear...
User Guide
Page 24
... for all parts excluding the light source and one (1) year for : 1. Replacement product or parts may also have other damages, whether incidental, consequential or otherwise. 3. Any product on ViewSonic products sold outside the U.S.A. Causes external to state. Use of 1 Release Date: 03-31-05 ViewSonic 22 N3250w Normal wear and tear. Warranty_LCDTV 4.3: ViewSonic LCD TV Warranty Rev. 1a 1 of supplies or parts not meeting ViewSonic's specifi...
... for all parts excluding the light source and one (1) year for : 1. Replacement product or parts may also have other damages, whether incidental, consequential or otherwise. 3. Any product on ViewSonic products sold outside the U.S.A. Causes external to state. Use of 1 Release Date: 03-31-05 ViewSonic 22 N3250w Normal wear and tear. Warranty_LCDTV 4.3: ViewSonic LCD TV Warranty Rev. 1a 1 of supplies or parts not meeting ViewSonic's specifi...


