

PJD5553Lws User Guide English
Page 1
... well as registering your limited coverage from ViewSonic Corporation, which is also found on our web site at http:// www.viewsonic.com in English, or in specific languages using the Regional selection box in the upper right corner of our website. PJD5353LS/PJD5553LWS DLP Projector User Guide IMPORTANT: Please read this User Guide will describe your product for future service. VS15875/VS15876
... well as registering your limited coverage from ViewSonic Corporation, which is also found on our web site at http:// www.viewsonic.com in English, or in specific languages using the Regional selection box in the upper right corner of our website. PJD5353LS/PJD5553LWS DLP Projector User Guide IMPORTANT: Please read this User Guide will describe your product for future service. VS15875/VS15876

PJD5553Lws User Guide English
Page 7
... you for being part of Smarter, Greener Computing. Please print this guide. The ViewSonic CD also provides an opportunity for you for future customer service needs. Please use the directory ":\CD\Registration". ViewSonic respects the environment and is committed to a respective ViewSonic office. Product Name: Model Number: Document Number: Serial Number: Purchase Date: For Your Records PJD5353LS/PJD5553LWS ViewSonic DLP Projector VS15875/VS15876 PJD5353LS/PJD5553LWS_UG_ENG Rev. 1A...
... you for being part of Smarter, Greener Computing. Please print this guide. The ViewSonic CD also provides an opportunity for you for future customer service needs. Please use the directory ":\CD\Registration". ViewSonic respects the environment and is committed to a respective ViewSonic office. Product Name: Model Number: Document Number: Serial Number: Purchase Date: For Your Records PJD5353LS/PJD5553LWS ViewSonic DLP Projector VS15875/VS15876 PJD5353LS/PJD5553LWS_UG_ENG Rev. 1A...

PJD5553Lws User Guide English
Page 8
Table of contents Important safety instructions 2 Introduction 4 Projector features 4 Shipping contents 5 Projector exterior view 6 Controls and functions 7 Positioning your projector 12 Choosing a location 12 Projection dimensions 13 Connection 15 Connecting a computer or monitor .... 16 Connecting Video source devices ...... 17 Using the cable management cover (optional accessory 19 Operation 20 Starting up the projector 20 Using the menus 21 Utilizing the password function ......... 22 Switching input signal 24 Adjusting the projected image 25 Magnifying and searching for ...
Table of contents Important safety instructions 2 Introduction 4 Projector features 4 Shipping contents 5 Projector exterior view 6 Controls and functions 7 Positioning your projector 12 Choosing a location 12 Projection dimensions 13 Connection 15 Connecting a computer or monitor .... 16 Connecting Video source devices ...... 17 Using the cable management cover (optional accessory 19 Operation 20 Starting up the projector 20 Using the menus 21 Utilizing the password function ......... 22 Switching input signal 24 Adjusting the projected image 25 Magnifying and searching for ...
PJD5553Lws User Guide English
Page 9
... remote control. 7. Refer servicing to suitably qualified professional service personnel. 12. Space that you operate your projector through a power stabilizer, surge protector or uninterruptible power supply (UPS). 6. However, to become excessively high, such as this manual and marked on . 5. Do not block the projection lens with all windows rolled up. - Do not look straight at least 50 cm clearance from walls and free flow of air...
... remote control. 7. Refer servicing to suitably qualified professional service personnel. 12. Space that you operate your projector through a power stabilizer, surge protector or uninterruptible power supply (UPS). 6. However, to become excessively high, such as this manual and marked on . 5. Do not block the projection lens with all windows rolled up. - Do not look straight at least 50 cm clearance from walls and free flow of air...

PJD5553Lws User Guide English
Page 10
... at angle of displaying inverted pictures for mounting the projector and ensure it is securely installed. 19. Do not use the Security bar for ceiling mounting of restraining the projector should be used with a cloth or any other soft surface. - This product is not fully horizontal may sense some heated air and odor from the ceiling due to your projector. Safety instructions for transporting or...
... at angle of displaying inverted pictures for mounting the projector and ensure it is securely installed. 19. Do not use the Security bar for ceiling mounting of restraining the projector should be used with a cloth or any other soft surface. - This product is not fully horizontal may sense some heated air and odor from the ceiling due to your projector. Safety instructions for transporting or...
PJD5553Lws User Guide English
Page 11
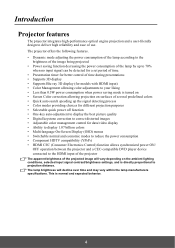
... brightness of the image being projected • Power saving function decreasing the power consumption of the lamp by up the signal detecting process • Color modes providing choices for different projection purposes • Selectable quick power off function • One-key auto-adjustment to display the best picture quality • Digital keystone correction to correct distorted images • Adjustable color management control for models with HDMI input) • Color Management allowing color adjustments to your liking...
... brightness of the image being projected • Power saving function decreasing the power consumption of the lamp by up the signal detecting process • Color modes providing choices for different projection purposes • Selectable quick power off function • One-key auto-adjustment to display the best picture quality • Digital keystone correction to correct distorted images • Adjustable color management control for models with HDMI input) • Color Management allowing color adjustments to your liking...
PJD5553Lws User Guide English
Page 14
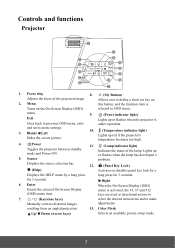
... standby mode and Power ON. 5. Enter Enacts the selected On-Screen Display (OSD) menu item. resulting from an angled projection. 13. Color Mode Up/ Down (Arrow keys) Selects an available picture setup mode. 7 Controls and functions Projector 1 7 2 8 3 9 10 4 11 5 13 12 6 7 1. Allows user to make adjustments. and saves menu settings. 3. Lights up red if the projector's temperature becomes too high. 4. Blank/ Left Hides the screen picture. 10. (Temperature indicator light) Lights up or flashes when the lamp has developed a problem. 12. (Panel Key Lock...
... standby mode and Power ON. 5. Enter Enacts the selected On-Screen Display (OSD) menu item. resulting from an angled projection. 13. Color Mode Up/ Down (Arrow keys) Selects an available picture setup mode. 7 Controls and functions Projector 1 7 2 8 3 9 10 4 11 5 13 12 6 7 1. Allows user to make adjustments. and saves menu settings. 3. Lights up red if the projector's temperature becomes too high. 4. Blank/ Left Hides the screen picture. 10. (Temperature indicator light) Lights up or flashes when the lamp has developed a problem. 12. (Panel Key Lock...

PJD5553Lws User Guide English
Page 16
... projector audio between the normal and mouse modes. Color Mode Selects an available picture setup mode. When several adjacent projectors are set on a connected PC) which responds to 8. To switch the code for the projector, select from the remote control. To switch the code for 5 seconds or more. PgUp PgDn Mouse Pattern Blank If different codes are in COMP1 COMP2 HDMI Auto Sync Source the projector OSD together for the remote control, press ID set and the number button...
... projector audio between the normal and mouse modes. Color Mode Selects an available picture setup mode. When several adjacent projectors are set on a connected PC) which responds to 8. To switch the code for the projector, select from the remote control. To switch the code for 5 seconds or more. PgUp PgDn Mouse Pattern Blank If different codes are in COMP1 COMP2 HDMI Auto Sync Source the projector OSD together for the remote control, press ID set and the number button...
PJD5553Lws User Guide English
Page 23
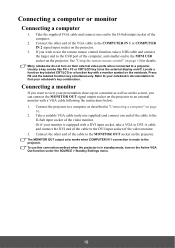
... a suitable VGA cable (only one supplied) and connect one end to the D-Sub output socket of the VGA cable to the COMPUTER IN 1 or COMPUTER IN 2 signal input socket on their external video ports when connected to view your presentation close-up on a monitor as well as described in standby mode, turn on the projector. 3. The MONITOR OUT output only works when COMPUTER IN 1 connection is in "Connecting a computer...
... a suitable VGA cable (only one supplied) and connect one end to the D-Sub output socket of the VGA cable to the COMPUTER IN 1 or COMPUTER IN 2 signal input socket on their external video ports when connected to view your presentation close-up on a monitor as well as described in standby mode, turn on the projector. 3. The MONITOR OUT output only works when COMPUTER IN 1 connection is in "Connecting a computer...

PJD5553Lws User Guide English
Page 25
... mono audio projector. The projector is turned on the projector. See "Changing HDMI input settings" on page 17 for details. Connect the other end of the cable to the HDMI input port on and operating correctly. If the selected video image is not displayed after the projector is turned on and the correct video source has been selected, check that the Video source device is only capable of the sockets; VGA-Component adapter (ViewSonic P/N: CB-00008906) Connecting an S-Video source device...
... mono audio projector. The projector is turned on the projector. See "Changing HDMI input settings" on page 17 for details. Connect the other end of the cable to the HDMI input port on and operating correctly. If the selected video image is not displayed after the projector is turned on and the correct video source has been selected, check that the Video source device is only capable of the sockets; VGA-Component adapter (ViewSonic P/N: CB-00008906) Connecting an S-Video source device...

PJD5553Lws User Guide English
Page 26
... audio input is ceiling-mounted or wallmounted. 1. If the selected video image is not displayed after the projector is turned on and the correct video source has been selected, check that all the cables are unavailable for details. Using the cable management cover (optional accessory) This cable management cover helps you to conceal and organize the cables connected to the back of the projector. 3. Tighten the screws that the signal cables have already made a Component Video connection...
... audio input is ceiling-mounted or wallmounted. 1. If the selected video image is not displayed after the projector is turned on and the correct video source has been selected, check that all the cables are unavailable for details. Using the cable management cover (optional accessory) This cable management cover helps you to conceal and organize the cables connected to the back of the projector. 3. Tighten the screws that the signal cables have already made a Component Video connection...

PJD5553Lws User Guide English
Page 27
... -screen instructions. 5. Please change to an input signal which is compatible with the projector's resolution or set the input signal to start to adjust the image clearness. As soon as the lamp lights up the projector 1. To maintain the lamp life, once you will see "Turning off . If the projector is on page 35 for the first time, select your desired input signal. Plug the power cord into the projector and into a wall socket. The Power indicator light stays blue...
... -screen instructions. 5. Please change to an input signal which is compatible with the projector's resolution or set the input signal to start to adjust the image clearness. As soon as the lamp lights up the projector 1. To maintain the lamp life, once you will see "Turning off . If the projector is on page 35 for the first time, select your desired input signal. Plug the power cord into the projector and into a wall socket. The Power indicator light stays blue...
PJD5553Lws User Guide English
Page 29
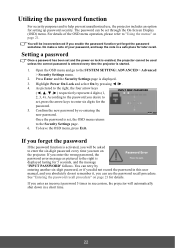
... projector will automatically shut down in this user manual, and you absolutely do not remember it, you turn on page 21. Do make a note of the OSD menu operation, please refer to enter the six-digit password every time you can be asked to "Using the menus" on the projector. Highlight Power On Lock and select On by re-entering the new password. The password can use , the projector...
... projector will automatically shut down in this user manual, and you absolutely do not remember it, you turn on page 21. Do make a note of the OSD menu operation, please refer to enter the six-digit password every time you can be asked to "Using the menus" on the projector. Highlight Power On Lock and select On by re-entering the new password. The password can use , the projector...
PJD5553Lws User Guide English
Page 30
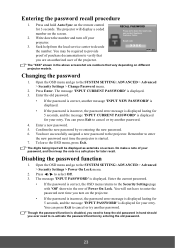
... projector. Press and hold Auto Sync on the projector. • If the password is incorrect, the password error message is displayed lasting for 5 seconds, and the message 'INPUT PASSWORD' is disabled, you turn off your retry. The projector will not have successfully assigned a new password to cancel or try another password. 4. Changing the password 1. RECALL PASSWORD Please write down the number and turn on the remote control for your projector. 3. Disabling the password function 1. Open the OSD menu...
... projector. Press and hold Auto Sync on the projector. • If the password is incorrect, the password error message is displayed lasting for 5 seconds, and the message 'INPUT PASSWORD' is disabled, you turn off your retry. The projector will not have successfully assigned a new password to cancel or try another password. 4. Changing the password 1. RECALL PASSWORD Please write down the number and turn on the remote control for your projector. 3. Disabling the password function 1. Open the OSD menu...

PJD5553Lws User Guide English
Page 38
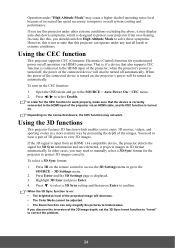
... be used to test the color presentation on monitors, TVs, projectors, etc., you can indicate the presentation time on the screen and enter the Color Management menu to the PICTURE > Advanced > Color Management menu. 2. Press to allow for other . a setting of that color in the projected picture will be considered. Follow these steps to display the Presentation Timer page. 31 Color management provides fine color control adjustment to highlight Saturation and adjust...
... be used to test the color presentation on monitors, TVs, projectors, etc., you can indicate the presentation time on the screen and enter the Color Management menu to the PICTURE > Advanced > Color Management menu. 2. Press to allow for other . a setting of that color in the projected picture will be considered. Follow these steps to display the Presentation Timer page. 31 Color management provides fine color control adjustment to highlight Saturation and adjust...
PJD5553Lws User Guide English
Page 41
... 3D Settings page is turned on, the projector's power will be adjusted. • The Zoom function can operate under any and all harsh or extreme conditions. To turn on the remote control to access the 3D Settings menu or go to the SOURCE > Auto Power On > CEC menu. 2. If the 3D signal is not to state that the device is correctly connected to the HDMI input of the projector via HDMI connection. Press...
... 3D Settings page is turned on, the projector's power will be adjusted. • The Zoom function can operate under any and all harsh or extreme conditions. To turn on the remote control to access the 3D Settings menu or go to the SOURCE > Auto Power On > CEC menu. 2. If the 3D signal is not to state that the device is correctly connected to the HDMI input of the projector via HDMI connection. Press...
PJD5553Lws User Guide English
Page 46
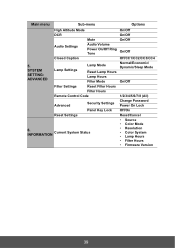
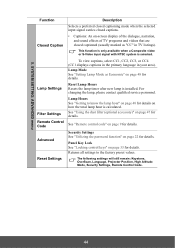
... Status • Resolution • Color System • Lamp Hours • Filter Hours • Firmware Version 39 Main menu Sub-menu Options High Altitude Mode On/Off DCR On/Off Mute On/Off Audio Settings Audio Volume Power On/Off Ring Tone On/Off Closed Caption Off/CC1/CC2/CC3/CC4 5. SYSTEM SETTING: ADVANCED Lamp Settings Lamp Mode Reset Lamp Hours Lamp Hours Filter Mode Normal/Economic/ Dynamic/Sleep Mode On/Off Filter Settings Reset Filter Hours Filter Hours Remote Control Code 1/2/3/4/5/6/7/8 (All) Advanced Security Settings Change Password Power On Lock...
... Status • Resolution • Color System • Lamp Hours • Filter Hours • Firmware Version 39 Main menu Sub-menu Options High Altitude Mode On/Off DCR On/Off Mute On/Off Audio Settings Audio Volume Power On/Off Ring Tone On/Off Closed Caption Off/CC1/CC2/CC3/CC4 5. SYSTEM SETTING: ADVANCED Lamp Settings Lamp Mode Reset Lamp Hours Lamp Hours Filter Mode Normal/Economic/ Dynamic/Sleep Mode On/Off Filter Settings Reset Filter Hours Filter Hours Remote Control Code 1/2/3/4/5/6/7/8 (All) Advanced Security Settings Change Password Power On Lock...
PJD5553Lws User Guide English
Page 51
.... Lamp Hours See "Getting to the factory preset values. Security Settings See "Utilizing the password function" on page 9 for details. Reset Lamp Hours Resets the lamp timer after new lamp is selected. This function is only available when a Composite video or S-Video input signal with NTSC system is installed. See "Remote control code" on page 22 for details. The following settings will still remain: Keystone, OverScan, Language, Projector Position, High Altitude Mode, Security Settings, Remote Control Code. 44 Lamp Mode See "Setting Lamp Mode as...
.... Lamp Hours See "Getting to the factory preset values. Security Settings See "Utilizing the password function" on page 9 for details. Reset Lamp Hours Resets the lamp timer after new lamp is selected. This function is only available when a Composite video or S-Video input signal with NTSC system is installed. See "Remote control code" on page 22 for details. The following settings will still remain: Keystone, OverScan, Language, Projector Position, High Altitude Mode, Security Settings, Remote Control Code. 44 Lamp Mode See "Setting Lamp Mode as...
PJD5553Lws User Guide English
Page 54
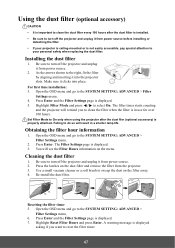
... inserting it from power source. 2. The filter timer starts counting and the projector will result in use for over 100 hours. You will see the Filter Hours information on the filter away. 4. Press Enter and the Filter Settings page is displayed. 5. A warning message is displayed asking if you to clean the filter when the filter is in a shorter lamp life. Highlight Filter Mode and press / to the SYSTEM SETTING: ADVANCED > Filter Settings menu. 4. Cleaning the dust filter 1. Press the latches...
... inserting it from power source. 2. The filter timer starts counting and the projector will result in use for over 100 hours. You will see the Filter Hours information on the filter away. 4. Press Enter and the Filter Settings page is displayed. 5. A warning message is displayed asking if you to clean the filter when the filter is in a shorter lamp life. Highlight Filter Mode and press / to the SYSTEM SETTING: ADVANCED > Filter Settings menu. 4. Cleaning the dust filter 1. Press the latches...

PJD5553Lws User Guide English
Page 59
... lens using the focus ring. Remove the obstacle. No picture Cause Remedy The video source is not correctly connected to turn on. Attempting to the input signal device. Check the connection. The projector and the screen are too far away from the projector. Stand within 8 meters (26 feet) from the projector. Adjust the remote control code. 52 Plug the power cord into the power outlet. The projector is not turned on or connected correctly. Adjust the focus of the projector...
... lens using the focus ring. Remove the obstacle. No picture Cause Remedy The video source is not correctly connected to turn on. Attempting to the input signal device. Check the connection. The projector and the screen are too far away from the projector. Stand within 8 meters (26 feet) from the projector. Adjust the remote control code. 52 Plug the power cord into the power outlet. The projector is not turned on or connected correctly. Adjust the focus of the projector...


