
PJD7830HDL Datasheet English
Page 1
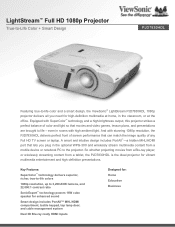
... wirelessly streaming content from a mobile device or notebook PC to the projector. Equipped with high ambient light. LightStream™ Full HD 1080p Projector True-to-Life Color + Smart Design PJD7830HDL Featuring true-to-life color and a smart design, the ViewSonic® LightStream PJD7830HDL 1080p projector delivers all you plug in the optional WPG-300 and wirelessly...
... wirelessly streaming content from a mobile device or notebook PC to the projector. Equipped with high ambient light. LightStream™ Full HD 1080p Projector True-to-Life Color + Smart Design PJD7830HDL Featuring true-to-life color and a smart design, the ViewSonic® LightStream PJD7830HDL 1080p projector delivers all you plug in the optional WPG-300 and wirelessly...
PJD7830HDL Datasheet English
Page 2
... 16W (x1) Normal / Eco-mode 32 dB / 28 dB Voltage 100~240VAC (Auto Switching), 50-60Hz (universal) Consumption 315W (max) / L. G. LightStream™ Full HD 1080p Projector PJD7830HDL PProjection Distance Inches 28-38 Meters 0.7-1.0 37-51 1.0-1.3 56-76 1.4-1.9 75-102 1.9-2.6 94-127 2.4-3.2 140-191 3.6-4.8 187-254 4.8-6.5 234-318 5.9-8.1 281-381 7.1-9.7 Screen Size (4:3) Diagonal...
... 16W (x1) Normal / Eco-mode 32 dB / 28 dB Voltage 100~240VAC (Auto Switching), 50-60Hz (universal) Consumption 315W (max) / L. G. LightStream™ Full HD 1080p Projector PJD7830HDL PProjection Distance Inches 28-38 Meters 0.7-1.0 37-51 1.0-1.3 56-76 1.4-1.9 75-102 1.9-2.6 94-127 2.4-3.2 140-191 3.6-4.8 187-254 4.8-6.5 234-318 5.9-8.1 281-381 7.1-9.7 Screen Size (4:3) Diagonal...

PJD7830HDL User Guide English
Page 1
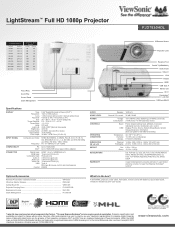
... User Guide to obtain important information on our web site at http:// www.viewsonic.com in English, or in specific languages using your product for future service. PJD7830HDL/PJD7835HD DLP Projector User Guide IMPORTANT: Please read this User Guide will describe your limited coverage ...from ViewSonic Corporation, which is also found on installing and using the Regional selection box in...
... User Guide to obtain important information on our web site at http:// www.viewsonic.com in English, or in specific languages using your product for future service. PJD7830HDL/PJD7835HD DLP Projector User Guide IMPORTANT: Please read this User Guide will describe your limited coverage ...from ViewSonic Corporation, which is also found on installing and using the Regional selection box in...

PJD7830HDL User Guide English
Page 7
... green. Product Name: Model Number: Document Number: Serial Number: Purchase Date: For Your Records PJD7830HDL/PJD7835HD ViewSonic DLP Projector VS15996/VS15994 PJD7830HDL/PJD7835HD_UG_ENG Rev. 1A 06-29-15 Product disposal at end of Smarter, Greener Computing. USA & Canada: http://...www.viewsonic.com/company/green/recycle-program/ Europe: http://www.viewsoniceurope.com/uk/support/recycling-information/ Taiwan:...
... green. Product Name: Model Number: Document Number: Serial Number: Purchase Date: For Your Records PJD7830HDL/PJD7835HD ViewSonic DLP Projector VS15996/VS15994 PJD7830HDL/PJD7835HD_UG_ENG Rev. 1A 06-29-15 Product disposal at end of Smarter, Greener Computing. USA & Canada: http://...www.viewsonic.com/company/green/recycle-program/ Europe: http://www.viewsoniceurope.com/uk/support/recycling-information/ Taiwan:...

PJD7830HDL User Guide English
Page 9
...from a cold location to a warm one. The product may fall, causing serious damage to the projector. 6. Do not use the projector for cleaning the projector housing. Ventilation The projector is exposed to service this product on the lens and the crucial internal parts. Do not block...operating instructions should be adhered to. 3. Power sources Check that the replacement parts are specified by suffocation. Cleaning Unplug the projector from the projector, accessories and optional parts) out of the reach of your unit is operated. 2. Keep the plastic packing materials (...
...from a cold location to a warm one. The product may fall, causing serious damage to the projector. 6. Do not use the projector for cleaning the projector housing. Ventilation The projector is exposed to service this product on the lens and the crucial internal parts. Do not block...operating instructions should be adhered to. 3. Power sources Check that the replacement parts are specified by suffocation. Cleaning Unplug the projector from the projector, accessories and optional parts) out of the reach of your unit is operated. 2. Keep the plastic packing materials (...

PJD7830HDL User Guide English
Page 10
... Ground For Australia and Mainland China Ground For the U.S.A. iii Notes on the AC power cord AC Power Cord must meet the requirement of this projector. and Canada Ground For Continental Europe For the U.K. Please ensure that the proper AC Power Cord is equipped with a grounding type AC line plug to...
... Ground For Australia and Mainland China Ground For the U.S.A. iii Notes on the AC power cord AC Power Cord must meet the requirement of this projector. and Canada Ground For Continental Europe For the U.K. Please ensure that the proper AC Power Cord is equipped with a grounding type AC line plug to...
PJD7830HDL User Guide English
Page 11
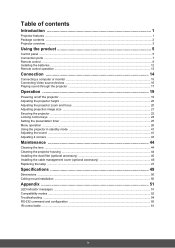
...15 Connecting Video source devices ...16 Playing sound through the projector ...17 Operation 19 Powering on/off the projector ...19 Adjusting the projector height ...20 Adjusting the projector zoom and focus 20 Adjusting projection image size ...21 Securing the projector ...22 Locking control keys ...24 Setting the presentation timer... mode 41 Adjusting the sound ...41 Adjusting 4 corners ...43 Maintenance 44 Cleaning the lens ...44 Cleaning the projector housing ...44 Installing the dust filter (optional accessory 45 Installing the cable management cover (optional accessory 46 Replacing ...
...15 Connecting Video source devices ...16 Playing sound through the projector ...17 Operation 19 Powering on/off the projector ...19 Adjusting the projector height ...20 Adjusting the projector zoom and focus 20 Adjusting projection image size ...21 Securing the projector ...22 Locking control keys ...24 Setting the presentation timer... mode 41 Adjusting the sound ...41 Adjusting 4 corners ...43 Maintenance 44 Cleaning the lens ...44 Cleaning the projector housing ...44 Installing the dust filter (optional accessory 45 Installing the cable management cover (optional accessory 46 Replacing ...

PJD7830HDL User Guide English
Page 12
...to the HDMI input of the projector Note • The information in this document is not permitted without notices. • The reproduction, transfer or copy of all or any part of use. Introduction Projector features The projector integrates high-performance optical engine ...projection and a user - The projector offers the following features: • Compatibility with Macintosh® computers • Compatibility with NTSC...
...to the HDMI input of the projector Note • The information in this document is not permitted without notices. • The reproduction, transfer or copy of all or any part of use. Introduction Projector features The projector integrates high-performance optical engine ...projection and a user - The projector offers the following features: • Compatibility with Macintosh® computers • Compatibility with NTSC...

PJD7830HDL User Guide English
Page 13
... the original shipping carton and packing materials and repack your product as it was originally packed at the factory if you have all these components: Projector Remote control (IR) & batteries (AAA *2 PCS) AC power cord VGA cable (D-SUB to ship it. 2 Carry bag 3. Package contents When you unpack the...
... the original shipping carton and packing materials and repack your product as it was originally packed at the factory if you have all these components: Projector Remote control (IR) & batteries (AAA *2 PCS) AC power cord VGA cable (D-SUB to ship it. 2 Carry bag 3. Package contents When you unpack the...
PJD7830HDL User Guide English
Page 14
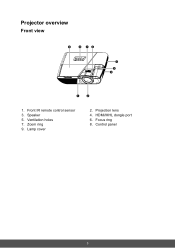
Lamp cover 2. Focus ring 8. Speaker 5. Zoom ring 9. HDMI/MHL dongle port 6. Ventilation holes 7. Control panel 3 Projection lens 4. Front IR remote control sensor 3. Projector overview Front view 9 8 76 5 4 3 1 2 1.
Lamp cover 2. Focus ring 8. Speaker 5. Zoom ring 9. HDMI/MHL dongle port 6. Ventilation holes 7. Control panel 3 Projection lens 4. Front IR remote control sensor 3. Projector overview Front view 9 8 76 5 4 3 1 2 1.
PJD7830HDL User Guide English
Page 15
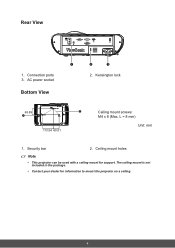
AC power socket 2. L = 8 mm) Unit: mm 1. The ceiling mount is not included in the package. • Contact your dealer for support. Security bar 2. Connection ports 3. Kensington lock Bottom View 65.89 1 113.54 60.01 2 Ceiling mount screws: M4 x 8 (Max. Ceiling mount holes Note • This projector can be used with a ceiling mount for information to mount the projector on a ceiling. 4 Rear View 1 2 3 1.
AC power socket 2. L = 8 mm) Unit: mm 1. The ceiling mount is not included in the package. • Contact your dealer for support. Security bar 2. Connection ports 3. Kensington lock Bottom View 65.89 1 113.54 60.01 2 Ceiling mount screws: M4 x 8 (Max. Ceiling mount holes Note • This projector can be used with a ceiling mount for information to mount the projector on a ceiling. 4 Rear View 1 2 3 1.
PJD7830HDL User Guide English
Page 16
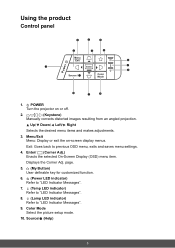
... Adj.) Enacts the selected On-Screen Display (OSD) menu item. Up/ Down/ Left/ Right Selects the desired menu items and makes adjustments. 3. POWER Turn the projector on -screen display menus. Displays the Corner Adj. Exit: Goes back to "LED Indicator Messages". 9. Source/ ? (Help) 5
... Adj.) Enacts the selected On-Screen Display (OSD) menu item. Up/ Down/ Left/ Right Selects the desired menu items and makes adjustments. 3. POWER Turn the projector on -screen display menus. Displays the Corner Adj. Exit: Goes back to "LED Indicator Messages". 9. Source/ ? (Help) 5
PJD7830HDL User Guide English
Page 18
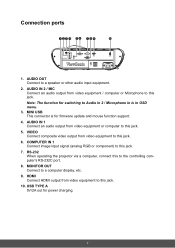
... to this jack. 7. COMPUTER IN 1 Connect image input signal (analog RGB or component) to the controlling computer's RS-232C port. 8. RS-232 When operating the projector via a computer, connect this to this jack. 10. AUDIO IN 1 Connect an audio output from video equipment to a speaker or other audio input equipment. 2. HDMI...
... to this jack. 7. COMPUTER IN 1 Connect image input signal (analog RGB or component) to the controlling computer's RS-232C port. 8. RS-232 When operating the projector via a computer, connect this to this jack. 10. AUDIO IN 1 Connect an audio output from video equipment to a speaker or other audio input equipment. 2. HDMI...
PJD7830HDL User Guide English
Page 19
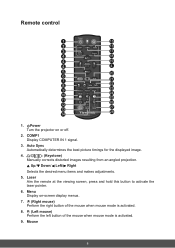
.... 6. COMP1 Display COMPUTER IN 1 signal. 3. Menu Display on or off. 2. Up/ Down/ Left/ Right Selects the desired menu items and makes adjustments. 5. Power Turn the projector on -screen display menus. 7. (Right mouse) Perform the right button of the mouse when mouse mode is activated. 8. (Left mouse) Perform the left button of...
.... 6. COMP1 Display COMPUTER IN 1 signal. 3. Menu Display on or off. 2. Up/ Down/ Left/ Right Selects the desired menu items and makes adjustments. 5. Power Turn the projector on -screen display menus. 7. (Right mouse) Perform the right button of the mouse when mouse mode is activated. 8. (Left mouse) Perform the left button of...

PJD7830HDL User Guide English
Page 20
...) User definable key for PJD5 series. 18. HDMI Display HDMI signal. 17. page. 20. Color Mode Select the picture setup mode. 28. (Mute) Toggles the projector audio between the normal and mouse modes. 10. (Lock)/ID Set Lock: Activates or disables panel key lock. Enter/ (Corner Adj.) Enacts the selected On...
...) User definable key for PJD5 series. 18. HDMI Display HDMI signal. 17. page. 20. Color Mode Select the picture setup mode. 28. (Mute) Toggles the projector audio between the normal and mouse modes. 10. (Lock)/ID Set Lock: Activates or disables panel key lock. Enter/ (Corner Adj.) Enacts the selected On...
PJD7830HDL User Guide English
Page 21
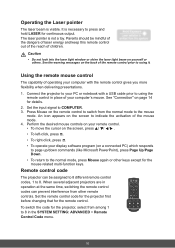
...codes, 1 to the normal mode, press Mouse again or other remote controls. Using the remote mouse control The capability of children. Connect the projector to your computer with a USB cable prior to 8 in operation at the same time, switching the remote control codes can be mindful of... operating your PC or notebook with the remote control gives you more flexibility when delivering presentations. 1. Remote control code The projector can prevent interference from other keys except for the projector, select from the normal mode to the mouse mode. Set the remote control code for the...
...codes, 1 to the normal mode, press Mouse again or other remote controls. Using the remote mouse control The capability of children. Connect the projector to your computer with a USB cable prior to 8 in operation at the same time, switching the remote control codes can be mindful of... operating your PC or notebook with the remote control gives you more flexibility when delivering presentations. 1. Remote control code The projector can prevent interference from other keys except for the projector, select from the normal mode to the mouse mode. Set the remote control code for the...

PJD7830HDL User Guide English
Page 22
When that happens, switch the code for 5 seconds or more. To switch the code for the remote control, press ID set and the corresponding button from 1 to 8, the remote control can control every projector. The initial code is switched to 8 buttons on the projector and remote control, there will be no response from the remote control. Note • If different codes are set to1. When the code is set on the remote control together for the remote control again. 11
When that happens, switch the code for 5 seconds or more. To switch the code for the remote control, press ID set and the corresponding button from 1 to 8, the remote control can control every projector. The initial code is switched to 8 buttons on the projector and remote control, there will be no response from the remote control. Note • If different codes are set to1. When the code is set on the remote control together for the remote control again. 11
PJD7830HDL User Guide English
Page 24
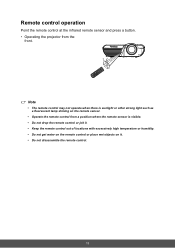
Remote control operation Point the remote control at the infrared remote sensor and press a button. • Operating the projector from the front. 15 15 5m 8m 7m Note • The remote control may not operate when there is sunlight or other strong light such ...
Remote control operation Point the remote control at the infrared remote sensor and press a button. • Operating the projector from the front. 15 15 5m 8m 7m Note • The remote control may not operate when there is sunlight or other strong light such ...
PJD7830HDL User Guide English
Page 25
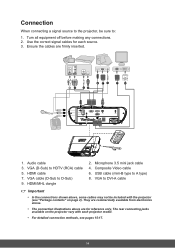
...• In the connections shown above are firmly inserted. 13 45 6 71 7 8 2 1 9 1. Connection When connecting a signal source to the projector, be included with each source. 3. Microphone 3.5 mini jack cable 4. Composite Video cable 6. The rear connecting jacks available on page 2). Audio cable 3. VGA... cable (D-Sub to A type) 8. Ensure the cables are for each projector model. • For detailed connection methods, see "Package contents" on the projector vary with the projector (see pages 15-17. 14 Use the correct signal cables for reference only. ...
...• In the connections shown above are firmly inserted. 13 45 6 71 7 8 2 1 9 1. Connection When connecting a signal source to the projector, be included with each source. 3. Microphone 3.5 mini jack cable 4. Composite Video cable 6. The rear connecting jacks available on page 2). Audio cable 3. VGA... cable (D-Sub to A type) 8. Ensure the cables are for each projector model. • For detailed connection methods, see "Package contents" on the projector vary with the projector (see pages 15-17. 14 Use the correct signal cables for reference only. ...
PJD7830HDL User Guide English
Page 26
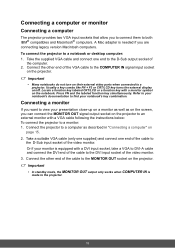
...when connected to a computer as on page 15. 2. Refer to your notebook's documentation to find your monitor is made to a monitor: 1. Connect the projector to a projector. Press FN and the labeled function key simultaneously. Connecting a monitor If you want to the D-Sub output socket of the computer. 2. Usually a key .... Connect the other end of the cable to the D-Sub input socket of the cable to the MONITOR OUT socket on the projector. Important • In standby mode, the MONITOR OUT output only works when COMPUTER IN is equipped with a monitor symbol on /off.
...when connected to a computer as on page 15. 2. Refer to your notebook's documentation to find your monitor is made to a monitor: 1. Connect the projector to a projector. Press FN and the labeled function key simultaneously. Connecting a monitor If you want to the D-Sub output socket of the computer. 2. Usually a key .... Connect the other end of the cable to the D-Sub input socket of the cable to the MONITOR OUT socket on the projector. Important • In standby mode, the MONITOR OUT output only works when COMPUTER IN is equipped with a monitor symbol on /off.


