

VSD220 Datasheet Hires (English,US)
Page 2
...that you need. Copyright © 2012 ViewSonic Corporation. Side Connectors (2 USB Ports) Integrated Speakers Power Button Side Connectors (Micro USB Port & Audio Port) Adjustable/Removable Stand Rear Connectors (Micro SD Card Slot, Micro HDMI Port, LAN/Ethernet Port, DC-In Port) Specifications SYSTEM CPU Processor Operating System System Memory Storage Memory Internal MIC DISPLAY Type Display Area Optimum Resolution Brightness Contrast Ratio Viewing Angles Response Time Backlight Backlight Life Touch Panel Touch Controller INPUT/OUTPUT USB HDMI Card Reader LAN/Ethernet Audio Power...
...that you need. Copyright © 2012 ViewSonic Corporation. Side Connectors (2 USB Ports) Integrated Speakers Power Button Side Connectors (Micro USB Port & Audio Port) Adjustable/Removable Stand Rear Connectors (Micro SD Card Slot, Micro HDMI Port, LAN/Ethernet Port, DC-In Port) Specifications SYSTEM CPU Processor Operating System System Memory Storage Memory Internal MIC DISPLAY Type Display Area Optimum Resolution Brightness Contrast Ratio Viewing Angles Response Time Backlight Backlight Life Touch Panel Touch Controller INPUT/OUTPUT USB HDMI Card Reader LAN/Ethernet Audio Power...
VSD220 User Guide (English)
Page 2
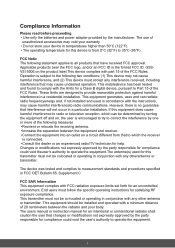
... with the limits for a Class B digital device, pursuant to operate the equipment. This equipment should be co-located or operating in conjunction with FCC radiation exposure limits set forth for an uncontrolled environment. End users must accept any otherantenna or transmitter. i Compliance Information Please read before proceeding • Use only the batteries and power adapter provided by one or more...
... with the limits for a Class B digital device, pursuant to operate the equipment. This equipment should be co-located or operating in conjunction with FCC radiation exposure limits set forth for an uncontrolled environment. End users must accept any otherantenna or transmitter. i Compliance Information Please read before proceeding • Use only the batteries and power adapter provided by one or more...
VSD220 User Guide (English)
Page 5
... easily accessible. POWER INPUT RATING: Refer to direct sunlight as objects may scratch the screen. 2. If needed, dampen the cloth slightly before cleaning the device. 15. Never use a pen or any foreign objects into the device. 5. Always power off before cleaning. The device has apertures to install or remove external devices that the power adapter complies with a soft cloth. DO NOT insert any sharp object to USB...
... easily accessible. POWER INPUT RATING: Refer to direct sunlight as objects may scratch the screen. 2. If needed, dampen the cloth slightly before cleaning the device. 15. Never use a pen or any foreign objects into the device. 5. Always power off before cleaning. The device has apertures to install or remove external devices that the power adapter complies with a soft cloth. DO NOT insert any sharp object to USB...

VSD220 User Guide (English)
Page 8
...of Contents 1 VSD220 Smart Display Features 1.1 Installing wall mount bracket 3 2 Set Up Your VSD220 Smart Display 2.1 Connection 4 2.2 Get Your Smart Display Ready for Use 4 2.3 Turn On Your Device 6 2.4 Turn Off Your Device 6 3 About Your VSD220 Smart Display 3.1 Touch Screen 7 3.2 Applications, Widgets and Shortcuts 7 3.3 Home Screen 8 3.4 Navigation buttons 10 3.5 Notifications and Status 10 3.5.1 Managing Notifications 11 3.5.2 Status Detail 11 3.6 Customizing Your Home Screen 11 3.6.1 Add an Item (Shortcut 11 3.6.2 Move an Item 12 3.6.3 Delete an Item 12 3.6.4 Change the...
...of Contents 1 VSD220 Smart Display Features 1.1 Installing wall mount bracket 3 2 Set Up Your VSD220 Smart Display 2.1 Connection 4 2.2 Get Your Smart Display Ready for Use 4 2.3 Turn On Your Device 6 2.4 Turn Off Your Device 6 3 About Your VSD220 Smart Display 3.1 Touch Screen 7 3.2 Applications, Widgets and Shortcuts 7 3.3 Home Screen 8 3.4 Navigation buttons 10 3.5 Notifications and Status 10 3.5.1 Managing Notifications 11 3.5.2 Status Detail 11 3.6 Customizing Your Home Screen 11 3.6.1 Add an Item (Shortcut 11 3.6.2 Move an Item 12 3.6.3 Delete an Item 12 3.6.4 Change the...

VSD220 User Guide (English)
Page 9
...Wi-Fi network 26 Synchronizing Your Google Data 27 Video Chat 27 6 Customizing Your VSD220 Smart Display 6.1 Display Settings 29 6.2 Sound and Ringtone Settings 29 6.2.1 System settings 30 6.2.2 Notifications settings 30 6.3 Date, Time, and Time Zone 30 6.4 Language & Input Settings 31 6.5 OSD Settings 32 6.5.1 Adjustment Bars 32 6.5.2 Functions Buttons 32 6.5.3 OSD Notice 33 7 Protecting Your VSD220 Smart Display 7.1 Protect Your Device Data with a Screen Unlock Pattern.. 34 7.1.1 Create a screen unlock pattern 34 7.1.2 Change unlock pattern settings 35 7.2 Disable the screen...
...Wi-Fi network 26 Synchronizing Your Google Data 27 Video Chat 27 6 Customizing Your VSD220 Smart Display 6.1 Display Settings 29 6.2 Sound and Ringtone Settings 29 6.2.1 System settings 30 6.2.2 Notifications settings 30 6.3 Date, Time, and Time Zone 30 6.4 Language & Input Settings 31 6.5 OSD Settings 32 6.5.1 Adjustment Bars 32 6.5.2 Functions Buttons 32 6.5.3 OSD Notice 33 7 Protecting Your VSD220 Smart Display 7.1 Protect Your Device Data with a Screen Unlock Pattern.. 34 7.1.1 Create a screen unlock pattern 34 7.1.2 Change unlock pattern settings 35 7.2 Disable the screen...

VSD220 User Guide (English)
Page 11
... dialog screen. - Press about 2-3 seconds to let the system enter the power saving mode (sleep mode - Components 1 Microphone 2 USB Ports x 2 3 Power Button 4 LED Indicator 5 Speaker 5 43 Descriptions Used for keyboard, mouse, Flash Disk or printer connections. Press about 0.5 seconds to turn on /off or power saving) Audio output. 1 Front View 9 1 8 7 2 6 No. NOTE • The features or applications described in this User's manual may vary depending on , off the device. - VSD220 Smart Display Features 1 VSD220 Smart Display Features...
... dialog screen. - Press about 2-3 seconds to let the system enter the power saving mode (sleep mode - Components 1 Microphone 2 USB Ports x 2 3 Power Button 4 LED Indicator 5 Speaker 5 43 Descriptions Used for keyboard, mouse, Flash Disk or printer connections. Press about 0.5 seconds to turn on /off or power saving) Audio output. 1 Front View 9 1 8 7 2 6 No. NOTE • The features or applications described in this User's manual may vary depending on , off the device. - VSD220 Smart Display Features 1 VSD220 Smart Display Features...

VSD220 User Guide (English)
Page 12
... USB Port 8 Touch Screen 9 Front-Panel Camera Descriptions Connect to digital high quality device for video and audio configurations (e.g. VSD220 Smart Display Features No. Connect to earphone or headset. Used for data transferring. (Need MTP driver) Touch the screen to control the on-screen configurations including menu items, applications, buttons, keyboard and so on the back of the smart display to connect power adapter, LAN cable, HDMI cable and insert the SD card. Back View 1 5 2 4 3 No. Connect to windows computer for making video calls with supportive web...
... USB Port 8 Touch Screen 9 Front-Panel Camera Descriptions Connect to digital high quality device for video and audio configurations (e.g. VSD220 Smart Display Features No. Connect to earphone or headset. Used for data transferring. (Need MTP driver) Touch the screen to control the on-screen configurations including menu items, applications, buttons, keyboard and so on the back of the smart display to connect power adapter, LAN cable, HDMI cable and insert the SD card. Back View 1 5 2 4 3 No. Connect to windows computer for making video calls with supportive web...

VSD220 User Guide (English)
Page 17
... Zoom In Descriptions Simply touch the items with you to perform a specific task. About Your VSD220 Smart Display 3 About Your VSD220 Smart Display 3.1 Touch Screen The main way to control the device is your starting point to access all the features on your device. Move an item on the screen to enlarge the view of an image or web page. 3.2 Applications, Widgets and Shortcuts The...
... Zoom In Descriptions Simply touch the items with you to perform a specific task. About Your VSD220 Smart Display 3 About Your VSD220 Smart Display 3.1 Touch Screen The main way to control the device is your starting point to access all the features on your device. Move an item on the screen to enlarge the view of an image or web page. 3.2 Applications, Widgets and Shortcuts The...
VSD220 User Guide (English)
Page 20
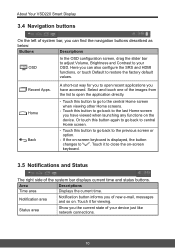
.... About Your VSD220 Smart Display 3.4 Navigation buttons On the left of system bar, you can also configure the SRS and HDMI functions, or touch Default to your device just like network connections. 10 Here you can find the navigation buttons described as below: Buttons Descriptions OSD In the OSD configuration screen, drag the slider bar to adjust Volume, Brightness and Contrast to restore the factory default values.
.... About Your VSD220 Smart Display 3.4 Navigation buttons On the left of system bar, you can also configure the SRS and HDMI functions, or touch Default to your device just like network connections. 10 Here you can find the navigation buttons described as below: Buttons Descriptions OSD In the OSD configuration screen, drag the slider bar to adjust Volume, Brightness and Contrast to restore the factory default values.
VSD220 User Guide (English)
Page 24
... remain on before entering sleeping mode, touch the Home button│Apps button│Settings│Display│Sleep. 14 NOTE • Set the duration of the larger circle that surrounds it to unlock the screen. When you press the power button to wake up the display, the screen lock wallpaper appears to 2.3 Turn On Your Device. to close the list of recently used applications, and touch the...
... remain on before entering sleeping mode, touch the Home button│Apps button│Settings│Display│Sleep. 14 NOTE • Set the duration of the larger circle that surrounds it to unlock the screen. When you press the power button to wake up the display, the screen lock wallpaper appears to 2.3 Turn On Your Device. to close the list of recently used applications, and touch the...
VSD220 User Guide (English)
Page 31
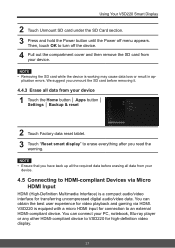
... video display. 21 We suggest you unmount the SD card before removing it. 4.4.3 Erase all data from your device 1 Touch the Home button │ Apps button │ Settings │ Backup & reset 2 Touch Factory data reset tablet. 3 Touch "Reset smart display" to erase everything after you have back up all the required data before erasing all data from your PC, notebook, Blu-ray player or any other HDMI-compliant device to VSD220 for transferring uncompressed digital audio/video data. Using Your VSD220 Smart Display...
... video display. 21 We suggest you unmount the SD card before removing it. 4.4.3 Erase all data from your device 1 Touch the Home button │ Apps button │ Settings │ Backup & reset 2 Touch Factory data reset tablet. 3 Touch "Reset smart display" to erase everything after you have back up all the required data before erasing all data from your PC, notebook, Blu-ray player or any other HDMI-compliant device to VSD220 for transferring uncompressed digital audio/video data. Using Your VSD220 Smart Display...

VSD220 User Guide (English)
Page 32
... a wireless network. resolution of 1920*1080. 5 To enable the touch screen function, connect the micro USB cable to the micro HDMI port located on . Your device cannot send and receive data using Bluetooth. 22 compliant device. 3 Connect the Type D connector of the HDMI cable to micro USB connector of the HDMI cable to your VSD220. 4 For PC or notebook connection, always set the appropriate resolution. Bluetooth on , and other Bluetooth devices can detect your device operates...
... a wireless network. resolution of 1920*1080. 5 To enable the touch screen function, connect the micro USB cable to the micro HDMI port located on . Your device cannot send and receive data using Bluetooth. 22 compliant device. 3 Connect the Type D connector of the HDMI cable to micro USB connector of the HDMI cable to your VSD220. 4 For PC or notebook connection, always set the appropriate resolution. Bluetooth on , and other Bluetooth devices can detect your device operates...

VSD220 User Guide (English)
Page 35
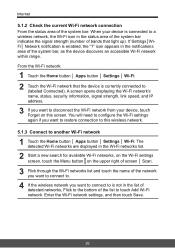
... a Wi-Fi network you can connect VSD220 to a LAN network via RJ45 cable on LAN connector or set up a Wi-Fi connection. 5.1.1 Wi-Fi connection 1 Touch the Home button │ Apps button │Settings │ Wi-Fi to enable Wi-Fi function by Wired Equivalent Privacy (WEP), Wi-Fi Protected Access (WPA), WPA2, or Wireless Protected Setup (WPS), you reset your device connects to a previously accessed secured wireless network, you will not...
... a Wi-Fi network you can connect VSD220 to a LAN network via RJ45 cable on LAN connector or set up a Wi-Fi connection. 5.1.1 Wi-Fi connection 1 Touch the Home button │ Apps button │Settings │ Wi-Fi to enable Wi-Fi function by Wired Equivalent Privacy (WEP), Wi-Fi Protected Access (WPA), WPA2, or Wireless Protected Setup (WPS), you reset your device connects to a previously accessed secured wireless network, you will not...
VSD220 User Guide (English)
Page 36
... Home button │ Apps button │ Settings │ Wi-Fi. 2 Touch the Wi-Fi network that light up). A screen opens displaying the Wi-Fi network's name, status, security information, signal strength, link speed, and IP address. 3 If you want to disconnect the Wi-Fi network from your device is connected to a wireless network, the Wi-Fi icon in the status area of the system bar indicates the signal strength (number...
... Home button │ Apps button │ Settings │ Wi-Fi. 2 Touch the Wi-Fi network that light up). A screen opens displaying the Wi-Fi network's name, status, security information, signal strength, link speed, and IP address. 3 If you want to disconnect the Wi-Fi network from your device is connected to a wireless network, the Wi-Fi icon in the status area of the system bar indicates the signal strength (number...

VSD220 User Guide (English)
Page 37
... need to use to access your Google account. section, touch icon to select check box to synchronize Internet 1 Touch the Home button │ Apps button │ Settings │ Accounts & sync. 2 Under the Accounts & sync. VSD220 supports various video chat apps from Google Play. NOTE • While data is the most simple video chat application for synchronizing, touch "ADD ACCOUNT" on the upper right of screen to make...
... need to use to access your Google account. section, touch icon to select check box to synchronize Internet 1 Touch the Home button │ Apps button │ Settings │ Accounts & sync. 2 Under the Accounts & sync. VSD220 supports various video chat apps from Google Play. NOTE • While data is the most simple video chat application for synchronizing, touch "ADD ACCOUNT" on the upper right of screen to make...
VSD220 User Guide (English)
Page 39
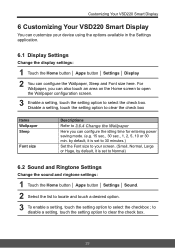
... configuration screen. 3 Enable a setting, touch the setting option to clear the check box. 29 by default, it is set to 30 minutes.) Set the Font size to your device using the options available in the Settings application. 6.1 Display Settings Change the display settings: 1 Touch the Home button │ Apps button │ Settings │ Display 2 You can configure the idling time for entering power saving mode. (e.g. 15 sec., 30 sec., 1, 2, 5, 10 or 30 min. Disable a setting...
... configuration screen. 3 Enable a setting, touch the setting option to clear the check box. 29 by default, it is set to 30 minutes.) Set the Font size to your device using the options available in the Settings application. 6.1 Display Settings Change the display settings: 1 Touch the Home button │ Apps button │ Settings │ Display 2 You can configure the idling time for entering power saving mode. (e.g. 15 sec., 30 sec., 1, 2, 5, 10 or 30 min. Disable a setting...
VSD220 User Guide (English)
Page 41
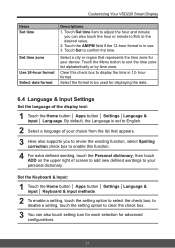
... VSD220 Smart Display Items Set time Set time zone Use 24-hour format Select date format Descriptions 1. Select the format to display the time in use. 3. Clear this function. 4 For extra defined wording, touch the Personal dictionary, then touch ADD on the upper right of screen to add new defined wordings to English. 2 Select a language of the display text: 1 Touch the Home button │ Apps button │ Settings │Language & input │ Language. By default, the Language...
... VSD220 Smart Display Items Set time Set time zone Use 24-hour format Select date format Descriptions 1. Select the format to display the time in use. 3. Clear this function. 4 For extra defined wording, touch the Personal dictionary, then touch ADD on the upper right of screen to add new defined wordings to English. 2 Select a language of the display text: 1 Touch the Home button │ Apps button │ Settings │Language & input │ Language. By default, the Language...
VSD220 User Guide (English)
Page 44
... the screen is drawn. Protecting Your VSD220 Smart Display 7 Protecting Your VSD220 Smart Display 7.1 Protect Your Device Data with a screen unlock pattern. Then, touch Next when you can protect your device data against unauthorized access by connecting at least four dots in to the Google website using your Google account name and password. 3 Draw a new screen unlock pattern. 7.1.1 Create a screen unlock pattern 1 Touch the Home button │ Apps button │ Settings │ Security. 2 Touch Screen Lock section...
... the screen is drawn. Protecting Your VSD220 Smart Display 7 Protecting Your VSD220 Smart Display 7.1 Protect Your Device Data with a screen unlock pattern. Then, touch Next when you can protect your device data against unauthorized access by connecting at least four dots in to the Google website using your Google account name and password. 3 Draw a new screen unlock pattern. 7.1.1 Create a screen unlock pattern 1 Touch the Home button │ Apps button │ Settings │ Security. 2 Touch Screen Lock section...
VSD220 User Guide (English)
Page 46
... touch Continue. 4 Select None secured to disable the PIN; Protecting Your VSD220 Smart Display 5 Enter the PIN again to confirm. 6 Touch OK. 7.3.1 Disable or change PIN code. 7.4 Protect Your Device Data with a Password 1 Touch the Home button │ Apps button │ Settings │ Security. 2 Touch Screen Lock section → Password. 3 On the Choose your password screen appears, enter a password in the text box. A valid password consists of at least 4 characters and contains...
... touch Continue. 4 Select None secured to disable the PIN; Protecting Your VSD220 Smart Display 5 Enter the PIN again to confirm. 6 Touch OK. 7.3.1 Disable or change PIN code. 7.4 Protect Your Device Data with a Password 1 Touch the Home button │ Apps button │ Settings │ Security. 2 Touch Screen Lock section → Password. 3 On the Choose your password screen appears, enter a password in the text box. A valid password consists of at least 4 characters and contains...

VSD220 User Guide (English)
Page 49
... power button (power on/off/suspend/ resume) HDMI x 1 (Micro type) USB x 2 USB x 1 (Micro type, supports OTG) 3.5mm Headphone-out LAN (RJ45, supports 10/100 Mbps) DC Jack (ID 1.7mm, OD4.0mm) SD card slot (Micro type) Optical touch type, with glass One touch & Gesture 1W x 2 Input: 100~240Vac, 50-60Hz, 1.2A Output: DC Jack 19V, 2.1A, 40W max. 30W typ. 9 Appendix Specification LCD Spec...
... power button (power on/off/suspend/ resume) HDMI x 1 (Micro type) USB x 2 USB x 1 (Micro type, supports OTG) 3.5mm Headphone-out LAN (RJ45, supports 10/100 Mbps) DC Jack (ID 1.7mm, OD4.0mm) SD card slot (Micro type) Optical touch type, with glass One touch & Gesture 1W x 2 Input: 100~240Vac, 50-60Hz, 1.2A Output: DC Jack 19V, 2.1A, 40W max. 30W typ. 9 Appendix Specification LCD Spec...


