
LCD Product Comparison Guide
Page 1
... (typ) Video Response (ms) Viewing Angle (H/V) Optimum Resolution Interface AutoTune® Function Portrait/Landscape Pivot* OnView® Menu Control Integrated Speakers Ergonomic Adjustments VESA® Wall Mount Option Net Weight (lb.) Physical Dimensions (in display technology. Specifications subject to change without notice. The value-priced A Series displays deliver exceptional price/performance combinations for discriminating users who require the highest screen performance from ViewSonic. †...
... (typ) Video Response (ms) Viewing Angle (H/V) Optimum Resolution Interface AutoTune® Function Portrait/Landscape Pivot* OnView® Menu Control Integrated Speakers Ergonomic Adjustments VESA® Wall Mount Option Net Weight (lb.) Physical Dimensions (in display technology. Specifications subject to change without notice. The value-priced A Series displays deliver exceptional price/performance combinations for discriminating users who require the highest screen performance from ViewSonic. †...

LCD Product Comparison Guide
Page 2
... - The digital interface delivers optimized image quality with all listed products unless otherwise specified. Adapter may vary by ViewSonic. ViewSonic® LCD Displays 2010 Panel Size (in .) (W x H x D) Power Consumption-watts (typ) Power Supply Cabinet Color Special Features VA926 19.0 Windows 7 300 1000:1 static 2000:1 dynamic 5 170°/160° 1280x1024 Analog/Digital Yes - Tilt Yes 7.5 17.6 x 13.8 x 7.5 20 Integrated Black Eco-mode for multiple digital connectivity options.
... - The digital interface delivers optimized image quality with all listed products unless otherwise specified. Adapter may vary by ViewSonic. ViewSonic® LCD Displays 2010 Panel Size (in .) (W x H x D) Power Consumption-watts (typ) Power Supply Cabinet Color Special Features VA926 19.0 Windows 7 300 1000:1 static 2000:1 dynamic 5 170°/160° 1280x1024 Analog/Digital Yes - Tilt Yes 7.5 17.6 x 13.8 x 7.5 20 Integrated Black Eco-mode for multiple digital connectivity options.

LCD Product Comparison Guide
Page 3
... Analog/Digital Yes - Select displays feature our proprietary Dynamic Structure™ and Amplified Impulse™ technologies to change without notice. Adapter may vary by ViewSonic. All rights reserved. [14798-02B-05/10] page 3 of their respective companies. Video Response (ms) Viewing Angle (H/V) Optimum Resolution Interface AutoTune® Function Portrait/Landscape Pivot* OnView® Menu Control Integrated Speakers Ergonomic Adjustments VESA® Wall...
... Analog/Digital Yes - Select displays feature our proprietary Dynamic Structure™ and Amplified Impulse™ technologies to change without notice. Adapter may vary by ViewSonic. All rights reserved. [14798-02B-05/10] page 3 of their respective companies. Video Response (ms) Viewing Angle (H/V) Optimum Resolution Interface AutoTune® Function Portrait/Landscape Pivot* OnView® Menu Control Integrated Speakers Ergonomic Adjustments VESA® Wall...

LCD Product Comparison Guide
Page 4
...) Viewing Angle (H/V) Optimum Resolution Interface AutoTune® Function Portrait/Landscape Pivot* OnView® Menu Control Integrated Speakers Ergonomic Adjustments VESA® Wall Mount Option Net Weight (lb.) Physical Dimensions (in their respective companies. Sales: (888)881-8781 salesinfo@ViewSonic.com ViewSonic.com For the most current product accessories and specifications visit ViewSonic.com.*Software included for complete details. Apple computers not supported by...
...) Viewing Angle (H/V) Optimum Resolution Interface AutoTune® Function Portrait/Landscape Pivot* OnView® Menu Control Integrated Speakers Ergonomic Adjustments VESA® Wall Mount Option Net Weight (lb.) Physical Dimensions (in their respective companies. Sales: (888)881-8781 salesinfo@ViewSonic.com ViewSonic.com For the most current product accessories and specifications visit ViewSonic.com.*Software included for complete details. Apple computers not supported by...

LCD Product Comparison Guide
Page 5
... surround sound, HDMI, RoHS HDMI input, SRS Premium Sound, slim bezel, Eco-mode for PC only. Sales: (888)881-8781 salesinfo@ViewSonic.com ViewSonic.com For the most current product accessories and specifications visit ViewSonic.com.*Software included for energy savings . . Adapter may vary by ViewSonic. Corporate names, trademarks stated herein are the property of colors - ViewSonic® LCD Displays 2010 Panel Size (in .) (W x H x D) Power Consumption-watts (typ) Power Supply Cabinet Color Special...
... surround sound, HDMI, RoHS HDMI input, SRS Premium Sound, slim bezel, Eco-mode for PC only. Sales: (888)881-8781 salesinfo@ViewSonic.com ViewSonic.com For the most current product accessories and specifications visit ViewSonic.com.*Software included for energy savings . . Adapter may vary by ViewSonic. Corporate names, trademarks stated herein are the property of colors - ViewSonic® LCD Displays 2010 Panel Size (in .) (W x H x D) Power Consumption-watts (typ) Power Supply Cabinet Color Special...

LCD Product Comparison Guide
Page 6
... 4-port USB 2.0 hub, OptiSync®, HDMI, Eco-mode for energy savings, slim bezel, ENERGY STAR® 5.0, EPEAT certified 58 Integrated Black HDMI input, SRS Premium Sound, slim bezel, Ecomode for complete details. Adapter may vary by ViewSonic. Selection, offers and programs may be required. Corporate names, trademarks stated herein are the property of colors - ViewSonic® LCD Displays 2010 Panel Size (in .) (W x H x D) Power Consumption-watts (typ) Power Supply...
... 4-port USB 2.0 hub, OptiSync®, HDMI, Eco-mode for energy savings, slim bezel, ENERGY STAR® 5.0, EPEAT certified 58 Integrated Black HDMI input, SRS Premium Sound, slim bezel, Ecomode for complete details. Adapter may vary by ViewSonic. Selection, offers and programs may be required. Corporate names, trademarks stated herein are the property of colors - ViewSonic® LCD Displays 2010 Panel Size (in .) (W x H x D) Power Consumption-watts (typ) Power Supply...

VSD241 Datasheet Hi Res (English)
Page 2
... of connectivity options including HDMI, two full-sized USB ports, a micro USB and a mini USB, and SD card storage. and is connected as an external display to the internet and cloud. Users can also utilize the webcam when the VSD241 is in accordance with ViewSonic. VSD241 smart display, power cord and adapter, micro USB cable, mini USB cable, Quick Start Guide ViewSonic Corporation's QMS & EMS have been registered to ISO 9001 & ISO 14001, respectively, by Google and used according to change...
... of connectivity options including HDMI, two full-sized USB ports, a micro USB and a mini USB, and SD card storage. and is connected as an external display to the internet and cloud. Users can also utilize the webcam when the VSD241 is in accordance with ViewSonic. VSD241 smart display, power cord and adapter, micro USB cable, mini USB cable, Quick Start Guide ViewSonic Corporation's QMS & EMS have been registered to ISO 9001 & ISO 14001, respectively, by Google and used according to change...

VSD241 User Guide (English)
Page 2
... FCC ID in the format FCC ID: GSSVS15197 on the product label.This device complies with part 15 of the following two conditions: (1) This device may void your warranty. • Do not store your body. End users must accept any interference received, including interference that have received FCC approval. This transmitter must not be installed and operated with a minimum distance...
... FCC ID in the format FCC ID: GSSVS15197 on the product label.This device complies with part 15 of the following two conditions: (1) This device may void your warranty. • Do not store your body. End users must accept any interference received, including interference that have received FCC approval. This transmitter must not be installed and operated with a minimum distance...

VSD241 User Guide (English)
Page 9
... of Contents 1 VSD241 Smart Display Features 1.1 Installing wall mount bracket 4 2 Set Up Your VSD241 Smart Display 2.1 Connection 5 2.2 Get Your Smart Display Ready for Use 5 2.3 Power on Your Device 6 2.3.1 Wake on LAN (WOL) Function 7 2.4 Power Off Your Device 7 3 About Your VSD241 Smart Display 3.1 Touch Screen 8 3.2 Applications, Widgets and Shortcuts 9 3.3 Home Screen 9 3.4 Navigation buttons 11 3.5 Status Bar 11 3.5.1 Managing Status Menu 12 3.6 Customizing Your Home Screen 12 3.6.1 Add an Item (Shortcut 12 3.6.2 Move an Item 13 3.6.3 Delete an Item 13 3.6.4 Change the...
... of Contents 1 VSD241 Smart Display Features 1.1 Installing wall mount bracket 4 2 Set Up Your VSD241 Smart Display 2.1 Connection 5 2.2 Get Your Smart Display Ready for Use 5 2.3 Power on Your Device 6 2.3.1 Wake on LAN (WOL) Function 7 2.4 Power Off Your Device 7 3 About Your VSD241 Smart Display 3.1 Touch Screen 8 3.2 Applications, Widgets and Shortcuts 9 3.3 Home Screen 9 3.4 Navigation buttons 11 3.5 Status Bar 11 3.5.1 Managing Status Menu 12 3.6 Customizing Your Home Screen 12 3.6.1 Add an Item (Shortcut 12 3.6.2 Move an Item 13 3.6.3 Delete an Item 13 3.6.4 Change the...
VSD241 User Guide (English)
Page 12
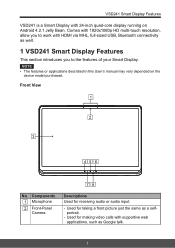
... work with 24-inch quad-core display running on the device model purchased. Front View 1 2 3 45 6 78 No. Comes with 1920x1080p HD multi-touch resolution, allow you to the features of your Smart Display. Components 1 Microphone 2 Front-Panel Camera Descriptions Used for taking a front picture just the same as Google talk. 1 Used for making video calls with supportive web applications, such as a selfportrait. - Used for receiving audio or audio input...
... work with 24-inch quad-core display running on the device model purchased. Front View 1 2 3 45 6 78 No. Comes with 1920x1080p HD multi-touch resolution, allow you to the features of your Smart Display. Components 1 Microphone 2 Front-Panel Camera Descriptions Used for taking a front picture just the same as Google talk. 1 Used for making video calls with supportive web applications, such as a selfportrait. - Used for receiving audio or audio input...

VSD241 User Guide (English)
Page 13
... Button (Up / Right) Use the arrow buttons (Down / Left and Up / Right) to switch input signal (HDMI / Android). - Touch about 3 seconds to each item of OSD menu. 2 Select function in blue) - You can also use the arrow buttons to adjust the values to shut down the smart display (under Android mode). 6 Input Signal Switch / OSD Menu Select - VSD241 Smart Display Features No. Components Descriptions 3 Touch Screen Touch the screen to control the on-screen configurations including menu items, applications, buttons...
... Button (Up / Right) Use the arrow buttons (Down / Left and Up / Right) to switch input signal (HDMI / Android). - Touch about 3 seconds to each item of OSD menu. 2 Select function in blue) - You can also use the arrow buttons to adjust the values to shut down the smart display (under Android mode). 6 Input Signal Switch / OSD Menu Select - VSD241 Smart Display Features No. Components Descriptions 3 Touch Screen Touch the screen to control the on-screen configurations including menu items, applications, buttons...

VSD241 User Guide (English)
Page 14
... x 2 Used for keyboard, mouse, flash disk ( supports FAT32 format only) or printer connections. 5 Mini USB Port External display mode for USB upstream, Webcam and Touch-screen control functionality. 6 Micro USB Port Connect to earphone or headset. 3 Back View VSD241 Smart Display Features 4 5 6 7 8 12 3 No. Components Descriptions 1 DC in Port Connect to power adaptor. 2 HDMI Connect to digital high quality device for data transferring. (Need MTP driver) 7 SD Card Slot Input SD card to extend storage capacity. 8 Earphone Jack Connect to windows computer for video and audio...
... x 2 Used for keyboard, mouse, flash disk ( supports FAT32 format only) or printer connections. 5 Mini USB Port External display mode for USB upstream, Webcam and Touch-screen control functionality. 6 Micro USB Port Connect to earphone or headset. 3 Back View VSD241 Smart Display Features 4 5 6 7 8 12 3 No. Components Descriptions 1 DC in Port Connect to power adaptor. 2 HDMI Connect to digital high quality device for data transferring. (Need MTP driver) 7 SD Card Slot Input SD card to extend storage capacity. 8 Earphone Jack Connect to windows computer for video and audio...
VSD241 User Guide (English)
Page 19
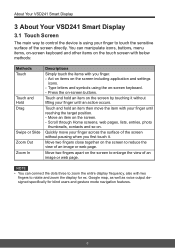
... -screen buttons. Scroll through Home screens, web pages, lists, entries, photo thumbnails, contacts and so on the screen. - Move two fingers apart on the screen to reduce the view of the screen directly. Move an item on . Quickly move the item with you first touch it. About Your VSD241 Smart Display 3 About Your VSD241 Smart Display 3.1 Touch Screen The main way to control the device is using the on-screen keyboard...
... -screen buttons. Scroll through Home screens, web pages, lists, entries, photo thumbnails, contacts and so on the screen. - Move two fingers apart on the screen to reduce the view of the screen directly. Move an item on . Quickly move the item with you first touch it. About Your VSD241 Smart Display 3 About Your VSD241 Smart Display 3.1 Touch Screen The main way to control the device is using the on-screen keyboard...
VSD241 User Guide (English)
Page 35
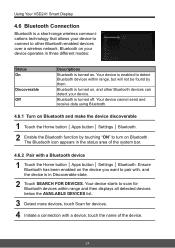
... make the device discoverable 1 Touch the Home button │ Apps button │ Settings │ Bluetooth. 2 Enable the Bluetooth function by them. Bluetooth is enabled to other Bluetooth devices can detect your device. Your device cannot send and receive data using Bluetooth. 4.6.1 Turn on . touch the name of the system bar. 4.6.2 Pair with a device; The Bluetooth icon appears in the status area of the device. 24 Using Your VSD241 Smart Display...
... make the device discoverable 1 Touch the Home button │ Apps button │ Settings │ Bluetooth. 2 Enable the Bluetooth function by them. Bluetooth is enabled to other Bluetooth devices can detect your device. Your device cannot send and receive data using Bluetooth. 4.6.1 Turn on . touch the name of the system bar. 4.6.2 Pair with a device; The Bluetooth icon appears in the status area of the device. 24 Using Your VSD241 Smart Display...
VSD241 User Guide (English)
Page 37
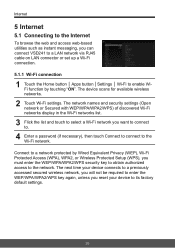
... connect to. 4 Enter a password (if necessary), then touch Connect to connect to its factory default settings. 26 Connect to a network protected by Wired Equivalent Privacy (WEP), Wi-Fi Protected Access (WPA), WPA2, or Wireless Protected Setup (WPS), you must enter the WEP/WPA/WPA2/WPS security key to obtain authorized access to enable WiFi function by touching "ON". The device scans for available wireless networks. 2 Touch Wi-Fi settings. Internet 5 Internet 5.1 Connecting to the Internet...
... connect to. 4 Enter a password (if necessary), then touch Connect to connect to its factory default settings. 26 Connect to a network protected by Wired Equivalent Privacy (WEP), Wi-Fi Protected Access (WPA), WPA2, or Wireless Protected Setup (WPS), you must enter the WEP/WPA/WPA2/WPS security key to obtain authorized access to enable WiFi function by touching "ON". The device scans for available wireless networks. 2 Touch Wi-Fi settings. Internet 5 Internet 5.1 Connecting to the Internet...

VSD241 User Guide (English)
Page 41
... device using the options available in the Settings application. 6.1 Display Settings Change the display settings: 1 Touch the Home button │ Apps button │ Settings │ Display. 2 You can configure the Wallpaper, Sleep, Daydream and Font size here. For Wallpaper, you can configure the idling time for entering power saving mode. (e.g. 15 sec., 30 sec., 1, 2, 5, 10 or 30 min. Customizing Your VSD241 Smart Display 6 Customizing Your VSD241 Smart Display You can customize your screen...
... device using the options available in the Settings application. 6.1 Display Settings Change the display settings: 1 Touch the Home button │ Apps button │ Settings │ Display. 2 You can configure the Wallpaper, Sleep, Daydream and Font size here. For Wallpaper, you can configure the idling time for entering power saving mode. (e.g. 15 sec., 30 sec., 1, 2, 5, 10 or 30 min. Customizing Your VSD241 Smart Display 6 Customizing Your VSD241 Smart Display You can customize your screen...
VSD241 User Guide (English)
Page 45
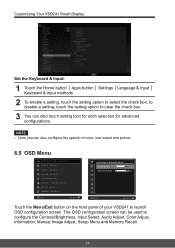
..., Audio Adjust, Color Adjust, Information, Manual Image Adjust, Setup Menu and Memory Recall. 34 Customizing Your VSD241 Smart Display Set the Keyboard & Input: 1 Touch the Home button │ Apps button │ Settings │Language & input │ Keyboard & input methods. 2 To enable a setting, touch the setting option to clear the check box. 3 You can also touch setting icon for each selection for advanced configurations. NOTE • Here you can be used to launch OSD configuration screen. to disable a setting...
..., Audio Adjust, Color Adjust, Information, Manual Image Adjust, Setup Menu and Memory Recall. 34 Customizing Your VSD241 Smart Display Set the Keyboard & Input: 1 Touch the Home button │ Apps button │ Settings │Language & input │ Keyboard & input methods. 2 To enable a setting, touch the setting option to clear the check box. 3 You can also touch setting icon for each selection for advanced configurations. NOTE • Here you can be used to launch OSD configuration screen. to disable a setting...
VSD241 User Guide (English)
Page 46
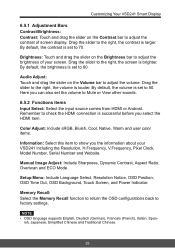
... to show you select the HDMI item. Audio Adjust: Touch and drag the slider on the Volume bar to 80. By default, the brightness is set to adjust the volume. Setup Menu: Include Language Select, Resolution Notice, OSD Position, OSD Time Out, OSD Background, Touch Screen, and Power Indicator. ish, Japanese, Simplified Chinese and Traditional Chinese. 35 Customizing Your VSD241 Smart Display 6.5.1 Adjustment Bars Contrast/Brightness: Contrast: Touch...
... to show you select the HDMI item. Audio Adjust: Touch and drag the slider on the Volume bar to 80. By default, the brightness is set to adjust the volume. Setup Menu: Include Language Select, Resolution Notice, OSD Position, OSD Time Out, OSD Background, Touch Screen, and Power Indicator. ish, Japanese, Simplified Chinese and Traditional Chinese. 35 Customizing Your VSD241 Smart Display 6.5.1 Adjustment Bars Contrast/Brightness: Contrast: Touch...
VSD241 User Guide (English)
Page 51
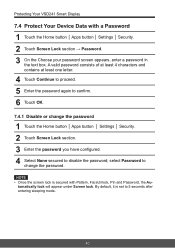
... one letter. 4 Touch Continue to proceed. 5 Enter the password again to confirm. 6 Touch OK. 7.4.1 Disable or change the password. select Password to change the password 1 Touch the Home button │ Apps button │ Settings │ Security. 2 Touch Screen Lock section. 3 Enter the password you have configured. 4 Select None secured to 5 seconds after entering sleeping mode. 40 Protecting Your VSD241 Smart Display 7.4 Protect Your Device Data with Pattern, FaceUnlock, Pin and...
... one letter. 4 Touch Continue to proceed. 5 Enter the password again to confirm. 6 Touch OK. 7.4.1 Disable or change the password. select Password to change the password 1 Touch the Home button │ Apps button │ Settings │ Security. 2 Touch Screen Lock section. 3 Enter the password you have configured. 4 Select None secured to 5 seconds after entering sleeping mode. 40 Protecting Your VSD241 Smart Display 7.4 Protect Your Device Data with Pattern, FaceUnlock, Pin and...

VSD241 User Guide (English)
Page 56
Appendix 9 Appendix Specification LCD Spec. Size Resolution Brightness Backlight Thickness Touch screen Hardware Buttons Power LED Indicator I/O ports Camera Digital / Analog Mic Mic location Card reader Speakers Adaptor Physical Weight 61cm (23.8") 1920x1080 250 cd/m2 LED 11.2 mm Optical touch type, with glass Power button *1 Control keys *4 Blue (on) / Orange (saving) HDMI *1 USB type A *2, mini *1, micro *1 (OTG) 3.5mm Headphone-out *1 LAN (RJ45, supports 100Mbps only) *1 DC-In Jack...
Appendix 9 Appendix Specification LCD Spec. Size Resolution Brightness Backlight Thickness Touch screen Hardware Buttons Power LED Indicator I/O ports Camera Digital / Analog Mic Mic location Card reader Speakers Adaptor Physical Weight 61cm (23.8") 1920x1080 250 cd/m2 LED 11.2 mm Optical touch type, with glass Power button *1 Control keys *4 Blue (on) / Orange (saving) HDMI *1 USB type A *2, mini *1, micro *1 (OTG) 3.5mm Headphone-out *1 LAN (RJ45, supports 100Mbps only) *1 DC-In Jack...


