

VSD241 Datasheet Hi Res (English)
Page 1
..., headphone jack, and 2MP webcam with integrated microphone for Android™ VSD241 The ViewSonic® VSD241 is equipped with 1920x1080 Full HD resolution. The VSD241 features a NVIDIA® Tegra® 3 1.7GHz processor and Android™ Jelly Bean OS. Appzone and Google Play Store The VSD241 smart display with the powerful NVIDIA Tegra 3 quad-core processor and Android...
..., headphone jack, and 2MP webcam with integrated microphone for Android™ VSD241 The ViewSonic® VSD241 is equipped with 1920x1080 Full HD resolution. The VSD241 features a NVIDIA® Tegra® 3 1.7GHz processor and Android™ Jelly Bean OS. Appzone and Google Play Store The VSD241 smart display with the powerful NVIDIA Tegra 3 quad-core processor and Android...

VSD241 Datasheet Hi Res (English)
Page 2
... USB (x1), mini USB (x1) HDMI (with ViewSonic. Three-year limited warranty on parts, labor and backlight. VSD241 smart display, power cord and adapter, micro USB cable, mini USB cable, Quick Start Guide ViewSonic Corporation's QMS & EMS have been registered to change without... and lead the industry with our next-generation smart displays. and/or one or more of Google Inc. What's in other countries. 24" (23.8" viewable) 1080p Smart Display VSD241 Continuing Innovation Leveraging our 25-year display heritage, ViewSonic continues to 1920x1080 non-interlaced) n/a AC-DC...
... USB (x1), mini USB (x1) HDMI (with ViewSonic. Three-year limited warranty on parts, labor and backlight. VSD241 smart display, power cord and adapter, micro USB cable, mini USB cable, Quick Start Guide ViewSonic Corporation's QMS & EMS have been registered to change without... and lead the industry with our next-generation smart displays. and/or one or more of Google Inc. What's in other countries. 24" (23.8" viewable) 1080p Smart Display VSD241 Continuing Innovation Leveraging our 25-year display heritage, ViewSonic continues to 1920x1080 non-interlaced) n/a AC-DC...
VSD241 User Guide (English)
Page 8
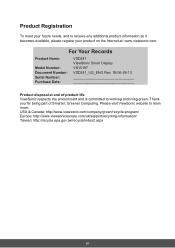
... Name: Model Number: Document Number: Serial Number: Purchase Date: VSD241 ViewSonic Smart Display VS15197 VSD241_UG_ENG Rev. 1B 06-26-13 Product disposal at : www.viewsonic.com. Thank you for being part of product life ViewSonic respects the environment and is committed to learn more. Please visit ViewSonic website to working and living green. USA & Canada: http://www...
... Name: Model Number: Document Number: Serial Number: Purchase Date: VSD241 ViewSonic Smart Display VS15197 VSD241_UG_ENG Rev. 1B 06-26-13 Product disposal at : www.viewsonic.com. Thank you for being part of product life ViewSonic respects the environment and is committed to learn more. Please visit ViewSonic website to working and living green. USA & Canada: http://www...

VSD241 User Guide (English)
Page 9
... Item 13 3.6.4 Change the Wallpaper 13 3.7 Navigating the Applications 14 3.7.1 Apps screen 14 3.7.2 Application Shortcuts 14 3.7.3 Recent Applications 15 3.7.4 Screen Lock Wallpaper 15 4 Using Your VSD241 Smart Display 4.1 Managing Contacts 16 4.1.1 Add a new contact 16 4.1.2 Find a contact 17 4.1.3 E-mail or send a message to a contact 17 4.2 Pop-up Menu 19 4.3 Google Search 20 viii
... Item 13 3.6.4 Change the Wallpaper 13 3.7 Navigating the Applications 14 3.7.1 Apps screen 14 3.7.2 Application Shortcuts 14 3.7.3 Recent Applications 15 3.7.4 Screen Lock Wallpaper 15 4 Using Your VSD241 Smart Display 4.1 Managing Contacts 16 4.1.1 Add a new contact 16 4.1.2 Find a contact 17 4.1.3 E-mail or send a message to a contact 17 4.2 Pop-up Menu 19 4.3 Google Search 20 viii
VSD241 User Guide (English)
Page 10
...connection........ 27 5.1.3 Connect to another Wi-Fi network 27 Synchronizing Your Google Data 28 Video Chat 28 6 Customizing Your VSD241 Smart Display 6.1 Display Settings 30 6.2 Sound and Ringtone Settings 31 6.2.1 System settings 31 6.2.2 Notifications settings 31 6.2.3 ViewSound enhancement 32 6.3...& Input Settings 33 6.5 OSD Menu 34 6.5.1 Adjustment Bars 35 6.5.2 Functions items 35 6.5.3 OSD Notice 36 7 Protecting Your VSD241 Smart Display 7.1 Protect Your Device Data with a Screen Unlock Pattern... 37 7.1.1 Create a screen unlock pattern 38 7.1.2 Change unlock pattern ...
...connection........ 27 5.1.3 Connect to another Wi-Fi network 27 Synchronizing Your Google Data 28 Video Chat 28 6 Customizing Your VSD241 Smart Display 6.1 Display Settings 30 6.2 Sound and Ringtone Settings 31 6.2.1 System settings 31 6.2.2 Notifications settings 31 6.2.3 ViewSound enhancement 32 6.3...& Input Settings 33 6.5 OSD Menu 34 6.5.1 Adjustment Bars 35 6.5.2 Functions items 35 6.5.3 OSD Notice 36 7 Protecting Your VSD241 Smart Display 7.1 Protect Your Device Data with a Screen Unlock Pattern... 37 7.1.1 Create a screen unlock pattern 38 7.1.2 Change unlock pattern ...
VSD241 User Guide (English)
Page 12
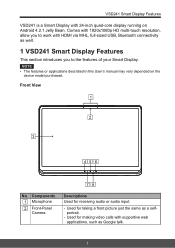
VSD241 Smart Display Features VSD241 is a Smart Display with HDMI via MHL, full-sized USB, Bluetooth connectivity as well. 1 VSD241 Smart Display Features This section introduces you to the features of your Smart Display. Comes with 1920x1080p HD multi-touch resolution, allow you to work with 24-inch quad-core display running on the device model purchased. Used for receiving audio or audio...
VSD241 Smart Display Features VSD241 is a Smart Display with HDMI via MHL, full-sized USB, Bluetooth connectivity as well. 1 VSD241 Smart Display Features This section introduces you to the features of your Smart Display. Comes with 1920x1080p HD multi-touch resolution, allow you to work with 24-inch quad-core display running on the device model purchased. Used for receiving audio or audio...

VSD241 User Guide (English)
Page 13
... to adjust the values to shut down the smart display (under Android mode). 6 Input Signal Switch / OSD Menu Select - VSD241 Smart Display Features No. Touch about 3 seconds to each item of OSD menu. 2 Recall the unlock display when the smart display is on (LED turns into orange). - ... to switch input signal (HDMI / Android). - Select function in blue) - When the display is locked. - You can highlight a menu item by touching the arrow buttons. Lock the smart display when the display is on , press this button to launch the OSD configuration menu and touch again to exit...
... to adjust the values to shut down the smart display (under Android mode). 6 Input Signal Switch / OSD Menu Select - VSD241 Smart Display Features No. Touch about 3 seconds to each item of OSD menu. 2 Recall the unlock display when the smart display is on (LED turns into orange). - ... to switch input signal (HDMI / Android). - Select function in blue) - When the display is locked. - You can highlight a menu item by touching the arrow buttons. Lock the smart display when the display is on , press this button to launch the OSD configuration menu and touch again to exit...

VSD241 User Guide (English)
Page 14
... for USB upstream, Webcam and Touch-screen control functionality. 6 Micro USB Port Connect to earphone or headset. 3 Back View VSD241 Smart Display Features 4 5 6 7 8 12 3 No. Components Descriptions 1 DC in Port Connect to power adaptor. 2 HDMI Connect to digital high quality device for data transferring. (Need MTP driver) 7 ...
... for USB upstream, Webcam and Touch-screen control functionality. 6 Micro USB Port Connect to earphone or headset. 3 Back View VSD241 Smart Display Features 4 5 6 7 8 12 3 No. Components Descriptions 1 DC in Port Connect to power adaptor. 2 HDMI Connect to digital high quality device for data transferring. (Need MTP driver) 7 ...

VSD241 User Guide (English)
Page 15
... the monitor face-down on a flat surface. We recommend using mounting interface that comply with the arm-type base, wall mount hanger or other base. 4 VSD241 Smart Display Features 1.1 Installing wall mount bracket The VSD241 supports wall mount bracket installation.
... the monitor face-down on a flat surface. We recommend using mounting interface that comply with the arm-type base, wall mount hanger or other base. 4 VSD241 Smart Display Features 1.1 Installing wall mount bracket The VSD241 supports wall mount bracket installation.

VSD241 User Guide (English)
Page 16
Set Up Your VSD241 Smart Display 2 Set Up Your VSD241 Smart Display 2.1 Connection Keyboard Printer Mouse USB Storage External Computer SD card Earphone USB USB Mini USB Micro USB SD Earphone LAN HDMI Power Outlet DVD Player Notebook 2.2 Get Your Smart Display Ready for Use Insert the SD card 1 Open the compartment cover on the back of the smart display. Bluetooth Devices Wi-Fi Devices 2 Insert a SD card if desired and / or available on the back of your smart display. 5
Set Up Your VSD241 Smart Display 2 Set Up Your VSD241 Smart Display 2.1 Connection Keyboard Printer Mouse USB Storage External Computer SD card Earphone USB USB Mini USB Micro USB SD Earphone LAN HDMI Power Outlet DVD Player Notebook 2.2 Get Your Smart Display Ready for Use Insert the SD card 1 Open the compartment cover on the back of the smart display. Bluetooth Devices Wi-Fi Devices 2 Insert a SD card if desired and / or available on the back of your smart display. 5
VSD241 User Guide (English)
Page 17
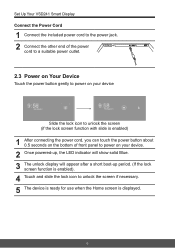
Set Up Your VSD241 Smart Display Connect the Power Cord 1 Connect the included power cord to the power jack. 2 Connect the other end of the power cord to a suitable power outlet. 2.3 ... about 0.5 seconds on the bottom of front panel to power on your device. 2 Once powered-up, the LED indicator will show solid Blue. 3 The unlock display will appear after a short boot-up period. (If the lock screen function is enabled). 4 Touch and slide the lock icon to unlock the screen if...
Set Up Your VSD241 Smart Display Connect the Power Cord 1 Connect the included power cord to the power jack. 2 Connect the other end of the power cord to a suitable power outlet. 2.3 ... about 0.5 seconds on the bottom of front panel to power on your device. 2 Once powered-up, the LED indicator will show solid Blue. 3 The unlock display will appear after a short boot-up period. (If the lock screen function is enabled). 4 Touch and slide the lock icon to unlock the screen if...

VSD241 User Guide (English)
Page 18
Set Up Your VSD241 Smart Display 2.3.1 Wake on LAN (WOL) Function To Enable the Wake on LAN (WOL) Function: • Touch Settings icon on the right-hand side of screen. 2.4 Power Off Your Device 1 Touch and hold the power button for about 3 seconds. 2 When the power off menu appears, touch OK. 7 under Data usage row. • Enable Wakeup on Lan on the screen. • Check Ethernet is ON. • Choose More...
Set Up Your VSD241 Smart Display 2.3.1 Wake on LAN (WOL) Function To Enable the Wake on LAN (WOL) Function: • Touch Settings icon on the right-hand side of screen. 2.4 Power Off Your Device 1 Touch and hold the power button for about 3 seconds. 2 When the power off menu appears, touch OK. 7 under Data usage row. • Enable Wakeup on Lan on the screen. • Check Ethernet is ON. • Choose More...
VSD241 User Guide (English)
Page 19
About Your VSD241 Smart Display 3 About Your VSD241 Smart Display 3.1 Touch Screen The main way to control the device is using the on -screen buttons. Type letters and symbols using your finger to touch the ... by touching it . Touch and hold an item on the screen to rotate and zoom the display for blind users and gesture mode navigation features. 8 Act on items on the screen to zoom the entire display frequency, also with you first touch it without pausing when you finger. - Move two fingers close...
About Your VSD241 Smart Display 3 About Your VSD241 Smart Display 3.1 Touch Screen The main way to control the device is using the on -screen buttons. Type letters and symbols using your finger to touch the ... by touching it . Touch and hold an item on the screen to rotate and zoom the display for blind users and gesture mode navigation features. 8 Act on items on the screen to zoom the entire display frequency, also with you first touch it without pausing when you finger. - Move two fingers close...

VSD241 User Guide (English)
Page 20
... allows you to Home screen. Widgets: Widgets are applications that you can also download additional applications from the Google Play Store. About Your VSD241 Smart Display 3.2 Applications, Widgets and Shortcuts The soft buttons or icons offer a variety of five screen panels. Power on your device, it allows ...applications you have installed. 3.3 Home Screen Once you to access all the features installed in your screen, the central Home screen will display firstly. On the Home screen, it is your starting point to access all the features on your device, and unlock your device. ...
... allows you to Home screen. Widgets: Widgets are applications that you can also download additional applications from the Google Play Store. About Your VSD241 Smart Display 3.2 Applications, Widgets and Shortcuts The soft buttons or icons offer a variety of five screen panels. Power on your device, it allows ...applications you have installed. 3.3 Home Screen Once you to access all the features installed in your screen, the central Home screen will display firstly. On the Home screen, it is your starting point to access all the features on your device, and unlock your device. ...

VSD241 User Guide (English)
Page 21
...quickly. 10 Touch this button to capture an image of 5 Recent images about the applications you enable the Bluetooth function. 9 4:39 Time Display the current time. 10 Voice Input Use voice input as an alternative to open the applications. 6 Screehshot Tap this button to the 11 ... is displayed. 3 Back Return to the previous screen or option. 4 Home This button will appear on your device. You can add an application shortcut to show you a list of your screen. 7 Apps Touch the Apps button to central Home screen at any time. About Your VSD241 Smart Display No....
...quickly. 10 Touch this button to capture an image of 5 Recent images about the applications you enable the Bluetooth function. 9 4:39 Time Display the current time. 10 Voice Input Use voice input as an alternative to open the applications. 6 Screehshot Tap this button to the 11 ... is displayed. 3 Back Return to the previous screen or option. 4 Home This button will appear on your device. You can add an application shortcut to show you a list of your screen. 7 Apps Touch the Apps button to central Home screen at any time. About Your VSD241 Smart Display No....

VSD241 User Guide (English)
Page 22
...button again to go back to . the status menu will appear as below : 11 Touch it and drag down; 3.4 Navigation buttons About Your VSD241 Smart Display On the bottom of the screen (system bar), you can find the navigation buttons described as below : Buttons Descriptions Back - Or touch this... button to close the on the device. Recent Apps. Select and touch one of the screen displays current time, battery status and specified icon (status bar). Touch it to capture an image of your screen. 3.5 Status Bar The upper ...
...button again to go back to . the status menu will appear as below : 11 Touch it and drag down; 3.4 Navigation buttons About Your VSD241 Smart Display On the bottom of the screen (system bar), you can find the navigation buttons described as below : Buttons Descriptions Back - Or touch this... button to close the on the device. Recent Apps. Select and touch one of the screen displays current time, battery status and specified icon (status bar). Touch it to capture an image of your screen. 3.5 Status Bar The upper ...

VSD241 User Guide (English)
Page 23
About Your VSD241 Smart Display Items Time Specified Icon Status Menu Descriptions Displays the current time. Show you the current state of your device just like Owner, Brightness, Settings, WIFI, Auto Rotate, Battery Charging Status, Airplane Mode and ...
About Your VSD241 Smart Display Items Time Specified Icon Status Menu Descriptions Displays the current time. Show you the current state of your device just like Owner, Brightness, Settings, WIFI, Auto Rotate, Battery Charging Status, Airplane Mode and ...

VSD241 User Guide (English)
Page 24
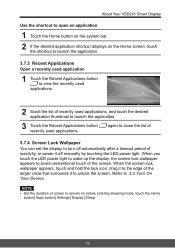
... change the wallpaper color, ex. Magic Smoke. You can touch Back button to change ", touch the screen to individual Home Screen panel. 13 About Your VSD241 Smart Display 3.6.2 Move an Item • On the Home screen, touch and hold the item that you want to delete such as a widget or shortcut. • ...An "X" will soon be displayed at the top of the Home screen. • Drag the item over the "X". • Then release your finger to delete the item. 3.6.4 Change the Wallpaper...
... change the wallpaper color, ex. Magic Smoke. You can touch Back button to change ", touch the screen to individual Home Screen panel. 13 About Your VSD241 Smart Display 3.6.2 Move an Item • On the Home screen, touch and hold the item that you want to delete such as a widget or shortcut. • ...An "X" will soon be displayed at the top of the Home screen. • Drag the item over the "X". • Then release your finger to delete the item. 3.6.4 Change the Wallpaper...

VSD241 User Guide (English)
Page 25
... of your device in the all of applications Flick the Apps screen horizontally and touch an application to 3.6 Customizing Your Home Screen. 14 About Your VSD241 Smart Display 3.7 Navigating the Applications You can find applications available on your screen. The Apps screen contains all Apps menu: 3.7.1 Apps screen Open the Apps screen You...
... of your device in the all of applications Flick the Apps screen horizontally and touch an application to 3.6 Customizing Your Home Screen. 14 About Your VSD241 Smart Display 3.7 Navigating the Applications You can find applications available on your screen. The Apps screen contains all Apps menu: 3.7.1 Apps screen Open the Apps screen You...
VSD241 User Guide (English)
Page 26
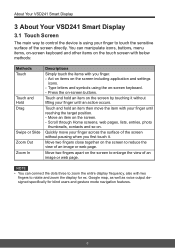
...2 Scroll the list of recently used applications. NOTE • Set the duration of screen to 2.3 Turn On Your Device. About Your VSD241 Smart Display Use the shortcut to open an application 1 Touch the Home button on the system bar. 2 If the desired application shortcut... off automatically after a timeout period of inactivity, or power it to avoid unintentional touch of 3.7.4 Screen Lock Wallpaper You can set the display to launch the application. 3 Touch the Recent Applications button recently used applications, and touch the desired application thumbnail to turn off manually by...
...2 Scroll the list of recently used applications. NOTE • Set the duration of screen to 2.3 Turn On Your Device. About Your VSD241 Smart Display Use the shortcut to open an application 1 Touch the Home button on the system bar. 2 If the desired application shortcut... off automatically after a timeout period of inactivity, or power it to avoid unintentional touch of 3.7.4 Screen Lock Wallpaper You can set the display to launch the application. 3 Touch the Recent Applications button recently used applications, and touch the desired application thumbnail to turn off manually by...