User Guide
Page 1
...important information on our web site at http://www.viewsonic.com in English, or in specific languages using your product for future service. "Antes de operar su equipo lea cu idadosamente las instrucciones en este manual" Model No. X10-4K Lamp Free Smart Theater User Guide IMPORTANT: Please ...read this User Guide will describe your limited coverage from ViewSonic® Corporation, which is also found on installing and using the Regional ...
...important information on our web site at http://www.viewsonic.com in English, or in specific languages using your product for future service. "Antes de operar su equipo lea cu idadosamente las instrucciones en este manual" Model No. X10-4K Lamp Free Smart Theater User Guide IMPORTANT: Please ...read this User Guide will describe your limited coverage from ViewSonic® Corporation, which is also found on installing and using the Regional ...
User Guide
Page 14
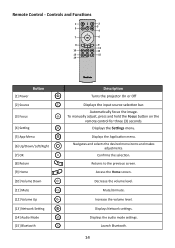
Decrease the volume level. Displays Network settings. Displays the audio mode settings. To manually adjust, press and hold the Focus button on the remote control for three (3) seconds Displays the Settings menu. Confirms the selection. Increase the volume level. ...
Decrease the volume level. Displays Network settings. Displays the audio mode settings. To manually adjust, press and hold the Focus button on the remote control for three (3) seconds Displays the Settings menu. Confirms the selection. Increase the volume level. ...

User Guide
Page 15
Displays the speaker settings. Returns to the previous screen. Access the Home menu. To manually adjust, press and hold the Focus button on your country 15 Controls and Functions Button [1] Power [2] Source [3] Focus [4] Setting [5] Audio Mode [6] Bluetooth [7] Up/Down/Left/...
Displays the speaker settings. Returns to the previous screen. Access the Home menu. To manually adjust, press and hold the Focus button on your country 15 Controls and Functions Button [1] Power [2] Source [3] Focus [4] Setting [5] Audio Mode [6] Bluetooth [7] Up/Down/Left/...

User Guide
Page 35
You can easily connect to let the system configure the network settings automatically by choosing Automatic for Configure IP. 35 Wired LAN Connection You can Configure the IP automatically or manually. Go to IP Address, Subnet Mask, Default Gateway, and DNS Server. Choosing Manual will allow access to : Home > Settings > Network Settings > Wired LAN 3. Plug the RJ45 cable into your wired Internet source. 2. NOTE: It is plugged into the LAN port of the projector, then ensure the other end is recommended to wired Internet networks and customize the connection as well. 1.
You can easily connect to let the system configure the network settings automatically by choosing Automatic for Configure IP. 35 Wired LAN Connection You can Configure the IP automatically or manually. Go to IP Address, Subnet Mask, Default Gateway, and DNS Server. Choosing Manual will allow access to : Home > Settings > Network Settings > Wired LAN 3. Plug the RJ45 cable into your wired Internet source. 2. NOTE: It is plugged into the LAN port of the projector, then ensure the other end is recommended to wired Internet networks and customize the connection as well. 1.

User Guide
Page 54
.... Automatically adjusts the brightness levels of the screen with a 16:9 aspect ratio. Smooths the picture quality of the input signal automatically. 54 It can also manually select a brightness level to display better picture quality. Menu Option Aspect Ratio HDR EOTF Frame Interpolation HDMI Settings Description 16:9 Scales an image so that...
.... Automatically adjusts the brightness levels of the screen with a 16:9 aspect ratio. Smooths the picture quality of the input signal automatically. 54 It can also manually select a brightness level to display better picture quality. Menu Option Aspect Ratio HDR EOTF Frame Interpolation HDMI Settings Description 16:9 Scales an image so that...

User Guide
Page 57
On-Screen Display (OSD) Menu Tree Main Menu Aptoide Sub-menu Menu Option Apps Center Settings Network Settings WiFi Off On SSID: Configure IP IP Address Subnet Mask Default Gateway DNS Server Others Wired LAN Configure IP Automatic Manual IP Address xxx.xxx.xxx.xxx Subnet Mask xxx.xxx.xxx.xxx Date & Time Automatic Date & Time Date Time Time Zone Time Format Default Gateway DNS Server Off On xxx.xxx.xxx.xxx xxx.xxx.xxx.xxx 12 Hours 24 Hours 57 Home Screen -
On-Screen Display (OSD) Menu Tree Main Menu Aptoide Sub-menu Menu Option Apps Center Settings Network Settings WiFi Off On SSID: Configure IP IP Address Subnet Mask Default Gateway DNS Server Others Wired LAN Configure IP Automatic Manual IP Address xxx.xxx.xxx.xxx Subnet Mask xxx.xxx.xxx.xxx Date & Time Automatic Date & Time Date Time Time Zone Time Format Default Gateway DNS Server Off On xxx.xxx.xxx.xxx xxx.xxx.xxx.xxx 12 Hours 24 Hours 57 Home Screen -

User Guide
Page 58
Main Menu Settings Sub-menu Basic Settings Menu Option Language Projector Projection Keystone Focus English French German Italian Spanish Russian Swedish Dutch Turkish Czech Portuguese Thai Polish Finnish Arabic Indonesian Hindi Vietnam Greek Front Table Front Ceiling Rear Table Rear Ceiling Manual Auto V Keystone Manual Auto Focus (-/+, -40~40) Disable Enable Off On 58
Main Menu Settings Sub-menu Basic Settings Menu Option Language Projector Projection Keystone Focus English French German Italian Spanish Russian Swedish Dutch Turkish Czech Portuguese Thai Polish Finnish Arabic Indonesian Hindi Vietnam Greek Front Table Front Ceiling Rear Table Rear Ceiling Manual Auto V Keystone Manual Auto Focus (-/+, -40~40) Disable Enable Off On 58

User Guide
Page 72
... a trapezoidal screen image caused by the tilting of the projector. • Enable: Automatically adjust the keystone number. • Disable: Manually adjust the keystone number. Select the preferred projection position. Auto V Keystone Provides a rectangular screen image by automatically adjusting the keystone number when there is selected, ...
... a trapezoidal screen image caused by the tilting of the projector. • Enable: Automatically adjust the keystone number. • Disable: Manually adjust the keystone number. Select the preferred projection position. Auto V Keystone Provides a rectangular screen image by automatically adjusting the keystone number when there is selected, ...

User Guide
Page 73
NOTE: If Auto Focus is On, the projector will automatically focus the screen image when turned on the remote control. Manual Adjust the focus with the Left and Right buttons on or the position or angle is adjusted. 73 Menu Focus Description Adjust the focus of the screen image. Auto Focus Choose from the following: • On: Automatically adjust the focus. • Off: Manually adjust the focus.
NOTE: If Auto Focus is On, the projector will automatically focus the screen image when turned on the remote control. Manual Adjust the focus with the Left and Right buttons on or the position or angle is adjusted. 73 Menu Focus Description Adjust the focus of the screen image. Auto Focus Choose from the following: • On: Automatically adjust the focus. • Off: Manually adjust the focus.

User Guide
Page 92
... to select specific color temperature settings to your projector. B Brightest Mode Maximizes the brightness of the projected image. 92 Color Adjusts the color saturation. F Focus Manually improve the clarity of the projected image. Glossary This section describes the standard glossary of terms used in alphabetical order. A Aspect Ratio Refers to the...
... to select specific color temperature settings to your projector. B Brightest Mode Maximizes the brightness of the projected image. 92 Color Adjusts the color saturation. F Focus Manually improve the clarity of the projected image. Glossary This section describes the standard glossary of terms used in alphabetical order. A Aspect Ratio Refers to the...

User Guide
Page 93
... level and power consumption. I Information Displays the timing mode (video signal input), the projector model number, the serial number, and the ViewSonic® website URL. Input Select Toggles between 5° C and 25° C. G Gamma Allows the user to manually select the greyscale curve of an image caused by the signal type detected.
... level and power consumption. I Information Displays the timing mode (video signal input), the projector model number, the serial number, and the ViewSonic® website URL. Input Select Toggles between 5° C and 25° C. G Gamma Allows the user to manually select the greyscale curve of an image caused by the signal type detected.


