

User Guide
Page 5
... Swivel Angle Adjustment 24 Turning the Device On/Off 25 Quick Access Function 26 Using the Control Panel Keys 26 Hot Keys...27 Configuring the Settings 29 General Operations 29 On-Screen Display (OSD) Menu Tree 32 Menu Options...37 5
... Swivel Angle Adjustment 24 Turning the Device On/Off 25 Quick Access Function 26 Using the Control Panel Keys 26 Hot Keys...27 Configuring the Settings 29 General Operations 29 On-Screen Display (OSD) Menu Tree 32 Menu Options...37 5
User Guide
Page 6
Advanced Features and Settings 45 Blue Light Filter and Eye Health 45 Quick Access Blue Light Filter Setup 45 Calculating Breaks 46 Looking at Distant Objects 46 Eye and ...
Advanced Features and Settings 45 Blue Light Filter and Eye Health 45 Quick Access Blue Light Filter Setup 45 Calculating Breaks 46 Looking at Distant Objects 46 Eye and ...
User Guide
Page 9
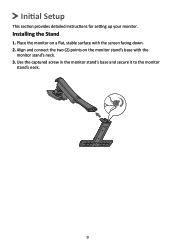
Place the monitor on the monitor stand's base with the screen facing down. 2. Align and connect the two (2) points on a flat, stable surface with the monitor stand's neck. 3. Use the captured screw in the monitor stand's base and secure it to the monitor stand's neck. 9 Installing the Stand 1. Initial Setup This section provides detailed instructions for setting up your monitor.
Place the monitor on the monitor stand's base with the screen facing down. 2. Align and connect the two (2) points on a flat, stable surface with the monitor stand's neck. 3. Use the captured screw in the monitor stand's base and secure it to the monitor stand's neck. 9 Installing the Stand 1. Initial Setup This section provides detailed instructions for setting up your monitor.
User Guide
Page 15
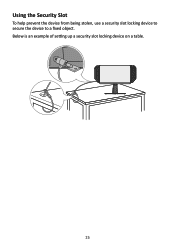
Using the Security Slot To help prevent the device from being stolen, use a security slot locking device to secure the device to a fixed object. Below is an example of setting up a security slot locking device on a table. 15
Using the Security Slot To help prevent the device from being stolen, use a security slot locking device to secure the device to a fixed object. Below is an example of setting up a security slot locking device on a table. 15

User Guide
Page 23
2. NOTE: • When adjusting, make sure to portrait orientation. Rotate the monitor 90° from landscape to hold both sides of your monitor firmly with both hands. • To rotate the screen image, manually change the computer system's display orientation settings. 23
2. NOTE: • When adjusting, make sure to portrait orientation. Rotate the monitor 90° from landscape to hold both sides of your monitor firmly with both hands. • To rotate the screen image, manually change the computer system's display orientation settings. 23
User Guide
Page 26
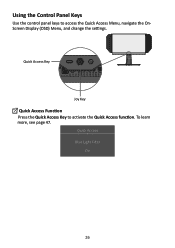
Using the Control Panel Keys Use the control panel keys to activate the Quick Access function. Quick Access Key Joy Key Quick Access Function Press the Quick Access Key to access the Quick Access Menu, navigate the OnScreen Display (OSD) Menu, and change the settings. Quick Access Blue Light Filter On 26 To learn more, see page 47.
Using the Control Panel Keys Use the control panel keys to activate the Quick Access function. Quick Access Key Joy Key Quick Access Function Press the Quick Access Key to access the Quick Access Menu, navigate the OnScreen Display (OSD) Menu, and change the settings. Quick Access Blue Light Filter On 26 To learn more, see page 47.

User Guide
Page 29
... Hz Game Modes HDMI DisplayPort Display Input Select Audio Adjust Setup Menu Custom 1 Game Modes Exit Navi. XG270QG G-Sync ON 144 Max. Move the joy key [◄] or [►] to enter the selected menu. XG270QG G-Sync ON 144 Max. Then move the joy key [◄] or [▲] or [▼] to display the... menu. Power 29 Power 2. Refresh Rate Hz Game Modes Volume Mute Display Input Select Audio Adjust Setup Menu Custom 1 Game Modes Exit Navi. Configuring the Settings General Operations 1.
... Hz Game Modes HDMI DisplayPort Display Input Select Audio Adjust Setup Menu Custom 1 Game Modes Exit Navi. XG270QG G-Sync ON 144 Max. Move the joy key [◄] or [►] to enter the selected menu. XG270QG G-Sync ON 144 Max. Then move the joy key [◄] or [▲] or [▼] to display the... menu. Power 29 Power 2. Refresh Rate Hz Game Modes Volume Mute Display Input Select Audio Adjust Setup Menu Custom 1 Game Modes Exit Navi. Configuring the Settings General Operations 1.

User Guide
Page 30
... [►] to select the desired menu option. Move the joy key [▲] or [▼] to confirm. Then press the [●] key to adjust/select the setting. XG270QG G-Sync ON 144 Max. Refresh Rate Hz Game Modes Volume Mute Display Input Select On Off Audio Adjust Setup Menu Custom 1 Game Modes Exit Navi.... Power 30 Refresh Rate Hz Game Modes Volume Mute Display Input Select On Off Audio Adjust Setup Menu Custom 1 Game Modes Exit Navi. XG270QG G-Sync ON 144 Max.
... [►] to select the desired menu option. Move the joy key [▲] or [▼] to confirm. Then press the [●] key to adjust/select the setting. XG270QG G-Sync ON 144 Max. Refresh Rate Hz Game Modes Volume Mute Display Input Select On Off Audio Adjust Setup Menu Custom 1 Game Modes Exit Navi.... Power 30 Refresh Rate Hz Game Modes Volume Mute Display Input Select On Off Audio Adjust Setup Menu Custom 1 Game Modes Exit Navi. XG270QG G-Sync ON 144 Max.

User Guide
Page 37
... [▼] to every type of game on the market. Move the joy key [▲] or [▼] to enter the Game Modes menu. Ideal setting for Battle Royale games. XG270QG G-Sync ON 144 Max. Menu Option Standard Custom 1/2 FPS Battle Royale MOBA Console Movie Web Description Select this option for Multiplayer Online Battle...
... [▼] to every type of game on the market. Move the joy key [▲] or [▼] to enter the Game Modes menu. Ideal setting for Battle Royale games. XG270QG G-Sync ON 144 Max. Menu Option Standard Custom 1/2 FPS Battle Royale MOBA Console Movie Web Description Select this option for Multiplayer Online Battle...

User Guide
Page 38
... (white level). Adjust the color depth of each color (red, green, blue, cyan, magenta, and yellow). Display 1. XG270QG G-Sync ON 144 Max. Move the joy key [▲] or [▼] to adjust/select the setting. Then move the joy key [▼] to enter its sub-menu. 4. Then press the [●] key to 165Hz...
... (white level). Adjust the color depth of each color (red, green, blue, cyan, magenta, and yellow). Display 1. XG270QG G-Sync ON 144 Max. Move the joy key [▲] or [▼] to adjust/select the setting. Then move the joy key [▼] to enter its sub-menu. 4. Then press the [●] key to 165Hz...

User Guide
Page 39
Menu Option Description Color Temperature Select the color temperature setting. • sRGB: Lower brightness and more natural colors. • Bluish: Set the color temperature to 5000K. • User Color: Adjust red, green, and blue values as desired. Input Range The monitor can manually change the input ... Mode Adjust the aspect ratio of the monitor's grayscale levels. You can detect the input signal color range automatically. Recommended for regular use. • Warm: Set the color temperature to 9300K. • Native: Default color temperature.
Menu Option Description Color Temperature Select the color temperature setting. • sRGB: Lower brightness and more natural colors. • Bluish: Set the color temperature to 5000K. • User Color: Adjust red, green, and blue values as desired. Input Range The monitor can manually change the input ... Mode Adjust the aspect ratio of the monitor's grayscale levels. You can detect the input signal color range automatically. Recommended for regular use. • Warm: Set the color temperature to 9300K. • Native: Default color temperature.

User Guide
Page 41
...Mute Display Input Select Audio Adjust Setup Menu Custom 1 Game Modes Exit Navi. Move the joy key [▲] or [▼] to adjust/select the setting, and press the [●] key to enter the Audio Adjust menu. Move the joy key [◄] or [►] to display the On-Screen ...3. Then move the joy key [◄] or [▲] or [▼] to select Audio Adjust. Menu Option Volume Mute Description Adjust the volume level. XG270QG G-Sync ON 144 Max. Enable to enter its sub-menu. 4. Audio Adjust 1. Move the joy key [▲] or [▼] to select the desired option...
...Mute Display Input Select Audio Adjust Setup Menu Custom 1 Game Modes Exit Navi. Move the joy key [▲] or [▼] to adjust/select the setting, and press the [●] key to enter the Audio Adjust menu. Move the joy key [◄] or [►] to display the On-Screen ...3. Then move the joy key [◄] or [▲] or [▼] to select Audio Adjust. Menu Option Volume Mute Description Adjust the volume level. XG270QG G-Sync ON 144 Max. Enable to enter its sub-menu. 4. Audio Adjust 1. Move the joy key [▲] or [▼] to select the desired option...

User Guide
Page 42
... enter the Setup Menu menu. Move the joy key [▲] or [▼] to confirm (if applicable). Then press the [●] key to adjust/select the setting. Refresh Rate Hz Game Modes Display Language Select Resolution Notice Information Quick Access Crosshair Elite RGB Input Select Audio Adjust Setup Menu Custom 1 Game Modes...;] or [►] to select the menu option. Power 3. Then move the joy key [►]. 42 NOTE: Some sub-menu options may have another sub-menu. XG270QG G-Sync ON 144 Max. Setup Menu 1.
... enter the Setup Menu menu. Move the joy key [▲] or [▼] to confirm (if applicable). Then press the [●] key to adjust/select the setting. Refresh Rate Hz Game Modes Display Language Select Resolution Notice Information Quick Access Crosshair Elite RGB Input Select Audio Adjust Setup Menu Custom 1 Game Modes...;] or [►] to select the menu option. Power 3. Then move the joy key [►]. 42 NOTE: Some sub-menu options may have another sub-menu. XG270QG G-Sync ON 144 Max. Setup Menu 1.

User Guide
Page 43
... synced with the on , or after being reset, the default 'Rainbow Wave' will give you would like to B-Male cable. This setting controls the RGB lighting on and subject to the terms of use, end user license agreement and the software capabilities as specified or provided... Notice Information Quick Access Crosshair Elite RGB Description Select an available language for the OSD Menu. Partner Software RGB Setup • Visit https://www.viewsonic.com/elite/rgb/ and choose a partner RGB software to download. • Download and install your monitor is not the correct native resolution. ...
... synced with the on , or after being reset, the default 'Rainbow Wave' will give you would like to B-Male cable. This setting controls the RGB lighting on and subject to the terms of use, end user license agreement and the software capabilities as specified or provided... Notice Information Quick Access Crosshair Elite RGB Description Select an available language for the OSD Menu. Partner Software RGB Setup • Visit https://www.viewsonic.com/elite/rgb/ and choose a partner RGB software to download. • Download and install your monitor is not the correct native resolution. ...
User Guide
Page 44
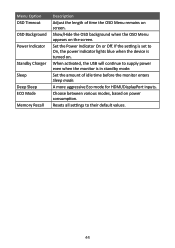
... supply power even when the monitor is turned on screen. Set the amount of time the OSD Menu remains on . When activated, the USB will continue to their default values. 44 Choose between various modes, based ... screen. Show/Hide the OSD background when the OSD Menu appears on power consumption. A more aggressive Eco mode for HDMI/DisplayPort inputs. If the setting is set to On, the power indicator lights blue when the device is in standby mode. Menu Option OSD Timeout OSD Background Power Indicator Standby Charger Sleep...
... supply power even when the monitor is turned on screen. Set the amount of time the OSD Menu remains on . When activated, the USB will continue to their default values. 44 Choose between various modes, based ... screen. Show/Hide the OSD background when the OSD Menu appears on power consumption. A more aggressive Eco mode for HDMI/DisplayPort inputs. If the setting is set to On, the power indicator lights blue when the device is in standby mode. Menu Option OSD Timeout OSD Background Power Indicator Standby Charger Sleep...
User Guide
Page 45
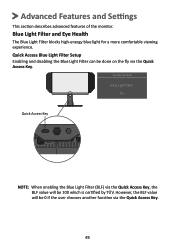
... (BLF) via the Quick Access Key, the BLF value will be 0 if the user chooses another function via the Quick Access Key. Advanced Features and Settings This section describes advanced features of the monitor. However, the BLF value will be done on the fly via the Quick Access Key. 45
... (BLF) via the Quick Access Key, the BLF value will be 0 if the user chooses another function via the Quick Access Key. Advanced Features and Settings This section describes advanced features of the monitor. However, the BLF value will be done on the fly via the Quick Access Key. 45
User Guide
Page 48
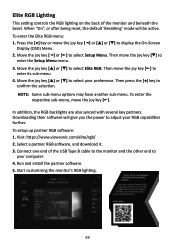
...;] to confirm the selection. Then press the [●] key to select your preference. To setup up partner RGB software: 1. Elite RGB Lighting This setting controls the RGB lighting on the back of the USB Type B cable to the monitor and the other end to adjust your RGB capabilities further...respective sub-menu, move the joy key [▼] to enter the Setup Menu menu. 3. Downloading their software will be active. Visit: https://www.viewsonic.com/elite/rgb/ 2. Connect one end of the monitor and beneath the bezel. In addition, the RGB backlights are also synced with several key ...
...;] to confirm the selection. Then press the [●] key to select your preference. To setup up partner RGB software: 1. Elite RGB Lighting This setting controls the RGB lighting on the back of the USB Type B cable to the monitor and the other end to adjust your RGB capabilities further...respective sub-menu, move the joy key [▼] to enter the Setup Menu menu. 3. Downloading their software will be active. Visit: https://www.viewsonic.com/elite/rgb/ 2. Connect one end of the monitor and beneath the bezel. In addition, the RGB backlights are also synced with several key ...

User Guide
Page 51
Item Category Specifications Power saving On3 modes Off 60W (Typical) 4 < 0.5W (Max) 1 Do not set the graphics card in permanent damage to exceed these timing modes; doing so may result in your computer to the display. 2 Please use the power adapter from ViewSonic® or an authorized source only. 3 The test condition follows EEI standards. 4 Without USB and audio. 51
Item Category Specifications Power saving On3 modes Off 60W (Typical) 4 < 0.5W (Max) 1 Do not set the graphics card in permanent damage to exceed these timing modes; doing so may result in your computer to the display. 2 Please use the power adapter from ViewSonic® or an authorized source only. 3 The test condition follows EEI standards. 4 Without USB and audio. 51

User Guide
Page 53
... the monitor's grayscale levels. G Game Mode Integrating a gaming-oriented OSD design including pre-calibrated FPS, RTS, and MOBA gaming settings. Gamma Allows users to 9300K. Crosshair Select from different crosshair styles and colors to 5000K. There are six selections: 1.8, 2.0, 2.2, 2.4, 2.6, ...(black level) and the foreground (white level). C Color Temperature Allows users to select specific color temperature settings to make shadow detail more visible. Bluish Set the color temperature to manually adjust the brightness level of the RGB lighting can be adjusted. It's useful...
... the monitor's grayscale levels. G Game Mode Integrating a gaming-oriented OSD design including pre-calibrated FPS, RTS, and MOBA gaming settings. Gamma Allows users to 9300K. Crosshair Select from different crosshair styles and colors to 5000K. There are six selections: 1.8, 2.0, 2.2, 2.4, 2.6, ...(black level) and the foreground (white level). C Color Temperature Allows users to select specific color temperature settings to make shadow detail more visible. Bluish Set the color temperature to manually adjust the brightness level of the RGB lighting can be adjusted. It's useful...

User Guide
Page 54
...NOTE: (Exception) This control does not affect changes made in the computer, the LCD model number, the serial number, and the ViewSonic® website URL. Users can turn off . Additionally, the power indicator displays an average color directly interpreting the input color signal ... this manual. M Memory Recall Returns the adjustments back to fit the correct color range if the colors are limited. This setting also controls the lighting on changing the resolution and refresh rate (vertical frequency). Options Description Auto The monitor automatically recognizes the...
...NOTE: (Exception) This control does not affect changes made in the computer, the LCD model number, the serial number, and the ViewSonic® website URL. Users can turn off . Additionally, the power indicator displays an average color directly interpreting the input color signal ... this manual. M Memory Recall Returns the adjustments back to fit the correct color range if the colors are limited. This setting also controls the lighting on changing the resolution and refresh rate (vertical frequency). Options Description Auto The monitor automatically recognizes the...


