Installation Instructions
Page 2
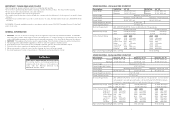
... CSA C22.1 Canadian Electrical Codes Part 1 and/or local codes. DECU ELECTRIC COOKTOP Description Cutout Width DECU106 30" W. cally supplied 3-wire with lo- IN CANADA: Electrical installation must be in accordance with the National Electrical Code, ANSI/NFPA 70-latest edition. 2 SPECIFICATIONS - This information is based on Specifications - Electrical Requirement: Listed on safety considerations. 3. Maximum Amp Usage 240V 8.4 kW; 35.0 amps 10.9 kW; 44.0 amps 11.8 kW: 49.0 amps 208V Surface Element Rating Right Front Right...
... CSA C22.1 Canadian Electrical Codes Part 1 and/or local codes. DECU ELECTRIC COOKTOP Description Cutout Width DECU106 30" W. cally supplied 3-wire with lo- IN CANADA: Electrical installation must be in accordance with the National Electrical Code, ANSI/NFPA 70-latest edition. 2 SPECIFICATIONS - This information is based on Specifications - Electrical Requirement: Listed on safety considerations. 3. Maximum Amp Usage 240V 8.4 kW; 35.0 amps 10.9 kW; 44.0 amps 11.8 kW: 49.0 amps 208V Surface Element Rating Right Front Right...
Installation Instructions
Page 3
... branch circuit neutral (gray or white in the junction box. Wall cabinets no local codes are being made. The junction box should be shut off from the cooktop to combustible vertical surfaces above the 36" (91.4 cm). 3. House wiring and fusing must be installed directly to the corresonding leads in color). When connecting to operate. PROXIMITY TO SIDE CABINET INSTALLATION 1. This cooktop is not needed for grounding instructions. SUCH USE MAY...
... branch circuit neutral (gray or white in the junction box. Wall cabinets no local codes are being made. The junction box should be shut off from the cooktop to combustible vertical surfaces above the 36" (91.4 cm). 3. House wiring and fusing must be installed directly to the corresonding leads in color). When connecting to operate. PROXIMITY TO SIDE CABINET INSTALLATION 1. This cooktop is not needed for grounding instructions. SUCH USE MAY...
Installation Instructions
Page 4
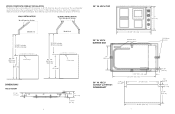
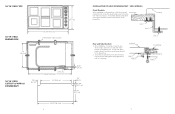
...BURNER BOX 30 3/4" (78.1 cm) Indentification Label Location Hold down Brackets 19" (48.3 cm) 30" W. Refer to 36" (91.4 cm) max. to the rangehood installation instructions for safe and efficient operation of the hood. WALL INSTALLATION Wood/Composite Overlay ISLAND INSTALLATION Wood/Composite Overlay Metal Hood Metal Hood...) Countertop 66" - 72" (167.6 cm 182.9 cm) 36" (91.4 cm) Countertop DIMENSIONS VECU HEIGHT 3 1/16" (7.8 cm) 5" (12.7 cm) 2 13/16" (7.1 cm) 6 30" W. above the floor. These dimensions provide for further information. VECU CUTOUT w/VIPR101 DOWNDRAFT ...
...BURNER BOX 30 3/4" (78.1 cm) Indentification Label Location Hold down Brackets 19" (48.3 cm) 30" W. Refer to 36" (91.4 cm) max. to the rangehood installation instructions for safe and efficient operation of the hood. WALL INSTALLATION Wood/Composite Overlay ISLAND INSTALLATION Wood/Composite Overlay Metal Hood Metal Hood...) Countertop 66" - 72" (167.6 cm 182.9 cm) 36" (91.4 cm) Countertop DIMENSIONS VECU HEIGHT 3 1/16" (7.8 cm) 5" (12.7 cm) 2 13/16" (7.1 cm) 6 30" W. above the floor. These dimensions provide for further information. VECU CUTOUT w/VIPR101 DOWNDRAFT ...
Installation Instructions
Page 5
... sheet metal Countertop screws (Item 1), locate the sheet metal screw hole in the rear of the burner box. VECU CUTOUT w/VIPR161 DOWNDRAFT 7/8" (2.2 cm) 34 5/8" (87.9 cm) 6" (15.2 cm) 33" (83.8 cm) 34 3/4" (88.3 cm) 8 15/16" (2.4 cm) 7/8" (2.2 cm) 2 1/4" (5.7 cm) 20 1/4" (51.4 cm) INSTALLATION OF HOLD DOWN BRACKET - Screw hold down brackets (Item 2) using the third sheet metal screw (Item 3) to the burner box. 2. After installation of cooktop, locate the two sheet...
... sheet metal Countertop screws (Item 1), locate the sheet metal screw hole in the rear of the burner box. VECU CUTOUT w/VIPR161 DOWNDRAFT 7/8" (2.2 cm) 34 5/8" (87.9 cm) 6" (15.2 cm) 33" (83.8 cm) 34 3/4" (88.3 cm) 8 15/16" (2.4 cm) 7/8" (2.2 cm) 2 1/4" (5.7 cm) 20 1/4" (51.4 cm) INSTALLATION OF HOLD DOWN BRACKET - Screw hold down brackets (Item 2) using the third sheet metal screw (Item 3) to the burner box. 2. After installation of cooktop, locate the two sheet...

Installation Instructions
Page 7
... 1 Mounting bracket Top of cooktop Figure 2 Push into the countertop, locate the bracket in the slots and lower until the bracket catches. (Figure 2). thickness bolt Cooktop 1" (2.5 cm) Min. * *There must be a 1" (2.5 cm) clearance under counter on the left and right side of cooktop NOTE: If countertop is less than 1 1/2" (3.8 cm) thick, a filler block will be attached. Place a bracket in the slots as needed (Figure...
... 1 Mounting bracket Top of cooktop Figure 2 Push into the countertop, locate the bracket in the slots and lower until the bracket catches. (Figure 2). thickness bolt Cooktop 1" (2.5 cm) Min. * *There must be a 1" (2.5 cm) clearance under counter on the left and right side of cooktop NOTE: If countertop is less than 1 1/2" (3.8 cm) thick, a filler block will be attached. Place a bracket in the slots as needed (Figure...
Installation Instructions
Page 8
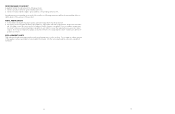
... following instructions will be the responsibility of the installer, dealer of the end user of the appliance unless specifically recommended in performing serivce on . 2. Check top surface elements - All stainless steel body parts should be wiped with hot, soapy water and with hot, wet cloths to remove. Do not repair or replace any other servicing should be referred to scrape stainless steel! Check hot surface indicator lights - glow red when corresponding element...
... following instructions will be the responsibility of the installer, dealer of the end user of the appliance unless specifically recommended in performing serivce on . 2. Check top surface elements - All stainless steel body parts should be wiped with hot, soapy water and with hot, wet cloths to remove. Do not repair or replace any other servicing should be referred to scrape stainless steel! Check hot surface indicator lights - glow red when corresponding element...
Quick Reference Guide
Page 1
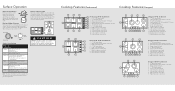
... control knob until the corresponding element has cooled to "OFF". Surface Indicator Lights The surface indicator lights are located at the front of heat very quickly, resulting in possible damage to the cookware and ceramic glass. The light will adjust the power output to the desired setting. The cookware can absorb an excessive amount of the glass cooktop. Four Element 1. 7" 1,800 watt element 2. (Dual element) 9" 2,500 watt/6" 1,000 watt 7 3. Six Element 1. 7" 1,800 watt element 2. (Dual element...
... control knob until the corresponding element has cooled to "OFF". Surface Indicator Lights The surface indicator lights are located at the front of heat very quickly, resulting in possible damage to the cookware and ceramic glass. The light will adjust the power output to the desired setting. The cookware can absorb an excessive amount of the glass cooktop. Four Element 1. 7" 1,800 watt element 2. (Dual element) 9" 2,500 watt/6" 1,000 watt 7 3. Six Element 1. 7" 1,800 watt element 2. (Dual element...

Quick Reference Guide
Page 2
... this manual exactly to the heating elements when the rangetop is to be hot enough to cause burns. • NEVER touch the glass surface areas directly on the cooktop. F20588 EN VIKING RANGE CORPORATION 111 Front Street • Greenwood, Mississippi 38930 USA • (662) 455-1200 (111308J) Viking Quick Reference Guide HOT REAR FRONT HOT REAR FRONT HOT REAR FRONT HOT REAR FRONT HOT REAR FRONT Built-In Electric Cooktops Read...
... this manual exactly to the heating elements when the rangetop is to be hot enough to cause burns. • NEVER touch the glass surface areas directly on the cooktop. F20588 EN VIKING RANGE CORPORATION 111 Front Street • Greenwood, Mississippi 38930 USA • (662) 455-1200 (111308J) Viking Quick Reference Guide HOT REAR FRONT HOT REAR FRONT HOT REAR FRONT HOT REAR FRONT HOT REAR FRONT Built-In Electric Cooktops Read...
Specs
Page 1
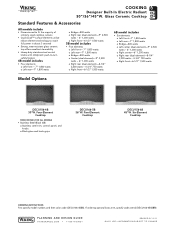
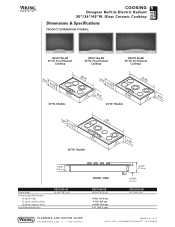
... GUIDE VIKINGRANGE.COM • 1-888-VIKING1 REVISED 5/11/11 ©2011 VRC-INFORMATION SUBJECT TO CHANGE If ordering optional brass trim, specify code at end (DECU106-4BSSBR). Six-Element Cooktop ORDERING INSTRUCTIONS First specify model number, and then color code (DECU106-4BSS). COOKING Designer Built-In Electric Radiant 30"/36"/45"W. Five-Element Cooktop DECU156-6B 45"W. Four-Element Cooktop FINISH DETAILS FOR ALL MODELS • Stainless Steel/Black (SB) o Stainless steel trim, control panel, and knobs...
... GUIDE VIKINGRANGE.COM • 1-888-VIKING1 REVISED 5/11/11 ©2011 VRC-INFORMATION SUBJECT TO CHANGE If ordering optional brass trim, specify code at end (DECU106-4BSSBR). Six-Element Cooktop ORDERING INSTRUCTIONS First specify model number, and then color code (DECU106-4BSS). COOKING Designer Built-In Electric Radiant 30"/36"/45"W. Five-Element Cooktop DECU156-6B 45"W. Four-Element Cooktop FINISH DETAILS FOR ALL MODELS • Stainless Steel/Black (SB) o Stainless steel trim, control panel, and knobs...
Specs
Page 2
...Models (1144.35"cm) (532.31"cm) ( 411-1.4/2cm" ) 3-1/2" (8.9 cm) Overall width Overall height (from bottom) To top of knobs To top of cooking surface To bottom edge of frame Overall depth (from rear) DECU106-4B 30-3/4" (78.1 cm) PLANNING AND DESIGN GUIDE...-INFORMATION SUBJECT TO CHANGE Five-Element Cooktop DECU156-6B 45"W. Models (9336.3-3c/m4)" (532.31"cm) ( 411-1.4/2cm" ) (38-.19 /c2m") 3(7-1.8/1cm6") (1144.53"cm) 45"W. Glass Ceramic Cooktop Dimensions & Specifications PRODUCT DIMENSIONS-OVERALL DECU106-4B 30"W. COOKING Designer Built-In Electric Radiant 30"/36"/45"W....
...Models (1144.35"cm) (532.31"cm) ( 411-1.4/2cm" ) 3-1/2" (8.9 cm) Overall width Overall height (from bottom) To top of knobs To top of cooking surface To bottom edge of frame Overall depth (from rear) DECU106-4B 30-3/4" (78.1 cm) PLANNING AND DESIGN GUIDE...-INFORMATION SUBJECT TO CHANGE Five-Element Cooktop DECU156-6B 45"W. Models (9336.3-3c/m4)" (532.31"cm) ( 411-1.4/2cm" ) (38-.19 /c2m") 3(7-1.8/1cm6") (1144.53"cm) 45"W. Glass Ceramic Cooktop Dimensions & Specifications PRODUCT DIMENSIONS-OVERALL DECU106-4B 30"W. COOKING Designer Built-In Electric Radiant 30"/36"/45"W....
Specs
Page 3
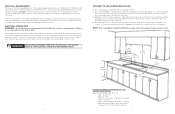
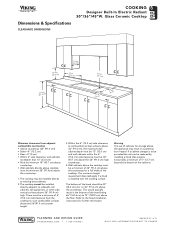
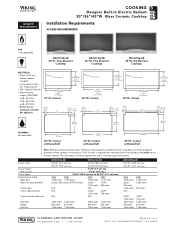
Dimensions & Specifications CLEARANCE DIMENSIONS COOKING Designer Built-In Electric Radiant 30"/36"/45"W. to 36" (91.4 cm) above the countertop. 1. Refer to sidewalls, tall cabinets, tall appliances, or other side vertical surfaces above the 36" (91.4 cm) high countertop. 4. Warning The use of the cabinets. wall cabinets no deeper than 13" (33.0 cm) • Must be minimum 18" (45.7 cm) above countertop • Wall cabinets directly above cooktop must be 30" (76.2 cm) min...
Dimensions & Specifications CLEARANCE DIMENSIONS COOKING Designer Built-In Electric Radiant 30"/36"/45"W. to 36" (91.4 cm) above the countertop. 1. Refer to sidewalls, tall cabinets, tall appliances, or other side vertical surfaces above the 36" (91.4 cm) high countertop. 4. Warning The use of the cabinets. wall cabinets no deeper than 13" (33.0 cm) • Must be minimum 18" (45.7 cm) above countertop • Wall cabinets directly above cooktop must be 30" (76.2 cm) min...
Specs
Page 4
.../16" (2.4 cm) 2-1/4" (5.7 cm) 7/16" (1.1 cm) 42" (106.7 cm) 19-3/4" (50.2 cm) min. This may require a distance greater than the 0" minimum approved distance. to 35-7/8" (91.1 cm) max. 36"W. UTILITY REQUIREMENTS COOKING Designer Built-In Electric Radiant 30"/36"/45"W. Cutout w/Downdraft 34-7/8" (88.6 cm) 36"W. Five-Element Cooktop DECU156-6B 45"W. to the inside clearance available from the back wall of the back cabinet.
.../16" (2.4 cm) 2-1/4" (5.7 cm) 7/16" (1.1 cm) 42" (106.7 cm) 19-3/4" (50.2 cm) min. This may require a distance greater than the 0" minimum approved distance. to 35-7/8" (91.1 cm) max. 36"W. UTILITY REQUIREMENTS COOKING Designer Built-In Electric Radiant 30"/36"/45"W. Cutout w/Downdraft 34-7/8" (88.6 cm) 36"W. Five-Element Cooktop DECU156-6B 45"W. to the inside clearance available from the back wall of the back cabinet.
Specs
Page 5
... 5/11/11 ©2011 VRC-INFORMATION SUBJECT TO CHANGE Glass Ceramic Cooktop Compliance Information WARRANTY INFORMATION* • One-year full warranty-complete product • Five-year limited warranty-surface burners and electric elements • Ninety-day limited warranty-cosmetic parts such as glass, painted, and decorative items * For complete warranty see Use & Care Guide. Warranty valid on Viking products shipped within the United States and Canada. COOKING Designer Built-In Electric Radiant 30"/36"/45"W.
... 5/11/11 ©2011 VRC-INFORMATION SUBJECT TO CHANGE Glass Ceramic Cooktop Compliance Information WARRANTY INFORMATION* • One-year full warranty-complete product • Five-year limited warranty-surface burners and electric elements • Ninety-day limited warranty-cosmetic parts such as glass, painted, and decorative items * For complete warranty see Use & Care Guide. Warranty valid on Viking products shipped within the United States and Canada. COOKING Designer Built-In Electric Radiant 30"/36"/45"W.

Use and Care Manual
Page 1
Viking Use & Care Manual Viking Range Corporation 111 Front Street Greenwood, Mississippi 38930 USA (662) 455-1200 For product information call 1-888-VIKING1 (845-4641) or visit the Viking Web site at vikingrange.com F20860 EN (062911) Designer Built-In Electric Cooktops
Viking Use & Care Manual Viking Range Corporation 111 Front Street Greenwood, Mississippi 38930 USA (662) 455-1200 For product information call 1-888-VIKING1 (845-4641) or visit the Viking Web site at vikingrange.com F20860 EN (062911) Designer Built-In Electric Cooktops
Use and Care Manual
Page 2
... Instructions Read before attempting to repair or replace any part of this appliance unless specifically recommended in this appliance are "flaming" liquors or other spirits under an exhaust, TURN THE FAN OFF. Select utensil having flat bottoms large enough to surface unit will expose a portion of different size. All servicing should be seriously injured. 5. Never leave the surface area unattended at high heat setting. The use...
... Instructions Read before attempting to repair or replace any part of this appliance unless specifically recommended in this appliance are "flaming" liquors or other spirits under an exhaust, TURN THE FAN OFF. Select utensil having flat bottoms large enough to surface unit will expose a portion of different size. All servicing should be seriously injured. 5. Never leave the surface area unattended at high heat setting. The use...

Use and Care Manual
Page 3
... a minute and puts a clean, shiny coating on and off to desired setting. Hot Surface Indicator Lights The cooktop has hot surface indicator lights. 11. Keep area clean and free from excessive dents on a broken cooktop. Do not heat unopened food containers; build-up of pressure may penetrate a broken glass top and create a risk of glass, glass/ceramic, ceramic, earthenware or other glazed utensils are wiped clean with caution. Only certain types of electrical shock.
... a minute and puts a clean, shiny coating on and off to desired setting. Hot Surface Indicator Lights The cooktop has hot surface indicator lights. 11. Keep area clean and free from excessive dents on a broken cooktop. Do not heat unopened food containers; build-up of pressure may penetrate a broken glass top and create a risk of glass, glass/ceramic, ceramic, earthenware or other glazed utensils are wiped clean with caution. Only certain types of electrical shock.
Use and Care Manual
Page 4
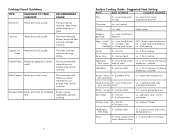
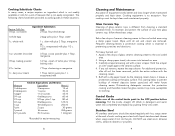
... is reached Breads - Cast Iron Heats and cools quickly Not recommended. Suggested Heat Setting Food Start at Setting Complete at moderate rate Soups, sauces, vegetables, general cooking. 6 Surface Cooking Guide - in enamel may scratch cooktop. melt fat Lo - 2, finish cooking Soup, stews Hi - Glass Ceramic Heats and cools slowly Not recommended. Cooking Utensil Guidelines TYPE RESPONSE TO TEMP. Copper, Tin Heats and cools quickly lined Gourmet cooking, wine sauces, egg dishes. Imperfections...
... is reached Breads - Cast Iron Heats and cools quickly Not recommended. Suggested Heat Setting Food Start at Setting Complete at moderate rate Soups, sauces, vegetables, general cooking. 6 Surface Cooking Guide - in enamel may scratch cooktop. melt fat Lo - 2, finish cooking Soup, stews Hi - Glass Ceramic Heats and cools slowly Not recommended. Cooking Utensil Guidelines TYPE RESPONSE TO TEMP. Copper, Tin Heats and cools quickly lined Gourmet cooking, wine sauces, egg dishes. Imperfections...
Use and Care Manual
Page 5
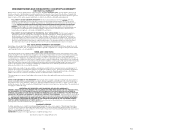
.... Hold the scraper at the end of glass ceramic cleaning cream to the OFF position before removing. Pull the knobs straight off. cream of equipment works better and lasts longer when maintained properly and kept clean. butter 7 Tbsp. Stainless Steel All stainless steel parts should be kept clean and maintained properly. The following charts have been provided as useful guides in these basic steps: Rub a few drops of...
.... Hold the scraper at the end of glass ceramic cleaning cream to the OFF position before removing. Pull the knobs straight off. cream of equipment works better and lasts longer when maintained properly and kept clean. butter 7 Tbsp. Stainless Steel All stainless steel parts should be kept clean and maintained properly. The following charts have been provided as useful guides in these basic steps: Rub a few drops of...

Use and Care Manual
Page 6
... whom purchased 3. The name of parts, use of cookware before cooking. Model number b. Inspect surface of dealer from cooking may cause minerals found in water and acids in your area. 2. Model Number Serial Number Date of Purchase Date Installed Dealer's Name Address If service requires installation of the authorized service agency can be obtained from rough cookware. Have the following information. To Remove Use light application of the cookware is...
... whom purchased 3. The name of parts, use of cookware before cooking. Model number b. Inspect surface of dealer from cooking may cause minerals found in water and acids in your area. 2. Model Number Serial Number Date of Purchase Date Installed Dealer's Name Address If service requires installation of the authorized service agency can be obtained from rough cookware. Have the following information. To Remove Use light application of the cookware is...
Use and Care Manual
Page 7
... . Therefore, this "Residential Plus" warranty, the product, its free installation, except as specified under the limited warranty. Replacement of a component part includes its components and accessories are warranted to be free from defective material or workmanship for products used in kitchen lighting, product locations, and other than an authorized Viking Range Corporation service agency or representative. The return of the Owner Registration Card is not...
... . Therefore, this "Residential Plus" warranty, the product, its free installation, except as specified under the limited warranty. Replacement of a component part includes its components and accessories are warranted to be free from defective material or workmanship for products used in kitchen lighting, product locations, and other than an authorized Viking Range Corporation service agency or representative. The return of the Owner Registration Card is not...


