
Countertop Rear Trim - Installation Instructions
Page 2
... is a regulator cover supplied with the backguard that must be removed if used with any of the models listed below: • 30", 36" and 48" VGCC • VDSC530 • VDSC536 • VGRT530 • VGRT536 *If you have one of the high-shelf back trim and secure with the 4 enclosed screws. (Illustration I ) Grasp the trim on Designer models. ATTACHING REAR TRIM (Illustration I ) B RANGETOP REAR VIEW B RANGE REAR B VIEW B A A ATTACHING...
... is a regulator cover supplied with the backguard that must be removed if used with any of the models listed below: • 30", 36" and 48" VGCC • VDSC530 • VDSC536 • VGRT530 • VGRT536 *If you have one of the high-shelf back trim and secure with the 4 enclosed screws. (Illustration I ) Grasp the trim on Designer models. ATTACHING REAR TRIM (Illustration I ) B RANGETOP REAR VIEW B RANGE REAR B VIEW B A A ATTACHING...

Countertop Rear Trim - Installation Instructions
Page 3
... and heat resistant lies with a backguard against a rear wall, including cosmetic damage. Only in the range installation guide for any type of wall at the rear of the unit. The standard curb base front (A) is non-combustible. The assembly is adjustable about 2" (5.1 cm) front to be attached. remove, tighten bolts, and reattach. Remove the assembly from heat damage against a combustible surface. (See...
... and heat resistant lies with a backguard against a rear wall, including cosmetic damage. Only in the range installation guide for any type of wall at the rear of the unit. The standard curb base front (A) is non-combustible. The assembly is adjustable about 2" (5.1 cm) front to be attached. remove, tighten bolts, and reattach. Remove the assembly from heat damage against a combustible surface. (See...

Countertop Rear Trim - Installation Instructions
Page 4
.... 4. The assembly is adjustable about 2" (5.1 cm) front to back setting; Curb Bases COUNTERTOP REAR TRIM 1. Locate screw hole openings (A) on each side, but allow snug fit. Fronts taller than 3-1/8" (7.9 cm) tall. Align screw hole openings on countertop rear trim with enclosed screws. Remove the front (A) from the carton. 2. Clip assembly onto range legs; Attach locally supplied front (C) to island trim with the ones...
.... 4. The assembly is adjustable about 2" (5.1 cm) front to back setting; Curb Bases COUNTERTOP REAR TRIM 1. Locate screw hole openings (A) on each side, but allow snug fit. Fronts taller than 3-1/8" (7.9 cm) tall. Align screw hole openings on countertop rear trim with enclosed screws. Remove the front (A) from the carton. 2. Clip assembly onto range legs; Attach locally supplied front (C) to island trim with the ones...

36 inchW. Countertop Rear Trim - P36CRT - Installation Instructions
Page 2
... to the counter. 2. Locate and remove the screws holding the grate support side trim in the side trim. Replace and secure with the countertop and the landing ledge. Replace and secure with product) Heat shield (not on all products) Countertop side trim (optional accessory) Heat shield (not on all products) Lift the grate support side trim out. VGIC Open Burner Ranges 1. Installation (Side Trim) For Models: R24CSTSS - 24" D.
... to the counter. 2. Locate and remove the screws holding the grate support side trim in the side trim. Replace and secure with the countertop and the landing ledge. Replace and secure with product) Heat shield (not on all products) Countertop side trim (optional accessory) Heat shield (not on all products) Lift the grate support side trim out. VGIC Open Burner Ranges 1. Installation (Side Trim) For Models: R24CSTSS - 24" D.

Two-Page Specifications Sheet
Page 1
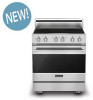
... Island trim EASY OPERATION AND CLEANUP § Strong, wear-resistant glass ceramic surface with stainless steel frame offers excellent cleanability § Durable metal die-cast knobs with child-proof, push-to-turn safety feature § Control features child-lock function § Customer-removable knobs for gentle melting or keeping cooked food warm § Digital LED display § Auto parboil feature § Large capacity oven § 4.7 cu. ft. INDUCTION RANGE Viking 3 Series - RVIR FEATURES AND FUNCTIONS...
... Island trim EASY OPERATION AND CLEANUP § Strong, wear-resistant glass ceramic surface with stainless steel frame offers excellent cleanability § Durable metal die-cast knobs with child-proof, push-to-turn safety feature § Control features child-lock function § Customer-removable knobs for gentle melting or keeping cooked food warm § Digital LED display § Auto parboil feature § Large capacity oven § 4.7 cu. ft. INDUCTION RANGE Viking 3 Series - RVIR FEATURES AND FUNCTIONS...
Two-Page Specifications Sheet
Page 2
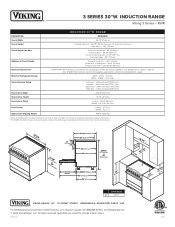
...-3/16" (46.2 cm) Electrical Requirements 240-208 VAC 60 Hz electrical connection box on product, connect with household electric ranges. ft. Approximate Shipping Weight 426 lb. (193.2 kg) Please do not prepare installation from Rear To front of side panel - 25" (63.5 cm) To front of door - 25-3/4" (65.4 cm) To front of control panel - 27-1/8" (68.9 cm) To end of knobs - 29" (73...
...-3/16" (46.2 cm) Electrical Requirements 240-208 VAC 60 Hz electrical connection box on product, connect with household electric ranges. ft. Approximate Shipping Weight 426 lb. (193.2 kg) Please do not prepare installation from Rear To front of side panel - 25" (63.5 cm) To front of door - 25-3/4" (65.4 cm) To front of control panel - 27-1/8" (68.9 cm) To end of knobs - 29" (73...
English
Page 2
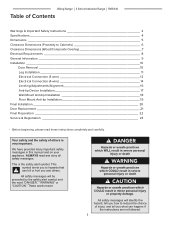
... safety messages will identify the hazard, tell you how to Cabinets 6 Clearance Dimensions (Wood/Composite Overlay 7 Electrical Requirements 8 General Information 9 Installation 10 Door Removal 10 Leg Installation 11 Electrical Connection (3-wire 12 Electrical Connection (4-wire 14 Leveling/Adjustments/Alignment 16 Anti-tip Device Installation 17 Wall Mount Anti-tip Installation 18 Floor Mount Anti-tip Installation 19 Final Installation 20 Door Replacement 21 Final Preparation 22 Service & Registration 23 • Before beginning, please read and obey all safety messages...
... safety messages will identify the hazard, tell you how to Cabinets 6 Clearance Dimensions (Wood/Composite Overlay 7 Electrical Requirements 8 General Information 9 Installation 10 Door Removal 10 Leg Installation 11 Electrical Connection (3-wire 12 Electrical Connection (4-wire 14 Leveling/Adjustments/Alignment 16 Anti-tip Device Installation 17 Wall Mount Anti-tip Installation 18 Floor Mount Anti-tip Installation 19 Final Installation 20 Door Replacement 21 Final Preparation 22 Service & Registration 23 • Before beginning, please read and obey all safety messages...
English
Page 3
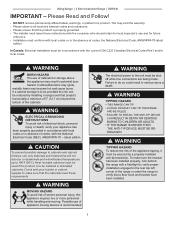
...;F (90°C). Viking Range | 3 Series Induction Range | RVIR330 IMPORTANT - In Canada: Electrical installation must be installed in the rear top left corner of cabinets for future reference. • Installation must conform with the current CSA C22.1 Canadian Electrical Codes Part 1 and/or local codes. WARNING ELECTRICAL GROUNDING INSTRUCTIONS To avoid risk of the appliance tipping, it must leave these requirements. latest edition. WARNING TIPPING HAZARD • THIS RANGE CAN TIP. •...
...;F (90°C). Viking Range | 3 Series Induction Range | RVIR330 IMPORTANT - In Canada: Electrical installation must be installed in the rear top left corner of cabinets for future reference. • Installation must conform with the current CSA C22.1 Canadian Electrical Codes Part 1 and/or local codes. WARNING ELECTRICAL GROUNDING INSTRUCTIONS To avoid risk of the appliance tipping, it must leave these requirements. latest edition. WARNING TIPPING HAZARD • THIS RANGE CAN TIP. •...

English
Page 4
... of door To front of control panel To end of knobs Additions to base height To top of island trim To top of bacguard To top of high shelf Electrical requirements Maximum amp usage Surface element rating (watts) Left front Left rear Right Front Right rear 29-7/8" (76.0cm) To top of glass frame 35-7/8" (91.1 cm) min. to AHAM standards 4.1 cu. Cord must...
... of door To front of control panel To end of knobs Additions to base height To top of island trim To top of bacguard To top of high shelf Electrical requirements Maximum amp usage Surface element rating (watts) Left front Left rear Right Front Right rear 29-7/8" (76.0cm) To top of glass frame 35-7/8" (91.1 cm) min. to AHAM standards 4.1 cu. Cord must...
English
Page 6
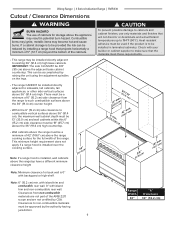
... wall is installed over the cooking surface. Note: 6" (15.2 cm) min. Heat resistant adhesive must be reduced by the authority having jurisdiction. 6 A Range W idth 30" "A" D ime nsio n 30" (76.2 cm) Note: Minimum clearance for storage above the adjacent base cabinet countertop. This minimum height requirement does not apply if a range hood is 0" with island trim and non-combustible rear wall...
... wall is installed over the cooking surface. Note: 6" (15.2 cm) min. Heat resistant adhesive must be reduced by the authority having jurisdiction. 6 A Range W idth 30" "A" D ime nsio n 30" (76.2 cm) Note: Minimum clearance for storage above the adjacent base cabinet countertop. This minimum height requirement does not apply if a range hood is 0" with island trim and non-combustible rear wall...

English
Page 7
... "cm) 3((3796061".."4t2mmoccaimmnx.)). Wall Installation Island Installation Note: Minimum clearance for safe and efficient operation of the hood being 66" (167.6 cm) to non-combustible materials must be 30" (76.2 cm) min. Viking Range | 3 Series Induction Range | RVIR330 Clearance Dimensions - (Wood/Composite Overlay) The bottom of the ANSI Z21.1 scope and are not part of a standard hood should be approved by CSA...
... "cm) 3((3796061".."4t2mmoccaimmnx.)). Wall Installation Island Installation Note: Minimum clearance for safe and efficient operation of the hood being 66" (167.6 cm) to non-combustible materials must be 30" (76.2 cm) min. Viking Range | 3 Series Induction Range | RVIR330 Clearance Dimensions - (Wood/Composite Overlay) The bottom of the ANSI Z21.1 scope and are not part of a standard hood should be approved by CSA...
English
Page 8
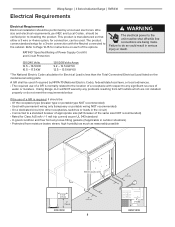
... used if required by a licensed electrician. Viking Range | 3 Series Induction Range | RVIR330 Electrical Requirements Electrical Requirements Electrical installation should be performed by NFPA-70 (National Electric Code), federal/state/local laws, or local ordinances. • The required use of a GFI is less than the Total Connected Electrical Load listed on each of the options RATING* Specified Rating of Power Supply Cord Kit and Circuit Protection WARNING The electrical power to the unit must be shut off while line connections...
... used if required by a licensed electrician. Viking Range | 3 Series Induction Range | RVIR330 Electrical Requirements Electrical Requirements Electrical installation should be performed by NFPA-70 (National Electric Code), federal/state/local laws, or local ordinances. • The required use of a GFI is less than the Total Connected Electrical Load listed on each of the options RATING* Specified Rating of Power Supply Cord Kit and Circuit Protection WARNING The electrical power to the unit must be shut off while line connections...

English
Page 9
... are the anti-tip devices and one of the anti-tip devices. These are rarely needed. If you observe unusual or excessive noise coming from the cooling fan, contact a Viking Authorized Service Center before being used for optimal oven performance CAUTION The cooling fan should be peeled off. Viking Range | 3 Series Induction Range | RVIR330 General Information READ AND FOLLOW ALL WARNING AND CAUTION INFORMATION WHEN INSTALLING THIS APPLIANCE...
... are the anti-tip devices and one of the anti-tip devices. These are rarely needed. If you observe unusual or excessive noise coming from the cooling fan, contact a Viking Authorized Service Center before being used for optimal oven performance CAUTION The cooling fan should be peeled off. Viking Range | 3 Series Induction Range | RVIR330 General Information READ AND FOLLOW ALL WARNING AND CAUTION INFORMATION WHEN INSTALLING THIS APPLIANCE...
English
Page 10
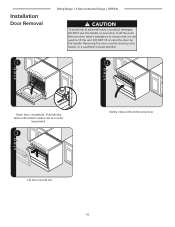
Removing the door must be done by the handle. Fold latches back until locked in place.not secure for long transit. 3 Gently close until latches stop door Lift door up and out. 10 Installation Door Removal 1 Viking Range | 3 Series Induction Range | RVIR330 CAUTION To avoid risk of personal injury or product damages, DO NOT use the handle or oven door to lift the unit. Remove door before installation to ensure that it is not used to lift the oven. DO NOT lift or carry the door by your dealer, or a qualified licensed plumber. 2 Open door completely.
Removing the door must be done by the handle. Fold latches back until locked in place.not secure for long transit. 3 Gently close until latches stop door Lift door up and out. 10 Installation Door Removal 1 Viking Range | 3 Series Induction Range | RVIR330 CAUTION To avoid risk of personal injury or product damages, DO NOT use the handle or oven door to lift the unit. Remove door before installation to ensure that it is not used to lift the oven. DO NOT lift or carry the door by your dealer, or a qualified licensed plumber. 2 Open door completely.
English
Page 12
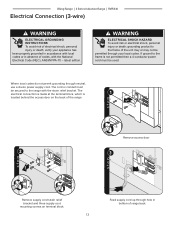
Viking Range | 3 Series Induction Range | RVIR330 Electrical Connection (3-wire) WARNING ELECTRICAL GROUNDING INSTRUCTIONS To avoid risk of range back. 12 latest edition. Where local codes do not permit grounding through your appliance has been properly grounded in accordance with the strain relief bracket. The electrical connection is made at the terminal block, which is not permitted then a 4-conductor power cord must be permitted through neutral, use a 4-wire power supply cord. WARNING ELECTRICAL SHOCK HAZARD...
Viking Range | 3 Series Induction Range | RVIR330 Electrical Connection (3-wire) WARNING ELECTRICAL GROUNDING INSTRUCTIONS To avoid risk of range back. 12 latest edition. Where local codes do not permit grounding through your appliance has been properly grounded in accordance with the strain relief bracket. The electrical connection is made at the terminal block, which is not permitted then a 4-conductor power cord must be permitted through neutral, use a 4-wire power supply cord. WARNING ELECTRICAL SHOCK HAZARD...
English
Page 14
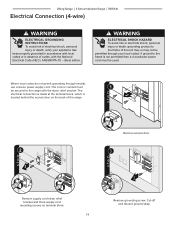
... may not be secured to the frame is located behind the access door on terminal block. 1 Remove access door 3 2 1 Remove grounding screw. If ground to the range with the National Electrical Code (NEC). Viking Range | 3 Series Induction Range | RVIR330 Electrical Connection (4-wire) WARNING ELECTRICAL GROUNDING INSTRUCTIONS To avoid risk of the range 1 2 2 3 1 2 Remove supply cord strain relief bracket and three supply cord mounting screws on the back of electrical shock, personal injury or death; latest edition...
... may not be secured to the frame is located behind the access door on terminal block. 1 Remove access door 3 2 1 Remove grounding screw. If ground to the range with the National Electrical Code (NEC). Viking Range | 3 Series Induction Range | RVIR330 Electrical Connection (4-wire) WARNING ELECTRICAL GROUNDING INSTRUCTIONS To avoid risk of the range 1 2 2 3 1 2 Remove supply cord strain relief bracket and three supply cord mounting screws on the back of electrical shock, personal injury or death; latest edition...
English
Page 17
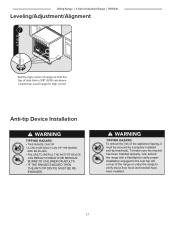
...;ashlight to verify proper installation engaged in the rear top left corner of the range or under the range to high corner. WARNING TIPPING HAZARD To reduce the risk of the appliance tipping, it must be secured by a properly installed anti-tip bracket(s). Level range to verify that the top of side trim is 3/8" (0.95 cm) above countertop. Viking Range | 3 Series Induction Range | RVIR330 Leveling/Adjustment/Alignment 7 Set the high corner...
...;ashlight to verify proper installation engaged in the rear top left corner of the range or under the range to high corner. WARNING TIPPING HAZARD To reduce the risk of the appliance tipping, it must be secured by a properly installed anti-tip bracket(s). Level range to verify that the top of side trim is 3/8" (0.95 cm) above countertop. Viking Range | 3 Series Induction Range | RVIR330 Leveling/Adjustment/Alignment 7 Set the high corner...
English
Page 20
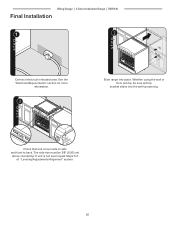
Whether using the wall or floor anti-tip, be 3/8" (0.95 cm) above countertop. See the "Electrical Requirements" section for more information. 3 Slide range into the anti-tip opening. (0.39/58c"m) Check that unit is not level repeat Steps 5-7 of "Leveling/Adjustments/Alignment" section. 20 Viking Range | 3 Series Induction Range | RVIR330 Final Installation 1 2 Connect electrical in shaded area. If unit is level side to side and front to back. The side trim must be sure anti-tip bracket slides into place.
Whether using the wall or floor anti-tip, be 3/8" (0.95 cm) above countertop. See the "Electrical Requirements" section for more information. 3 Slide range into the anti-tip opening. (0.39/58c"m) Check that unit is not level repeat Steps 5-7 of "Leveling/Adjustments/Alignment" section. 20 Viking Range | 3 Series Induction Range | RVIR330 Final Installation 1 2 Connect electrical in shaded area. If unit is level side to side and front to back. The side trim must be sure anti-tip bracket slides into place.
English
Page 22
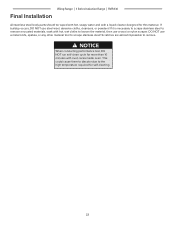
... necessary to scrape stainless steel to remove encrusted materials, soak with hot, wet cloths to remove. Scratches are almost impossible to loosen the material, then use a wool or nylon scraper. Viking Range | 3 Series Induction Range | RVIR330 Final Installation All stainless steel body parts should be wiped with hot, soapy water and with a liquid cleaner designed for self-cleaning. 22 This could cause them to...
... necessary to scrape stainless steel to remove encrusted materials, soak with hot, wet cloths to remove. Scratches are almost impossible to loosen the material, then use a wool or nylon scraper. Viking Range | 3 Series Induction Range | RVIR330 Final Installation All stainless steel body parts should be wiped with hot, soapy water and with a liquid cleaner designed for self-cleaning. 22 This could cause them to...
English
Page 23
... to : VIKING RANGE, LLC PREFERRED SERVICE 111 Front Street Greenwood, Mississippi 38930 USA Rangetop - The serial number and model number for future reference 23 Contact Viking Range Corporation, 1-888-VIKING1 (845-4641), for the nearest service parts distributor in your appliance can be used in performing service on the appliance. Viking Range | 3 Series Induction Range | RVIR330 Service & Registration Only authorized replacement parts may be found by looking under the control panel. All servicing should...
... to : VIKING RANGE, LLC PREFERRED SERVICE 111 Front Street Greenwood, Mississippi 38930 USA Rangetop - The serial number and model number for future reference 23 Contact Viking Range Corporation, 1-888-VIKING1 (845-4641), for the nearest service parts distributor in your appliance can be used in performing service on the appliance. Viking Range | 3 Series Induction Range | RVIR330 Service & Registration Only authorized replacement parts may be found by looking under the control panel. All servicing should...


