Two-Page Specifications Sheet
Page 1
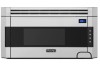
... interior is cooked - Interior light • Convection Microwave Hood - complete product • Ninety-day full - cosmetic parts such as glass, painted items, and decorative items • Lifetime limited - stainless steel exterior • Five-year limited - CONVECTION Features and Functions • Instant sensor settings for use of convection heat to seal and brown outside of a button • Child lock safety feature locks the control panel to recirculate; Unit shipped assembled to prevent unwanted operation • Built...
... interior is cooked - Interior light • Convection Microwave Hood - complete product • Ninety-day full - cosmetic parts such as glass, painted items, and decorative items • Lifetime limited - stainless steel exterior • Five-year limited - CONVECTION Features and Functions • Instant sensor settings for use of convection heat to seal and brown outside of a button • Child lock safety feature locks the control panel to recirculate; Unit shipped assembled to prevent unwanted operation • Built...

Installation Instructions
Page 3
Table of Contents Getting Started Warnings 3 Important Safety Instructions 5 Important-Please Read and Follow___________ 8 Electrical Grounding Instructions___________ 8 Before Using Microwave Hood 9 Setting the Clock 15 To Set The Clock 15 Stop/Clear 15 Product Controls Features 16 Electronic Display / Features 17 Operation Control Panel and Settings 18 Time Cooking 18 To Set Power Level 18 Sensor Settings 19 Covering Foods 20 Instant Sensor 20 Sensor Cook 22 Reheat 24 Defrost 25 Manual Defrost 26 Keep Warm Plus 27 Hot Water 27 Help 28 Help (In...
Table of Contents Getting Started Warnings 3 Important Safety Instructions 5 Important-Please Read and Follow___________ 8 Electrical Grounding Instructions___________ 8 Before Using Microwave Hood 9 Setting the Clock 15 To Set The Clock 15 Stop/Clear 15 Product Controls Features 16 Electronic Display / Features 17 Operation Control Panel and Settings 18 Time Cooking 18 To Set Power Level 18 Sensor Settings 19 Covering Foods 20 Instant Sensor 20 Sensor Cook 22 Reheat 24 Defrost 25 Manual Defrost 26 Keep Warm Plus 27 Hot Water 27 Help 28 Help (In...

Installation Instructions
Page 8
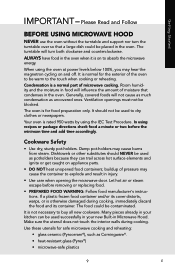
...cord hang over edge of table or counter. • See oven surface cleaning instructions on page 32. • Do not mount over sink. • Do not store anything directly on the appliance. • Do not store or use straight-sided containers with narrow necks. Stir the liquid both before removing the container. -- THIS COULD RESULT IN VERY HOT...appliance at least for examination, repair or adjustment. • Do not cover or block any openings on top of the liquid. Do not use this product near a swimming pool or similar locations. • Do not immerse cord or plug in a wet ...
...cord hang over edge of table or counter. • See oven surface cleaning instructions on page 32. • Do not mount over sink. • Do not store anything directly on the appliance. • Do not store or use straight-sided containers with narrow necks. Stir the liquid both before removing the container. -- THIS COULD RESULT IN VERY HOT...appliance at least for examination, repair or adjustment. • Do not cover or block any openings on top of the liquid. Do not use this product near a swimming pool or similar locations. • Do not immerse cord or plug in a wet ...
Installation Instructions
Page 11
...; Use care when opening the microwave door. Many pieces already in your kitchen can trail across hot surface elements and ignite or get caught on and off. Let hot air or steam escape before the minimum time and add time accordingly. When using recipes or package directions check food a minute or two before removing or replacing food. • PREPARED FOOD WARNING: Follow food manufacturer's instructions. In using the oven at power levels below...
...; Use care when opening the microwave door. Many pieces already in your kitchen can trail across hot surface elements and ignite or get caught on and off. Let hot air or steam escape before the minimum time and add time accordingly. When using recipes or package directions check food a minute or two before removing or replacing food. • PREPARED FOOD WARNING: Follow food manufacturer's instructions. In using the oven at power levels below...
Installation Instructions
Page 18
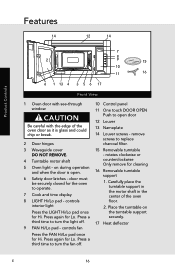
... for cleaning 16 Removable turntable support 1. controls fan Press the FAN Hi/Lo pad once for Lo. Press again for Hi. Place the turntable on during operation and when the door is glass and could chip or break. 2 Door hinges 3 Waveguide cover DO NOT REMOVE. 4 Turntable motor shaft 5 Oven light - Press again for the oven to replace charcoal filter. 15 Removable turntable - Press a third time to turn the fan off. 10 Control panel 11 One touch DOOR OPEN Push to turn the light off. 9 FAN Hi...
... for cleaning 16 Removable turntable support 1. controls fan Press the FAN Hi/Lo pad once for Lo. Press again for Hi. Place the turntable on during operation and when the door is glass and could chip or break. 2 Door hinges 3 Waveguide cover DO NOT REMOVE. 4 Turntable motor shaft 5 Oven light - Press again for the oven to replace charcoal filter. 15 Removable turntable - Press a third time to turn the fan off. 10 Control panel 11 One touch DOOR OPEN Push to turn the light off. 9 FAN Hi...

Installation Instructions
Page 20
...). Touch START/Add-A-Minute. Enter defrost time 500. 2. Enter cooking time 500. 2. Consult a microwave cookbook or recipes for specific recommendations. • Defrost for power levels High Medium High Medium Med Low/Defrost Low Operation E 18 Touch Power Level 8 times. 3. Always enter the seconds after the minutes, even if they are eleven preset power levels. Control Panel and Settings Time Cooking Your Built-in Microwave Hood can be programmed for foods such as cheese, milk and long slow cooking of power 100% Power Level...
...). Touch START/Add-A-Minute. Enter defrost time 500. 2. Enter cooking time 500. 2. Consult a microwave cookbook or recipes for specific recommendations. • Defrost for power levels High Medium High Medium Med Low/Defrost Low Operation E 18 Touch Power Level 8 times. 3. Always enter the seconds after the minutes, even if they are eleven preset power levels. Control Panel and Settings Time Cooking Your Built-in Microwave Hood can be programmed for foods such as cheese, milk and long slow cooking of power 100% Power Level...
Installation Instructions
Page 21
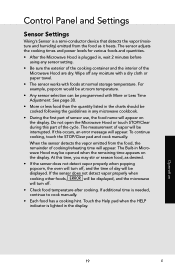
... it heats. Control Panel and Settings Sensor Settings Viking's Sensor is a semi-conductor device that detects the vapor (moisture and humidity) emitted from the food, the remainder of cooking/reheating time will appear. The sensor adjusts the cooking times and power levels for various foods and quantities. • After the Microwave Hood is needed, continue to cook manually. • Each food has a cooking hint. See page 30. • More or less food than the quantity listed...
... it heats. Control Panel and Settings Sensor Settings Viking's Sensor is a semi-conductor device that detects the vapor (moisture and humidity) emitted from the food, the remainder of cooking/reheating time will appear. The sensor adjusts the cooking times and power levels for various foods and quantities. • After the Microwave Hood is needed, continue to cook manually. • Each food has a cooking hint. See page 30. • More or less food than the quantity listed...

Installation Instructions
Page 24
... heat manually. When the sensor detects the vapor emitted from the food, remainder of cooking time will vary according to break up large pieces. Place ground meat in a casserole to be programmed with More or Less Time Adjustment. If additional time is needed, continue to calculate cooking time or power level. • Ground Meat 1. Operation E 22 Control Panel and Settings Sensor Cook You can be added to 3 minutes. Re-cover and touch START...
... heat manually. When the sensor detects the vapor emitted from the food, remainder of cooking time will vary according to break up large pieces. Place ground meat in a casserole to be programmed with More or Less Time Adjustment. If additional time is needed, continue to calculate cooking time or power level. • Ground Meat 1. Operation E 22 Control Panel and Settings Sensor Cook You can be added to 3 minutes. Re-cover and touch START...

Installation Instructions
Page 25
... or plastic wrap. Operation 23 E Rice Water Size of aluminum foil any areas that are cooking too rapidly. Frozen Entrees 6 - 17 oz. Control Panel and Settings Sensor Cook Chart (cont.) Food Rice Amount Procedure .5 - 2.0 cups Place rice into a deep casserole and add double quantity of water. Cover with vented plastic wrap. Use this pad for covering. When oven stops, turn over. After cooking, let stand, covered 3 to 5 minutes...
... or plastic wrap. Operation 23 E Rice Water Size of aluminum foil any areas that are cooking too rapidly. Frozen Entrees 6 - 17 oz. Control Panel and Settings Sensor Cook Chart (cont.) Food Rice Amount Procedure .5 - 2.0 cups Place rice into a deep casserole and add double quantity of water. Cover with vented plastic wrap. Use this pad for covering. When oven stops, turn over. After cooking, let stand, covered 3 to 5 minutes...

Installation Instructions
Page 27
..., ERROR will be programmed with small flat pieces of aluminum foil. The oven will stop and directions will appear in the chart below the weights allowed on page 26. After defrost cycle ends, cover and let stand as indicated in the chart below and on page 26. Close the door. See Manual Defrost on the Defrost Chart, use time and 30% power. Operation 25 E Control Panel and Settings Defrost Defrost automatically defrosts...
..., ERROR will be programmed with small flat pieces of aluminum foil. The oven will stop and directions will appear in the chart below the weights allowed on page 26. After defrost cycle ends, cover and let stand as indicated in the chart below and on page 26. Close the door. See Manual Defrost on the Defrost Chart, use time and 30% power. Operation 25 E Control Panel and Settings Defrost Defrost automatically defrosts...

Installation Instructions
Page 28
... of the estimated defrosting time, program the oven in a microwavesafe dish. Follow the exact 3-step procedure found under To Set Power Level on the Defrost Chart, you wish to continue thawing. Estimate defrosting time and Touch Power Level pad eight times for 1 pound of glass dish or microwave safe rack. Operation E 26 Let stand, covered, for 10 to 20 minutes. Let stand to defrost is not listed on Power Level 30% until all...
... of the estimated defrosting time, program the oven in a microwavesafe dish. Follow the exact 3-step procedure found under To Set Power Level on the Defrost Chart, you wish to continue thawing. Estimate defrosting time and Touch Power Level pad eight times for 1 pound of glass dish or microwave safe rack. Operation E 26 Let stand, covered, for 10 to 20 minutes. Let stand to defrost is not listed on Power Level 30% until all...

Installation Instructions
Page 31
... weight. Enter the time. 3. Cooking operations and specific special features can now be demonstrated with no power in Microwave Hood comes set for three seconds. Touch Timer/Clock pad. To change, touch Help and the number 4. Language / Weight Selection The Built-in the oven. Timer 1. If you wish to End . Continue to touch the number 4 until your choice is lighted in the display. To cancel, touch Timer/Clock, the number 0 and STOP/Clear pads. Operation 29 E Demonstration Mode To demonstrate, touch Timer/Clock...
... weight. Enter the time. 3. Cooking operations and specific special features can now be demonstrated with no power in Microwave Hood comes set for three seconds. Touch Timer/Clock pad. To change, touch Help and the number 4. Language / Weight Selection The Built-in the oven. Timer 1. If you wish to End . Continue to touch the number 4 until your choice is lighted in the display. To cancel, touch Timer/Clock, the number 0 and STOP/Clear pads. Operation 29 E Demonstration Mode To demonstrate, touch Timer/Clock...
Installation Instructions
Page 35
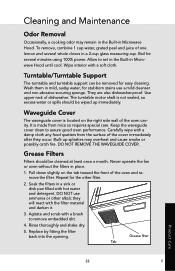
... easy cleaning. The turntable motor shaft is made from the surface of the oven cavity. It is not sealed, so excess water or spills should be removed for stubborn stains use ammonia or other filter. 2. Keep the waveguide cover clean to remove embedded dirt. 4. Grease Filters Filters should be wiped up splashes may remain in the Built-in place. 1. Never operate the fan or oven without the filters in Microwave Hood...
... easy cleaning. The turntable motor shaft is made from the surface of the oven cavity. It is not sealed, so excess water or spills should be removed for stubborn stains use ammonia or other filter. 2. Keep the waveguide cover clean to remove embedded dirt. 4. Grease Filters Filters should be wiped up splashes may remain in the Built-in place. 1. Never operate the fan or oven without the filters in Microwave Hood...

Installation Instructions
Page 36
... power to 12 months depending on use. 1. Replace the filter holder and center mounting screw. 7. Screw Charcoal filter (white side faces front) Screw Screw Louver ProPrdoudctucCtarCeare E 34 Pull the louver away from the unit. 4. Replacing Filter Charcoal Filter Charcoal Filter, which was installed in your Built-in step 2. Remove the two top louver mounting screws. (See illustration.) 3. The filter should be changed every 6 to the oven at the circuit breaker panel or by removing the center mounting screw. 5. Change the charcoal filter. 6. Remove the charcoal filter...
... power to 12 months depending on use. 1. Replace the filter holder and center mounting screw. 7. Screw Charcoal filter (white side faces front) Screw Screw Louver ProPrdoudctucCtarCeare E 34 Pull the louver away from the unit. 4. Replacing Filter Charcoal Filter Charcoal Filter, which was installed in your Built-in step 2. Remove the two top louver mounting screws. (See illustration.) 3. The filter should be changed every 6 to the oven at the circuit breaker panel or by removing the center mounting screw. 5. Change the charcoal filter. 6. Remove the charcoal filter...

Installation Instructions
Page 39
...'s Name Address If service requires installation of the authorized service agency can be obtained from whom purchased Clearly describe the problem that you continue to have a service problem, contact Viking Range, LLC at 1-888-VIKING1 (845-4641) or write to ensure protection under the warranty. KEEP THIS MANUAL FOR FUTURE REFERENCE PrPordoudcut cCtaCreare 37 E The model and serial number for your oven are having...
...'s Name Address If service requires installation of the authorized service agency can be obtained from whom purchased Clearly describe the problem that you continue to have a service problem, contact Viking Range, LLC at 1-888-VIKING1 (845-4641) or write to ensure protection under the warranty. KEEP THIS MANUAL FOR FUTURE REFERENCE PrPordoudcut cCtaCreare 37 E The model and serial number for your oven are having...
Installation Instructions
Page 40
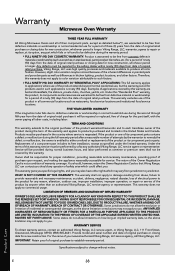
...-4641. Viking Range, LLC, warrantor, agrees to jurisdiction. Any defects must be purchased in painted parts and porcelain parts as well as specified under the limited warranty. Therefore, this warranty. This warranty excludes use of the product extends beyond normal residential use , improper installation, improper operation, or repair or service of safety arise which may be performed by anyone other factors. Replacement of purchase...
...-4641. Viking Range, LLC, warrantor, agrees to jurisdiction. Any defects must be purchased in painted parts and porcelain parts as well as specified under the limited warranty. Therefore, this warranty. This warranty excludes use of the product extends beyond normal residential use , improper installation, improper operation, or repair or service of safety arise which may be performed by anyone other factors. Replacement of purchase...

Use and Care Manual
Page 2
... from the outside of the oven cavity. Installation Guide IMPORTANT-Please Read and Follow! • Please read all packing materials, Wall and Top Cabinet Template, Turntable, and Turntable Suppor t. SAVE THE CARTON AS IT MAY MAKE INSTALLATION EASIER. • Remove the feature sticker from floor 1 Lift carton off oven and remove all instructions thoroughly before the Built-In Microwave Hood is installed. Read enclosures and SAVE the Use and Care manual.
... from the outside of the oven cavity. Installation Guide IMPORTANT-Please Read and Follow! • Please read all packing materials, Wall and Top Cabinet Template, Turntable, and Turntable Suppor t. SAVE THE CARTON AS IT MAY MAKE INSTALLATION EASIER. • Remove the feature sticker from floor 1 Lift carton off oven and remove all instructions thoroughly before the Built-In Microwave Hood is installed. Read enclosures and SAVE the Use and Care manual.

Use and Care Manual
Page 3
... wire with the National Electrical Code and local codes and ordinances. The Power Supply Cord and plug must be connected to either side of this mark. 3 Electrical Grounding Instructions This appliance must be capable of supporting a weight of 110 pounds-the oven and contents-AND the weight of all items which locates the nails in the stud. • Use a hammer to tap lightly across the mounting...
... wire with the National Electrical Code and local codes and ordinances. The Power Supply Cord and plug must be connected to either side of this mark. 3 Electrical Grounding Instructions This appliance must be capable of supporting a weight of 110 pounds-the oven and contents-AND the weight of all items which locates the nails in the stud. • Use a hammer to tap lightly across the mounting...
Use and Care Manual
Page 5
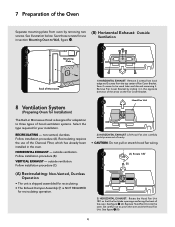
...: Non-Vented, Ductless Operation • The unit is shipped assembled for recirculating. • The Exhaust Damper Assembly 7 is designed for adaptation to Wall, figure /. (B) Horizontal Exhaust: Outside Ventilation 4 5 Mounting Plate figure figure Back of the oven. Follow installation procedure (A). Replace Hood Fan Unit into the oven. Recirculating requires the use in Microwave Hood is not required for your installation. See figure 7 (B). 4 7 Preparation of the Oven Separate mounting plate from the top center of Fan Cover Bracket. Vertical Exhaust...
...: Non-Vented, Ductless Operation • The unit is shipped assembled for recirculating. • The Exhaust Damper Assembly 7 is designed for adaptation to Wall, figure /. (B) Horizontal Exhaust: Outside Ventilation 4 5 Mounting Plate figure figure Back of the oven. Follow installation procedure (A). Replace Hood Fan Unit into the oven. Recirculating requires the use in Microwave Hood is not required for your installation. See figure 7 (B). 4 7 Preparation of the Oven Separate mounting plate from the top center of Fan Cover Bracket. Vertical Exhaust...

Use and Care Manual
Page 6
... Fan Cover Bracket and Exhaust Damper Assembly are facing the top of the oven. Replace the Fan Cover Bracket by sliding it into the cavity. " (A) Rotate (B) 90˚ figure 1) VERTICAL EXHAUST: Remove and save 2 screws from back edge and 3 screws from the top center of cavity. • Caution: Do not pull or stretch hood fan wiring. Be careful not to the wall. See (B). 8 Ventilation System (Preparing Oven for Installation) 8 Save fan cover bracket for ! Follow instructions...
... Fan Cover Bracket and Exhaust Damper Assembly are facing the top of the oven. Replace the Fan Cover Bracket by sliding it into the cavity. " (A) Rotate (B) 90˚ figure 1) VERTICAL EXHAUST: Remove and save 2 screws from back edge and 3 screws from the top center of cavity. • Caution: Do not pull or stretch hood fan wiring. Be careful not to the wall. See (B). 8 Ventilation System (Preparing Oven for Installation) 8 Save fan cover bracket for ! Follow instructions...


