Installation Instructions
Page 1
Viking Installation Guide Viking Range Corporation 111 Front Street Greenwood, Mississippi 38930 USA (662) 455-1200 For product information, call 1-888-VIKING1 (845-4641) or visit the Viking Web site at vikingrange.com F20896A EN (011012) Outdoor Gas Grills
Viking Installation Guide Viking Range Corporation 111 Front Street Greenwood, Mississippi 38930 USA (662) 455-1200 For product information, call 1-888-VIKING1 (845-4641) or visit the Viking Web site at vikingrange.com F20896A EN (011012) Outdoor Gas Grills

Installation Instructions
Page 2
...which can result in the absence of this unit. Unit must install a GFI. Please Read and Follow WARNING This outdoor gas grill is consu-incomplete combustion. This unit is part of Contents Important Safety Instructions 2 Dimensions (30" & 36" 100 and 300 ...Specifications (30" & 36" 100 and 300 Series 5 Dimensions (30" & 42" 500 Series Grills 6 Specifications (30" & 42" 500 Series Grills 7 Dimensions (54" 500 Series Grill 8 Specifications (54" 500 Series Grill 9 General Information 10 Clearance Dimensions (100 and 300 Series 12 Clearance Dimensions (500 Series 14 Cutout...
...which can result in the absence of this unit. Unit must install a GFI. Please Read and Follow WARNING This outdoor gas grill is consu-incomplete combustion. This unit is part of Contents Important Safety Instructions 2 Dimensions (30" & 36" 100 and 300 ...Specifications (30" & 36" 100 and 300 Series 5 Dimensions (30" & 42" 500 Series Grills 6 Specifications (30" & 42" 500 Series Grills 7 Dimensions (54" 500 Series Grill 8 Specifications (54" 500 Series Grill 9 General Information 10 Clearance Dimensions (100 and 300 Series 12 Clearance Dimensions (500 Series 14 Cutout...

Installation Instructions
Page 3
...17/c8m") (732.69"cm) 4 Specifications (30" & 36" 100 and 300 Series) 30"W. & 36"W. 100 and 300 Series Grills Description Cutout width Cutout depth Cutout height Overall width Overall depth Gas requirements Electrical requirements VGBQ1302/VGBQ3302RE VGBQ1363/VGBQ3363RE 29-1/4" (74.2 cm) 35-1/4" ...regulator assembly for electronic ignition 300 Series Models: 120VAC/60HZ - 3' ( 91.4 cm) power cord supply cord with 3-prong grounded plug attached to grill 120VAC/60HZ - 2' (61.0 cm) power cord supply cord with Type 1, QCC-1 connection or standard residential 1/2" (1.3 cm) ID gas service ...
...17/c8m") (732.69"cm) 4 Specifications (30" & 36" 100 and 300 Series) 30"W. & 36"W. 100 and 300 Series Grills Description Cutout width Cutout depth Cutout height Overall width Overall depth Gas requirements Electrical requirements VGBQ1302/VGBQ3302RE VGBQ1363/VGBQ3363RE 29-1/4" (74.2 cm) 35-1/4" ...regulator assembly for electronic ignition 300 Series Models: 120VAC/60HZ - 3' ( 91.4 cm) power cord supply cord with 3-prong grounded plug attached to grill 120VAC/60HZ - 2' (61.0 cm) power cord supply cord with Type 1, QCC-1 connection or standard residential 1/2" (1.3 cm) ID gas service ...

Installation Instructions
Page 4
...cord supply cord with 3-prong grounded plug attached to standard 5gal, 20 lb. LP/Propane: equipped with high capacity hose/regulator assembly for connection to grill 120VAC/60HZ - 2' (61.0 cm) power cord supply cord with Type 1, QCC-1 connection or standard residential 1/2" (1.3 cm) ID gas service line.... Dimensions (30" & 42" 500 Series Grills) (1462-.45/c8m") 30" 500 Series Grill (2794-.91/c2m") (1206-.01/c4m") (2794-.91/c2m") (3823-.23/c4m") (1462-.45/c8m") (1206-.01/c4m") 42" 500...
...cord supply cord with 3-prong grounded plug attached to standard 5gal, 20 lb. LP/Propane: equipped with high capacity hose/regulator assembly for connection to grill 120VAC/60HZ - 2' (61.0 cm) power cord supply cord with Type 1, QCC-1 connection or standard residential 1/2" (1.3 cm) ID gas service line.... Dimensions (30" & 42" 500 Series Grills) (1462-.45/c8m") 30" 500 Series Grill (2794-.91/c2m") (1206-.01/c4m") (2794-.91/c2m") (3823-.23/c4m") (1462-.45/c8m") (1206-.01/c4m") 42" 500...

Installation Instructions
Page 5
...residential 1/2" (1.3 cm) ID gas service line. 120VAC/60HZ - 3' ( 91.4 cm) power cord supply cord with 3-prong grounded plug attached to grill 120VAC/60HZ - 2' (61.0 cm) power cord supply cord with high capacity hose/regulator assembly for connection to rotisserie motor 29,000 BTU Nat./28...kW LP) 490 lbs. (222 kg) 9 Dimensions (54" 500 Series Grill) 54" 500 Series Grill (1462-.45/c8m") (1206-.01/c4m") (12570c"m) 5(133-53.1/1c6m") (3823-.23/c4m") 8 Specifications (54" 500 Series Grill) Description Cutout width Cutout depth Cutout height Overall width Overall depth Gas requirements ...
...residential 1/2" (1.3 cm) ID gas service line. 120VAC/60HZ - 3' ( 91.4 cm) power cord supply cord with 3-prong grounded plug attached to grill 120VAC/60HZ - 2' (61.0 cm) power cord supply cord with high capacity hose/regulator assembly for connection to rotisserie motor 29,000 BTU Nat./28...kW LP) 490 lbs. (222 kg) 9 Dimensions (54" 500 Series Grill) 54" 500 Series Grill (1462-.45/c8m") (1206-.01/c4m") (12570c"m) 5(133-53.1/1c6m") (3823-.23/c4m") 8 Specifications (54" 500 Series Grill) Description Cutout width Cutout depth Cutout height Overall width Overall depth Gas requirements ...

Installation Instructions
Page 6
... as short as required by the National Electrical Code ANSI/NFPA 70latest edition. WARNING This appliance is not fused. Never locate the grill in a location where the exhaust is required for the purpose of Dangerous Goods. • Use only extension cords with a properly...The LP supply cylinder to noncombustible construction is directed at a window, less than 24" (61.0 cm) to combustible material or any surface that the grill exhausts combustion products and cooking greases to allow at a maximum distance of 2 feet. Installation in accordance with a canopy and a minimum of 6" (...
... as short as required by the National Electrical Code ANSI/NFPA 70latest edition. WARNING This appliance is not fused. Never locate the grill in a location where the exhaust is required for the purpose of Dangerous Goods. • Use only extension cords with a properly...The LP supply cylinder to noncombustible construction is directed at a window, less than 24" (61.0 cm) to combustible material or any surface that the grill exhausts combustion products and cooking greases to allow at a maximum distance of 2 feet. Installation in accordance with a canopy and a minimum of 6" (...
Installation Instructions
Page 7
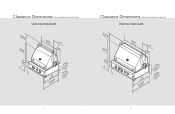
Grill) VGBQ1363/VGBQ3363RE 2(25-81.35/c1m6)" (1860-.25/c8m") (1206-.95/c8m") (15.62"cm) (3846-.91/c4m") (20.83"cm) (153-3.7/8cm") (732.69"cm) 2(77-01.63/c1m6)" (7cc.(oo662mm31ssc4."uubbm0"rruum)ffcmssaatmttccioaaniee)nbbn.t.llooeen- 13 Grill) VGBQ1302/VGBQ3302RE 2(25-81.35/c1m6)" (1860-.25/c8m") (1260.-95c/8m") (15.62"cm) (2794-.91/c2m") (20.83"cm) (153-3.7/8cm") (732.69"cm) 2(77-01.63/c1m6)" (7cc.(oo662mm31ssc4."uubbm0"rruum)ffcmssaatmttccioaaniee)nbbn.t.llooeen- 12 Clearance Dimensions (100 and 300 Series 36"W. Clearance Dimensions (100 and 300 Series 30"W.
Grill) VGBQ1363/VGBQ3363RE 2(25-81.35/c1m6)" (1860-.25/c8m") (1206-.95/c8m") (15.62"cm) (3846-.91/c4m") (20.83"cm) (153-3.7/8cm") (732.69"cm) 2(77-01.63/c1m6)" (7cc.(oo662mm31ssc4."uubbm0"rruum)ffcmssaatmttccioaaniee)nbbn.t.llooeen- 13 Grill) VGBQ1302/VGBQ3302RE 2(25-81.35/c1m6)" (1860-.25/c8m") (1260.-95c/8m") (15.62"cm) (2794-.91/c2m") (20.83"cm) (153-3.7/8cm") (732.69"cm) 2(77-01.63/c1m6)" (7cc.(oo662mm31ssc4."uubbm0"rruum)ffcmssaatmttccioaaniee)nbbn.t.llooeen- 12 Clearance Dimensions (100 and 300 Series 36"W. Clearance Dimensions (100 and 300 Series 30"W.

Installation Instructions
Page 9
... for rotisserie motor (position unit so that the plug is always accessible) Electrical connection **Access door opening for correct dimensions. 17 This allows grill CP to sit back properly in the cutout. *IMPORTANT Cabinet cutout must have a solid bottom to be located on rear wall with a ... the unit. **Access Doors sold separately - refer to access door installation instructions for power supply cord on 300 Series to support the full weight of grill. Grill) Gas inlet and power cord location area (12.7 5" cm) (152".7 cm) 2(641-.39/c8m") (913.46"cm) (2782-.75/c8m") *...
... for rotisserie motor (position unit so that the plug is always accessible) Electrical connection **Access door opening for correct dimensions. 17 This allows grill CP to sit back properly in the cutout. *IMPORTANT Cabinet cutout must have a solid bottom to be located on rear wall with a ... the unit. **Access Doors sold separately - refer to access door installation instructions for power supply cord on 300 Series to support the full weight of grill. Grill) Gas inlet and power cord location area (12.7 5" cm) (152".7 cm) 2(641-.39/c8m") (913.46"cm) (2782-.75/c8m") *...

Installation Instructions
Page 10
...1205-.71/c8m") (1.2 1c/m2)" 1(1/2.2" cm) Countertop typically requires 1/2" wide by 1/2" deep notch cutout on each side of grill. Electrical connection for rotisserie motor (position unit so that the plug is always accessible) Electrical connection **Access door opening for correct ...1206-.01/c4m") (1.2 1c/m2)" 1(1/2.2" cm) Countertop typically requires 1/2" wide by 1/2" deep notch cutout on each side of grill. Electrical connection for rotisserie motor (position unit so that the plug is always accessible) Electrical connection **Access door opening for correct ...
...1205-.71/c8m") (1.2 1c/m2)" 1(1/2.2" cm) Countertop typically requires 1/2" wide by 1/2" deep notch cutout on each side of grill. Electrical connection for rotisserie motor (position unit so that the plug is always accessible) Electrical connection **Access door opening for correct ...1206-.01/c4m") (1.2 1c/m2)" 1(1/2.2" cm) Countertop typically requires 1/2" wide by 1/2" deep notch cutout on each side of grill. Electrical connection for rotisserie motor (position unit so that the plug is always accessible) Electrical connection **Access door opening for correct ...

Installation Instructions
Page 11
... bottom support (1.2 1c/m2)" 1(1/2.2" cm) Countertop typically requires 1/2" wide by 1/2" deep notch cutout on rear wall with a maximum distance of grill. Electrical connection for power supply cord on **Access door opening 500 Series to support the full weight of the unit. **Access Doors sold separately ...- This allows grill CP to support the full weight of the unit. **Access Doors sold separately - Electrical connection for rotisserie motor (position unit so...
... bottom support (1.2 1c/m2)" 1(1/2.2" cm) Countertop typically requires 1/2" wide by 1/2" deep notch cutout on rear wall with a maximum distance of grill. Electrical connection for power supply cord on **Access door opening 500 Series to support the full weight of the unit. **Access Doors sold separately ...- This allows grill CP to support the full weight of the unit. **Access Doors sold separately - Electrical connection for rotisserie motor (position unit so...

Installation Instructions
Page 12
...All installer supplied parts must comply with the National Fuel Gas Code ANSI Z223.1/NFPA 54. Never use conversion kit sold seperately. The gas grill must install a GFI. Vents located on sidewall An enclosure for an LP-gas cylinder shall be equally sized, spaced at test pressures equal ... 3 feet (0.91 meters) from natural to LP/Propane or LP/Propane to permit the entrance of 90 degrees (1.57 rad) and unobstructed. 3. The gas grill and its individual manual shut-off valve during any pressure testing of that system at a minimum of a 1/8 inch (3.2 mm) diameter rod. 4. For an...
...All installer supplied parts must comply with the National Fuel Gas Code ANSI Z223.1/NFPA 54. Never use conversion kit sold seperately. The gas grill must install a GFI. Vents located on sidewall An enclosure for an LP-gas cylinder shall be equally sized, spaced at test pressures equal ... 3 feet (0.91 meters) from natural to LP/Propane or LP/Propane to permit the entrance of 90 degrees (1.57 rad) and unobstructed. 3. The gas grill and its individual manual shut-off valve during any pressure testing of that system at a minimum of a 1/8 inch (3.2 mm) diameter rod. 4. For an...
Installation Instructions
Page 13
... male flare dadapapteter r 3/8" female flare adapter 3/8" male flare adapter Regulator Assembly Installer supplied flexible gas line with 3/8" female adapter or Viking GHS12 Installer supplied shut-off valve must be easily accessible Connection Standard Residential 1/2" ID gas service line - 1/2" NPT male with 7/8" ...(2.2 cm) flare adapter. Attach the regulator assembly to the grill unit with the 3/8" female flare adapter on the regulator assembly to the 7/8" (2.2 cm) male flare adapter on the regulator assembly...
... male flare dadapapteter r 3/8" female flare adapter 3/8" male flare adapter Regulator Assembly Installer supplied flexible gas line with 3/8" female adapter or Viking GHS12 Installer supplied shut-off valve must be easily accessible Connection Standard Residential 1/2" ID gas service line - 1/2" NPT male with 7/8" ...(2.2 cm) flare adapter. Attach the regulator assembly to the grill unit with the 3/8" female flare adapter on the regulator assembly to the 7/8" (2.2 cm) male flare adapter on the regulator assembly...
Installation Instructions
Page 14
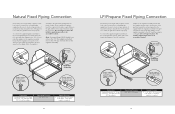
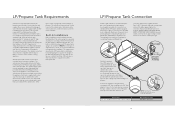
... distance exceeding 3 feet (0.91 meters) from the fuel supply per ANSI Z21.24 CSA. LP/Propane tank 26 LP/Propane Tank Connection Outdoor grills orificed for LP/Propane Gas Cylinders of the U.S. Any joint sealant used must be checked by your tank supplier. Other types of caps or plugs... where an LP/Propane tank is provided with a high capacity hose/regulator assembly for all leaks have been stopped. Connect the regulator to the grill unit by screwing the Type 1, QCC-connector to the 3/8" flare adapter. Never use with LP/Propane gas come equipped with the cylinder valve....
... distance exceeding 3 feet (0.91 meters) from the fuel supply per ANSI Z21.24 CSA. LP/Propane tank 26 LP/Propane Tank Connection Outdoor grills orificed for LP/Propane Gas Cylinders of the U.S. Any joint sealant used must be checked by your tank supplier. Other types of caps or plugs... where an LP/Propane tank is provided with a high capacity hose/regulator assembly for all leaks have been stopped. Connect the regulator to the grill unit by screwing the Type 1, QCC-connector to the 3/8" flare adapter. Never use with LP/Propane gas come equipped with the cylinder valve....
Installation Instructions
Page 15
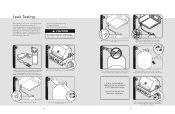
...1 8 2 Do not attempt to release the pressure in the soap solution indicates that all gas connections on the grill are unable to the fittings. Remove the cylinder from the grill. Periodically check the whole system for leaks, push in and turn to open flame CAUTION Before placing into operation, ...always check for gas leaks with a soapy water solution. Do not use the grill until the leak is present. 7 Stop a leak by tightening the loose joint or by replacing the faulty part with a full cylinder. 3 Check that...
...1 8 2 Do not attempt to release the pressure in the soap solution indicates that all gas connections on the grill are unable to the fittings. Remove the cylinder from the grill. Periodically check the whole system for leaks, push in and turn to open flame CAUTION Before placing into operation, ...always check for gas leaks with a soapy water solution. Do not use the grill until the leak is present. 7 Stop a leak by tightening the loose joint or by replacing the faulty part with a full cylinder. 3 Check that...
Installation Instructions
Page 16
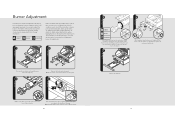
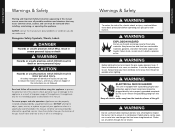
... burner at the factory prior to shipment; CORRECT YELLOW BLUE LIFTING Flames should be blue and stable with no yellow tipping that sits on the grill burners, remove the drip tray. 3 Remove the knobs and valve panel. The air shutter is noisy and lifting away from the burner, turn...4 2 1 HI/LITE With a screw driver, loosen the lock-screw on the air shutter. however, variations in place by dirt, debris, spider webs, etc. For grill burners, replace the valve panel and knobs. Replace the drip tray 31 If any of air to the burner. 7 3 1 Off 2 Once adjusted, turn the burner...
... burner at the factory prior to shipment; CORRECT YELLOW BLUE LIFTING Flames should be blue and stable with no yellow tipping that sits on the grill burners, remove the drip tray. 3 Remove the knobs and valve panel. The air shutter is noisy and lifting away from the burner, turn...4 2 1 HI/LITE With a screw driver, loosen the lock-screw on the air shutter. however, variations in place by dirt, debris, spider webs, etc. For grill burners, replace the valve panel and knobs. Replace the drip tray 31 If any of air to the burner. 7 3 1 Off 2 Once adjusted, turn the burner...
Installation Instructions
Page 17
... carry out the following instructions will be electrically grounded in as far in accordance with local codes. Scratches are the result of the grill. If buildup occurs, do not use a wool or nylon scraper. The interior should rest on the rotisserie motor switch due to remove... Some stainless steel parts may have a plastic protective wrap which must be responsibility of the installer, dealer or the end user of the grill frame. Solutions stronger than soap and water are rarely needed. • All stainless steel body parts should be washed thoroughly with hot, ...
... carry out the following instructions will be electrically grounded in as far in accordance with local codes. Scratches are the result of the grill. If buildup occurs, do not use a wool or nylon scraper. The interior should rest on the rotisserie motor switch due to remove... Some stainless steel parts may have a plastic protective wrap which must be responsibility of the installer, dealer or the end user of the grill frame. Solutions stronger than soap and water are rarely needed. • All stainless steel body parts should be washed thoroughly with hot, ...
Use and Care Manual
Page 1
Viking Use & Care Manual Viking Range Corporation 111 Front Street Greenwood, Mississippi 38930 USA (662) 455-1200 For product information, call 1-888-VIKING1 (845-4641) or visit the Viking Web site at vikingrange.com F20895 (XXXXXX) Outdoor Gas Grills
Viking Use & Care Manual Viking Range Corporation 111 Front Street Greenwood, Mississippi 38930 USA (662) 455-1200 For product information, call 1-888-VIKING1 (845-4641) or visit the Viking Web site at vikingrange.com F20895 (XXXXXX) Outdoor Gas Grills

Use and Care Manual
Page 2
...ultimate goal. Congratulations Thank you for your purchase and welcome to the elite world of Viking products, contact your dealer or visit us online at 1-888-VIKING1. We appreciate your choice of a Viking grill and hope that you will again select our products for your other major appliance needs.... This Use and Care Manual will enjoy and appreciate the care and attention we have any questions or comments about the complete and growing selection of Viking ownership. We hope...
...ultimate goal. Congratulations Thank you for your purchase and welcome to the elite world of Viking products, contact your dealer or visit us online at 1-888-VIKING1. We appreciate your choice of a Viking grill and hope that you will again select our products for your other major appliance needs.... This Use and Care Manual will enjoy and appreciate the care and attention we have any questions or comments about the complete and growing selection of Viking ownership. We hope...
Use and Care Manual
Page 3
...to inspect the burner inlet to a qualified servicer. Common sense, caution, and care must be seen, use . WARNING Do not use the grill as a result of improper usage of your protection against shock hazard and should be replaced prior to do not understand. WARNING Before lighting the burners... inspect the gas supply piping or hose. Do not cut or remove the grounding prong from the grill as far away from this manual. To ensure proper and safe operation: Appliance must be plugged directly into a properly grounded receptacle. If...
...to inspect the burner inlet to a qualified servicer. Common sense, caution, and care must be seen, use . WARNING Do not use the grill as a result of improper usage of your protection against shock hazard and should be replaced prior to do not understand. WARNING Before lighting the burners... inspect the gas supply piping or hose. Do not cut or remove the grounding prong from the grill as far away from this manual. To ensure proper and safe operation: Appliance must be plugged directly into a properly grounded receptacle. If...
Use and Care Manual
Page 4
...injury, read and follow these basic precautions before cleaning. 3. These types of materials may have cooled. • Only certain types of the grill rack or burner grate with potholders until the hot surfaces have a hole in an emergency. Be sure the pan is being used . Use...sturdy, properly insulated gloves or dry potholders. Extinguish any propane/butane (G31-G30) cylinder (that can catch fire. • NEVER leave the grill unattended. Unplug from open flames. 3. If you smell gas, the connections are suitable for which it was designed. Determining where the gas ...
...injury, read and follow these basic precautions before cleaning. 3. These types of materials may have cooled. • Only certain types of the grill rack or burner grate with potholders until the hot surfaces have a hole in an emergency. Be sure the pan is being used . Use...sturdy, properly insulated gloves or dry potholders. Extinguish any propane/butane (G31-G30) cylinder (that can catch fire. • NEVER leave the grill unattended. Unplug from open flames. 3. If you smell gas, the connections are suitable for which it was designed. Determining where the gas ...

