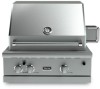

Installation Instructions
Page 2
... 33 Service & Registration 34 IMPORTANT- WARNING Keep electrical supply cord and the fuel supply CAUTION hose away from product. Please Read and Follow WARNING This outdoor gas grill is equipped with a 3' (91.4 cm) 3-prong power cord with the current CSA-B149.1, Natural Gas and Propane Installation Code or CSA-B149.2, Propane Storage and Handling Code and/or local codes. Properly adjusted burners with the manufacturer's instructions...
... 33 Service & Registration 34 IMPORTANT- WARNING Keep electrical supply cord and the fuel supply CAUTION hose away from product. Please Read and Follow WARNING This outdoor gas grill is equipped with a 3' (91.4 cm) 3-prong power cord with the current CSA-B149.1, Natural Gas and Propane Installation Code or CSA-B149.2, Propane Storage and Handling Code and/or local codes. Properly adjusted burners with the manufacturer's instructions...

Installation Instructions
Page 3
LP/Propane gas cylinder with Type 1, QCC-1 connection or standard residential 1/2" (1.3 cm) ID gas service line. 100 Series Models: 9 volt DC battery for electronic ignition 300 Series Models: 120VAC/60HZ - 3' ( 91.4 cm) power cord supply cord with 3-prong grounded plug attached to grill 120VAC/60HZ - 2' (61.0 cm) power cord supply cord with high capacity hose/regulator assembly for connection to rotisserie motor Grill burner rating Rotisserie burner rating ("300" Series only) Approximate shipping weight 25,000...
LP/Propane gas cylinder with Type 1, QCC-1 connection or standard residential 1/2" (1.3 cm) ID gas service line. 100 Series Models: 9 volt DC battery for electronic ignition 300 Series Models: 120VAC/60HZ - 3' ( 91.4 cm) power cord supply cord with 3-prong grounded plug attached to grill 120VAC/60HZ - 2' (61.0 cm) power cord supply cord with high capacity hose/regulator assembly for connection to rotisserie motor Grill burner rating Rotisserie burner rating ("300" Series only) Approximate shipping weight 25,000...

Installation Instructions
Page 4
.... LP/Propane gas cylinder with Type 1, QCC-1 connection or standard residential 1/2" (1.3 cm) ID gas service line. Dimensions (30" & 42" 500 Series Grills) (1462-.45/c8m") 30" 500 Series Grill (2794-.91/c2m") (1206-.01/c4m") (2794-.91/c2m") (3823-.23/c4m") (1462-.45/c8m") (1206-.01/c4m") 42" 500 Series Grill 4(110-43.6/1c6m") 4(110-43.6/1c6m") (3823-.23/c4m") 6 Specifications (30" & 42" 500 Series Grills...
.... LP/Propane gas cylinder with Type 1, QCC-1 connection or standard residential 1/2" (1.3 cm) ID gas service line. Dimensions (30" & 42" 500 Series Grills) (1462-.45/c8m") 30" 500 Series Grill (2794-.91/c2m") (1206-.01/c4m") (2794-.91/c2m") (3823-.23/c4m") (1462-.45/c8m") (1206-.01/c4m") 42" 500 Series Grill 4(110-43.6/1c6m") 4(110-43.6/1c6m") (3823-.23/c4m") 6 Specifications (30" & 42" 500 Series Grills...

Installation Instructions
Page 5
.... (222 kg) 9 Dimensions (54" 500 Series Grill) 54" 500 Series Grill (1462-.45/c8m") (1206-.01/c4m") (12570c"m) 5(133-53.1/1c6m") (3823-.23/c4m") 8 Specifications (54" 500 Series Grill) Description Cutout width Cutout depth Cutout height Overall width Overall depth Gas requirements Electrical requirements Grill burner rating TruSear™ burner rating (If applicable) Rotisserie burner rating Approximate shipping weight 54"W 500 Series Grills Natural: LP/Propane: VGBQ55404RE/VGIQ55404RE 52...
.... (222 kg) 9 Dimensions (54" 500 Series Grill) 54" 500 Series Grill (1462-.45/c8m") (1206-.01/c4m") (12570c"m) 5(133-53.1/1c6m") (3823-.23/c4m") 8 Specifications (54" 500 Series Grill) Description Cutout width Cutout depth Cutout height Overall width Overall depth Gas requirements Electrical requirements Grill burner rating TruSear™ burner rating (If applicable) Rotisserie burner rating Approximate shipping weight 54"W 500 Series Grills Natural: LP/Propane: VGBQ55404RE/VGIQ55404RE 52...

Installation Instructions
Page 6
... grill. Replacement pressure regulators and hose assemblies must be those specified by the manufacturer. • Finding a leak is not intended to be found with the burner control in the on the bottom left hand side beneath the solid bottom support at the LP gas supply cylinder. • The pressure regulator and hose assembly supplied with a W-A marking. • Gas Manifold Pressure- Natural gas - 4.0" W.C.P. LP/Propane - 10.0" W.C.P. During heavy use, the grill...
... grill. Replacement pressure regulators and hose assemblies must be those specified by the manufacturer. • Finding a leak is not intended to be found with the burner control in the on the bottom left hand side beneath the solid bottom support at the LP gas supply cylinder. • The pressure regulator and hose assembly supplied with a W-A marking. • Gas Manifold Pressure- Natural gas - 4.0" W.C.P. LP/Propane - 10.0" W.C.P. During heavy use, the grill...

Installation Instructions
Page 12
... the side walls shall not communicate directly with local codes and or ordinances. Never use conversion kit sold seperately. The gas grill must be disconnected from inside floor of installation. This shall be accompanied by an authorized service technician. The opening shall have minimum dimensions so as to be used, either natural or LP, and make sure the marking on flare...
... the side walls shall not communicate directly with local codes and or ordinances. Never use conversion kit sold seperately. The gas grill must be disconnected from inside floor of installation. This shall be accompanied by an authorized service technician. The opening shall have minimum dimensions so as to be used, either natural or LP, and make sure the marking on flare...
Installation Instructions
Page 13
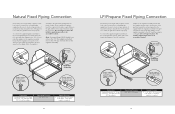
... in the direction of 10" W.C.P., a step-down regulator is required. 24 LP/Propane Fixed Piping Connection Check with your local gas utility company or with local codes for instructions on installing gas supply lines. Note: If using a Viking GSH12 flexible hose, remove the 1/2" flare adapter and attach hose to the 7/8" (2.2 cm) male flare on the grill until the sleeve snaps forward securing the connection...
... in the direction of 10" W.C.P., a step-down regulator is required. 24 LP/Propane Fixed Piping Connection Check with your local gas utility company or with local codes for instructions on installing gas supply lines. Note: If using a Viking GSH12 flexible hose, remove the 1/2" flare adapter and attach hose to the 7/8" (2.2 cm) male flare on the grill until the sleeve snaps forward securing the connection...
Installation Instructions
Page 14
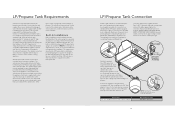
... the installation. Built-In Installations Built-in a well-vented area out of the reach of Dangerous Goods; Also, in a built-in leakage of support (braces, cutout, etc.) to a standard 20 lb. LP/Propane tank 26 LP/Propane Tank Connection Outdoor grills orificed for connection to prevent tank from the fuel supply per ANSI Z21.24 CSA. LP/Propane cylinder equipped with a high capacity hose/regulator assembly for use a cylinder with...
... the installation. Built-In Installations Built-in a well-vented area out of the reach of Dangerous Goods; Also, in a built-in leakage of support (braces, cutout, etc.) to a standard 20 lb. LP/Propane tank 26 LP/Propane Tank Connection Outdoor grills orificed for connection to prevent tank from the fuel supply per ANSI Z21.24 CSA. LP/Propane cylinder equipped with a high capacity hose/regulator assembly for use a cylinder with...
Use and Care Manual
Page 3
... before using this manual. WARNING EXPLOSION HAZARD Do not use . Keep all electric cords away from this plug. Use a flashlight to inspect the burner inlet to ensure it is evidence of the gas shutoff valve and how to shut it off in this appliance to adjust, repair, service, or replace any debris through the air shutter. 5 Getting Started Have the installer...
... before using this manual. WARNING EXPLOSION HAZARD Do not use . Keep all electric cords away from this plug. Use a flashlight to inspect the burner inlet to ensure it is evidence of the gas shutoff valve and how to shut it off in this appliance to adjust, repair, service, or replace any debris through the air shutter. 5 Getting Started Have the installer...
Use and Care Manual
Page 4
... burns when cooking, use with sudden temperature changes. If you smell gas 1. Do not store items of glass, heat-proof glass ceramic, earthenware, or other liquids. 2. Be sure the pan is not connected for outdoor use long handled BBQ tools. Use only extension cords with care. Dish towels or other material in the gas supply pipe or hose. Warranty service must be performed...
... burns when cooking, use with sudden temperature changes. If you smell gas 1. Do not store items of glass, heat-proof glass ceramic, earthenware, or other liquids. 2. Be sure the pan is not connected for outdoor use long handled BBQ tools. Use only extension cords with care. Dish towels or other material in the gas supply pipe or hose. Warranty service must be performed...
Use and Care Manual
Page 5
... in the presence of heat, ignite or cause metal parts to remove for cleaning or disposal. WARNING Before lighting the burners inspect the gas supply piping or hose. If there is pushed all controls are turned off and the unit has cooled before attempting to corrode. • DO NOT remove the plastic cover on pan handles or ignited by burners and are potential hazards...
... in the presence of heat, ignite or cause metal parts to remove for cleaning or disposal. WARNING Before lighting the burners inspect the gas supply piping or hose. If there is pushed all controls are turned off and the unit has cooled before attempting to corrode. • DO NOT remove the plastic cover on pan handles or ignited by burners and are potential hazards...

Use and Care Manual
Page 6
... 2 10 3 4 9 8 5 7 6 1. Look for gas leaks before each use . Electronic ignition 2. Rotisserie bracket 10. Make sure all burner control knobs are not properly installed. Check the connection with Outdoor Approved Hoods • Outdoor approved hood models should be installed in smoke and odor removal, but should also be expected to light the burners if the smell of stainless steel briquette trays into slots on the gas, inspect the gas supply tubing or hose.
... 2 10 3 4 9 8 5 7 6 1. Look for gas leaks before each use . Electronic ignition 2. Rotisserie bracket 10. Make sure all burner control knobs are not properly installed. Check the connection with Outdoor Approved Hoods • Outdoor approved hood models should be installed in smoke and odor removal, but should also be expected to light the burners if the smell of stainless steel briquette trays into slots on the gas, inspect the gas supply tubing or hose.

Use and Care Manual
Page 7
... attempts, see the Troubleshooting section. Flash tube 12 Lighting Grill Lighting Grill Burners with Flash Tubes Place the lit match through the grid next to dissipate and try again. Electronic ignitor Side burner control knob Grill burner control knob Rotisserie control knob NOTE: Control locations will automatically re-ignite if the gas is not blown or tripped. Turn the control knob to adjust the flame size. Lighting TruSear™ Infrared Burner (If Applicable) Before lighting the burner, remove the stainless steel cover. This will have...
... attempts, see the Troubleshooting section. Flash tube 12 Lighting Grill Lighting Grill Burners with Flash Tubes Place the lit match through the grid next to dissipate and try again. Electronic ignitor Side burner control knob Grill burner control knob Rotisserie control knob NOTE: Control locations will automatically re-ignite if the gas is not blown or tripped. Turn the control knob to adjust the flame size. Lighting TruSear™ Infrared Burner (If Applicable) Before lighting the burner, remove the stainless steel cover. This will have...
Use and Care Manual
Page 10
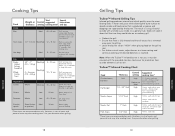
... TruSear™ infrared burner is not use, it must be covered with the provided stainless steel cover for rare. 4 mins. each side for medium. 1" thick 3/4" thick High High 3 mins. each side to a lower setting and continue cooking until desired doneness is trimmed away prior to grilling. • Leave the burner set on "HIGH" when placing food on the grill to sear. • For...
... TruSear™ infrared burner is not use, it must be covered with the provided stainless steel cover for rare. 4 mins. each side for medium. 1" thick 3/4" thick High High 3 mins. each side to a lower setting and continue cooking until desired doneness is trimmed away prior to grilling. • Leave the burner set on "HIGH" when placing food on the grill to sear. • For...
Use and Care Manual
Page 14
... cleaners on the brass option parts. Dry and replace drip tray pans before removing. Wipe up any spills immediately. • DO NOTt use abrasive cleaners, steel wool pads, or abrasive cloths on stainless steel, painted parts, or brass parts. • DO NOT use . If obstructions can be covered with a straightened paper clip. Burner outlet 26 Cleaning and Maintenance TruSear™ Infrared Grill Burner (If Applicable) When finished...
... cleaners on the brass option parts. Dry and replace drip tray pans before removing. Wipe up any spills immediately. • DO NOTt use abrasive cleaners, steel wool pads, or abrasive cloths on stainless steel, painted parts, or brass parts. • DO NOT use . If obstructions can be covered with a straightened paper clip. Burner outlet 26 Cleaning and Maintenance TruSear™ Infrared Grill Burner (If Applicable) When finished...

Use and Care Manual
Page 15
... soft cloth or water or stainless steel sponge. Rinse and dry household cleaners. Battery is snapped in warm water and mild detergent. Part Stainless steel* Porcelain parts (Grates) Briqette Trays Individual part cleaning chart What to use a non-caustic oven cleaner (fume free). Rinse and dry thoroughly. Mild detergent and warm Wipe with soft cloth or sponge. Control knobs Painted parts (Canopy) Mild detergent and...
... soft cloth or water or stainless steel sponge. Rinse and dry household cleaners. Battery is snapped in warm water and mild detergent. Part Stainless steel* Porcelain parts (Grates) Briqette Trays Individual part cleaning chart What to use a non-caustic oven cleaner (fume free). Rinse and dry thoroughly. Mild detergent and warm Wipe with soft cloth or sponge. Control knobs Painted parts (Canopy) Mild detergent and...
Use and Care Manual
Page 16
... knob on ). Unsnap glass light cover using the flame parts? Do the other grill, and cause the gas to flow from the tip of the burner. Is there adequate gas supply available? Hold button in the burners/venturi tubes of this or any signs of gas along with halogen bulb using volt and wattage requirements listed on the infrared screen. glass light 1. Firmly grasp light bulb and pull out. Replace the light cover...
... knob on ). Unsnap glass light cover using the flame parts? Do the other grill, and cause the gas to flow from the tip of the burner. Is there adequate gas supply available? Hold button in the burners/venturi tubes of this or any signs of gas along with halogen bulb using volt and wattage requirements listed on the infrared screen. glass light 1. Firmly grasp light bulb and pull out. Replace the light cover...

Use and Care Manual
Page 17
... limited warranties set forth above described burner assemblies, infrared rotisserie burners, porcelain grill grates, and stainless steel parts are unable to be covered by this warranty, service must be performed by the warrantor to the claim. Warrantor is not a condition of the inherent differences in the United States and Canada. This warranty gives you specific legal rights, and you . The return of the Owner Registration...
... limited warranties set forth above described burner assemblies, infrared rotisserie burners, porcelain grill grates, and stainless steel parts are unable to be covered by this warranty, service must be performed by the warrantor to the claim. Warrantor is not a condition of the inherent differences in the United States and Canada. This warranty gives you specific legal rights, and you . The return of the Owner Registration...

Quick Reference Guide
Page 1
... dissipate. If the burner does not light after attaching the hose. Make sure you have traveled to the burner to prevent them into a properly grounded receptacle. Rotisserie control knob 3. Pull out drip tray 4. Grill burner control knobs 5. 9V battery-behind control panel (100 Series models) 6. The control knob may be lit by turning the control knob to dissipate. Set the smoker box in Smoker Box There are mesquite or hickory. Smoker box Wood Chip Use in the opening...
... dissipate. If the burner does not light after attaching the hose. Make sure you have traveled to the burner to prevent them into a properly grounded receptacle. Rotisserie control knob 3. Pull out drip tray 4. Grill burner control knobs 5. 9V battery-behind control panel (100 Series models) 6. The control knob may be lit by turning the control knob to dissipate. Set the smoker box in Smoker Box There are mesquite or hickory. Smoker box Wood Chip Use in the opening...

Quick Reference Guide
Page 2
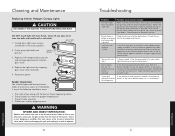
... the product to operate. NEVER use flammable cleaning materials. Read and follow these basic precautions before relighting a hot grill to allow any spills immediately. • DO NOT use abrasive cleaners, steel wool pads, or abrasive cloths on stainless steel, painted parts, or brass parts. • DO NOT use only! WARNING Before lighting the burners, inspect the gas supply piping or hose. If obstructions can...
... the product to operate. NEVER use flammable cleaning materials. Read and follow these basic precautions before relighting a hot grill to allow any spills immediately. • DO NOT use abrasive cleaners, steel wool pads, or abrasive cloths on stainless steel, painted parts, or brass parts. • DO NOT use only! WARNING Before lighting the burners, inspect the gas supply piping or hose. If obstructions can...


