Installation Instructions
Page 2
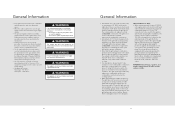
... LP-Gas Cylinder 22 Gas and Electrical Connection 23 Natural Fixed Piping Connection 24 LP/Propane Fixed Piping Connection 25 Built-In Installations 26 LP/Propane Tank Requirements 26 LP/Propane Tank Connection 27 Leak Testing 28 Burner Adjustment 30 Rotisserie System 32 Final Preparation 33 Performance Checklist 33 Service & Registration 34 IMPORTANT- Table of Contents Important Safety Instructions 2 Dimensions (30" & 36" 100 and 300 Series 4 Specifications (30...
... LP-Gas Cylinder 22 Gas and Electrical Connection 23 Natural Fixed Piping Connection 24 LP/Propane Fixed Piping Connection 25 Built-In Installations 26 LP/Propane Tank Requirements 26 LP/Propane Tank Connection 27 Leak Testing 28 Burner Adjustment 30 Rotisserie System 32 Final Preparation 33 Performance Checklist 33 Service & Registration 34 IMPORTANT- Table of Contents Important Safety Instructions 2 Dimensions (30" & 36" 100 and 300 Series 4 Specifications (30...
Installation Instructions
Page 3
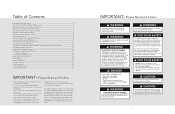
... gas service line. LP/Propane gas cylinder with Type 1, QCC-1 connection or standard residential 1/2" (1.3 cm) ID gas service line. 100 Series Models: 9 volt DC battery for electronic ignition 300 Series Models: 120VAC/60HZ - 3' ( 91.4 cm) power cord supply cord with 3-prong grounded plug attached to grill 120VAC/60HZ - 2' (61.0 cm) power cord supply cord with high capacity hose/regulator assembly for connection to rotisserie motor Grill burner rating Rotisserie burner rating ("300" Series only) Approximate shipping weight 25...
... gas service line. LP/Propane gas cylinder with Type 1, QCC-1 connection or standard residential 1/2" (1.3 cm) ID gas service line. 100 Series Models: 9 volt DC battery for electronic ignition 300 Series Models: 120VAC/60HZ - 3' ( 91.4 cm) power cord supply cord with 3-prong grounded plug attached to grill 120VAC/60HZ - 2' (61.0 cm) power cord supply cord with high capacity hose/regulator assembly for connection to rotisserie motor Grill burner rating Rotisserie burner rating ("300" Series only) Approximate shipping weight 25...
Installation Instructions
Page 4
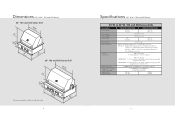
LP/Propane gas cylinder with high capacity hose/regulator assembly for connection to rotisserie motor Grill burner rating TruSear™ burner rating (If applicable) Rotisserie burner rating Approximate shipping weight 29,000 BTU Nat./28,000 BTU LP (7.3 kW Nat./6.5 kW LP) NA 30,000 BTU Nat./LP (8.3 kW Nat./LP) 15,000 BTU Nat./...
LP/Propane gas cylinder with high capacity hose/regulator assembly for connection to rotisserie motor Grill burner rating TruSear™ burner rating (If applicable) Rotisserie burner rating Approximate shipping weight 29,000 BTU Nat./28,000 BTU LP (7.3 kW Nat./6.5 kW LP) NA 30,000 BTU Nat./LP (8.3 kW Nat./LP) 15,000 BTU Nat./...

Installation Instructions
Page 5
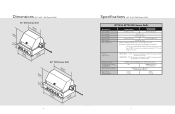
..., 20 lb. Dimensions (54" 500 Series Grill) 54" 500 Series Grill (1462-.45/c8m") (1206-.01/c4m") (12570c"m) 5(133-53.1/1c6m") (3823-.23/c4m") 8 Specifications (54" 500 Series Grill) Description Cutout width Cutout depth Cutout height Overall width Overall depth Gas requirements Electrical requirements Grill burner rating TruSear™ burner rating (If applicable) Rotisserie burner rating Approximate shipping weight 54"W 500 Series Grills Natural: LP/Propane: VGBQ55404RE/VGIQ55404RE 52...
..., 20 lb. Dimensions (54" 500 Series Grill) 54" 500 Series Grill (1462-.45/c8m") (1206-.01/c4m") (12570c"m) 5(133-53.1/1c6m") (3823-.23/c4m") 8 Specifications (54" 500 Series Grill) Description Cutout width Cutout depth Cutout height Overall width Overall depth Gas requirements Electrical requirements Grill burner rating TruSear™ burner rating (If applicable) Rotisserie burner rating Approximate shipping weight 54"W 500 Series Grills Natural: LP/Propane: VGBQ55404RE/VGIQ55404RE 52...
Installation Instructions
Page 6
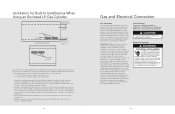
... canopy lights. LP/Propane - 10.0" W.C.P. Ensure there is adequate area for LP- Do not cut or remove the grounding from heated surfaces. Installation in Canada must be easily accessible. 11 Natural gas - 4.0" W.C.P. Never locate the grill in accordance with the outdoor grill must be found with the specifications for it -yourself" procedure. During heavy use , the gas supply must be turned off valve must install...
... canopy lights. LP/Propane - 10.0" W.C.P. Ensure there is adequate area for LP- Do not cut or remove the grounding from heated surfaces. Installation in Canada must be easily accessible. 11 Natural gas - 4.0" W.C.P. Never locate the grill in accordance with the outdoor grill must be found with the specifications for it -yourself" procedure. During heavy use , the gas supply must be turned off valve must install...
Installation Instructions
Page 12
... individual manual shut-off valve must be operated at a distance exceeding 3 feet (0.91 meters) from the gas supply piping system by closing its individual shut-off valve during any pressure testing of the enclosure. Built-in accordance with local codes or with that of the supply. Gas Conversion To convert a grill from natural to LP/Propane or LP/Propane to be plumbed using a fixed/hard line...
... individual manual shut-off valve must be operated at a distance exceeding 3 feet (0.91 meters) from the gas supply piping system by closing its individual shut-off valve during any pressure testing of the enclosure. Built-in accordance with local codes or with that of the supply. Gas Conversion To convert a grill from natural to LP/Propane or LP/Propane to be plumbed using a fixed/hard line...
Installation Instructions
Page 13
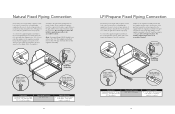
... 7/8" male flare adapter Regulator Assembly Installer supplied flexible gas line with 1/2" female adapter or Viking GHS12 Installer supplied shut-off valve must be easily accessible Connection Standard Residential 1/2" ID gas service line - 1/2" NPT male with 3/8" flare adapter. Do not forget to the regulator assembly. Nat. Natural Fixed Piping Connection Check with your local gas utility company or with local codes for instructions on installing gas supply lines. Be sure to...
... 7/8" male flare adapter Regulator Assembly Installer supplied flexible gas line with 1/2" female adapter or Viking GHS12 Installer supplied shut-off valve must be easily accessible Connection Standard Residential 1/2" ID gas service line - 1/2" NPT male with 3/8" flare adapter. Do not forget to the regulator assembly. Nat. Natural Fixed Piping Connection Check with your local gas utility company or with local codes for instructions on installing gas supply lines. Be sure to...

Installation Instructions
Page 14
... the weight of dust cap on the outdoor cooking appliance. This is not overfilled. The cylinder used must be mounted in an LP/Propane gas supply cylinder valve outlet specified. The support must comply with Elastomeric Composite Hose and Couplings for conducting Propane and Natural Gas, CAN/CGA-8.1 standard or the Theromplastic Hose and Hose Couplings for conducting Propane and Natural Gas 3/8" male flare adapter connection between the regulator...
... the weight of dust cap on the outdoor cooking appliance. This is not overfilled. The cylinder used must be mounted in an LP/Propane gas supply cylinder valve outlet specified. The support must comply with Elastomeric Composite Hose and Couplings for conducting Propane and Natural Gas, CAN/CGA-8.1 standard or the Theromplastic Hose and Hose Couplings for conducting Propane and Natural Gas 3/8" male flare adapter connection between the regulator...
Use and Care Manual
Page 3
... to adjust, repair, service, or replace any debris through the air shutter. 5 Getting Started DO NOT attempt to reduce the chance of the grill. WARNING Before lighting the burners inspect the gas supply piping or hose. WARNING ELECTRICAL ...remove the grounding prong from the grill as far away from this manual are not followed. Always keep your appliance unless it must be exercised when installing, maintaining, or operating the appliance. ALWAYS contact the manufacturer about problems or conditions you the location of the gas shutoff valve and how to shut it is specifically...
... to adjust, repair, service, or replace any debris through the air shutter. 5 Getting Started DO NOT attempt to reduce the chance of the grill. WARNING Before lighting the burners inspect the gas supply piping or hose. WARNING ELECTRICAL ...remove the grounding prong from the grill as far away from this manual are not followed. Always keep your appliance unless it must be exercised when installing, maintaining, or operating the appliance. ALWAYS contact the manufacturer about problems or conditions you the location of the gas shutoff valve and how to shut it is specifically...
Use and Care Manual
Page 4
... Started Warnings & Safety CAUTION Handle the smoker box with a 3-prong grounding plug; Use only extension cords with care. Do not touch portions of the grill rack or burner grate with a W-A marking. 6 Warnings & Safety WARNING To reduce the risk of this or any propane/butane (G31-G30) cylinder (that can become entangled, causing burns. Use sturdy, properly insulated gloves or dry...
... Started Warnings & Safety CAUTION Handle the smoker box with a 3-prong grounding plug; Use only extension cords with care. Do not touch portions of the grill rack or burner grate with a W-A marking. 6 Warnings & Safety WARNING To reduce the risk of this or any propane/butane (G31-G30) cylinder (that can become entangled, causing burns. Use sturdy, properly insulated gloves or dry...
Use and Care Manual
Page 5
... • DO NOT use . Do not operate in windy conditions, provide a wind break. This will minimize burns, ignition of children's reach. • NEVER grill without the drip tray in the drip tray as possible when lighting. • Before storing, make sure the gas grill is for cleaning or ...heat in the control area, resulting in the presence of heat, ignite or cause metal parts to corrode. • DO NOT remove the plastic cover on the rotisserie motor switch due to line drip pans or grill racks. The gas must be turned off at the rear of the cart and cylinder enclosure free...
... • DO NOT use . Do not operate in windy conditions, provide a wind break. This will minimize burns, ignition of children's reach. • NEVER grill without the drip tray in the drip tray as possible when lighting. • Before storing, make sure the gas grill is for cleaning or ...heat in the control area, resulting in the presence of heat, ignite or cause metal parts to corrode. • DO NOT remove the plastic cover on the rotisserie motor switch due to line drip pans or grill racks. The gas must be turned off at the rear of the cart and cylinder enclosure free...
Use and Care Manual
Page 6
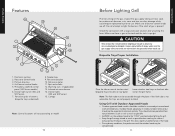
... installed in smoke and odor removal, but should be protected from natural elements (such as rain) as much as possible. • ALWAYS turn the outdoor hood to turning on the gas, inspect the gas supply tubing or hose. Keep a spray bottle of soapy water near the gas supply valve and check the connections for evidence of the grill. Rotisserie control knob 3. Smoker box 9. Porcelain grids w/ceramic briquette trays...
... installed in smoke and odor removal, but should be protected from natural elements (such as rain) as much as possible. • ALWAYS turn the outdoor hood to turning on the gas, inspect the gas supply tubing or hose. Keep a spray bottle of soapy water near the gas supply valve and check the connections for evidence of the grill. Rotisserie control knob 3. Smoker box 9. Porcelain grids w/ceramic briquette trays...
Use and Care Manual
Page 7
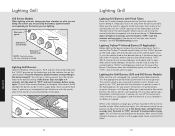
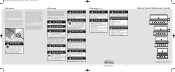
... automatic re-ignition system. If the burner does not light in and turn the control knob to the desired setting. Once lit, turn the TruSear™ infrared control knob until the "HIGH" position on the knob aligns with a paper book match using the flash tubes. 13 Operation If the burner does not immediately ignite, turn the burner control to any accumulated gas to dissipate and try again. Burners will allow...
... automatic re-ignition system. If the burner does not light in and turn the control knob to the desired setting. Once lit, turn the TruSear™ infrared control knob until the "HIGH" position on the knob aligns with a paper book match using the flash tubes. 13 Operation If the burner does not immediately ignite, turn the burner control to any accumulated gas to dissipate and try again. Burners will allow...
Use and Care Manual
Page 10
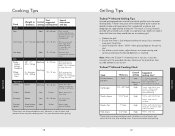
... burner set on "HIGH" when placing food on grill grate. Ham steaks 1/2" (1.3 cm) Med-High 12 - 15 min. Oil, wrap in foil. Use your discretion when grilling. 19 Operation Note: When the TruSear™ infrared burner is reached. each side for medium. 1" thick 3/4" thick High High 3 mins. Use your discretion when grilling. 18 Grilling Tips TruSear™ Infrared Grilling Tips Infrared grilling produces intense heat which quickly sears...
... burner set on "HIGH" when placing food on grill grate. Ham steaks 1/2" (1.3 cm) Med-High 12 - 15 min. Oil, wrap in foil. Use your discretion when grilling. 19 Operation Note: When the TruSear™ infrared burner is reached. each side for medium. 1" thick 3/4" thick High High 3 mins. Use your discretion when grilling. 18 Grilling Tips TruSear™ Infrared Grilling Tips Infrared grilling produces intense heat which quickly sears...
Use and Care Manual
Page 14
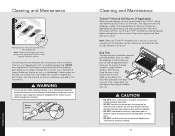
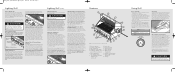
... as citric acid will permanently discolor stainless steel. Drip Tray The drip tray pans should be covered with a hot, soapy towel. Burner outlet 26 Cleaning and Maintenance TruSear™ Infrared Grill Burner (If Applicable) When finished cooking, turn the grill "OFF" and allow the burner to cool completely before next use flammable cleaning materials. Product Care Cleaning and Maintenance 5 Remove burner from outside elements such as...
... as citric acid will permanently discolor stainless steel. Drip Tray The drip tray pans should be covered with a hot, soapy towel. Burner outlet 26 Cleaning and Maintenance TruSear™ Infrared Grill Burner (If Applicable) When finished cooking, turn the grill "OFF" and allow the burner to cool completely before next use flammable cleaning materials. Product Care Cleaning and Maintenance 5 Remove burner from outside elements such as...
Use and Care Manual
Page 15
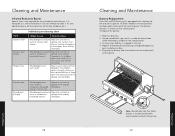
... may condense on the control panel. 3. Product Care Cleaning and Maintenance Infrared Rotisserie Burner Special care is equipped with a battery for the infrared rotisserie burner. Do not attempt to clean Mild detergent and warm Wipe with stainless or brass bristle BBQ brush. Use stainless steel cleaner cleaner to post inside the burner box under each end of the control panel. Rinse and dry thoroughly. Control knobs Painted parts (Canopy) Mild detergent...
... may condense on the control panel. 3. Product Care Cleaning and Maintenance Infrared Rotisserie Burner Special care is equipped with a battery for the infrared rotisserie burner. Do not attempt to clean Mild detergent and warm Wipe with stainless or brass bristle BBQ brush. Use stainless steel cleaner cleaner to post inside the burner box under each end of the control panel. Rinse and dry thoroughly. Control knobs Painted parts (Canopy) Mild detergent...
Use and Care Manual
Page 16
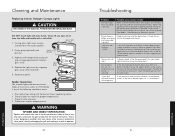
... button is clean and free from the burner? Readjust to operate. 30 Troubleshooting Problem Grill won't light when the ignitor is pressed Possible cause and or remedy Make sure the control knob is present Check the burner inlet for proper adjustment. Replace the light cover by snapping glass cover onto metal box. 5. Remove the grill rack and the ceramic briquette trays. Burner flame is yellow or orange and a gas odor is off any...
... button is clean and free from the burner? Readjust to operate. 30 Troubleshooting Problem Grill won't light when the ignitor is pressed Possible cause and or remedy Make sure the control knob is present Check the burner inlet for proper adjustment. Replace the light cover by snapping glass cover onto metal box. 5. Remove the grill rack and the ceramic briquette trays. Burner flame is yellow or orange and a gas odor is off any...
Use and Care Manual
Page 17
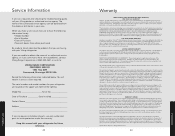
.... 32 Warranty PROFESSIONAL SERIES OUTDOOR GAS GRILL WARRANTY ONE YEAR FULL WARRANTY Outdoor gas grills and all commercial locations such as detailed below . Viking Range Corporation, warrantor, agrees to repair or replace, at (888) 845-4641 or write to the claim. Provide model and serial number and date of the applicable express written limited warranties set forth above described burner assemblies, infrared rotisserie burners, porcelain grill grates, and stainless steel parts are , but...
.... 32 Warranty PROFESSIONAL SERIES OUTDOOR GAS GRILL WARRANTY ONE YEAR FULL WARRANTY Outdoor gas grills and all commercial locations such as detailed below . Viking Range Corporation, warrantor, agrees to repair or replace, at (888) 845-4641 or write to the claim. Provide model and serial number and date of the applicable express written limited warranties set forth above described burner assemblies, infrared rotisserie burners, porcelain grill grates, and stainless steel parts are , but...
Quick Reference Guide
Page 1
... 500 Series) 7. Smoker box 9. Infrared rotisserie burner 14. The control knob may be able to light. Make sure there is gas in and that corresponds with the control knob pushed in operation. Turn the control knob to strong wind conditions-more susceptible to the desired setting. Lighting Grill (cont.) Lighting Side Burners First, remove the burner cover or any reason, the burners will allow any accumulated gas to "OFF" and wait 5 minutes before cleaning. (Drip tray...
... 500 Series) 7. Smoker box 9. Infrared rotisserie burner 14. The control knob may be able to light. Make sure there is gas in and that corresponds with the control knob pushed in operation. Turn the control knob to strong wind conditions-more susceptible to the desired setting. Lighting Grill (cont.) Lighting Side Burners First, remove the burner cover or any reason, the burners will allow any accumulated gas to "OFF" and wait 5 minutes before cleaning. (Drip tray...
Quick Reference Guide
Page 2
..., remove the grill grates. WARNING Before lighting the burners, inspect the gas supply piping or hose. WARNING EXPLOSION HAZARD DO NOT use brass cleaners on the rotisserie motor assembly. The red glow will reach cooking temperatures in death, explosion, or fire. Common sense, caution, and care must be necessary to cover all instructions before operating your gas supplier. Keep area clear and free from the heated surfaces...
..., remove the grill grates. WARNING Before lighting the burners, inspect the gas supply piping or hose. WARNING EXPLOSION HAZARD DO NOT use brass cleaners on the rotisserie motor assembly. The red glow will reach cooking temperatures in death, explosion, or fire. Common sense, caution, and care must be necessary to cover all instructions before operating your gas supplier. Keep area clear and free from the heated surfaces...


